Contents of this page is copied directly from AWS blog sites to make it Kindle friendly. Some styles & sections from these pages are removed to render this properly in 'Article Mode' of Kindle e-Reader browser. All the contents of this page is property of AWS.
Page 1|Page 2|Page 3|Page 4
Automatically resolve Security Hub findings for resources that no longer exist
=======================
In this post, you’ll learn how to automatically resolve AWS Security Hub findings for previously deleted Amazon Web Services (AWS) resources. By using an event-driven solution, you can automatically resolve findings for AWS and third-party service integrations.
Security Hub provides a comprehensive view of your security alerts and security posture across your AWS accounts. Security Hub provides a single place that aggregates, organizes, and prioritizes your security alerts (also called findings) from multiple AWS services and partner solutions. Security Hub lets you assign workflow statuses of NEW, NOTIFIED, SUPPRESSED, or RESOLVED to findings. These statuses help you understand the state of your security findings and identify which need attention. As AWS resources are spun up and down during the course of normal business activities, there might be findings in Security Hub for those resources. AWS Security Hub findings backed by AWS Config are automatically archived when AWS Config identifies that a resource has been deleted. However, for some AWS service integrations—such as Amazon GuardDuty and third-party partner products—findings aren’t automatically resolved or archived when a resource is deleted. This can result in orphaned findings for resources that no longer exist.
In this post, we show you how to use an event-driven architecture to automatically resolve findings for all providers—AWS and third-party—for resources that have been deleted. Automatically resolving these findings reduces alert fatigue by decreasing noise, allowing your security team to focus on investigating and remediating high fidelity findings.
A common use case for automatically resolving findings is for Amazon Elastic Compute Cloud (Amazon EC2) instances that are ephemeral in nature. For example, Amazon EC2 instances that are part of an Amazon EC2 Auto Scaling group. EC2 instances can scale to thousands of nodes multiple times a day depending on the workload. Without automatically resolving these findings, you could end up with one or more findings for each instance. By automatically resolving findings for the deleted resources, your teams can focus on investigating and remediating findings that affect active resources.
Prerequisites
This solution assumes that you have Security Hub and AWS Config configured across all of your AWS accounts. Instructions for configuring Security Hub and its dependencies can be found in the Security Hub user guide. Ensure you have configured Security Hub to use a delegated administrator account, which centralizes findings from all member accounts.
Solution overview
In Security Hub, the investigation status of a finding is tracked using the workflow status attribute. The workflow status attribute for new findings is initially set to NEW. You can change the workflow status of a finding by either selecting it in the AWS Security Hub console, or by automating the change of workflow status by using the AWS Command Line Interface (AWS CLI) or Security Hub SDKs. The usual workflow for a finding, whether managed manually or through automation, is NEW, NOTIFIED, then RESOLVED or SUPPRESSED.
In this solution, we show you how to automatically set the workflow status to RESOLVED for all applicable findings when an EC2 instance, Amazon Simple Storage Service (Amazon S3) bucket, or an AWS Identity and Access Management (IAM) role is deleted. This event-driven solution uses Amazon EventBridge event patterns—which can be easily customized to meet your specific business needs—to invoke the resolution workflow on Delete or Terminate API calls. An EventBridge event bus is used to forward all Delete or Terminate API calls to your Security Hub delegated administrator account. Event patterns are used to filter for specific events and forward them to a target. With this solution, you filter for specific Delete and Terminate events, identified by the event name. The target for matching events is an AWS Lambda function. The invocation of this function includes context around the event which includes the metadata for the resource that was just deleted or terminated. This function queries the Security Hub GetFindings API for all findings for the resource with a status of NEW or NOTIFIED. The function then sets the workflow status to RESOLVED for all findings for the Amazon Resource Name (ARN) of the given resource by calling the BatchUpdateFindings Security Hub API.
Solution architecture

Figure 1: Solution architecture overview
Figure 1 shows the deletion of an AWS resource in a Security Hub member account being forwarded to the EventBridge event bus in the Security Hub administrator account. The process flow is as follows:
- In a Security Hub member account, a user deletes or terminates a resource through the AWS Management Console, AWS CLI, or SDK.
- AWS CloudTrail logs the user activity and automatically forwards an event to EventBridge.
- An EventBridge event pattern filters for the delete or terminate API call, and generates an event.
- The event is forwarded to the event bus in the Security Hub administrator account.
- In the Security Hub administrator account, an event pattern is used to filter for all delete or terminate API calls.
- Matching events generate an EventBridge event.
- The target for this event is the Lambda function to resolve Security Hub findings for the recently deleted resource.
- The Lambda function generates a list of all findings for the recently deleted resource and updates the workflow status for each finding to RESOLVED in the Security Hub delegated administrator account.
- The workflow status propagates from the Security Hub delegated administrator account to the member accounts of Security Hub.
To deploy the solution
In the Security Hub administrator account complete the following steps:
- In the following resource policy, replace <Region> with the AWS Region where the solution is deployed, <AccountID> with the Security Hub administrator account ID and <OrgID> is the ID of the organization within your AWS Organizations implementation.
{
"Version": "2012-10-17",
"Statement": [{
"Sid": "allow_all_accounts_from_organization_to_put_events",
"Effect": "Allow",
"Principal": "*",
"Action": "events:PutEvents",
"Resource": "arn:aws:events:<Region>:<AccountID>:event-bus/default",
"Condition": {
"StringEquals": {
"aws:PrincipalOrgID": "<OrgID>"
}
}
}]
}
- Add the edited resource policy to the default EventBridge event bus to allow all accounts in your organization to send delete events for IAM roles, EC2 instances, and S3 buckets to the default event bus in the Security Hub administrator account.
Note: You can also choose to specify a list of accounts to receive events from. For more information about configuring a resource policy see Managing event bus permissions in Permissions for Amazon EventBridge event buses.
- Deploy the AWS CloudFormation template that creates the required resources.
Launch Stack Button
In each Security Hub member account, deploy the CloudFormation template. You will need to specify the Security Hub administrator AWS account ID to deploy the stack.
Launch Stack Button
Tip: CloudFormation StackSets can be used to deploy stacks across all accounts in your organization. For more information, see Working with AWS CloudFormation StackSets.
Note: With CloudFormation StackSets, the template isn’t deployed in the StackSet administrator account by default. The CloudFormation stack must be deployed separately in the StackSet administrator account.
Note: Security Hub now supports cross-Region aggregation of findings. If you have Security Hub cross-Region aggregation enabled. The solution in this post will work for findings in all aggregated regions.
Next steps
Understanding and fixing the root cause for Security Hub findings will improve your security posture and reduce the number of future findings. As a best practice, you should periodically analyze the findings for resources that have been automatically resolved by this solution to identify trends so that your team can investigate and fix root causes. You can use the filter below in the Security Hub console to view all findings automatically resolved by this solution:
To analyze findings
- Open the Security Hub console and select Findings.
- Check to see that Workflow status is RESOLVED and Note updated by is DeletedResourceFindingResolver.
- (Optional) You can also create a custom insight for these findings by adding Group by: ProductName to the filter.
- Select Create Insight as shown in Figure 2.

Figure 2: AWS Security Hub
Note: You can expand the solution to include other resource types based on your requirements, such as security groups, Amazon Relational Database Service (Amazon RDS) databases, and IAM users by updating the event pattern in the EventBridge rule and modifying the Lambda function code.
Conclusion
In this post, we showed how you can automatically resolve findings for deleted EC2, IAM and S3 resources by using the Security Hub GetFindings and BatchUpdateFindings API actions. We showed you how to configure EventBridge patterns and rules to initiate a Lambda function through a centralized event bus to address these findings for resources across your Organizations.
If you have feedback about this post, submit comments in the Comments section below. If you have questions about this post, start a new thread on the Security Hub forum. To start your 30-day free trial of Security Hub, visit AWS Security Hub.
Want more AWS Security how-to content, news, and feature announcements? Follow us on Twitter.
How to configure an incoming email security gateway with Amazon WorkMail
=======================
This blog post will walk you through the steps needed to integrate Amazon WorkMail with an email security gateway. Configuring WorkMail this way can provide a versatile defense strategy for inbound email threats.
Amazon WorkMail is a secure, managed business email and calendar service. WorkMail leverages the email receiving capabilities of Amazon Simple Email Service (Amazon SES) to scan all incoming and outgoing email for spam, malware, and viruses to help protect your users from harmful email. AWS Lambda for Amazon WorkMail functions can tap into the capabilities of other AWS services to accomplish additional business objectives, such as controlling message delivery or message modification.
For many organizations, existing features and integrations with Amazon SES are sufficient for their spam, malware, and virus detection. Other organizations may need either a dedicated on-premise security solution, or have other reasons to use an additional inspection point in the overall mail flow. A number of commercial and community-supported tools include features like special encryption capabilities, data loss prevention (DLP) content inspection engines, and embedded-hyperlink transformation features to protect end-user mailboxes.
Prerequisites
To implement this solution, you need:
A domain name and permission to alter domain name system (DNS) records in Amazon Route 53 or your existing DNS provider. This could be your organization’s existing domain (such as example.org), a new domain (such as example.net), or a subdomain (such as sub.example.org).
Access to an AWS account so you can configure WorkMail and Amazon SES. Optionally, you may also need the ability to create AWS Lambda functions to integrate with WorkMail.
Access to configure the email security gateway of your choosing.
How email flows with an email security gateway
Email security gateways function by handling the initial ingress of email via the Simple Mail Transport Protocol (SMTP). When email servers send messages to your domain’s email addresses, they look at your domain’s mail exchange (MX) record in the DNS. After processing an email message, the email security gateway delivers it to the downstream mailbox hosting service, such as WorkMail, by means of Amazon SES via SMTP. You can also optionally configure an AWS Lambda for Amazon WorkMail function to synchronously deliver messages into end-user junk email folders, or to take other actions.
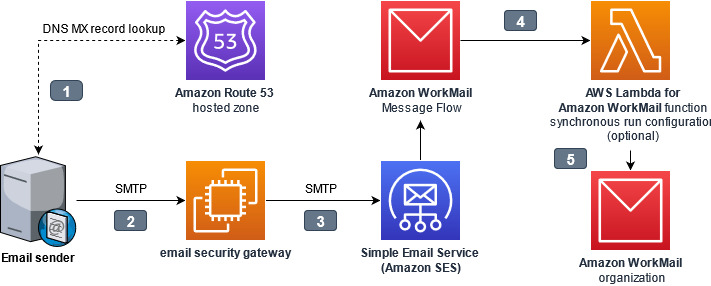
Figure 1. Interaction points while architecting an email security gateway
The interaction points are as follows:
- The email sender looks up the mail exchange (MX) record for the domain hosted by WorkMail. The domain name system (DNS) domain may be hosted in Route 53, or by another DNS hosting provider. The value of the MX record contains the internet protocol (IP) address of the email security gateway.
- The email sender connects to the email security gateway, and sends the message using the Simple Mail Transfer Protocol (SMTP)
- The email security gateway accepts, processes, and then delivers the message to the ingress SMTP endpoint for WorkMail. Amazon Simple Email Service (Amazon SES) handles inbound email receiving for WorkMail.
- Optionally, an AWS Lambda for Amazon WorkMail function can synchronously process messages before delivery to WorkMail.
- WorkMail receives the message for final delivery to the end-user.
The gateway assumes responsibility for inspecting incoming email, because the initial point of ingress is an important component of a multi-layer defense strategy against email-borne threats. The gateway could refuse or quarantine risky messages, it could modify the email subjects and body to add warnings visible to recipients, or it could append metadata to the email headers for downstream processing by an AWS Lambda function.
Why point of ingress email authentication is important
What is email authentication
SMTP was built at a time when networking was less reliable than it is today, and consequently, it was designed to be able to allow any domain to store and later forward messages on behalf of other domains to mitigate connection problems. While that helped at the time, today it presents real problems in authenticating who truly sent a message: the owner of the domain, or just someone else claiming to be the owner? To overcome this issue, the messaging industry has adopted three protocols to help verify the authenticity of a message: SPF, DKIM, and DMARC. These protocols aren’t perfect, but understanding how to use them is important when adding new steps to your message processing workflow, because they can affect how you receive inbound mail.
Sender Policy Framework
Sender Policy Framework (SPF) permits domain owners to declare which SMTP servers are allowed to send email messages claiming to be from their domain. This establishes an identity relationship between the owner of the domain and the authorized party that controls the SMTP server. When SPF is used, a message can only be handed off directly from an authorized SMTP server; it cannot be relayed through a second, unauthorized server without changing the originating address.
DomainKeys Identified Mail (DKIM)
DomainKeys Identified Mail (DKIM) permits domain owners to advertise a public key that a mail recipient’s system can use to verify the sender’s digital signature. This allows SMTP servers and other downstream applications to check the validity of the digital signature against the public key of the domain which had the matching private key to create the signature. DKIM signatures attached to messages can remain intact through intermediary SMTP servers, but if message contents (email body or email headers) are modified by intermediary servers, the final destination will find that the signature is no longer valid.
Domain-based Message Authentication, Reporting and Conformance (DMARC)
Domain-based Message Authentication, Reporting and Conformance (DMARC) permits domain owners to publish a policy telling receiving servers what to do when SPF or DKIM are not valid, such as if a message originated from an unauthorized server, or if it was tampered with after being sent. DMARC checks if a message matches what it knows about the sender via SPF and DKIM, a process known as alignment. The recipient’s server can then enforce the DMARC policy, for example by rejecting or quarantining non-aligned messages.
Tying it all together
Amazon WorkMail normally performs DMARC enforcement for inbound messages, based on their alignment when they were received by Amazon SES. But when an email security gateway acts as an intermediary SMTP server between the original sender and WorkMail, that breaks the relationship with the SMTP servers authorized by SPF, and if the gateway modifies the message, that invalidates the DKIM signature. This is why it’s necessary for the SMTP server at the point of ingress to perform the evaluation of SPF, DKIM, and DMARC. The email security gateway at the border should be made responsible for enforcing DMARC on messages that don’t align, and WorkMail DMARC enforcement should be disabled.
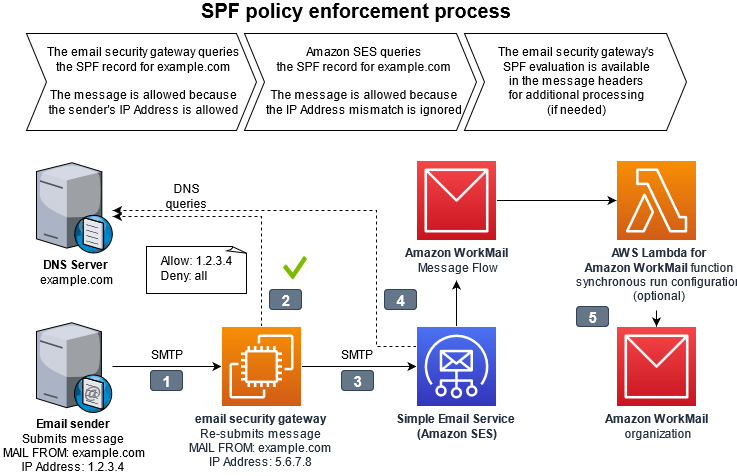
Figure 2. Diagram of SPF policy enforcement process. The full details of the interaction points are outlined below.
The interaction points for SPF policy enforcement are as follows:
- The email sender delivers the message to the email security gateway with a MAIL FROM address within a domain the sender owns.
- The email security gateway looks up the sender’s domain’s Sender Permitted From (SPF) policy in DNS to determine if the sending mail server’s IP address is authorized.
- The email security gateway delivers the message to Amazon SES with the same MAIL FROM address. The email security gateway has a different IP address than the original sending email server.
- When Amazon SES looks up the MAIL FROM domain’s SPF, it will not find the email security gateway’s IP address as authorized. From the perspective of Amazon SES, and the resulting logs in Amazon Cloudwatch, the message will appear to be unauthorized by the SPF policy. This result is ignored by disabling DMARC checks in the WorkMail organization configuration.
- The message continues delivery to WorkMail with an optional integration with AWS Lambda for Amazon WorkMail synchronous run configuration, which can analyze message headers to get a more complete picture of the message’s authenticity.
Choosing an email security gateway
Many email security vendors offer software as a service (SaaS) solutions. This offloads all management responsibilities to the software vendor’s platform. These solutions work as long as they support the email gateway features necessary for this solution as depicted in Figure 2 and described in the Why point of ingress email authentication is important section above.
If you wish to build and maintain your own email security gateway, you may deploy one available from the AWS Marketplace or add an open source application into your Amazon Virtual Private Cloud (Amazon VPC). You will need to remove port 25 restriction from your EC2 instance for the email security gateway within your Amazon VPC to send email to Amazon WorkMail.
How to configure Amazon WorkMail
Follow this procedure to configure your WorkMail organization and Amazon SES IP address filters to allow the email security gateway to process inbound email receiving.
To configure Amazon WorkMail
- From the WorkMail console, select your organization, navigate to Organization settings, and select Advanced. Edit the Inbound DMARC Settings and set Enforcement enabled to Off. This ensures that WorkMail does not re-evaluate DMARC.

Figure 3. Picture of the AWS WorkMail console showing the advanced configuration depicting Inbound DMARC enforcement disabled
- From the Amazon SES console, navigate to Email receiving and create IP address filters to allow the IP address or IP address range of the gateway(s).
- Add another rule to block 0.0.0.0/0. This prevents malicious actors from bypassing your email security gateway.

Figure 4. Picture of the Amazon SES console showing example IP address filters to allow the email security gateway IP addresses and blocking every other IP Address
- From the Route 53 console, navigate to Hosted zones, select the domain and edit the MX record to the IP address or hostname of the gateway. This causes all email senders to deliver to your gateway, instead of delivering directly to WorkMail.
Follow the instructions of your DNS provider if the domain’s DNS is hosted elsewhere.

Figure 5. Picture of the Amazon Route 53 console showing that the DMS MX record for the domain needs to be configured with the IP address of the email security gateway
- From the WorkMail console, navigate to Domains, select your domain to show the Domain verification status page.
- Copy the host name from the value of the MX record type as depicted in Figure 6.

Figure 6. Picture showing the section of the MX record value to copy from the WorkMail console.
- Configure your email security gateway with the value that you just copied (e.g. inbound-smtp.us-east-1.amazonaws.com) to send inbound messages to your WorkMail organization. Instructions for doing this will vary depending on which email security gateway you are using.
Some specifics of this configuration depend on which gateway you are using, how it is designed for high availability, and the type of features configured. Test your WorkMail integration with a non-production domain before changing your production domain.
It is normal for Amazon CloudWatch logs for WorkMail, as well as the individual message headers, to show that SPF fails for all messages which traverse the gateway. Configure the email security gateway to record its SPF evaluation in the message headers so that it remains available for troubleshooting and further processing.
Junk E-Mail folder integration
WorkMail normally moves spam messages into the Junk E-mail folder within each recipient’s mailbox. To replicate this behavior for spam messages identified by the email security gateway, use AWS Lambda for Amazon WorkMail with a synchronous run configuration to run a function for every inbound message to a group of recipients.
To configure an AWS Lambda function for every inbound message (optional)
- Configure the email security gateway to include a spam verdict in the message headers for all incoming mail.
- Create a synchronous run configuration using AWS Lambda for Amazon WorkMail to interpret the message headers and return a response to WorkMail with type: BYPASS_SPAM_CHECK or MOVE_TO_JUNK. A sample Amazon WorkMail Upstream Gateway Filter solution is available in the AWS Serverless Application Repository.
Conclusion
By integrating an email security gateway and leveraging AWS Lambda for Amazon WorkMail, you will gain additional security and management control over your organization’s inbound email. To learn more, read the Amazon WorkMail FAQs and Amazon WorkMail documentation.
If you have feedback about this post, submit comments in the Comments section below.
Want more AWS Security news? Follow us on Twitter.
Comprehensive Cyber Security Framework for Primary (Urban) Cooperative Banks (UCBs)
=======================
We are pleased to announce a new Amazon Web Services (AWS) workbook designed to help India Primary (UCBs) customers align with the Reserve Bank of India (RBI) guidance in Comprehensive Cyber Security Framework for Primary (Urban) Cooperative Banks (UCBs) – A Graded Approach.
In addition to RBI’s basic cyber security framework for Primary (Urban) Cooperative Banks (UCBs), RBI issued guidance on its comprehensive cyber security framework, which sets the expectations for the Indian Primary UCBs regarding their cyber security frameworks. This guidance divides the framework into four levels, starting with a common level that applies to all UCBs; the remaining levels apply to specific UCBs based upon their digital depth, and interconnectedness to the payment systems landscape based on RBI-defined criteria. The guidance aims to increase the awareness among the Primary UCBs in India of the controls they should look for as they progress on their digital journey.
Security and compliance is a shared responsibility between AWS and the customer. This differentiation of responsibility is commonly referred to as the AWS Shared Responsibility Model, in which AWS is responsible for security of the cloud, and the customer is responsible for their security in the cloud.
The new AWS Comprehensive Cyber Security Framework for Primary (Urban) Cooperative Banks (UCBs) – A Graded Approach workbook helps customers align with the RBI cyber security framework by providing control mappings for the following:
Security in the cloud by mapping RBI’s cyber security framework to the five pillars of the AWS Well-Architected Framework
Security of the cloud by mapping RBI’s cyber security framework to control statements from the AWS Compliance Program
The downloadable AWS RBI Comprehensive Cyber Security Framework for Primary UCBs workbook is available in AWS Artifact, a self-service portal for on-demand access to AWS Compliance Reports, and it contains two embedded formats:
Microsoft Excel: Coverage includes AWS responsibility control statements and Well-Architected Framework best practices
Dynamic HTML: Coverage is the same as in the Microsoft Excel format, with the added feature that the Well Architected Framework best practices are mapped to AWS Config managed rules and Amazon GuardDuty findings, where available or applicable.
The AWS RBI Comprehensive Cyber Security Framework for Primary UCBs and AWS RBI Basic Cyber Security Framework for Primary UCBs Workbook are available for download in AWS Artifact. Sign into AWS Artifact via the AWS Management Console, or learn more at Getting Started with AWS Artifact.
If you have feedback about this post, submit comments in the Comments section below.
Want more AWS Security news? Follow us on Twitter.
AWS publishes PiTuKri ISAE3000 Type II Attestation Report for Finnish customers
=======================
Gaining and maintaining customer trust is an ongoing commitment at Amazon Web Services (AWS). Our customers’ industry security requirements drive the scope and portfolio of compliance reports, attestations, and certifications we pursue. AWS is pleased to announce the issuance of the Criteria to Assess the Information Security of Cloud Services (PiTuKri) ISAE 3000 Type 2 attestation report. The scope of this report includes 141 AWS services and associated AWS global infrastructure, such as Regions and Edge Locations supporting these services.
Criteria for Assessing the Information Security of Cloud Services (PiTuKri) is a guidance document published by the Finnish Transport and Communications Agency (Traficom) Cyber Security Centre for assessing the security of cloud computing services, such as AWS. The PiTuKri criteria covers a total of 11 subdivisions such as security management, personnel security and physical security which cloud service providers are expected to implement. AWS has engaged with an independent third-party audit firm to examine whether the AWS control environment is appropriately designed and implemented to align with PiTuKri requirements. Additionally, the report provides customers with important guidance on complementary user entity controls (CUECs), which customers should consider implementing as part of the shared responsibility model to help them comply with PiTuKri requirements. The report covers the period from October 1, 2020 to September 30, 2021. A full list of certified services and Regions is presented within the published PiTuKri ISAE3000 report.
The alignment of AWS with PiTuKri requirements demonstrates our continuous commitment to meeting the heightened expectations for cloud service providers set by Traficom. Customers can use the AWS’ PiTuKri ISAE 3000 report as a tool to conduct their due diligence on AWS, which may minimize the effort and costs required for compliance. The report is now available free of charge to AWS customers from AWS Artifact. More information on how to download the report is available here.
As always, AWS is committed to bringing new services into the scope of our PiTuKri program in the future, based on customers’ architectural and regulatory needs. Please reach out to your AWS account team if you have questions about the PiTuKri report. You can also download this blog post translated into Finnish.
If you have feedback about this post, submit comments in the Comments section below.
Want more AWS Security news? Follow us on Twitter.
2021 FINMA ISAE 3000 Type 2 attestation report for Switzerland now available on AWS Artifact
=======================
AWS is pleased to announce the issuance of a second Swiss Financial Market Supervisory Authority (FINMA) ISAE 3000 Type 2 attestation report. The latest report covers the period from October 1, 2020 to September 30, 2021, with a total of 141 AWS services and 23 global AWS Regions included in the scope.
A full list of certified services and Regions are presented within the published FINMA report; customers can download the latest report from AWS Artifact.
The FINMA ISAE 3000 Type 2 report, conducted by an independent third-party audit firm, provides Swiss financial industry customers with the assurance that the AWS control environment is appropriately designed and implemented to address key operational risks, as well as risks related to outsourcing and business continuity management.
FINMA circulars
The report covers the five core FINMA circulars applicable to Swiss banks and insurers in the context of outsourcing arrangements to the cloud. These FINMA circulars are intended to assist Swiss-regulated financial institutions in understanding approaches to due diligence, third-party management, and key technical and organizational controls that should be implemented in cloud outsourcing arrangements, particularly for material workloads.
The report’s scope covers, in detail, the requirements of the following FINMA circulars:
2018/03 Outsourcing – banks, insurance companies and selected financial institutions under FinIA;
2008/21 Operational Risks – Banks – Principle 4 Technology Infrastructure (31.10.2019);
2008/21 Operational Risks – Banks – Appendix 3 Handling of electronic Client Identifying Data (31.10.2019);
2013/03 Auditing – Information Technology (04.11.2020);
2008/10 Self-regulation as a minimum standard – Minimum Business Continuity Management (BCM) minimum standards proposed by the Swiss Insurance Association (01.06.2015) and Swiss Bankers Association (29.08.2013);
Customers can continue to use the detailed FINMA workbooks that include detailed control mappings for each FINMA circular covered under this audit report; these workbooks are available on AWS Artifact. Where applicable, under the AWS shared responsibility model, these workbooks provide best practices guidance using AWS Well-Architected to assist Swiss customers in their own preparation for alignment with FINMA circulars.
As always, AWS is committed to bringing new services into the future scope of our FINMA program based on customers’ architectural and regulatory needs. Please reach out to your AWS account team if you have questions or feedback about the FINMA report.
If you have feedback about this post, submit comments in the Comments section below.
Want more AWS Security news? Follow us on Twitter.
Simplify setup of Amazon Detective with AWS Organizations
=======================
Amazon Detective makes it easy to analyze, investigate, and quickly identify the root cause of potential security issues or suspicious activities by collecting log data from your AWS resources. Amazon Detective simplifies the process of a deep dive into a security finding from other AWS security services, such as Amazon GuardDuty and AWS SecurityHub. Detective uses machine learning, statistical analysis, and graph theory to build a linked set of data that enables customers to easily conduct faster and more efficient security investigations.
In this post you will learn about the new AWS Organizations integration with Amazon Detective, where new and existing Detective customers can delegate any account in their organization to be the delegated Detective administrator account, and can centrally manage the Detective behavior graph database for an organization with up to 1,200 accounts.
Customers tell us that they want to manage security findings and investigations across multiple AWS Accounts. Depending on the customer this can be 100s or 1000s of accounts. AWS Organizations integration with security services, including GuardDuty, Security Hub and AWS IAM Access Analyzer comes in handy by helping customers centralize management and governance of their environments as they scale and grow their AWS accounts and resources. Adding to the list, Detective is now integrated with AWS Organizations to simplify security posture management across all existing and future AWS accounts across an organization. Organizations integration is available in all AWS Regions that Detective supports.
Detective is aware of your existing delegated administrator accounts for other AWS Security services such as GuardDuty or Security Hub. Using this awareness, Detective recommends that you choose the same account as the administrator account for Detective, as shown in Figure 1. For a more complete walk though of how to enable your accounts, visit the AWS Detective Documentation.

Figure 1. Setting delegated administrator
You can then use the same account to manage all of your security services. AWS recommends you align your Detective administrator account with your GuardDuty and SecurityHub administrator accounts, to enable seamless integration between Detective and those services.
In GuardDuty or Security Hub, when viewing details for a GuardDuty finding, you can pivot from the finding details to the Detective finding profile.
In Detective, when investigating a GuardDuty finding, you can choose the option to archive that finding.
Once designated, the chosen account becomes the administrator account for the organization behavior graph. They can enable any organization account as a member account in the organization behavior graph, and can configure Detective to automatically enable organization accounts when they join the organization.

Figure 2. Auto-enabling Organization accounts
The Detective administrator account can also manually invite other accounts to join the organization behavior graph.

Figure 3. Inviting accounts to join the Organization behavior graph
From Detective, the administrator account can centrally conduct security investigations across the organization
Considerations for AWS Organizations support
Some considerations and recommendations around Organizations support for Detective:
- Detective allows up to 1,200 member accounts in each behavior graph.
- The Detective administrator account becomes the administrator account for the organization’s behavior graph.
- An account can be a member account of multiple behavior graphs in the same Region. An account can accept multiple invitations. An organization account can be enabled as a member account in the organization behavior graph, and can then also accept invitations to other behavior graphs.
- An account can only be the administrator account of one behavior graph per Region, but can be an administrator account in different Regions.
- Changes to an organization are not immediately reflected in Detective. For most changes, such as new and removed organization accounts, it can take up to an hour for Detective to be notified.
Other recent updates from Amazon Detective
Additional support for all GuardDuty findings
With the recent expansion of security investigation support for Amazon Simple Storage Service (S3) and DNS-related findings on Amazon GuardDuty, Amazon Detective now provides full coverage of all detections from GuardDuty. Security analysts can now easily investigate and analyze the root cause of all GuardDuty findings using Detective, using the Investigate in Detective option in GuardDuty and Security Hub for further investigation.
New resource focused view
In addition to these integrations with AWS Organization and GuardDuty, Detective now makes it even easier for a security analyst to investigate entities and behaviors using a revamped user experience as seen in Figure 4. Amazon Detective presents a unified view of user and resource interactions over time, with all the context and details in one place, to help you quickly analyze the root cause of a security finding.

Figure 4. New resource focused view
New finding overview
The new finding overview provides an expanded set of details for each finding, and provides links to the profiles for each involved entity as seen in the right panel in Figure 4. With this unified view, you can visualize all of the details and context in one place, while identifying the underlying reasons for the findings. This resource-focused view helps you understand the connections between resources affected by a security finding, and further helps you drill down into relevant historical activity to quickly determine the root cause.
Integration with Splunk
Amazon Detective, in coordination with the Splunk Trumpet project, has released the ability to pivot from an Amazon GuardDuty finding in Splunk directly to an Amazon Detective entity profile. Customers can now quickly identify the root cause of potential security issues or suspicious activities. This setting can be enabled on the Splunk Trumpet project installation page by selecting Detective GuardDuty URLs from the AWS CloudWatch Events dropdown.
Amazon Detective’s interactive visualizations make it easy to investigate and analyze issues more thoroughly and effectively, with minimal effort. Using these visualizations, customers can easily filter large sets of event data into specific timelines, with all the details, context, and guidance needed to help you to investigate quickly. For example; Amazon Detective enables you to view login attempts on a geolocation map, drill down into relevant historical activity, quickly determine a root cause, and if necessary, take action to resolve the issue.
Amazon Detective makes it easy to analyze, investigate, and quickly identify the root cause of potential security issues. To get started, enable a 30-day free trial of Amazon Detective with just a few clicks in the AWS Management console. See the AWS Regions page for a list of all Regions where Detective is available. To learn more, visit the Amazon Detective product page.
If you have feedback about this post, submit comments in the Comments section below.
Want more AWS Security news? Follow us on Twitter.
Continuous runtime security monitoring with AWS Security Hub and Falco
=======================
Customers want a single and comprehensive view of the security posture of their workloads. Runtime security event monitoring is important to building secure, operationally excellent, and reliable workloads, especially in environments that run containers and container orchestration platforms. In this blog post, we show you how to use services such as AWS Security Hub and Falco, a Cloud Native Computing Foundation project, to build a continuous runtime security monitoring solution.
With the solution in place, you can collect runtime security findings from multiple AWS accounts running one or more workloads on AWS container orchestration platforms, such as Amazon Elastic Kubernetes Service (Amazon EKS) or Amazon Elastic Container Service (Amazon ECS). The solution collates the findings across those accounts into a designated account where you can view the security posture across accounts and workloads.
Solution overview
Security Hub collects security findings from other AWS services using a standardized AWS Security Findings Format (ASFF). Falco provides the ability to detect security events at runtime for containers. Partner integrations like Falco are also available on Security Hub and use ASFF. Security Hub provides a custom integrations feature using ASFF to enable collection and aggregation of findings that are generated by custom security products.
The solution in this blog post uses AWS FireLens, Amazon CloudWatch Logs, and AWS Lambda to enrich logs from Falco and populate Security Hub.
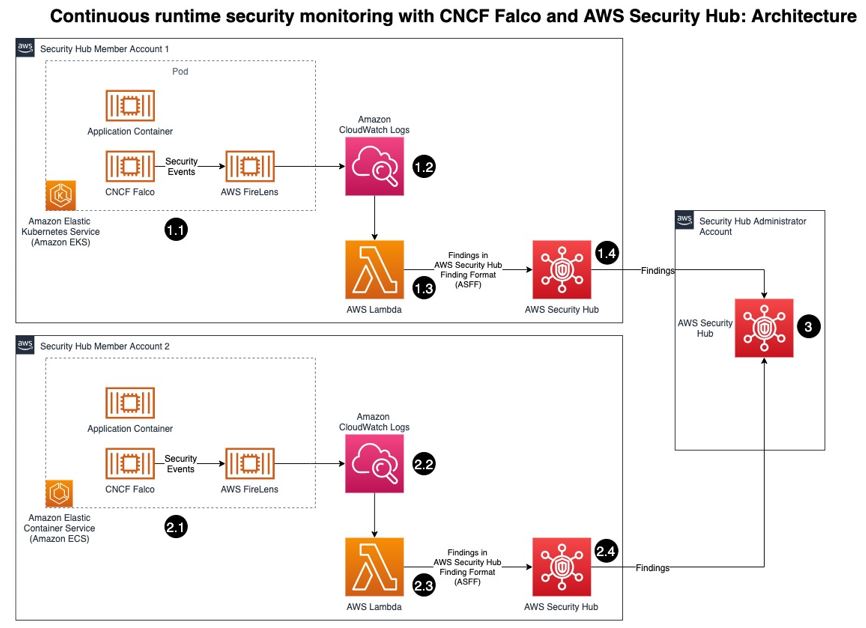
Figure 1: Architecture diagram of continuous runtime security monitoring
Here’s how the solution works, as shown in Figure 1:
- An AWS account is running a workload on Amazon EKS.
- Runtime security events detected by Falco for that workload are sent to CloudWatch logs using AWS FireLens.
- CloudWatch logs act as the source for FireLens and a trigger for the Lambda function in the next step.
- The Lambda function transforms the logs into the ASFF. These findings can now be imported into Security Hub.
- The Security Hub instance that is running in the same account as the workload running on Amazon EKS stores and processes the findings provided by Lambda and provides the security posture to users of the account. This instance also acts as a member account for Security Hub.
- Another AWS account is running a workload on Amazon ECS.
- Runtime security events detected by Falco for that workload are sent to CloudWatch logs using AWS FireLens.
- CloudWatch logs acts as the source for FireLens and a trigger for the Lambda function in the next step.
- The Lambda function transforms the logs into the ASFF. These findings can now be imported into Security Hub.
- The Security Hub instance that is running in the same account as the workload running on Amazon ECS stores and processes the findings provided by Lambda and provides the security posture to users of the account. This instance also acts as another member account for Security Hub.
- The designated Security Hub administrator account combines the findings generated by the two member accounts, and then provides a comprehensive view of security alerts and security posture across AWS accounts. If your workloads span multiple regions, Security Hub supports aggregating findings across Regions.
Prerequisites
For this walkthrough, you should have the following in place:
- Three AWS accounts.
Note: We recommend three accounts so you can experience Security Hub’s support for a multi-account setup. However, you can use a single AWS account instead to host the Amazon ECS and Amazon EKS workloads, and send findings to Security Hub in the same account. If you are using a single account, skip the following account specific-guidance. If you are integrated with AWS Organizations, the designated Security Hub administrator account will automatically have access to the member accounts.
- Security Hub set up with an administrator account on one account.
- Security Hub set up with member accounts on two accounts: one account to host the Amazon EKS workload, and one account to host the Amazon ECS workload.
- Falco set up on the Amazon EKS and Amazon ECS clusters, with logs routed to CloudWatch Logs using FireLens. For instructions on how to do this, see:
- AWS Cloud Development Kit (CDK) installed on the member accounts to deploy the solution that provides the custom integration between Falco and Security Hub.
Deploying the solution
In this section, you will learn how to deploy the solution and enable the CloudWatch Logs group. Enabling the CloudWatch Logs group is the trigger for running the Lambda function in both member accounts.
To deploy this solution in your own account
- Clone the aws-securityhub-falco-ecs-eks-integration GitHub repository by running the following command.
$git clone https://github.com/aws-samples/aws-securityhub-falco-ecs-eks-integration
- Follow the instructions in the README file provided on GitHub to build and deploy the solution. Make sure that you deploy the solution to the accounts hosting the Amazon EKS and Amazon ECS clusters.
- Navigate to the AWS Lambda console and confirm that you see the newly created Lambda function. You will use this function in the next section.
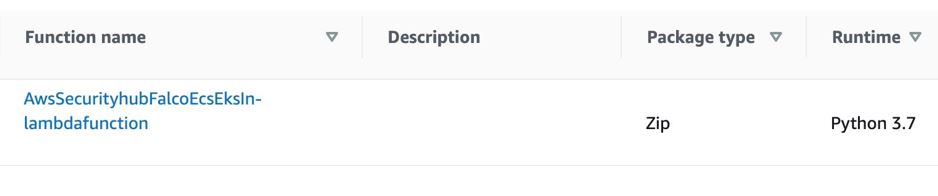
Figure 2: Lambda function for Falco integration with Security Hub
To enable the CloudWatch Logs group
- In the AWS Management Console, select the Lambda function shown in Figure 2—AwsSecurityhubFalcoEcsEksln-lambdafunction—and then, on the Function overview screen, select + Add trigger.
- On the Add trigger screen, provide the following information and then select Add, as shown in Figure 3.
- Trigger configuration – From the drop-down, select CloudWatch logs.
- Log group – Choose the Log group you noted in Step 4 of the Prerequisites. In our setup, the log group for the Amazon ECS and Amazon EKS clusters, deployed in separate AWS accounts, was set with the same value (falco).
- Filter name – Provide a name for the filter. In our example, we used the name falco.
- Filter pattern – optional – Leave this field blank.

Figure 3: Lambda function trigger – CloudWatch Log group
- Repeat these steps (as applicable) to set up the trigger for the Lambda function deployed in other accounts.
Testing the deployment
Now that you’ve deployed the solution, you will verify that it’s working.
With the default rules, Falco generates alerts for activities such as:
An attempt to write to a file below the /etc folder. The /etc folder contains important system configuration files.
An attempt to open a sensitive file (such as /etc/shadow) for reading.
To test your deployment, you will attempt to perform these activities to generate Falco alerts that are reported as Security Hub findings in the same account. Then you will review the findings.
To test the deployment in member account 1
- Run the following commands to trigger an alert in member account 1, which is running an Amazon EKS cluster. Replace <container_name> with your own value.
kubectl exec -it <container_name> /bin/bash
touch /etc/5
cat /etc/shadow > /dev/null
- To see the list of findings, log in to your Security Hub admin account and navigate to Security Hub > Findings. As shown in Figure 4, you will see the alerts generated by Falco, including the Falco-generated title, and the instance where the alert was triggered.

Figure 4: Findings in Security Hub
- To see more detail about a finding, check the box next to the finding. Figure 5 shows some of the details for the finding Read sensitive file untrusted.

Figure 5: Sensitive file read finding – detail view
To test the deployment in member account 2
- Run the following commands to trigger a Falco alert in member account 2, which is running an Amazon ECS cluster. Replace <<container_id> with your own value.
docker exec -it <container_id> bash
touch /etc/5
cat /etc/shadow > /dev/null
- As in the preceding example with member account 1, to view the findings related to this alert, navigate to your Security Hub admin account and select Findings.
To view the collated findings from both member accounts in Security Hub
- In the designated Security Hub administrator account, navigate to Security Hub > Findings. The findings from both member accounts are collated in the designated Security Hub administrator account. You can use this centralized account to view the security posture across accounts and workloads. Figure 7 shows two findings, one from each member account, viewable in the Single Pane of Glass administrator account.

Figure 7: Write below /etc findings in a single view
- To see more information and a link to the corresponding member account where the finding was generated, check the box next to the finding. Figure 8 shows the account detail associated with a specific finding in member account 1.

Figure 8: Write under /etc detail view in Security Hub admin account
Cleaning up
To clean up this demo:
- Delete the CloudWatch Logs trigger from the Lambda functions that were created in the section To enable the CloudWatch Logs group.
- Delete the Lambda functions by deleting the CloudFormation stack, created in the section To deploy this solution in your own account.
- Delete the Amazon EKS and Amazon ECS clusters created as part of the Prerequisites.
Conclusion
In this post, you learned how to achieve multi-account continuous runtime security monitoring for container-based workloads running on Amazon EKS and Amazon ECS. This is achieved by creating a custom integration between Falco and Security Hub.
You can extend this solution in a number of ways. For example:
You can forward findings across accounts using a single source to security information and event management (SIEM) tools such as Splunk.
You can perform automated remediation activities based on the findings generated, using Lambda.
To learn more about managing a centralized Security Hub administrator account, see Managing administrator and member accounts. To learn more about working with ASFF, see AWS Security Finding Format (ASFF) in the documentation. To learn more about the Falco engine and rule structure, see the Falco documentation.
If you have feedback about this post, submit comments in the Comments section below.
Want more AWS Security news? Follow us on Twitter.
Using AWS security services to protect against, detect, and respond to the Log4j vulnerability
=======================
January 4, 2022: The blog post has been updated to suggest using WAF rules when correct HTTP Host Header FQDN value is not provided in the request.
December 31, 2021: We made a minor update to the second paragraph in the Amazon Route 53 Resolver DNS Firewall section.
December 29, 2021: A paragraph under the Detect section has been added to provide guidance on validating if log4j exists in an environment.
December 23, 2021: The GuardDuty section has been updated to describe new threat labels added to specific finding to give log4j context.
December 21, 2021: The post includes more info about Route 53 Resolver DNS query logging.
December 20, 2021: The post has been updated to include Amazon Route 53 Resolver DNS Firewall info.
December 17, 2021: The post has been updated to include using Athena to query VPC flow logs.
December 16, 2021: The Respond section of the post has been updated to include IMDSv2 and container mitigation info.
Overview
In this post we will provide guidance to help customers who are responding to the recently disclosed log4j vulnerability. This covers what you can do to limit the risk of the vulnerability, how you can try to identify if you are susceptible to the issue, and then what you can do to update your infrastructure with the appropriate patches.
The log4j vulnerability (CVE-2021-44228, CVE-2021-45046) is a critical vulnerability (CVSS 3.1 base score of 10.0) in the ubiquitous logging platform Apache Log4j. This vulnerability allows an attacker to perform a remote code execution on the vulnerable platform. Version 2 of log4j, between versions 2.0-beta-9 and 2.15.0, is affected.
The vulnerability uses the Java Naming and Directory Interface (JNDI) which is used by a Java program to find data, typically through a directory, commonly a LDAP directory in the case of this vulnerability.
Figure 1, below, highlights the log4j JNDI attack flow.

Figure 1. Log4j attack progression. Source: GovCERT.ch, the Computer Emergency Response Team (GovCERT) of the Swiss government
As an immediate response, follow this blog and use the tool designed to hotpatch a running JVM using any log4j 2.0+. Steve Schmidt, Chief Information Security Officer for AWS, also discussed this hotpatch.
Protect
You can use multiple AWS services to help limit your risk/exposure from the log4j vulnerability. You can build a layered control approach, and/or pick and choose the controls identified below to help limit your exposure.
AWS WAF
Use AWS Web Application Firewall, following AWS Managed Rules for AWS WAF, to help protect your Amazon CloudFront distribution, Amazon API Gateway REST API, Application Load Balancer, or AWS AppSync GraphQL API resources.
AWSManagedRulesKnownBadInputsRuleSet esp. the Log4JRCE rule which helps inspects the request for the presence of the Log4j vulnerability. Example patterns include ${jndi:ldap://example.com/}.
AWSManagedRulesAnonymousIpList esp. the AnonymousIPList rule which helps inspect IP addresses of sources known to anonymize client information.
AWSManagedRulesCommonRuleSet, esp. the SizeRestrictions_BODY rule to verify that the request body size is at most 8 KB (8,192 bytes).
You should also consider implementing WAF rules that deny access, if the correct HTTP Host Header FQDN value is not provided in the request. This can help reduce the likelihood of scanners that are scanning the internet IP address space from reaching your resources protected by WAF via a request with an incorrect Host Header, like an IP address instead of an FQDN. It’s also possible to use custom Application Load Balancer listener rules to achieve this.
If you’re using AWS WAF Classic, you will need to migrate to AWS WAF or create custom regex match conditions.
Have multiple accounts? Follow these instructions to use AWS Firewall Manager to deploy AWS WAF rules centrally across your AWS organization.
Amazon Route 53 Resolver DNS Firewall
You can use Route 53 Resolver DNS Firewall, following AWS Managed Domain Lists, to help proactively protect resources with outbound public DNS resolution. We recommend associating Route 53 Resolver DNS Firewall with a rule configured to block domains on the AWSManagedDomainsMalwareDomainList, which has been updated in all supported AWS regions with domains identified as hosting malware used in conjunction with the log4j vulnerability. AWS will continue to deliver domain updates for Route 53 Resolver DNS Firewall through this list.
Also, you should consider blocking outbound port 53 to prevent the use of external untrusted DNS servers. This helps force all DNS queries through DNS Firewall and ensures DNS traffic is visible for GuardDuty inspection. Using DNS Firewall to block DNS resolution of certain country code top-level domains (ccTLD) that your VPC resources have no legitimate reason to connect out to, may also help. Examples of ccTLDs you may want to block may be included in the known log4j callback domains IOCs.
We also recommend that you enable DNS query logging, which allows you to identify and audit potentially impacted resources within your VPC, by inspecting the DNS logs for the presence of blocked outbound queries due to the log4j vulnerability, or to other known malicious destinations. DNS query logging is also useful in helping identify EC2 instances vulnerable to log4j that are responding to active log4j scans, which may be originating from malicious actors or from legitimate security researchers. In either case, instances responding to these scans potentially have the log4j vulnerability and should be addressed. GreyNoise is monitoring for log4j scans and sharing the callback domains here. Some notable domains customers may want to examine log activity for, but not necessarily block, are: *interact.sh, *leakix.net, *canarytokens.com, *dnslog.cn, *.dnsbin.net, and *cyberwar.nl. It is very likely that instances resolving these domains are vulnerable to log4j.
AWS Network Firewall
Customers can use Suricata-compatible IDS/IPS rules in AWS Network Firewall to deploy network-based detection and protection. While Suricata doesn’t have a protocol detector for LDAP, it is possible to detect these LDAP calls with Suricata. Open-source Suricata rules addressing Log4j are available from corelight, NCC Group, from ET Labs, and from CrowdStrike. These rules can help identify scanning, as well as post exploitation of the log4j vulnerability. Because there is a large amount of benign scanning happening now, we recommend customers focus their time first on potential post-exploitation activities, such as outbound LDAP traffic from their VPC to untrusted internet destinations.
We also recommend customers consider implementing outbound port/protocol enforcement rules that monitor or prevent instances of protocols like LDAP from using non-standard LDAP ports such as 53, 80, 123, and 443. Monitoring or preventing usage of port 1389 outbound may be particularly helpful in identifying systems that have been triggered by internet scanners to make command and control calls outbound. We also recommend that systems without a legitimate business need to initiate network calls out to the internet not be given that ability by default. Outbound network traffic filtering and monitoring is not only very helpful with log4j, but with identifying other classes of vulnerabilities too.
Use IMDSv2
Through the early days of the log4j vulnerability researchers have noted that, once a host has been compromised with the initial JDNI vulnerability, attackers sometimes try to harvest credentials from the host and send those out via some mechanism such as LDAP, HTTP, or DNS lookups. We recommend customers use IAM roles instead of long-term access keys, and not store sensitive information such as credentials in environment variables. Customers can also leverage AWS Secrets Manager to store and automatically rotate database credentials instead of storing long-term database credentials in a host’s environment variables. See prescriptive guidance here and here on how to implement Secrets Manager in your environment.
To help guard against such attacks in AWS when EC2 Roles may be in use — and to help keep all IMDS data private for that matter — customers should consider requiring the use of Instance MetaData Service version 2 (IMDSv2). Since IMDSv2 is enabled by default, you can require its use by disabling IMDSv1 (which is also enabled by default). With IMDSv2, requests are protected by an initial interaction in which the calling process must first obtain a session token with an HTTP PUT, and subsequent requests must contain the token in an HTTP header. This makes it much more difficult for attackers to harvest credentials or any other data from the IMDS. For more information about using IMDSv2, please refer to this blog and documentation. While all recent AWS SDKs and tools support IMDSv2, as with any potentially non-backwards compatible change, test this change on representative systems before deploying it broadly.
Detect
This post has covered how to potentially limit the ability to exploit this vulnerability. Next, we’ll shift our focus to which AWS services can help to detect whether this vulnerability exists in your environment.

Figure 2. Log4j finding in the Inspector console
Amazon Inspector
As shown in Figure 2, the Amazon Inspector team has created coverage for identifying the existence of this vulnerability in your Amazon EC2 instances and Amazon Elastic Container Registry Images (Amazon ECR). With the new Amazon Inspector, scanning is automated and continual. Continual scanning is driven by events such as new software packages, new instances, and new common vulnerability and exposure (CVEs) being published.
For example, once the Inspector team added support for the log4j vulnerability (CVE-2021-44228 & CVE-2021-45046), Inspector immediately began looking for this vulnerability for all supported AWS Systems Manager managed instances where Log4j was installed via OS package managers and where this package was present in Maven-compatible Amazon ECR container images. If this vulnerability is present, findings will begin appearing without any manual action. If you are using Inspector Classic, you will need to ensure you are running an assessment against all of your Amazon EC2 instances. You can follow this documentation to ensure you are creating an assessment target for all of your Amazon EC2 instances. Here are further details on container scanning updates in Amazon ECR private registries.
GuardDuty
In addition to finding the presence of this vulnerability through Inspector, the Amazon GuardDuty team has also begun adding indicators of compromise associated with exploiting the Log4j vulnerability, and will continue to do so. GuardDuty will monitor for attempts to reach known-bad IP addresses or DNS entries, and can also find post-exploit activity through anomaly-based behavioral findings. For example, if an Amazon EC2 instance starts communicating on unusual ports, GuardDuty would detect this activity and create the finding Behavior:EC2/NetworkPortUnusual. This activity is not limited to the NetworkPortUnusual finding, though. GuardDuty has a number of different findings associated with post exploit activity, such as credential compromise, that might be seen in response to a compromised AWS resource. For a list of GuardDuty findings, please refer to this GuardDuty documentation.
To further help you identify and prioritize issues related to CVE-2021-44228 and CVE-2021-45046, the GuardDuty team has added threat labels to the finding detail for the following finding types:
Backdoor:EC2/C&CActivity.B
If the IP queried is Log4j-related, then fields of the associated finding will include the following values:
service.additionalInfo.threatListName = Amazon
service.additionalInfo.threatName = Log4j Related
Backdoor:EC2/C&CActivity.B!DNS
If the domain name queried is Log4j-related, then the fields of the associated finding will include the following values:
service.additionalInfo.threatListName = Amazon
service.additionalInfo.threatName = Log4j Related
Behavior:EC2/NetworkPortUnusual
If the EC2 instance communicated on port 389 or port 1389, then the associated finding severity will be modified to High, and the finding fields will include the following value:
service.additionalInfo.context = Possible Log4j callback

Figure 3. GuardDuty finding with log4j threat labels
Security Hub
Many customers today also use AWS Security Hub with Inspector and GuardDuty to aggregate alerts and enable automatic remediation and response. In the short term, we recommend that you use Security Hub to set up alerting through AWS Chatbot, Amazon Simple Notification Service, or a ticketing system for visibility when Inspector finds this vulnerability in your environment. In the long term, we recommend you use Security Hub to enable automatic remediation and response for security alerts when appropriate. Here are ideas on how to setup automatic remediation and response with Security Hub.
VPC flow logs
Customers can use Athena or CloudWatch Logs Insights queries against their VPC flow logs to help identify VPC resources associated with log4j post exploitation outbound network activity. Version 5 of VPC flow logs is particularly useful, because it includes the “flow-direction” field. We recommend customers start by paying special attention to outbound network calls using destination port 1389, since outbound usage of that port is less common in legitimate applications. Customers should also investigate outbound network calls using destination port 389 to untrusted internet destination IP addresses. Free-tier IP reputation services, such as VirusTotal, GreyNoise, NOC.org, and ipinfo.io, can provide helpful insights related to public IP addresses found in the logged activity.
Note: If you have a Microsoft Active Directory environment in the captured VPC flow logs being queried, you might see false positives due to its use of port 389.
Validation with open-source tools
With the evolving nature of the different log4j vulnerabilities, it’s important to validate that upgrades, patches, and mitigations in your environment are indeed working to mitigate potential exploitation of the log4j vulnerability. You can use open-source tools, such as aws_public_ips, to get a list of all your current public IP addresses for an AWS Account, and then actively scan those IPs with log4j-scan using a DNS Canary Token to get notification of which systems still have the log4j vulnerability and can be exploited. We recommend that you run this scan periodically over the next few weeks to validate that any mitigations are still in place, and no new systems are vulnerable to the log4j issue.
Respond
The first two sections have discussed ways to help prevent potential exploitation attempts, and how to detect the presence of the vulnerability and potential exploitation attempts. In this section, we will focus on steps that you can take to mitigate this vulnerability. As we noted in the overview, the immediate response recommended is to follow this blog and use the tool designed to hotpatch a running JVM using any log4j 2.0+. Steve Schmidt, Chief Information Security Officer for AWS, also discussed this hotpatch.

Figure 4. Systems Manager Patch Manager patch baseline approving critical patches immediately
AWS Patch Manager
If you use AWS Systems Manager Patch Manager, and you have critical patches set to install immediately in your patch baseline, your EC2 instances will already have the patch. It is important to note that you’re not done at this point. Next, you will need to update the class path wherever the library is used in your application code, to ensure you are using the most up-to-date version. You can use AWS Patch Manager to patch managed nodes in a hybrid environment. See here for further implementation details.
Container mitigation
To install the hotpatch noted in the overview onto EKS cluster worker nodes AWS has developed an RPM that performs a JVM-level hotpatch which disables JNDI lookups from the log4j2 library. The Apache Log4j2 node agent is an open-source project built by the Kubernetes team at AWS. To learn more about how to install this node agent, please visit the this Github page.
Once identified, ECR container images will need to be updated to use the patched log4j version. Downstream, you will need to ensure that any containers built with a vulnerable ECR container image are updated to use the new image as soon as possible. This can vary depending on the service you are using to deploy these images. For example, if you are using Amazon Elastic Container Service (Amazon ECS), you might want to update the service to force a new deployment, which will pull down the image using the new log4j version. Check the documentation that supports the method you use to deploy containers.
If you’re running Java-based applications on Windows containers, follow Microsoft’s guidance here.
We recommend you vend new application credentials and revoke existing credentials immediately after patching.
Mitigation strategies if you can’t upgrade
In case you either can’t upgrade to a patched version, which disables access to JDNI by default, or if you are still determining your strategy for how you are going to patch your environment, you can mitigate this vulnerability by changing your log4j configuration. To implement this mitigation in releases >=2.10, you will need to remove the JndiLookup class from the classpath: zip -q -d log4j-core-*.jar org/apache/logging/log4j/core/lookup/JndiLookup.class.
For a more comprehensive list about mitigation steps for specific versions, refer to the Apache website.
Conclusion
In this blog post, we outlined key AWS security services that enable you to adopt a layered approach to help protect against, detect, and respond to your risk from the log4j vulnerability. We urge you to continue to monitor our security bulletins; we will continue updating our bulletins with our remediation efforts for our side of the shared-responsibility model.
Given the criticality of this vulnerability, we urge you to pay close attention to the vulnerability, and appropriately prioritize implementing the controls highlighted in this blog.
If you have feedback about this post, submit comments in the Comments section below.
Want more AWS Security news? Follow us on Twitter.
Open source hotpatch for Apache Log4j vulnerability
=======================
December 14, 2021:The version 2.15 Log4j was updated to the new version out today.
At Amazon Web Services (AWS), security remains our top priority. As we addressed the Apache Log4j vulnerability this weekend, I’m pleased to note that our team created and released a hotpatch as an interim mitigation step. This tool may help you mitigate the risk when updating is not immediately possible.
It’s important that you review, patch, or mitigate this vulnerability as soon as possible. We still recommend that you update Log4j to the latest version as a mitigation, but we know that can take some time, depending on your resources. To take immediate action, we recommend that you implement this newly created tool to hotpatch your Log4j deployments. A huge thanks to the Amazon Corretto team for spending days, nights, and the weekend to write, harden, and ship this code. This tool is available now at GitHub.
Caveats
As with all open source software, you’re using this at your own risk. Note that the hotpatch has been tested with JDK8 and JDK11 on Linux. On JDK17, only the static agent mode works. A full list of caveats can be found in the README.
Want more AWS Security how-to content, news, and feature announcements? Follow us on Twitter.
How to customize behavior of AWS Managed Rules for AWS WAF
=======================
AWS Managed Rules for AWS WAF provides a group of rules created by AWS that can be used help protect you against common application vulnerabilities and other unwanted access to your systems without having to write your own rules. AWS Threat Research Team updates AWS Managed Rules to respond to an ever-changing threat landscape in order to protect your applications.
Recently, AWS WAF launched four new features that are centered on rule customization:
Labels – Metadata that can be added to web requests when a rule is matched. Labels can be used to alter the behavior or default action of managed rules.
Version management – You can select a specific version of a managed rule group. Versioning can be used to return to previously tested versions.
Scope-down statements – Use to narrow the scope of the requests that a rule group evaluates.
Custom responses – Send a custom HTTP response back to the client from AWS WAF when a rule blocks a connection request.
In this blog, we go through four use cases to demonstrate how you can use these features to improve your security posture by customizing managed rules.
Case 1: Control automatic updates for a managed rule group by selecting a specific version
By default, managed rule groups are updated automatically as updates become available. This ensures you have the latest protection as soon as it’s available. With the version management feature, you can choose to stay on a specific version, meaning that it won’t update until you explicitly move to a newer version. This allows you to test a new version and promote it to your web ACL when you’re ready, and to return to a previously tested version if necessary.
Note: It’s recommended that you use a version as close as possible to the latest.
To select a managed rule group version
- In your AWS WAF console, navigate to the web ACL where you’ve added a managed rule group.
- Select the managed rule group whose version you want to set, and choose Edit.
- In the Version selection drop down, select the version you want to use. You’ll remain on this version until the version expires or you select another version—you’ll learn how to manage version expiration later in this post.
Note: If you want to receive updates automatically, select Default as the version.
- Choose Save Rule to save the configuration.
 Figure 1: Console screenshot showing the AWS Managed Rules version drop down
Set up notifications
You can use Amazon Simple Notification Service (Amazon SNS) to get notifications of updates to a managed rule group. You can subscribe to the SNS topic using the ARN of the managed rule group. Every SNS notification for AWS Managed Rules updates uses the same message format, which enables you to consume these updates programmatically. For more details on the SNS notification message format, see Getting notified of new versions and updates to a managed rule group.
To set up email notifications on new rule updates through Amazon SNS
- In your AWS WAF console, navigate to the web ACL where you added the managed rule group.
- Select the managed rule group that you want to receive notifications for, and choose Edit.
- On the Core rule set page, look for the Amazon SNS topic ARN. Select the link to go to the Amazon SNS console. Make a note of the topic ARN to use in step 4.
 Figure 2: Console screenshot highlighting the SNS topic ARN
- On the Create subscription page, enter the following information:
Topic ARN: Enter the SNS topic ARN from step 3.
Protocol: Select Email.
Endpoint: Enter the email address where you want notifications sent.
 Figure 3: SNS Create subscription console screenshot
- Choose Create subscription.
- Watch for a confirmation email from Amazon SNS. Choose the confirm subscription link in the email to complete the subscription.
Set up a version expiration alert using a CloudWatch alarm
When you stay on a specific version of managed rule group for a long time, there is a risk that you may miss important updates. To ensure you do not stay on a stale version for long time, you should set up an alarm to alert you when a version is close to expiring. When a version expires, the managed rule group automatically switches to the default version. To be notified when a version is about to expire, set up an alert using an Amazon CloudWatch alarm based on DaysToExpiry. You can use the following procedure to set up a notification 60 days before a specific version of the rule set you’re using expires.
To set up a CloudWatch alarm
This will notify you 60 days before a specific version of a rule set expires
- Navigate to the CloudWatch console.
- Select All metrics from the left navigation pane, and then select WAFV2 from the list of namespaces.
- Choose ManagedRuleGroup, Region, Vendor, Version.
- Select the managed rule group whose expiration you want to monitor. This example uses AWSManagedRulesCommonRuleSet and Version_1.0.
- Select Graphed metric and select the bell alarm icon on the lower right, under Actions. Selecting this icon will take you to the CloudWatch alarms console.
 Figure 4: CloudWatch Graphed metrics tab
- Configure the CloudWatch alarm with the following details, and then choose Next:
Statistic: Select Minimum
Period: Select 5 minutes
Threshold Type: Select Static
Operator: Select Lower/Equal (<=threshold)
Threshold: Enter the value as 60
Datapoints to alarm: Enter the lower value as 1 and higher value as 1
Missing data treatment: Select Treat missing data as good (not breaching threshold)
- Select the SNS topic that you want to be launched when the configured alarm goes to ALARM state and choose Next.
- Enter a name and description for the Alarm. Choose Next to preview the configuration and choose Create Alarm to complete the CloudWatch alarm creation process.
Additional tips
If the version of a managed rule group that you’re using has expired, AWS WAF will prevent any configuration change to the web ACL until you select a valid version. You should move onto the newest version as soon as possible so you are covered against the latest threats.
You will only receive the DaysToExpiry metric when there is traffic flowing through your web ACL.
You can use two different versions of a managed rule group in a web ACL. This can be useful if you want to test two different versions simultaneously to see how they will affect your traffic once deployed—for example, have one version in count mode and the other in block mode.
Note: This workflow is supported through the JSON rule editor and API, but not through the console.
Case 2: Use labels to mitigate false positives caused by a rule in a managed rule group
A label is metadata that a rule can add to matching web requests, regardless of the action associated with the rule. The latest version of AWS Managed Rules supports labels. By creating custom rules that match requests that have labels, you can change the behavior or default action of rules inside a managed rule group.
For example, if you have a rule that’s causing a false positive in a managed rule group, you can mitigate it by overriding the managed rule to Count and writing a custom rule with logic similar to the following:
IF (Statement 1) AND NOT (Statement 2) THEN Block
Statement 1 matches on the label generated from the rule causing a false positive.
Statement 2 contains exception conditions for when you don’t want the rule to evaluate because it’s causing false positives.
Consider a scenario where redirection requests to your application are blocked due to the rule GenericRFI_QUERYARGUMENTS in the managed rule group you’re using. This rule inspects the value of all query parameters and blocks requests that attempt to exploit remote file inclusion (RFI) in web applications, such as :// embedded midway through a URL. An example of a legitimate redirection request that could be blocked due to the characters :// present in the query argument scope could be as follows:
https://ourdomain.com/sso/complete?scope=email profile https://www.redirect-domain.com/auth/email https://www.redirect-domain.com/auth/profile
To prevent similar legitimate requests from being blocked, you can write a custom rule to match based on the label.
Step 1: Set the specific managed rule group to count mode
The first step is to set the specific managed rule to count mode, so that labels are added to the matching requests. Next, the priority of the managed rule must be set higher than the priority of the custom rule.
To set the specific managed rule group to count mode
- In your AWS WAF console, navigate to your web ACL and select the Rules tab. Choose Add Rule, and then select Add managed rule groups.
- Select AWS managed rule groups.
- Under Free rule groups, look for Core rule set and add it to your web ACL by selecting the toggle Add to web ACL.
- Choose Edit.
- From the list of rules, set the rule generating false positives to the Count action, by selecting the Count toggle beside the rule. This example changes the action for the rule GenericRFI_QUERYARGUMENTS to Count. This ensures that all the matching requests are sent to the subsequent WAF rules in order of priority and adds the label awswaf:managed:aws:commonruleset:GenericRFI_QueryArguments whenever there’s a matching request.
- Choose on Save rule.
- Choose Add rules again to go to the next window where you can set the rule priority. The managed rule must have a higher priority than the custom rule that you will create in the next steps.
- Choose Save to save the configuration.
Step 2: Add a custom rule to the web ACL with lower priority than the managed rule
Create a custom rule in the web ACL that blocks requests if it has the label that you are looking for and doesn’t have the exception condition that caused the false positive. The priority of this custom rule should be set lower than the managed rule.
To add a custom rule with lower priority than the managed rule
- In your AWS WAF console, navigate to your web ACL Rules tab and choose Add Rule and select Add my own rules and rule groups.
- Select Rule Builder for the rule type.
- Enter a Rule Name and select Regular Rule as the Type.
- Use the If a request drop down to select matches all the statements (AND).
- Statement 1 checks if the request has the label that you’re looking for. In this example it is configured with the following details:
Inspect: Select Has a label
Labels: Select Label
Match key: Select awswaf:managed:aws:commonruleset:GenericRFI_QueryArguments
- All subsequent statements must be negated so that the requests don’t match the statement criteria and will be treated as legitimate requests. In this example, we set NOT Statement 2, that checks if the request contains https://www.redirect-domain.com/ in its query string:
Enable: Select Negate statement results
Inspect: Select All query parameters
Match type: Select Contains string
String to Match: Enter https://www.redirect-domain.com/
Text transformation: Select None
- Under Action, select Block and choose Add rule.
- In the Set rule Priority window, set the rule priority of your custom rule to lower than the AWS Managed Rules rule.
- Choose Save.
Case 3: Use a scope-down statement to narrow the scope of traffic matching a managed rule group
A scope-down statement can be added to any rule group to narrow the scope of the requests that a rule group evaluates. This allows you to either filter in the requests that you want the rule group to inspect or filter out any requests that doesn’t meet the criteria.
Consider a case where you have a list of trusted IP address that you don’t want to be evaluated against AmazonIPReputationList. You can avoid blocking these trusted IP addresses by using a scope-down statement to exclude the traffic from evaluation.
Step 1: Create the IP set for allowed list of IPs
The first step is to create an IP set that contains the allowed list of IPs. The IP set can be created for a particular AWS Region, or can be global if the web ACL is associated with an Amazon CloudFront distribution.
- Choose IP sets in the AWS WAF console and then choose Create IP set.
- In IP set name enter Allowed IPs. Enter the IPs that you want to allow in IP addresses. Choose Create IP set when done.
 Figure 5: Console screenshot creating an IP set
Step 2: Add a scope-down statement to the managed rule group
Once you have created the IP set, you can add a scope down statement in your managed rule group so that traffic originating from the IPs in the IP set aren’t evaluated against the rules in the managed rule group.
- On the Rules tab of you your web ACL, choose Add Rule and select Add managed rule groups.
- Select AWS managed rule groups.
- Under Free rule groups, turn on Amazon IP reputation list to add it to the web ACL and choose Edit.
- Select Enable scope-down statement.
 Figure 6: Console screenshot showing enabling the scope-down statement
- Add the condition so that only the requests that don’t originate from the allowed IPs list created earlier are evaluated for this rule group. Use the If a request drop down to select doesn’t match the statements (NOT).
Inspect: Select Originates from an IP address in
IP set: Select Allowed-IPs
IP address to use as the originating address: Select Source IP address
 Figure 7: Scope down statement configuration console screenshot
- Choose Save rule to add this rule to your web ACL.
Case 4: Use custom responses to change the default block action for a managed rule group
AWS WAF sends back response code 403 (forbidden) when it blocks an incoming request. You can use the custom response feature to instead send a custom HTTP response back to the client when the rule blocks access. Using the custom response, you can customize the status code, response headers, and response body.
Let’s say you want to respond back to a client who might be connecting to your application over VPN. You want to use a custom response to inform the user that this behavior is discouraged, by sending error code 400 (Bad Request) and a static body message (“Please don’t try to connect over a VPN”). To do this, you can use the AWS Managed Rule group AWSManagedRulesAnonymousIpList and then set up custom rules using the label awswaf:managed:aws:anonymous-ip-list:AnonymousIPList.
Step 1: Create a custom response body
The first step in creating a custom response is to create a custom response body. This is the message that will be shown when the custom response is sent.
To create a custom response body
- In the AWS WAF console, open your web ACL and select the Custom response bodies tab.
- Choose Create custom response body.
- In Response body object name, enter a name for this response—for example, Custom-body-IP-list.
- Choose a Content type for the response body.
- In Response body, enter the response that you want to send back to the client.
- Choose Save.
 Figure 8: Custom response body creation on the AWS WAF console
Step 2: Override the actions of the managed rule group
The rule you use to send your custom response should be in count mode. This will ensure that all the matching requests are sent to the subsequent WAF rules in priority order. In the following example, the rule AnonymousIPList in the managed rule group AWSManagedRulesAnonymousIpList is set to count mode. For more details on how to override the action of a managed rule group, see Overriding the actions of a rule group or its rules.
 Figure 9: console screenshot overriding an AWS Managed Rules rule
Step 3: Create a rule to block the request and send a custom response back to the client
You’ll use the AWS WAF labels feature for this step. As explained in Case 2 above, you need to create a custom rule that matches the label generated by the managed rule. In this case the, custom rule should be configured to send your custom response.
To create a custom rule
- Expand the Custom response section and select Enable.
- Under Response code, enter the custom HTTP status code you want to send back to the client.
- (Optional) Use the Response headers section if you wish to add a custom response header
- Under Choose how you would like to specify the response body, select the custom response body you created in Step 1.
- (Optional) If you wish to generate additional labels to track activity in logs, you can use Add label.
- Choose Add rule.
- Set the rule priority of your custom rule to lower than the AWS Managed Rules rule.
- Choose Save.
 Figure 10: Console screenshot configuring a custom response body for a rule
Summary
In this post, we demonstrated how the new AWS WAF features such as labels, version management, scope-down statements, and custom responses can help you customize the behavior of AWS Managed Rules to protect your web applications and minimize risk. You can use these features in various ways, such as customizing AWS Managed Rules by combining labels and request properties to allow or block requests, and using labels to help filter logs.
You can learn more about AWS WAF in other AWS WAF–related Security Blog posts.
If you have feedback about this post, submit comments in the Comments section below.
Want more AWS Security news? Follow us on Twitter.
Page 1|Page 2|Page 3|Page 4