Contents of this page is copied directly from AWS blog sites to make it Kindle friendly. Some styles & sections from these pages are removed to render this properly in 'Article Mode' of Kindle e-Reader browser. All the contents of this page is property of AWS.
Page 1|Page 2|Page 3|Page 4
The Five Ws episode 2: Data Classification whitepaper
=======================
AWS whitepapers are a great way to expand your knowledge of the cloud. Authored by Amazon Web Services (AWS) and the AWS community, they provide in-depth content that often addresses specific customer situations.
We’re featuring some of our whitepapers in a new video series, The Five Ws. These short videos outline the who, what, when, where, and why of each whitepaper so you can decide whether to dig into it further.
The second whitepaper we’re featuring is Data Classification: Secure Cloud Adoption. This paper provides insight into data classification categories for organizations to consider when moving data to the cloud—and how implementing a data classification program can simplify cloud adoption and management. It outlines a process to build a data classification program, shares examples of data and the corresponding category the data may fall into, and outlines practices and models currently implemented by global first movers and early adopters. The paper also includes data classification and privacy considerations. Note: It’s important to use internationally recognized standards and frameworks when developing your own data classification rules. For more details on the Five Ws of Data Classification: Security Cloud Adoption, check out the video.
If you have feedback about this post, submit comments in the Comments section below.
Want more AWS Security how-to content, news, and feature announcements? Follow us on Twitter.
Forensic investigation environment strategies in the AWS Cloud
=======================
When a deviation from your secure baseline occurs, it’s crucial to respond and resolve the issue quickly and follow up with a forensic investigation and root cause analysis. Having a preconfigured infrastructure and a practiced plan for using it when there’s a deviation from your baseline will help you to extract and analyze the information needed to determine the impact, scope, and root cause of an incident and return to operations confidently.
Time is of the essence in understanding the what, how, who, where, and when of a security incident. You often hear of automated incident response, which has repeatable and auditable processes to standardize the resolution of incidents and accelerate evidence artifact gathering.
Similarly, having a standard, pristine, pre-configured, and repeatable forensic clean-room environment that can be automatically deployed through a template allows your organization to minimize human interaction, keep the larger organization separate from contamination, hasten evidence gathering and root cause analysis, and protect forensic data integrity. The forensic analysis process assists in data preservation, acquisition, and analysis to identify the root cause of an incident. This approach can also facilitate the presentation or transfer of evidence to outside legal entities or auditors. AWS CloudFormation templates—or other infrastructure as code (IaC) provisioning tools—help you to achieve these goals, providing your business with consistent, well-structured, and auditable results that allow for a better overall security posture. Having these environments as a permanent part of your infrastructure allows them to be well documented and tested, and gives you opportunities to train your teams in their use.
This post provides strategies that you can use to prepare your organization to respond to secure baseline deviations. These strategies take the form of best practices around Amazon Web Services (AWS) account structure, AWS Organizations organizational units (OUs) and service control policies (SCPs), forensic Amazon Virtual Private Cloud (Amazon VPC) and network infrastructure, evidence artifacts to be collected, AWS services to be used, forensic analysis tool infrastructure, and user access and authorization to the above. The specific focus is to provide an environment where Amazon Elastic Compute Cloud (Amazon EC2) instances with forensic tooling can be used to examine evidence artifacts.
This post presumes that you already have an evidence artifact collection procedure or that you are implementing one and that the evidence can be transferred to the accounts described here. If you are looking for advice on how to automate artifact collection, see How to automate forensic disk collection for guidance.
Infrastructure overview
A well-architected multi-account AWS environment is based on the structure provided by Organizations. As companies grow and need to scale their infrastructure with multiple accounts, often in multiple AWS Regions, Organizations offers programmatic creation of new AWS accounts combined with central management and governance that helps them to do so in a controlled and standardized manner. This programmatic, centralized approach should be used to create the forensic investigation environments described in the strategy in this blog post.
The example in this blog post uses a simplified structure with separate dedicated OUs and accounts for security and forensics, shown in Figure 1. Your organization’s architecture might differ, but the strategy remains the same.
Note: There might be reasons for forensic analysis to be performed live within the compromised account itself, such as to avoid shutting down or accessing the compromised instance or resource; however, that approach isn’t covered here.

Figure 1: AWS Organizations forensics OU example
The most important components in Figure 1 are:
A security OU, which is used for hosting security-related access and services. The security OU and the associated AWS accounts should be owned and managed by your security organization.
A forensics OU, which should be a separate entity, although it can have some similarities and crossover responsibilities with the security OU. There are several reasons for having it within a separate OU and account. Some of the more important reasons are that the forensics team might be a different team than the security team (or a subset of it), certain investigations might be under legal hold with additional access restrictions, or a member of the security team could be the focus of an investigation.
When speaking about Organizations, accounts, and the permissions required for various actions, you must first look at SCPs, a core functionality of Organizations. SCPs offer control over the maximum available permissions for all accounts in your organization. In the example in this blog post, you can use SCPs to provide similar or identical permission policies to all the accounts under the forensics OU, which is being used as a resource container. This policy overrides all other policies, and is a crucial mechanism to ensure that you can explicitly deny or allow any API calls desired. Some use cases of SCPs are to restrict the ability to disable AWS CloudTrail, restrict root user access, and ensure that all actions taken in the forensic investigation account are logged. This provides a centralized way to avoid changing individual policies for users, groups, or roles. Accessing the forensic environment should be done using a least-privilege model, with nobody capable of modifying or compromising the initially collected evidence. For an investigation environment, denying all actions except those you want to list as exceptions is the most straightforward approach. Start with the default of denying all, and work your way towards the least authorizations needed to perform the forensic processes established by your organization. AWS Config can be a valuable tool to track the changes made to the account and provide evidence of these changes.
Keep in mind that once the restrictive SCP is applied, even the root account or those with administrator access won’t have access beyond those permissions; therefore, frequent, proactive testing as your environment changes is a best practice. Also, be sure to validate which principals can remove the protective policy, if required, to transfer the account to an outside entity. Finally, create the environment before the restrictive permissions are applied, and then move the account under the forensic OU.
Having a separate AWS account dedicated to forensic investigations is best to keep your larger organization separate from the possible threat of contamination from the incident itself, ensure the isolation and protection of the integrity of the artifacts being analyzed, and keeping the investigation confidential. Separate accounts also avoid situations where the threat actors might have used all the resources immediately available to your compromised AWS account by hitting service quotas and so preventing you from instantiating an Amazon EC2 instance to perform investigations.
Having a forensic investigation account per Region is also a good practice, as it keeps the investigative capabilities close to the data being analyzed, reduces latency, and avoids issues of the data changing regulatory jurisdictions. For example, data residing in the EU might need to be examined by an investigative team in North America, but the data itself cannot be moved because its North American architecture doesn’t align with GDPR compliance. For global customers, forensics teams might be situated in different locations worldwide and have different processes. It’s better to have a forensic account in the Region where an incident arose. The account as a whole could also then be provided to local legal institutions or third-party auditors if required. That said, if your AWS infrastructure is contained within Regions only in one jurisdiction or country, then a single re-creatable account in one Region with evidence artifacts shared from and kept in their respective Regions could be an easier architecture to manage over time.
An account created in an automated fashion using a CloudFormation template—or other IaC methods—allows you to minimize human interaction before use by recreating an entirely new and untouched forensic analysis instance for each separate investigation, ensuring its integrity. Individual people will only be given access as part of a security incident response plan, and even then, permissions to change the environment should be minimal or none at all. The post-investigation environment would then be either preserved in a locked state or removed, and a fresh, blank one created in its place for the subsequent investigation with no trace of the previous artifacts. Templating your environment also facilitates testing to ensure your investigative strategy, permissions, and tooling will function as intended.
Accessing your forensics infrastructure
Once you’ve defined where your investigative environment should reside, you must think about who will be accessing it, how they will do so, and what permissions they will need.
The forensic investigation team can be a separate team from the security incident response team, the same team, or a subset. You should provide precise access rights to the group of individuals performing the investigation as part of maintaining least privilege.
You should create specific roles for the various needs of the forensic procedures, each with only the permissions required. As with SCPs and other situations described here, start with no permissions and add authorizations only as required while establishing and testing your templated environments. As an example, you might create the following roles within the forensic account:
Responder – acquire evidence
Investigator – analyze evidence
Data custodian – manage (copy, move, delete, and expire) evidence
Analyst – access forensics reports for analytics, trends, and forecasting (threat intelligence)
You should establish an access procedure for each role, and include it in the response plan playbook. This will help you ensure least privilege access as well as environment integrity. For example, establish a process for an owner of the Security Incident Response Plan to verify and approve the request for access to the environment. Another alternative is the two-person rule. Alert on log-in is an additional security measure that you can add to help increase confidence in the environment’s integrity, and to monitor for unauthorized access.
You want the investigative role to have read-only access to the original evidence artifacts collected, generally consisting of Amazon Elastic Block Store (Amazon EBS) snapshots, memory dumps, logs, or other artifacts in an Amazon Simple Storage Service (Amazon S3) bucket. The original sources of evidence should be protected; MFA delete and S3 versioning are two methods for doing so. Work should be performed on copies of copies if rendering the original immutable isn’t possible, especially if any modification of the artifact will happen. This is discussed in further detail below.
Evidence should only be accessible from the roles that absolutely require access—that is, investigator and data custodian. To help prevent potential insider threat actors from being aware of the investigation, you should deny even read access from any roles not intended to access and analyze evidence.
Protecting the integrity of your forensic infrastructures
Once you’ve built the organization, account structure, and roles, you must decide on the best strategy inside the account itself. Analysis of the collected artifacts can be done through forensic analysis tools hosted on an EC2 instance, ideally residing within a dedicated Amazon VPC in the forensics account. This Amazon VPC should be configured with the same restrictive approach you’ve taken so far, being fully isolated and auditable, with the only resources being dedicated to the forensic tasks at hand.
This might mean that the Amazon VPC’s subnets will have no internet gateways, and therefore all S3 access must be done through an S3 VPC endpoint. VPC flow logging should be enabled at the Amazon VPC level so that there are records of all network traffic. Security groups should be highly restrictive, and deny all ports that aren’t related to the requirements of the forensic tools. SSH and RDP access should be restricted and governed by auditable mechanisms such as a bastion host configured to log all connections and activity, AWS Systems Manager Session Manager, or similar.
If using Systems Manager Session Manager with a graphical interface is required, RDP or other methods can still be accessed. Commands and responses performed using Session Manager can be logged to Amazon CloudWatch and an S3 bucket, this allows auditing of all commands executed on the forensic tooling Amazon EC2 instances. Administrative privileges can also be restricted if required. You can also arrange to receive an Amazon Simple Notification Service (Amazon SNS) notification when a new session is started.
Given that the Amazon EC2 forensic tooling instances might not have direct access to the internet, you might need to create a process to preconfigure and deploy standardized Amazon Machine Images (AMIs) with the appropriate installed and updated set of tooling for analysis. Several best practices apply around this process. The OS of the AMI should be hardened to reduce its vulnerable surface. We do this by starting with an approved OS image, such as an AWS-provided AMI or one you have created and managed yourself. Then proceed to remove unwanted programs, packages, libraries, and other components. Ensure that all updates and patches—security and otherwise—have been applied. Configuring a host-based firewall is also a good precaution, as well as host-based intrusion detection tools. In addition, always ensure the attached disks are encrypted.
If your operating system is supported, we recommend creating golden images using EC2 Image Builder. Your golden image should be rebuilt and updated at least monthly, as you want to ensure it’s kept up to date with security patches and functionality.
EC2 Image Builder—combined with other tools—facilitates the hardening process; for example, allowing the creation of automated pipelines that produce Center for Internet Security (CIS) benchmark hardened AMIs. If you don’t want to maintain your own hardened images, you can find CIS benchmark hardened AMIs on the AWS Marketplace.
Keep in mind the infrastructure requirements for your forensic tools—such as minimum CPU, memory, storage, and networking requirements—before choosing an appropriate EC2 instance type. Though a variety of instance types are available, you’ll want to ensure that you’re keeping the right balance between cost and performance based on your minimum requirements and expected workloads.
The goal of this environment is to provide an efficient means to collect evidence, perform a comprehensive investigation, and effectively return to safe operations. Evidence is best acquired through the automated strategies discussed in How to automate incident response in the AWS Cloud for EC2 instances. Hashing evidence artifacts immediately upon acquisition is highly recommended in your evidence collection process. Hashes, and in turn the evidence itself, can then be validated after subsequent transfers and accesses, ensuring the integrity of the evidence is maintained. Preserving the original evidence is crucial if legal action is taken.
Evidence and artifacts can consist of, but aren’t limited to:
All EC2 instance metadata
Amazon EBS disk snapshots
EBS disks streamed to S3
Memory dumps
Memory captured through hibernation on the root EBS volume
CloudTrail logs
AWS Config rule findings
Amazon Route 53 DNS resolver query logs
VPC Flow Logs
AWS Security Hub findings
Elastic Load Balancing access logs
AWS WAF logs
Custom application logs
System logs
Security logs
Any third-party logs
Access to the control plane logs mentioned above—such as the CloudTrail logs—can be accessed in one of two ways. Ideally, the logs should reside in a central location with read-only access for investigations as needed. However, if not centralized, read access can be given to the original logs within the source account as needed. Read access to certain service logs found within the security account, such as AWS Config, Amazon GuardDuty, Security Hub, and Amazon Detective, might be necessary to correlate indicators of compromise with evidence discovered during the analysis.
As previously mentioned, it’s imperative to have immutable versions of all evidence. This can be achieved in many ways, including but not limited to the following examples:
Amazon EBS snapshots, including hibernation generated memory dumps:
Original Amazon EBS disks are snapshotted, shared to the forensics account, used to create a volume, and then mounted as read-only for offline analysis.
Amazon EBS volumes manually captured:
Linux tools such as dc3dd can be used to stream a volume to an S3 bucket, as well as provide a hash, and then made immutable using an S3 method from the next bullet point.
Artifacts stored in an S3 bucket, such as memory dumps and other artifacts:
S3 Object Lock prevents objects from being deleted or overwritten for a fixed amount of time or indefinitely.
Using MFA delete requires the requestor to use multi-factor authentication to permanently delete an object.
Amazon S3 Glacier provides a Vault Lock function if you want to retain immutable evidence long term.
Disk volumes:
Linux: Mount in read-only mode.
Windows: Use one of the many commercial or open-source write-blocker applications available, some of which are specifically made for forensic use.
CloudTrail:
CloudTrail log file integrity validation option, with SHA-256 for hashing and SHA-256 with RSA for signing.
Using S3 Object Lock – Governance Mode.
AWS Systems Manager inventory:
By default, metadata on managed instances is stored in an S3 bucket, and can be protected using the above methods.
AWS Config data:
By default, AWS Config stores data in an S3 bucket, and can be protected using the above methods.
Note: AWS services such as KMS can help enable encryption. KMS is integrated with AWS services to simplify using your keys to encrypt data across your AWS workloads.
An example use case of Amazon EBS disks being shared as evidence to the forensics account, the following figure—Figure 2—is a simplified S3 bucket folder structure you could use to store and work with evidence.
Figure 2 shows an S3 bucket structure for a forensic account. An S3 bucket and folder is created to hold incoming data—for example, from Amazon EBS disks—which is streamed to Incoming Data > Evidence Artifacts using dc3dd. The data is then copied from there to a folder in another bucket—Active Investigation > Root Directory > Extracted Artifacts—to be analyzed by the tooling installed on your forensic Amazon EC2 instance. Also, there are folders under Active Investigation for any investigation notes you make during analysis, as well as the final reports, which are discussed at the end of this blog post. Finally, a bucket and folders for legal holds, where an object lock will be placed to hold evidence artifacts at a specific version.

Figure 2: Forensic account S3 bucket structure
Considerations
Finally, depending on the severity of the incident, your on-premises network and infrastructure might also be compromised. Having an alternative environment for your security responders to use in case of such an event reduces the chance of not being able to respond in an emergency. Amazon services such as Amazon Workspaces—a fully managed persistent desktop virtualization service—can be used to provide your responders a ready-to-use, independent environment that they can use to access the digital forensics and incident response tools needed to perform incident-related tasks.
Aside from the investigative tools, communications services are among the most critical for coordination of response. You can use Amazon WorkMail and Amazon Chime to provide that capability independent of normal channels.
Conclusion
The goal of a forensic investigation is to provide a final report that’s supported by the evidence. This includes what was accessed, who might have accessed it, how it was accessed, whether any data was exfiltrated, and so on. This report might be necessary for legal circumstances, such as criminal or civil investigations or situations requiring breach notifications. What output each circumstance requires should be determined in advance in order to develop an appropriate response and reporting process for each. A root cause analysis is vital in providing the information required to prepare your resources and environment to help prevent a similar incident in the future. Reports should not only include a root cause analysis, but also provide the methods, steps, and tools used to arrive at the conclusions.
This article has shown you how you can get started creating and maintaining forensic environments, as well as enable your teams to perform advanced incident resolution investigations using AWS services. Implementing the groundwork for your forensics environment, as described above, allows you to use automated disk collection to begin iterating on your forensic data collection capabilities and be better prepared when security events occur.
If you have feedback about this post, submit comments in the Comments section below. If you have questions about this post, start a new thread on one of the AWS Security, Identity, and Compliance forums or contact AWS Support.
Want more AWS Security how-to content, news, and feature announcements? Follow us on Twitter.
Migrate and secure your Windows PKI to AWS with AWS CloudHSM
=======================
AWS CloudHSM provides a cloud-based hardware security module (HSM) that enables you to easily generate and use your own encryption keys in AWS. Using CloudHSM as part of a Microsoft Active Directory Certificate Services (AD CS) public key infrastructure (PKI) fortifies the security of your certificate authority (CA) private key and ensures the security of the trust hierarchy. In this blog post, we walk you through how to migrate your existing Microsoft AD CS CA private key to the HSM in a CloudHSM cluster.
The challenge
Organizations implement public key infrastructure (PKI) as an application to provide integrity and confidentiality between internal and customer-facing applications. A PKI provides encryption/decryption, message hashing, digital certificates, and digital signatures to ensure these security objectives are met. Microsoft AD CS is a popular choice for creating and managing a CA for enterprise applications such as Active Directory, Exchange, and Systems Center Configuration Manager. Moving your Microsoft AD CS to AWS as part of your overall migration plan allows you to continue to use your existing investment in Windows certificate auto enrollment for users and devices without disrupting existing workflows or requiring new certificates to be issued. However, when you migrate an on-premises infrastructure to the cloud, your security team may determine that storing private keys on the AD CS server’s disk is insufficient for protecting the private key that signs the certificates issued by the CA. Moving from storing private keys on the AD CS server’s disk to a hardware security module (HSM) can provide the added security required to maintain trust of the private keys.
This walkthrough shows you how to migrate your existing AD CS CA private key to the HSM in your CloudHSM cluster. The resulting configuration avoids the security concerns of using keys stored on your AD CS server, and uses the HSM to perform the cryptographic signing operations.
Prerequisites
For this walkthrough, you should have the following in place:
Windows Server configured as a Certificate Authority (CA) with CloudHSM.
An on-premises CA server with a private key backed by the Microsoft Software Key Storage Provider.
An Amazon Elastic Compute Cloud (Amazon EC2) instance provisioned in an Amazon Virtual Private Cloud (Amazon VPC) that will serve as a new CA server and will store its CA private key in CloudHSM.
The CloudHSM client installed on both the on-premises and Amazon EC2 CA servers. For instructions, see Install and Configure the AWS CloudHSM Client in the Getting Started section of the AWS CloudHSM User Guide.
An AWS CloudHSM cluster accessible from the on-premises and new EC2 CA servers on TCP ports 2223-2225. For instructions, see Create a Cluster, Initialize the Cluster, and Activate the Cluster in the Getting Started section of the AWS CloudHSM User Guide.
Network connectivity between the existing CA server and the CloudHSM cluster in your VPC, by using either AWS Virtual Private Network (AWS VPN) or AWS Direct Connect.
In order to ensure a smooth migration, we recommend that you review the Active Directory Certificate Services Migration Guide for Windows Server 2012 R2 for more information about migrating Active Directory Certificate Services, planning your CA migration, and the supporting infrastructure for Certificate Revocation List (CRL) distribution and Authority Information Access (AIA) endpoints.
Migrating a domain
In this section, you will walk through migrating your AD CS environment to AWS by using your existing CA certificate and private key that will be secured in CloudHSM. In order to securely migrate the private key into the HSM, you will install the CloudHSM client and import the keys directly from the existing CA server.
This walkthrough includes the following steps:
- Create a crypto user (CU) account
- Import the CA private key into CloudHSM
- Export the CA certificate and database
- Configure and import the certificate into the new Windows CA server
- Install AD CS on the new server
The operations you perform on the HSM require the credentials of an HSM user. Each HSM user has a type that determines the operations you can perform when authenticated as that user. Next, you will create a crypto user (CU) account to use with your CA servers, to manage keys and to perform cryptographic operations.
To create the CU account
- From the on-premises CA server, use the following command to log in with the crypto officer (CO) account that you created when you activated the cluster. Be sure to replace <co_password> with your CO password.
loginHSM CO admin <co_password>
- Use the following command to create the CU account. Replace <cu_user> and <cu_password> with the username and password you want to use for the CU.
createUser CU <cu_user> <cu_password>
- Use the following command to set the login credentials for the HSM on your system and enable the AWS CloudHSM client for Windows to use key storage providers (KSPs) and Cryptography API: Next Generation (CNG) providers. Replace <cu_user> and <cu_password> with the username and password of the CU.
set_cloudhsm_credentials.exe --username <cu_user> password <cu_password>
Now that you have the CloudHSM client installed and configured on the on-premises CA server, you can import the CA private key from the local server into your CloudHSM cluster.
To import the CA private key into CloudHSM
- Open an administrative command prompt and navigate to C:\Program Files\Amazon\CloudHSM.
- To identify the unique container name for your CA’s private key, enter certutil -store my to list all certificates stored in the local machine store. The CA certificate will be shown as follows:
================ Certificate 0 ================
Serial Number: <certificate_serial_number>
Issuer: CN=example-CA, DC=example, DC=com
NotBefore: 6/25/2021 5:04 PM
NotAfter: 6/25/2022 5:14 PM
Subject: CN=example-CA-test3, DC=example, DC=com
Certificate Template Name (Certificate Type): CA
CA Version: V0.0
Signature matches Public Key
Root Certificate: Subject matches Issuer
Template: CA, Root Certification Authority
Cert Hash(sha1): cb7c09cd6c76d69d9682a31fbdbbe01c29cebd82
Key Container = example-CA-test3
Unique container name: <unique_container_name>
Provider = Microsoft Software Key Storage Provider
Signature test passed
- Verify that the key is backed by the Microsoft Software Key Storage Provider and make note of the <unique_container_name> from the output, to use it in the following steps.
- Use the following command to set the environment variable n3fips_password. Replace <cu_user> and <cu_password> with the username and password for the CU you created earlier for the CloudHSM cluster. This variable will be used by the import_key command in the next step.
set n3fips_password=<cu_user>:<cu_password>
- Use the following import_key command to import the private key into the HSM. Replace <unique_container_name> with the value you noted earlier.
import_key.exe -RSA "<unique_container_name>”
The import_key command will report that the import was successful. At this point, your private key has been imported into the HSM, but the on-premises CA server will continue to run using the key stored locally.
The Active Directory Certificate Services Migration Guide for Windows Server 2012 R2 uses the Certification Authority snap-in to migrate the CA database, as well as the certificate and private key. Because you have already imported your private key into the HSM, next you will need to make a slight modification to this process and export the certificate manually, without its private key.
To export the CA certificate and database
- To open the Microsoft Management Console (MMC), open the Start menu and in the search field, enter MMC, and choose Enter.
- From the File menu, select Add/Remove Snapin.
- Select Certificates and choose Add.
- You will be prompted to select which certificate store to manage. Select Computer account and choose Next.
- Select Local Computer, choose Finish, then choose OK.
- In the left pane, choose Personal, then choose Certificates. In the center pane, locate your CA certificate, as shown in Figure 1.

Figure 1: Microsoft Management Console Certificates snap-in
- Open the context (right-click) menu for the certificate, choose All Tasks, then choose Export.
- In the Certificate Export Wizard, choose Next, then choose No, do not export the private key.
- Under Select the format you want to use, select Cryptographic Message Syntax Standard – PKCS #7 format file (.p7b) and select Include all certificates in the certification path if possible, as shown in Figure 2.

Figure 2: Certificate Export Wizard
- Save the file in a location where you’ll be able to locate it later, so you will be able to copy it to the new CA server.
- From the Start menu, browse to Administrative Tools, then choose Certificate Authority.
- Open the context (right-click) menu for your CA and choose All Tasks, then choose Back up CA.
- In the Certificate Authority Backup Wizard, choose Next. For items to back up, select only Certificate database and certificate database log. Leave all other options unselected.
- Under Back up to this location, choose Browse and select a new empty folder to hold the backup files, which you will move to the new CA later.
- After the backup is complete, in the MMC, open the context (right-click) menu for your CA, choose All Tasks, then choose Stop service.
At this point, until you complete the migration, your CA will no longer be issuing new certificates.
To configure and import the certificate into the new Windows CA server
- Open a Remote Desktop session to the EC2 instance that you created in the prerequisite steps, which will serve as your new AD CS certificate authority.
- Copy the certificate (.p7b file) backup from the on-premises CA server to the EC2 instance.
- On your EC2 instance, locate the certificate you just copied, as shown in Figure 3. Open the certificate to start the import process.

Figure 3: Certificate Manager tool
- Select Install Certificate. For Store Location, select Local Machine.
- Select Place the Certificates in the following store. Allowing Windows to place the certificate automatically will install it as a trusted root certificate, rather than a server certificate.
- Select Browse, select the Personal store, and then choose OK.
- Choose Next, then choose Finish to complete the certificate installation.
At this point, you’ve installed the public key and certificate from the on-premises CA server to your EC2-based Windows CA server. Next, you need to link this installed certificate with the private key, which is now stored on the CloudHSM cluster, in order to make it functional for signing issued certificates and CRLs.
To link the certificate with the private key
- Open an administrative command prompt and navigate to C:\Program Files\Amazon\CloudHSM.
- Use the following command to set the environment variable n3fips_password. Replace <cu_user> and <cu_password> with the username and password for the CU that you created earlier for the CloudHSM cluster. This variable will be used by the import_key command in the next step.
set n3fips_password=<cu_user>:<cu_password>
- Use the following import_key command to represent all keys stored on the HSM in a new key container in the key storage provider. This step is necessary to allow the cryptography tools to see the CA private key that is stored on the HSM.
import_key -from HSM -all
- Use the following Windows certutil command to find your certificate’s unique serial number.
certutil -store my
- Use the following Windows certutil command to link the installed certificate with the private key stored on the HSM. Replace <certificate_serial_number> with the value noted in the previous step.
certutil -repairstore my <certificate_serial_number>
- Enter the command certutil -store my. The CA certificate will be shown as follows. Verify that the certificate is now linked with the HSM-backed private key. Note that the private key is using the Cavium Key Store Provider. Also note the message Encryption test passed, which means that the private key is usable for encryption.
================ Certificate 0 ================
Serial Number: <certificate_serial_number>
Issuer: CN=example-CA, DC=example, DC=com
NotBefore: 6/25/2021 5:04 PM
NotAfter: 6/25/2022 5:14 PM
Subject: CN=example-CA, DC=example, DC=com
Certificate Template Name (Certificate Type): CA
CA Version: V0.0
Signature matches Public Key
Root Certificate: Subject matches Issuer
Template: CA, Root Certification Authority
Cert Hash(sha1): cb7c09cd6c76d69d9682a31fbdbbe01c29cebd82
Key Container = PRV_KEY_IMPORT-6-9-7e5cde
Provider = Cavium Key Storage Provider
Private key is NOT exportable
Encryption test passed
Now that your CA certificate and key materials are in place, you are ready to setup your EC2 instance as a CA server.
To install AD CS on the new server
- In Microsoft’s documentation to Install the Certificate Authority role on your new EC2 instance, follow steps 1-8. Do not complete the remaining steps, because you will be configuring the CA to use the existing HSM backed certificate and private-key instead of generating a new key.
- In Confirm installation selections, select Install.
- After your installation is complete, Server Manager will show a notification banner prompting you to configure AD CS. Select Configure Active Directory Certificate Services from this prompt.
- Select either Standalone or Enterprise CA installation, based upon the configuration of your on-premises CA.
- Select Use Existing Certificate and Private Key and browse to select the CA certificate imported from your on-premises CA server.
- Select Next and verify your location for the certificate database files.
- Select Finish to complete the wizard.
- To restore the CA database backup, from the Start menu, browse to Administrative Tools, then choose Certificate Authority.
- Open the context (right-click) menu for the certificate authority and choose All Tasks, then choose Restore CA. Browse to and select the database backup that you copied from the on-premises CA server.
Review the Active Directory Certificate Services Migration Guide for Windows Server 2012 R2 to complete migration of your remaining Microsoft Public Key Infrastructure (PKI) components. Depending on your existing CA environment, these steps may include establishing new CRL and AIA endpoints, configuring Windows Routing and Remote Access to use the new CA, or configuring certificate auto enrollment for Windows clients.
Conclusion
In this post, we walked you through migrating an on-premises Microsoft AD CS environment to an AWS environment that uses AWS CloudHSM to secure the CA private key. By migrating your existing Windows PKI backed by AWS CloudHSM, you can continue to use your Windows certificate auto enrollment for users and devices with your private key secured in a dedicated HSM.
For more information about setting up and managing CloudHSM, see Getting Started with AWS CloudHSM and the AWS Security Blog post CloudHSM best practices to maximize performance and avoid common configuration pitfalls.
If you have feedback about this blog post, submit comments in the Comments section below. You can also start a new thread on the AWS CloudHSM forum to get answers from the community.
Want more AWS Security how-to content, news, and feature announcements? Follow us on Twitter.
Three ways to improve your cybersecurity awareness program
=======================
Raising the bar on cybersecurity starts with education. That’s why we announced in August that Amazon is making its internal Cybersecurity Awareness Training Program available to businesses and individuals for free starting this month. This is the same annual training we provide our employees to help them better understand and anticipate potential cybersecurity risks. The training program will include a getting started guide to help you implement a cybersecurity awareness training program at your organization. It’s aligned with NIST SP 800-53rev4, ISO 27001, K-ISMS, RSEFT, IRAP, OSPAR, and MCTS.
I also want to share a few key learnings for how to implement effective cybersecurity training programs that might be helpful as you develop your own training program:
- Be sure to articulate personal value. As humans, we have an evolved sense of physical risk that has developed over thousands of years. Our bodies respond when we sense danger, heightening our senses and getting us ready to run or fight. We have a far less developed sense of cybersecurity risk. Your vision doesn’t sharpen when you assign the wrong permissions to a resource, for example. It can be hard to describe the impact of cybersecurity, but if you keep the message personal, it engages parts of the brain that are tied to deep emotional triggers in memory. When we describe how learning a behavior—like discerning when an email might be phishing—can protect your family, your child’s college fund, or your retirement fund, it becomes more apparent why cybersecurity matters.
- Be inclusive. Humans are best at learning when they share a lived experience with their educators so they can make authentic connections to their daily lives. That’s why inclusion in cybersecurity training is a must. But that only happens by investing in a cybersecurity awareness team that includes people with different backgrounds, so they can provide insight into different approaches that will resonate with diverse populations. People from different cultures, backgrounds, and age cohorts can provide insight into culturally specific attack patterns as well as how to train for them. For example, for social engineering in hierarchical cultures, bad actors often spoof authority figures, and for individualistic cultures, they play to the target’s knowledge and importance, and give compliments. And don’t forget to make everything you do accessible for people with varying disability experiences, because everyone deserves the same high-quality training experience. The more you connect with people, the more they internalize your message and provide valuable feedback. Diversity and inclusion breeds better cybersecurity.
- Weave it into workflows. Training takes investment. You have to make time for it in your day. We all understand that as part of a workforce we have to do it, but in addition to compliance training, you should be providing just-in-time reminders and challenges to complete. Try working with tooling teams to display messaging when critical tasks are being completed. Make training short and concise—3 minutes at most—so that people can make time for it in their day.
Cybersecurity training isn’t just a once-per-year exercise. Find ways to weave it into the daily lives of your workforce, and you’ll be helping them protect not only your company, but themselves and their loved ones as well.
Get started by going to learnsecurity.amazon.com and take the Cybersecurity Awareness training.
Want more AWS Security how-to content, news, and feature announcements? Follow us on Twitter.
Correlate security findings with AWS Security Hub and Amazon EventBridge
=======================
In this blog post, we’ll walk you through deploying a solution to correlate specific AWS Security Hub findings from multiple AWS services that are related to a single AWS resource, which indicates an increased possibility that a security incident has happened.
AWS Security Hub ingests findings from multiple AWS services, including Amazon GuardDuty, Amazon Inspector, Amazon Macie, AWS Firewall Manager, AWS Identity and Access Management (IAM) Access Analyzer, and AWS Systems Manager Patch Manager. Findings from each service are normalized into the AWS Security Finding Format (ASFF), so that you can review findings in a standardized format and take action quickly. You can use AWS Security Hub to provide a single view of all security-related findings, where you can set up alerting, automatic remediation, and ingestion into third-party incident management systems for specific findings.
Although Security Hub can ingest a vast number of integrations and findings, it cannot create correlation rules like a Security Information and Event Management (SIEM) tool can. However, you can create such rules using EventBridge. It’s important to take a closer look when multiple AWS security services generate findings for a single resource, because this potentially indicates elevated risk. Depending on your environment, the initial number of findings in AWS Security Hub findings may be high, so you may need to prioritize which findings require immediate action. AWS Security Hub natively gives you the ability to filter findings by resource, account, and many other details. With the solution in this post, when one of these correlated sets of findings is detected, a new finding is created and pushed to AWS Security Hub by using the Security Hub BatchImportFindings API operation. You can then respond to these new security incident-oriented findings through ticketing, chat, or incident management systems.
Prerequisites
This solution requires that you have AWS Security Hub enabled in your AWS account. In addition to AWS Security Hub, the following services must be enabled and integrated to AWS Security Hub:
Amazon GuardDuty
Amazon Macie
Amazon Inspector
Security Hub AWS Foundational Security Best Practices Standard
Solution overview
In this solution, you will use a combination of AWS Security Hub, Amazon EventBridge, AWS Lambda, and Amazon DynamoDB to ingest and correlate specific findings that indicate a higher likelihood of a security incident. Each correlation is focused on multiple specific AWS security service findings for a single AWS resource.
The following list shows the correlated findings that are detected by this solution. The Description section for each finding correlation provides context for that correlation, the Remediation section provides general recommendations for remediation, and the Prevention/Detection section provides guidance to either prevent or detect one or more findings within the correlation. With the code provided, you can also add more correlations than those listed here by modifying the Cloud Development Kit (CDK) code and AWS Lambda code. The Solution workflow section breaks down the flow of the solution. If you choose to implement automatic remediation, each finding correlation will be created with the following AWS Security Hub Finding Format (ASFF) fields:
- Severity: CRITICAL
- ProductArn: arn:aws:securityhub:<REGION>:<AWS_ACCOUNT_ID>:product/<AWS_ACCOUNT_ID>/default
These correlated findings are created as part of this solution:
- Any Amazon GuardDuty Backdoor findings and three critical common vulnerabilities and exposures (CVEs) from Amazon Inspector that are associated with the same Amazon Elastic Compute Cloud (Amazon EC2) instance.
- Description: Amazon Inspector has found at least three critical CVEs on the EC2 instance. CVEs indicate that the EC2 instance is currently vulnerable or exposed. The EC2 instance is also performing backdoor activities. The combination of these two findings is a stronger indication of an elevated security incident.
- Remediation: It’s recommended that you isolate the EC2 instance and follow standard protocol to triage the EC2 instance to verify if the instance has been compromised. If the instance has been compromised, follow your standard Incident Response process for post-instance compromise and forensics. Redeploy a backup of the EC2 instance by using an up-to-date hardened Amazon Machine Image (AMI) or apply all security-related patches to the redeployed EC2 instance.
- Prevention/Detection: To mitigate or prevent an Amazon EC2 instance from missing critical security updates, consider using Amazon Systems Manager Patch Manager to automate installing security-related patching for managed instances. Alternatively, you can provide developers up-to-date hardened Amazon Machine Images (AMI) by using Amazon EC2 Image Builder. For detection, you can set the AMI property called ‘DeprecationTime’ to indicate when the AMI will become outdated and respond accordingly.
- An Amazon Macie sensitive data finding and an Amazon GuardDuty S3 exfiltration finding for the same Amazon Simple Storage Service (Amazon S3) bucket.
- Description: Amazon Macie has scanned an Amazon S3 bucket and found a possible match for sensitive data. Amazon GuardDuty has detected a possible exfiltration finding for the same Amazon S3 bucket. The combination of these findings indicates a higher risk security incident.
- Remediation: It’s recommended that you review the source IP and/or IAM principal that is making the S3 object reads against the S3 bucket. If the source IP and/or IAM principal is not authorized to access sensitive data within the S3 bucket, follow your standard Incident Response process for post-compromise plan for S3 exfiltration. For example, you can restrict an IAM principal’s permissions, revoke existing credentials or unauthorized sessions, restricting access via the Amazon S3 bucket policy, or using the Amazon S3 Block Public Access feature.
- Prevention/Detection: To mitigate or prevent exposure of sensitive data within Amazon S3, ensure the Amazon S3 buckets are using least-privilege bucket policies and are not publicly accessible. Alternatively, you can use the Amazon S3 Block Public Access feature. Review your AWS environment to make sure you are following Amazon S3 security best practices. For detection, you can use Amazon Config to track and auto-remediate Amazon S3 buckets that do not have logging and encryption enabled or publicly accessible.
- AWS Security Hub detects an EC2 instance with a public IP and unrestricted VPC Security Group; Amazon GuardDuty unusual network traffic behavior finding; and Amazon GuardDuty brute force finding.
- Description: AWS Security Hub has detected an EC2 instance that has a public IP address attached and a VPC Security Group that allows traffic for ports outside of ports 80 and 443. Amazon GuardDuty has also determined that the EC2 instance has multiple brute force attempts and is communicating with a remote host on an unusual port that the EC2 instance has not previously used for network communication. The correlation of these lower-severity findings indicates a higher-severity security incident.
- Remediation: It’s recommended that you isolate the EC2 instance and follow standard protocol to triage the EC2 instance to verify if the instance has been compromised. If the instance has been compromised, follow your standard Incident Response process for post-instance compromise and forensics.
- Prevention/Detection: To mitigate or prevent these events from occurring within your AWS environment, determine whether the EC2 instance requires a public-facing IP address and review the VPC Security Group(s) has only the required rules configured. Review your AWS environment to make sure you are following Amazon EC2 best practices. For detection, consider implementing AWS Firewall Manager to continuously audit and limit VPC Security Groups.
The solution workflow, shown in Figure 1, is as follows:
- Security Hub ingests findings from integrated AWS security services.
- An EventBridge rule is invoked based on Security Hub findings in GuardDuty, Macie, Amazon Inspector, and Security Hub security standards.
- The EventBridge rule invokes a Lambda function to store the Security Hub finding, which is passed via EventBridge, in a DynamoDB table for further analysis.
- After the new findings are stored in DynamoDB, another Lambda function is invoked by using Dynamo StreamSets and a time-to-live (TTL) set to delete finding entries that are older than 30 days.
- The second Lambda function looks at the resource associated with the new finding entry in the DynamoDB table. The Lambda function checks for specific Security Hub findings that are associated with the same resource.

Figure 1: Architecture diagram describing the flow of the solution
Solution deployment
You can deploy the solution through either the AWS Management Console or the AWS Cloud Development Kit (AWS CDK).
To deploy the solution by using the AWS Management Console
In your account, launch the AWS CloudFormation template by choosing the following Launch Stack button. It will take approximately 10 minutes for the CloudFormation stack to complete.

To deploy the solution by using the AWS CDK
You can find the latest code in the aws-security GitHub repository where you can also contribute to the sample code. The following commands show how to deploy the solution by using the AWS CDK. First, the CDK initializes your environment and uploads the AWS Lambda assets to Amazon S3. Then, you can deploy the solution to your account. For <INSERT_AWS_ACCOUNT>, specify the account number, and for <INSERT_REGION>, specify the AWS Region that you want the solution deployed to.
cdk bootstrap aws://<INSERT_AWS_ACCOUNT>/<INSERT_REGION>
cdk deploy
Conclusion
In this blog post, we walked through a solution to use AWS services, including Amazon EventBridge, AWS Lambda, and Amazon DynamoDB, to correlate AWS Security Hub findings from multiple different AWS security services. The solution provides a framework to prioritize specific sets of findings that indicate a higher likelihood that a security incident has occurred, so that you can prioritize and improve your security response.
If you have feedback about this post, submit comments in the Comments section below. If you have any questions about this post, start a thread on the AWS Security Hub forum.
Want more AWS Security how-to content, news, and feature announcements? Follow us on Twitter.
New AWS workbook for New Zealand financial services customers
=======================
We are pleased to announce a new AWS workbook designed to help New Zealand financial services customers align with the Reserve Bank of New Zealand (RBNZ) Guidance on Cyber Resilience.
The RBNZ Guidance on Cyber Resilience sets out the RBNZ expectations for its regulated entities regarding cyber resilience, and aims to raise awareness and promote the cyber resilience of the financial sector, especially at board and senior management level. The guidance applies to all entities regulated by the RBNZ, including registered banks, licensed non-bank deposit takers, licensed insurers, and designated financial market infrastructures.
While the RBNZ describes its guidance as “a set of recommendations rather than requirements” which are not legally enforceable, it also states that it expects regulated entities to “proactively consider how their current approach to cyber risk management lines up with the recommendations in [the] guidance and look for [opportunities] for improvement as early as possible.”
Security and compliance is a shared responsibility between AWS and the customer. This differentiation of responsibility is commonly referred to as the AWS Shared Responsibility Model, in which AWS is responsible for security of the cloud, and the customer is responsible for their security in the cloud. The new AWS Reserve Bank of New Zealand Guidance on Cyber Resilience (RBNZ-GCR) Workbook helps customers align with the RBNZ Guidance on Cyber Resilience by providing control mappings for the following:
Security in the cloud by mapping RBNZ Guidance on Cyber Resilience practices to the five pillars of the AWS Well-Architected Framework.
Security of the cloud by mapping RBNZ Guidance on Cyber Resilience practices to control statements from the AWS Compliance Program.
The downloadable AWS RBNZ-GCR Workbook contains two embedded formats:
Microsoft Excel – Coverage includes AWS responsibility control statements and Well-Architected Framework best practices.
Dynamic HTML – Coverage is the same as in the Microsoft Excel format, with the added feature that the Well-Architected Framework best practices are mapped to AWS Config managed rules and Amazon GuardDuty findings, where available or applicable.
The AWS RBNZ-GCR Workbook is available for download in AWS Artifact, a self-service portal for on-demand access to AWS compliance reports. Sign in to AWS Artifact in the AWS Management Console, or learn more at Getting Started with AWS Artifact.
If you have feedback about this post, submit comments in the Comments section below.
Want more AWS Security how-to content, news, and feature announcements? Follow us on Twitter.
Introducing the Security at the Edge: Core Principles whitepaper
=======================
Amazon Web Services (AWS) recently released the Security at the Edge: Core Principles whitepaper. Today’s business leaders know that it’s critical to ensure that both the security of their environments and the security present in traditional cloud networks are extended to workloads at the edge. The whitepaper provides security executives the foundations for implementing a defense in depth strategy for security at the edge by addressing three areas of edge security:
AWS services at AWS edge locations
How those services and others can be used to implement the best practices outlined in the design principles of the AWS Well-Architected Framework Security Pillar
Additional AWS edge services, which customers can use to help secure their edge environments or expand operations into new, previously unsupported environments
Together, these elements offer core principles for designing a security strategy at the edge, and demonstrate how AWS services can provide a secure environment extending from the core cloud to the edge of the AWS network and out to customer edge devices and endpoints. You can find more information in the Security at the Edge: Core Principles whitepaper.
If you have feedback about this post, submit comments in the Comments section below.
Want more AWS Security how-to content, news, and feature announcements? Follow us on Twitter.
Update the alternate security contact across your AWS accounts for timely security notifications
=======================
Amazon Web Services (AWS) will send you important security notifications from time to time related to your account. From a security perspective, the ability for AWS Security to reach you in a timely manner is important whether you have one AWS account or thousands. These notifications could include alerts from AWS Security for potentially fraudulent activity on your AWS account or other messages from AWS Support and service teams regarding security-related topics associated with AWS account usage. This is why we added the alternate security contact—an additional contact field within AWS accounts that you can use to ensure that the right people are notified at the right time.
Make sure you get these notifications in a timely manner by confirming that the contact details on your accounts—especially the security contacts—are accurate and routed to an email account that is regularly monitored. If you have multiple accounts, several teams might need to be notified in the event of a security issue. This could be the account owner, platform teams, and security teams who need to work together to investigate the issue. Contacting only the primary account holder email isn’t always sufficient, particularly in time-sensitive situations. Larger organizations with decentralized development teams—but with a centralized security or governance function—may need to notify a non-technical primary account holder, who might be a business owner with little insight into the workloads within the account. Using a centralized security contact email address for multiple accounts that points to a shared inbox or a distribution list is typically the best practice. Providing additional contact details so that AWS can alert multiple contacts gives centralized teams a better view of decentralized environments, while also reducing the risk of a bottleneck in communications from AWS.
Note: Although AWS Organizations enables many aspects of account management to be done centrally, notifications typically are performed on a per-account basis. To update your account details across multiple accounts, try the new API for programmatically managing alternate contacts on member accounts with AWS Organizations.
Consider the challenges faced by a central security team for a large, diversified corporation; or for a large government agency with a wide range of sub-agencies, contractors, or resellers running workloads on their behalf. The primary account holder might be several steps removed from the central security team. In these cases, and particularly with contractors or resellers, these groups might not be part of the same AWS Organizations account. Having a single security contact email address in all the relevant AWS accounts gives the central security team a way to be notified of issues in these accounts.
To create better security communications with our customers, AWS has modified our internal systems and practices to send security-related email notifications to both the primary account holder as well as the alternate security contact (if provided). In some cases, what you have entered in the alternate security contact full name field will also be included in this email outreach. You can use the full name field to provide useful context regarding the account to help expedite investigation and remediation by a central security team. As a best practice, don’t include sensitive information in the full name field.
Conclusion
Make sure that the primary and alternate account contact details are set up for the workload owners and any additional teams that need to see security notifications. Pay special attention to accurate information for the security contact because AWS will use that email address for security-related outbound notifications. Centralize those security notifications where appropriate by using a common shared inbox or distribution list across multiple AWS accounts. Account management information can be found at Managing an AWS account. You can use the newly launched account management API for programmatically monitoring and updating as appropriate the alternate contacts on individual accounts or on member accounts with AWS Organizations.
If you have feedback about this post, submit comments in the Comments section below.
Enabling data classification for Amazon RDS database with Macie
=======================
Customers have been asking us about ways to use Amazon Macie data discovery on their Amazon Relational Database Service (Amazon RDS) instances. This post presents how to do so using AWS Database Migration Service (AWS DMS) to extract data from Amazon RDS, store it on Amazon Simple Storage Service (Amazon S3), and then classify the data using Macie. Macie’s resulting findings will also be made available to be queried with Amazon Athena by appropriate teams.
The challenge
Let’s suppose you need to find sensitive data in an RDS-hosted database using Macie, which currently only supports S3 as a data source. Therefore, you will need to extract and store the data from RDS in S3. In addition, you will need an interface for audit teams to audit these findings.
Solution overview
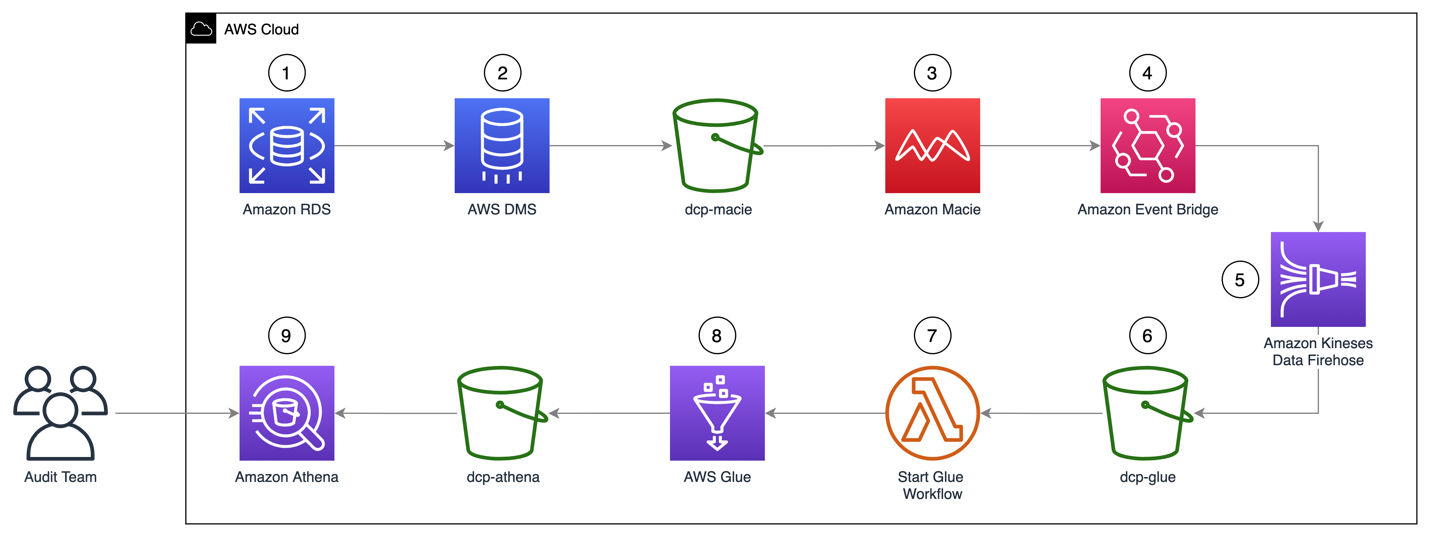
Figure 1: Solution architecture workflow
The architecture of the solution in Figure 1 can be described as:
- A MySQL engine running on RDS is populated with the Sakila sample database.
- A DMS task connects to the Sakila database, transforms the data into a set of Parquet compressed files, and loads them into the dcp-macie bucket.
- A Macie classification job analyzes the objects in the dcp-macie bucket using a combination of techniques such as machine learning and pattern matching to determine whether the objects contain sensitive data and to generate detailed reports on the findings.
- Amazon EventBridge routes the Macie findings reports events to Amazon Kinesis Data Firehose.
- Kinesis Data Firehose stores these reports in the dcp-glue bucket.
- S3 event notification triggers an AWS Lambda function whenever an object is created in the dcp-glue bucket.
- The Lambda function named Start Glue Workflow starts a Glue Workflow.
- Glue Workflow transforms the data from JSONL to Apache Parquet file format and places it in the dcp-athena bucket. This provides better performance during data query and optimized storage usage using a binary optimized columnar storage.
- Athena is used to query and visualize data generated by Macie.
Note: For better readability, the S3 bucket nomenclature omits the suffix containing the AWS Region and AWS account ID used to meet the global uniqueness naming requirement (for example, dcp-athena-us-east-1-123456789012).
The Sakila database schema consists of the following tables:
actor
address
category
city
country
customer
Building the solution
Prerequisites
Before configuring the solution, the AWS Identity and Access Management (IAM) user must have appropriate access granted for the following services:
AWS CloudFormation
AWS IAM
Amazon Virtual Private Cloud (Amazon VPC)
Amazon Elastic Compute Cloud (Amazon EC2)
AWS Key Management Service (AWS KMS)
AWS Secrets Manager
AWS Lambda
Amazon RDS
Amazon S3
AWS DMS
Amazon Macie
Amazon Kinesis Data Firehose
Amazon EventBridge
AWS Glue
Amazon Athena
You can find an IAM policy with the required permissions here.
Step 1 – Deploying the CloudFormation template
You’ll use CloudFormation to provision quickly and consistently the AWS resources illustrated in Figure 1. Through a pre-built template file, it will create the infrastructure using an Infrastructure-as-Code (IaC) approach.
- Download the CloudFormation template.
- Go to the CloudFormation console.
- Select the Stacks option in the left menu.
- Select Create stack and choose With new resources (standard).
- On Step 1 – Specify template, choose Upload a template file, select Choose file, and select the file template.yaml downloaded previously.
- On Step 2 – Specify stack details, enter a name of your preference for Stack name. You might also adjust the parameters as needed, like the parameter CreateRDSServiceRole to create a service role for RDS if it does not exist in the current account.
- On Step 3 – Configure stack options, select Next.
- On Step 4 – Review, check the box for I acknowledge that AWS CloudFormation might create IAM resources with custom names, and then select Create Stack.
- Wait for the stack to show status CREATE_COMPLETE.
Note: It is expected that provisioning will take around 10 minutes to complete.
Step 2 – Running an AWS DMS task
To extract the data from the Amazon RDS instance, you need to run an AWS DMS task. This makes the data available for Amazon Macie in an S3 bucket in Parquet format.
- Go to the AWS DMS console.
- In the left menu, select Database migration tasks.
- Select the task Identifier named rdstos3task.
- Select Actions.
- Select the option Restart/Resume.
When the Status changes to Load Complete the task has finished and you will be able to see migrated data in your target bucket (dcp-macie).
Inside each folder you can see parquet file(s) with names similar to LOAD00000001.parquet. Now you can use Macie to discover if you have sensitive data in your database contents as exported to S3.
Step 3 – Running a classification job with Amazon Macie
Now you need to create a data classification job so you can assess the contents of your S3 bucket. The job you create will run once and evaluate the complete contents of your S3 bucket to determine whether it can identify PII among the data. As mentioned earlier, this job only uses the managed identifiers available with Macie – you could also add your own custom identifiers.
- Go to the Macie console.
- Select the S3 buckets option in the left menu.
Choose the S3 bucket dcp-macie containing the output data from the DMS task. You may need to wait a minute and select the Refresh icon if the bucket names do not display.
- Select Create job.
- Select Next to continue.
- Create a job with the following scope.
- Sensitive data Discovery options: One-time job
- Sampling Depth: 100%
- Leave all other settings with their default values
- Select Next to continue.
- Select Next again to skip past the Custom data identifiers section.
- Give the job a name and description.
- Select Next to continue.
- Verify the details of the job you have created and select Submit to continue.
You will see a green banner stating that The Job was successfully created. The job can take up to 15 minutes to conclude and the Status will change from Active to Complete. To open the findings from the job, select the job’s check box, choose Show results, and select Show findings.
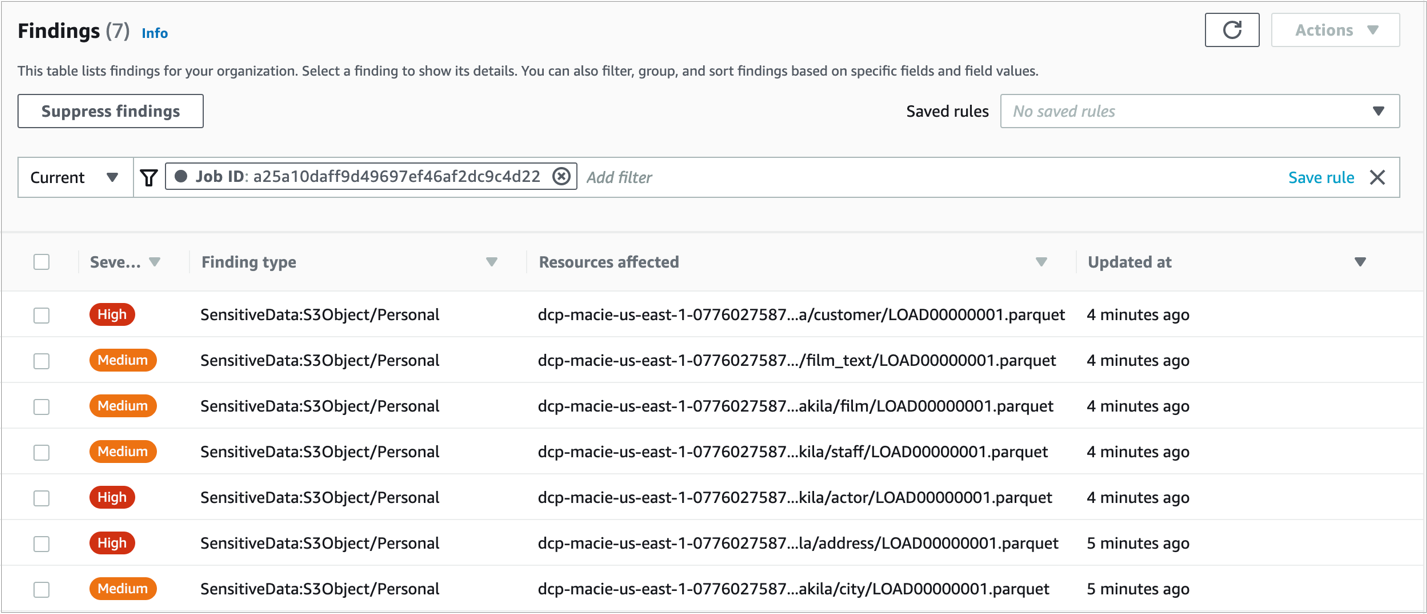
Figure 2: Macie Findings screen
Note: You can navigate in the findings and select each checkbox to see the details.
Step 4 – Enabling querying on classification job results with Amazon Athena
- Go to the Athena console and open the Query editor.
- If it’s your first-time using Athena you will see a message Before you run your first query, you need to set up a query result location in Amazon S3. Learn more. Select the link presented with this message.
- In the Settings window, choose Select and then choose the bucket dcp-assets to store the Athena query results.
- (Optional) To store the query results encrypted, check the box for Encrypt query results and select your preferred encryption type. To learn more about Amazon S3 encryption types, see Protecting data using encryption.
- Select Save.
Step 5 – Query Amazon Macie results with Amazon Athena.
It might take a few minutes for the data to complete the flow between Amazon Macie and AWS Glue. After it’s finished, you’ll be able to see in Athena’s console the table dcp_athena within the database dcp.
Then, select the three dots next to the table dcp_athena and select the Preview table option to see a data preview, or run your own custom queries.
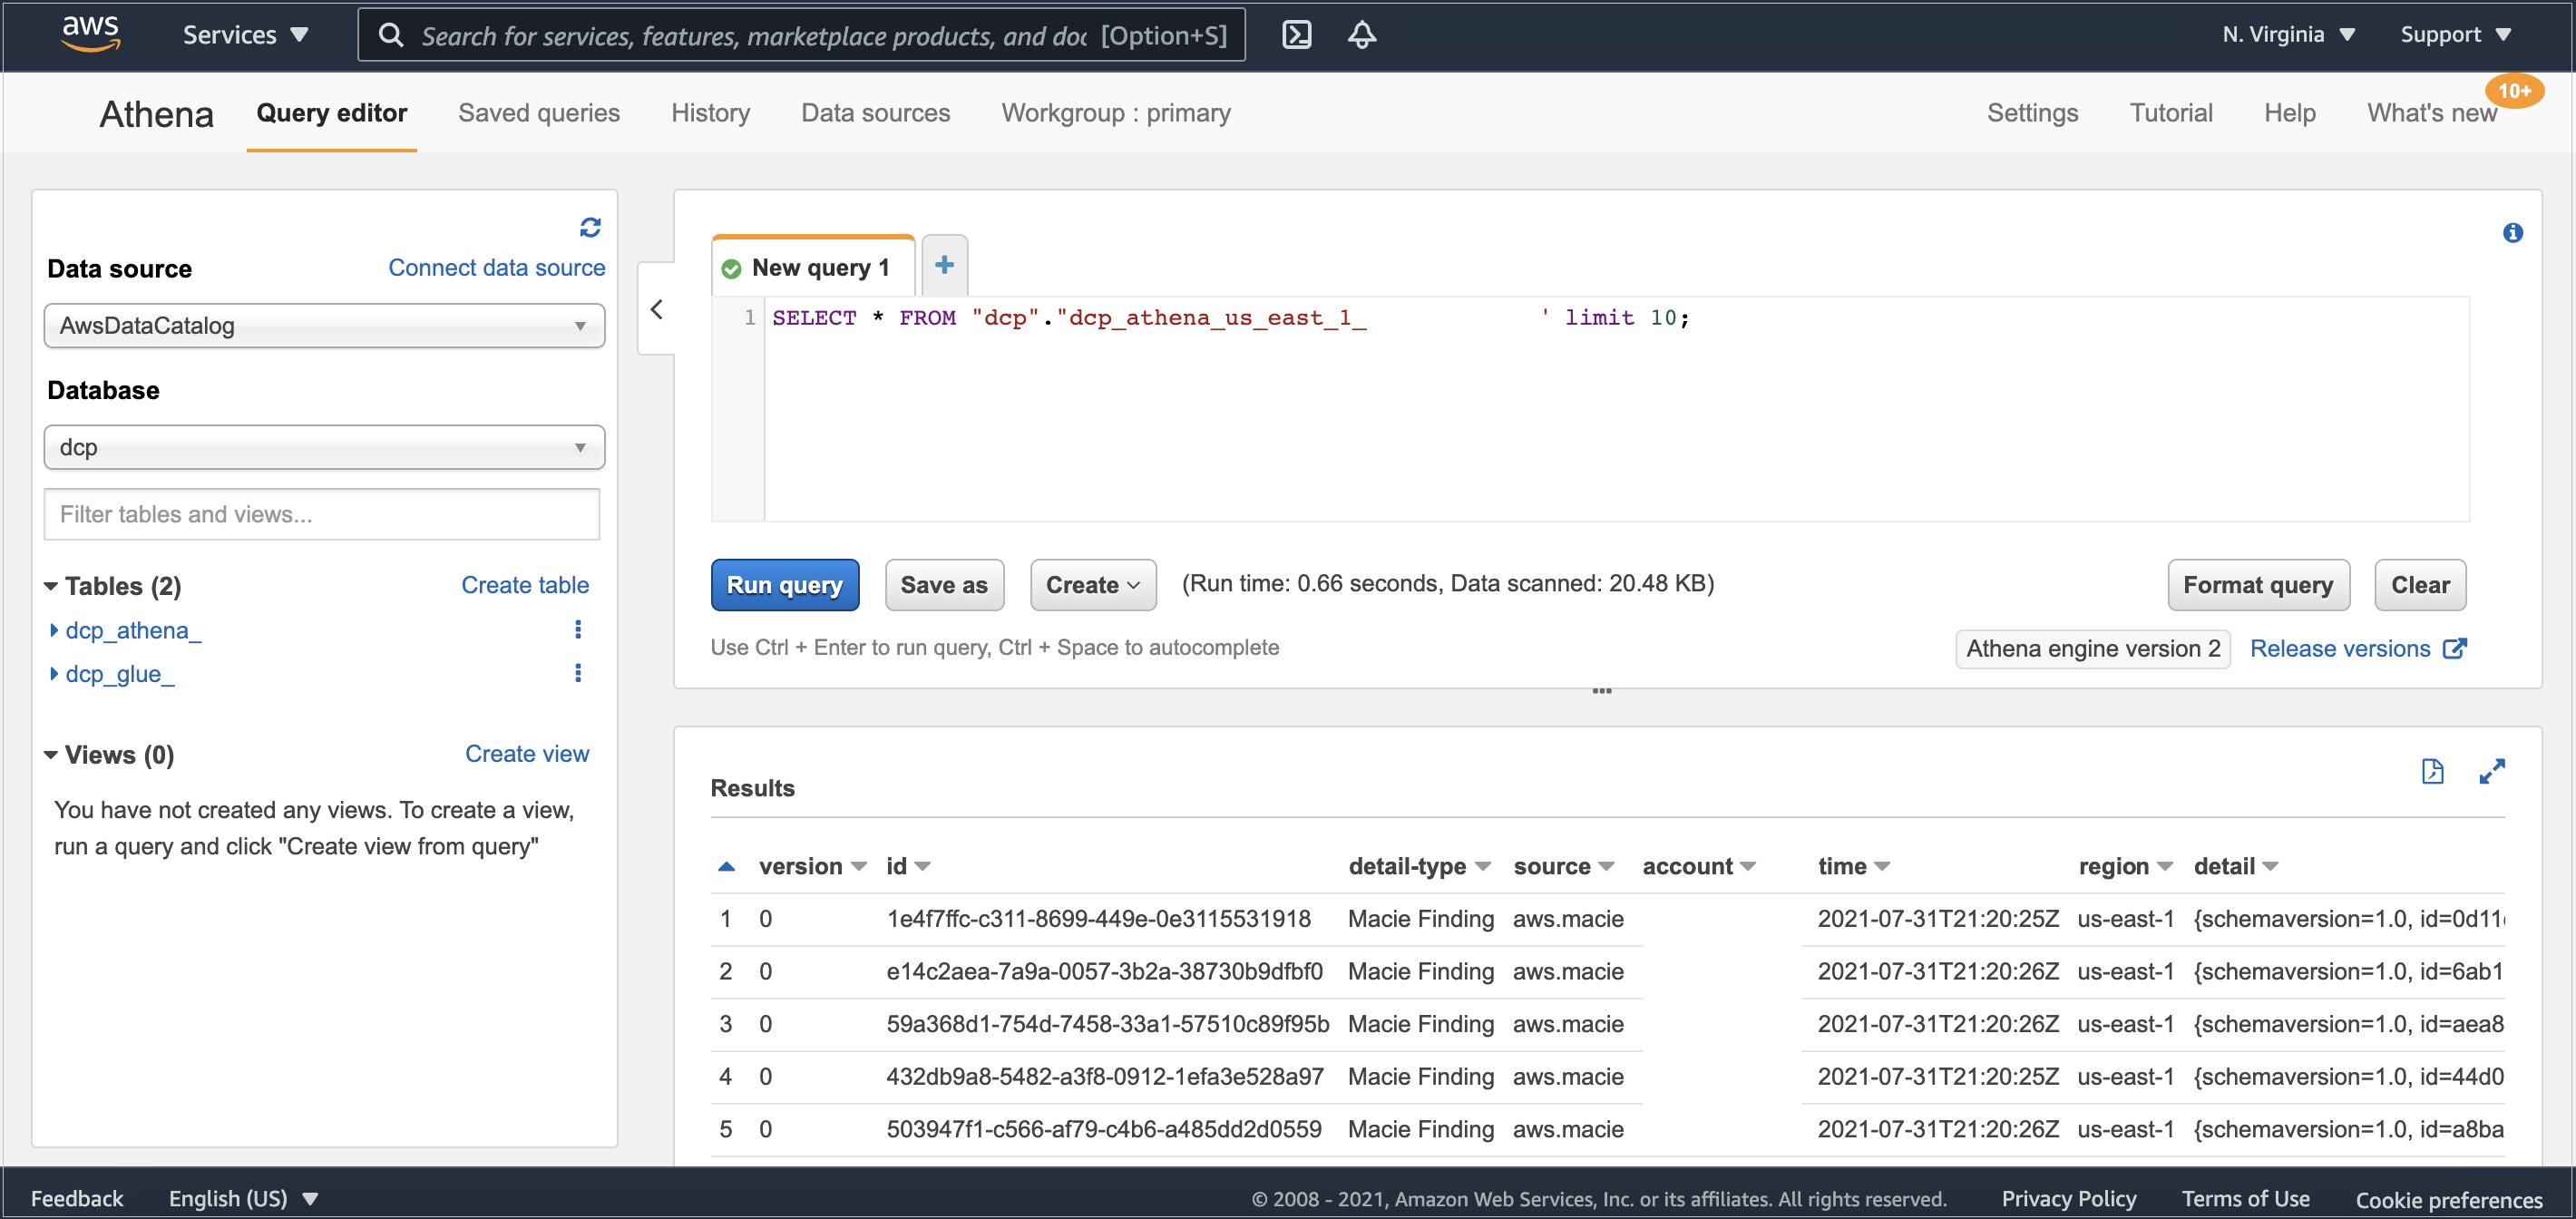
Figure 3: Athena table preview
As your environment grows, this blog post on Top 10 Performance Tuning Tips for Amazon Athena can help you apply partitioning of data and consolidate your data into larger files if needed.
Clean up
After you finish, to clean up the solution and avoid unnecessary expenses, complete the following steps:
- Go to the Amazon S3 console.
- Navigate to each of the buckets listed below and delete all its objects:
- dcp-assets
- dcp-athena
- dcp-glue
- dcp-macie
- Go to the CloudFormation console.
- Select the Stacks option in the left menu.
- Choose the stack you created in Step 1 – Deploying the CloudFormation template.
- Select Delete and then select Delete Stack in the pop-up window.
Conclusion
In this blog post, we show how you can find personally identifiable information (PII), and other data defined as sensitive, in Macie’s Managed Data Identifiers in an RDS-hosted MySQL database. You can use this solution with other relational databases like PostgreSQL, SQL Server, or Oracle, whether hosted on RDS or EC2. If you’re using Amazon DynamoDB, you may also find useful the blog post Detecting sensitive data in DynamoDB with Macie.
By classifying your data, you can inform your management of appropriate data protection and handling controls for the use of that data.
If you have feedback about this post, submit comments in the Comments section below.
Want more AWS Security how-to content, news, and feature announcements? Follow us on Twitter.
How to set up a two-way integration between AWS Security Hub and Jira Service Management
=======================
If you use both AWS Security Hub and Jira Service Management, you can use the new AWS Service Management Connector for Jira Service Management to create an automated, bidirectional integration between these two products that keeps your Security Hub findings and Jira issues in sync. In this blog post, I’ll show you how to set up this integration.
As a Jira administrator, you’ll then be able to create Jira issues from Security Hub findings automatically, and when you update those issues in Jira, the changes are automatically replicated back into the original Security Hub findings. For example, if you resolve an issue in Jira, the workflow status of the finding in Security Hub will also be resolved. This way, Security Hub always has up-to-date status about your security posture.
Watch a demonstration of the integration.
Prerequisites
To complete this walkthrough, you’ll need a Jira instance with the connector configured. For more information on how to set this up, see AWS Service Management Connector for Jira Service Management in the AWS Service Catalog Administrator Guide. At the moment, this connector can be used with Atlassian Data Center.
On the AWS side, you need Security Hub enabled in your AWS account. For more information, see Enabling Security Hub manually.
This walkthrough uses an AWS CloudFormation template to create the necessary AWS resources for this integration. In this template, I use the AWS Region us-east-1, but you can use any of the supported Regions for Security Hub.
Deploy the solution
In this solution, you will first deploy an AWS CloudFormation stack that sets up the necessary AWS resources that are needed to set up the integration in Jira.
To download and run the CloudFormation template
- Download the sample template for this walkthrough.
- In the AWS CloudFormation console, choose Create stack, choose With new resources (standard), and then select Template is ready.
- For Specify template, choose Upload a template file and select the template that you downloaded in step 1.
To create the CloudFormation stack
- In the CloudFormation console, choose Specify stack details, and enter a Stack name (in the example, I named mine SecurityHub-Jira-Integration).
- Keep the other default values as shown in Figure 1, and then choose Next.

Figure 1: Creating a CloudFormation stack
- On the Configure stack options page, choose Next.
- On the Review page, select the check box I acknowledge that AWS CloudFormation might create IAM resources with custom names. (Optional) If you would like more information about this acknowledgement, choose Learn more.
- Choose Create stack.

Figure 2: Acknowledge creation of IAM resources
- After the CloudFormation stack status is CREATE_COMPLETE, you can see the list of resources that are created, as shown in Figure 3.

Figure 3: Resources created from the CloudFormation template
Next, you’ll integrate Jira with Security Hub.
To integrate Jira with Security Hub
- In the Jira dashboard, choose the gear icon to open the JIRA ADMINISTRATION menu, and then choose Manage apps.

Figure 4: Jira Manage apps
- On the Administration screen, under AWS SERVICE MANAGEMENT CONNECTOR in the left navigation menu, choose AWS accounts.

Figure 5: Choose AWS accounts
- Choose Connect new account to open a page where you can configure Jira to access an AWS account.

Figure 6: Connect new account
- Enter values for the account alias and user credentials. For the account alias, I’ve named my account SHJiraIntegrationAccount. In the SecurityHub-Jira-Integration CloudFormation stack that you created previously, see the Outputs section to get the values for SCSyncUserAccessKey, SCSyncUserSecretAccessKey, SCEndUserAccessKey, and SCEndUserSecretAccessKey, as shown in Figure 7.

Figure 7: CloudFormation Outputs details
Important: Because this is an example walkthrough, I show the access key and secret key generated as CloudFormation outputs. However, if you’re using the AWS Service Management Connector for Jira in a production workload, see How do I create an AWS access key? to understand the connectivity and to create the access key and secret key for users. Visit that link to create an IAM user and access key. For the permissions that are required for the IAM user, you can review the permissions and policies outlined in the template.
- In Jira, on the Connect new account page, enter all the values from the CloudFormation Outputs that you saw in step 4, and choose the Region you used to launch your CloudFormation resources. I chose the Region US East (N.Virginia)/us-east-1.
- Choose Connect, and you should see a success message for the test connection. You can also choose Test connectivity after connecting the account, as shown in figure 8.

Figure 8: Test connectivity
The connector is preconfigured to automatically create Jira incidents for Security Hub findings. The findings will have the same information in both the AWS Security Hub console and the Jira console.
Test the integration
Finally, you can test the integration between Security Hub and Jira Service Management.
To test the integration
- For this walkthrough, I’ve created a new project from the Projects console in Jira. If you have an existing project, you can link the AWS account to the project.
- In the left navigation menu, under AWS SERVICE MANAGEMENT CONNECTOR, choose Connector settings.
- On the AWS Service Management Connector settings page, under Projects enabled for Connector, choose Add Jira project, and select the project you want to connect to the AWS account.

Figure 9: Add the Jira project
- On the same page, under OpsCenter Configuration, choose the project to associate with the AWS accounts. Under Security Hub Configuration, associate the Jira project with the AWS account. Choose Save after you’ve configured the project.
- On the AWS accounts page, choose Sync now.

Figure 10: Sync now
- In the top pane, under Issues, choose Search for issues.
- Choose the project that you added in step 3. You will see a screen like the one shown in Figure 11.
To further filter just the Security Hub findings, you can also choose AWS Security Hub Finding under Type.

Figure 11: A Security Hub finding in the Jira console
- You can review the same finding from Security Hub in the AWS console, as shown in Figure 12, to verify that it’s the same as the finding you saw in step 7.

Figure 12: A Security Hub finding in the AWS console
- On the Jira page for the Security Hub finding (the same page discussed in step 7), you can update the workflow status to Notified, after which the issue status changes to NOTIFIED, as shown in Figure 13.

Figure 13: Update the finding status to NOTIFIED

Figure 14: The Security Hub finding workflow updated to NOTIFIED
- You can now fix the issue from the Security Hub console. When you resolve the finding from Security Hub, it will also show up as resolved in the Jira console.
- (Optional) In the AWS Service Management Connector in the Jira console, you can configure several settings, such as Sync Interval, SQS Queue Name, and Number of messages to pull from SQS, as shown in Figure 15. You can also synchronize Security Hub findings according to their Severity value.

Figure 15: Jira settings for Security Hub
Conclusion
In this blog post, I showed you how to set up the new two-way integration of AWS Security Hub and Jira by using the AWS Service Management Connector for Jira Service Management. To learn more about Jira’s integration with Security Hub, watch the video AWS Security Hub – Bidirectional integration with Jira Service Management Center, and see AWS Service Management Connector for Jira Service Management in the AWS Service Catalog Administrator Guide. To download the free AWS Service Management Connector for Jira, see the Atlassian Marketplace. If you have additional questions, you can post them to the AWS Security Hub forum.
If you have feedback about this post, submit comments in the Comments section below.
Want more AWS Security how-to content, news, and feature announcements? Follow us on Twitter.
Page 1|Page 2|Page 3|Page 4