Contents of this page is copied directly from AWS blog sites to make it Kindle friendly. Some styles & sections from these pages are removed to render this properly in 'Article Mode' of Kindle e-Reader browser. All the contents of this page is property of AWS.
Page 1|Page 2|Page 3|Page 4
Accelerate Modernization of Legacy Applications Using Wipro CNAP and Amazon EKS
=======================
By Hari Gautham Somasundaram, Product Manager – Wipro
By Senaka Ariyasinghe, Sr. Partner Solutions Architect – AWS
By Manoj Balaji Alaghappan, Sr. Technical Account Manager – AWS
 |
| Wipro |
 |
Over the past decade, many organizations have embraced the cloud economy. Organizations are looking beyond mere economics and leveraging cloud-native capabilities to instill stability, scalability, and speed for their applications.
Cloud is now the de-facto environment for modern applications; hence, organizations are contemplating the best strategy for modernizing their legacy application workloads from on-premises systems to the cloud.
Budget and time constraints, along with shifting workplace dynamics and lack of skilled developers, prevent many companies from taking the leap in modernizing their legacy applications.
Wipro, an AWS Premier Consulting Partner and Managed Service Provider (MSP) with rich global experience, takes a step forward to address these challenges and deliver cloud transformation at scale with the Cloud Native Acceleration Platform (CNAP).
CNAP provides self-service and enhanced developer experience to help build both greenfield cloud-native applications and modernize legacy applications. CNAP also leverages extensive automation to transform application development, containerization, deployment, and management on Amazon Elastic Kubernetes Service (Amazon EKS) or self-managed Kubernetes (K8s) on the AWS Cloud or on-premises.
In this post, we explain what CNAP is and explore its architecture. We’ll also walk through how CNAP helps customers modernize their legacy .NET MVC application to .NET Core, along with other relevant business use cases.
What is CNAP?
CNAP offers a fully orchestrated cloud-native development platform which is cloud-agnostic. It’s built on managed Kubernetes such as Amazon EKS or self-managed K8s, open-source technologies, and Wipro accelerators to provide self-service to developers.
Essentially a containerization-as-a-service platform, CNAP empowers developers to control the entire application modernization lifecycle without having to rely too much on ops teams.
The platform is packed with features like automated code generation and code assessment tools, code convertors, pre-configured DevOps pipelines, automated deployment workflows, seamless monitoring of applications, and all of the power that K8s has to offer.
The solution offers containerization, using open source and managed versions of cloud-native build packs to help customers containerize apps at scale.
CNAP benefits include:
Quick transformation: Implementation lead times reduced from 6-9 months to 3-4 weeks for production-grade K8s.
Accelerated development: 30-40% reduction in efforts leveraging curated development frameworks and extensive automation.
Reduced time to market: CNAP increases minimum viable product(MVP) release velocity with multiple accelerators.
Solution Architecture
CNAP consists of five distinct architecture layers: infrastructure, platform, technology, orchestration, and service.
Infrastructure layer: CNAP is built to deploy application workloads on both hybrid and multi-cloud scenarios.
Platform layer: A user can try deploying workloads on multiple K8s environments in real-time and choose the best service before buying yearly licenses. CNAP helps a developer to create and manage clusters in real-time on any of the managed Kubernetes service providers in the market including Amazon EKS.
Technology layer: CNAP is an orchestration of opinionated toolsets with multiple managed service providers, open source tools, and in-house modules built for specific use cases. The platform is compatible with a wide range of CNCF tools.
CNAP Orchestration layer:
Unified Access Management – CNAP is customizable with any of the existing organizational access management protocols such as Lightweight Directory Access Protocol (LDAP) and multi-factor authentication (MFA).
Account and user management – CNAP is compatible with the role-based access control (RBAC) mechanism of AWS with a defined workspace.
Metering and governance – CNAP provides a pay-per-use model for consumption of resources through the platform. A consolidated view of the project consumption costs is provided for the user.
Service Layer: This defines the delivery of Wipro managed services through trained FTEs. The Wipro managed services include application development and maintenance services, consulting services, and innovation services specially curated to address customer requirements.
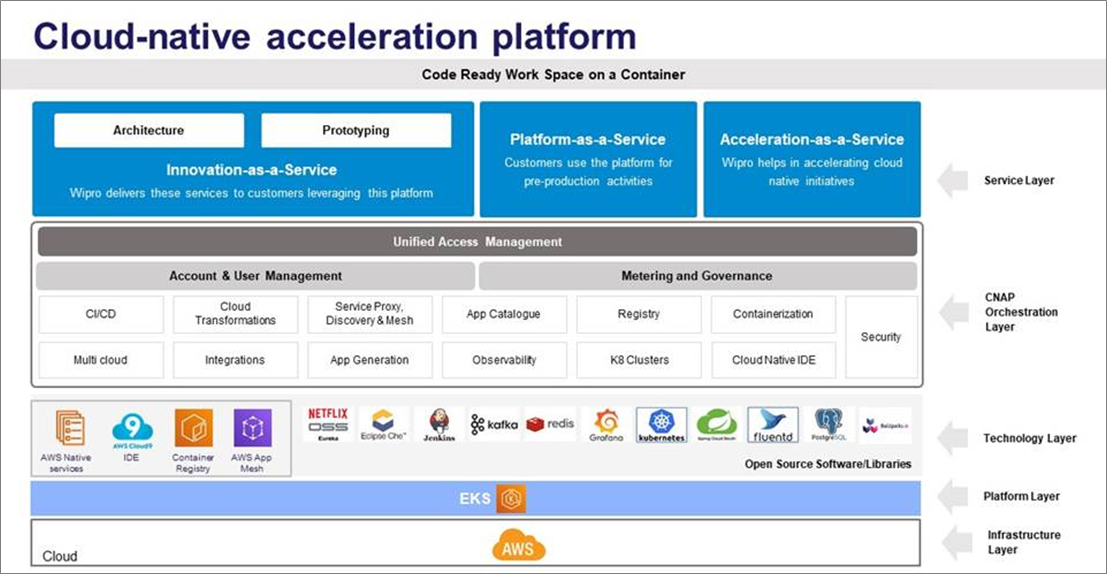
Figure 1 – CNAP architecture layers.
Modernizing a Legacy .NET MVC Application to .NET Core
CNAP provides built-in accelerators for different types of modernization projects. Following is a short walkthrough on the steps needed to modernize a .NET application running on-premises and host it on Amazon EKS clusters.

Figure 2 – CNAP .NET app modernization workflow.
Step 0: Create Project
A developer starts by creating a project with the appropriate modernization type and selecting the technology in which the application code is written. To modernize a MVC .NET application, a project is created with LEGACYMVCDOTNET as the type.
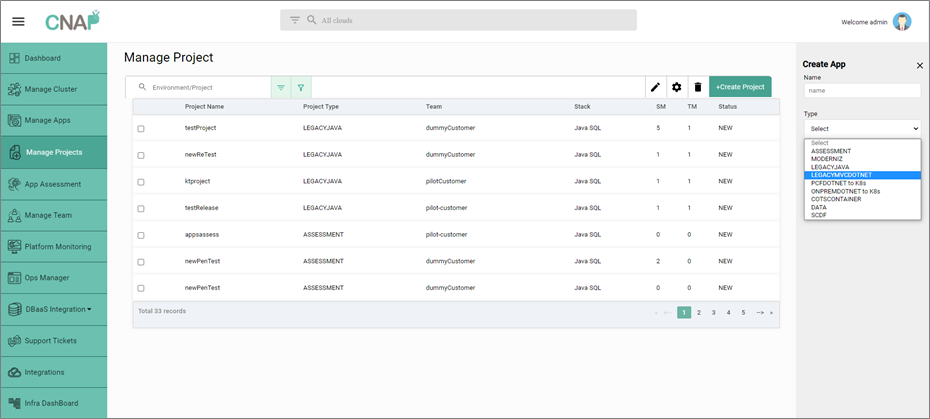
Figure 3 – Create new modernization project on CNAP.
Step 1: BYO Legacy Code
In this step, the customer brings their own legacy code to modernize.
- CNAP accepts Git URL as an input to access the legacy MVC .NET code.
- CNAP onboards the application code on the existing cloud-native integrated development environment (IDE) for the developers to access the code.
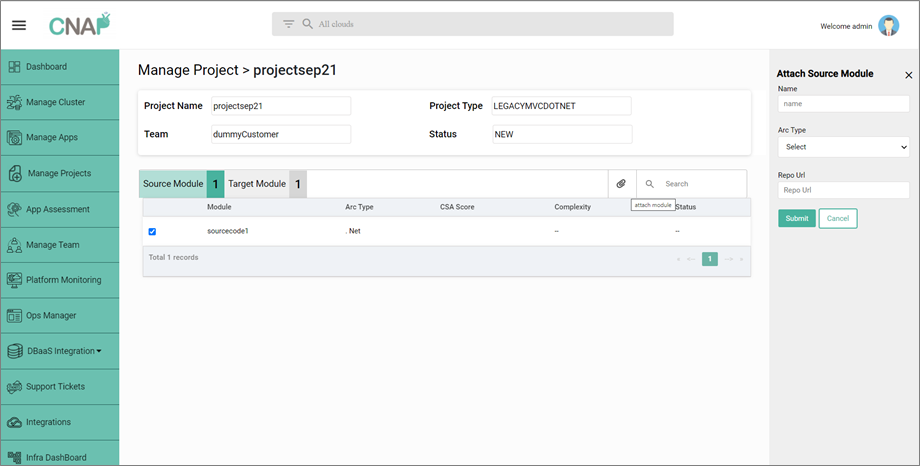
Figure 4 – Create new source module to onboard legacy application code.
Step 2: Modernize Legacy Code
In this step, CNAP provides the capability to automatically or manually convert your legacy .NET MVC to .NET Core.
- Perform cloud-native assessment, which provides cloud suitability of application code through a scoring mechanism. It also provides a view on manual efforts required to be spent, and high-level recommendations on the modernization approach.
- Based on recommendations, developers can incorporate manual code enhancements using the native IDE.
- Trigger .NET code converter which converts MVC to .NET Core into to a target Git repository. Developers can continue to develop their application via the native IDE.
Step 3: Deploy Modernized Code
In this step, CNAP provides an automated deployment pipeline to deploy the modernized application on Amazon EKS.
- Automatically trigger deployment pipeline via Jenkins and run preconfigured unit tests (configurable).
- An application image is built using cloud-native build packs, which consumes the app source code as the single source of truth and pushes your container images to Amazon Elastic Container Registry (Amazon ECR) as part of your pipeline.
- Deploy your modernized application containers to Amazon EKS or an Amazon EKS Anywhere cluster configured by the user.
- Start monitoring the underlying infrastructure and application workloads from the CNAP user interface (UI).
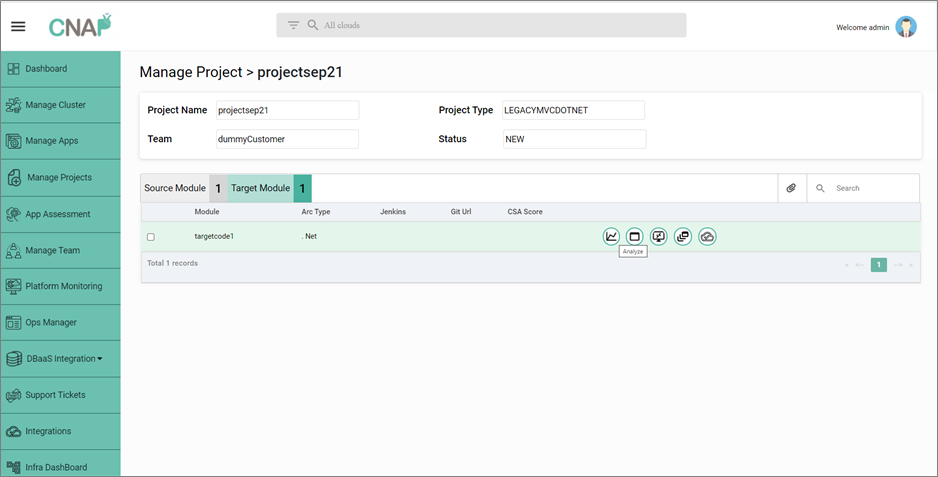
Figure 5 – Create new target module to modernize the source module and initiate deployment.
What Other Use Cases Can CNAP Address?
We’ve covered how CNAP can be used to modernize legacy applications. In addition, CNAP can help other business use cases such as:
Greenfield Development
CNAP offers a development environment with extensive automation intended to reduce distractions for a developer due to pre/post development activities. The platform provides pre-built boilerplate templates to generate a microservice. The templates are customized to precisely address the needs of a particular development project.
The platform also provides access to cloud-native IDEs for any required manual interventions. Post development, the developer is provided with an automated deployment pipeline which containerizes the application source code and deploys it on the target cluster by a single trigger.
Containerization of Applications
The CNAP engineering team understands the importance of cloud-native build packs over traditional containerization methods such as Docker containers. The platform provides access to both managed and open source build packs for containerization.
Based on the preference of the end user, the automated deployment pipeline is built on the required service.
COTS Containerization
Usage of commercial off-the-shelf (COTS) products has been increasing since the last decade. As a part of cloud migration, organizations are trying to move their COTS products as-is to cloud. CNAP can be used to facilitate the migration by jointly working with the service provider.
Mainframe Modernization
A big-bang mainframe exit poses significant concerns, especially in the financial services, insurance, and retail sectors where these complex applications serve core business capabilities. CNAP utilizes Wipro developed ModerniZ on AWS software, which assists developers with runtime analysis, UI upgrades, and database modernization when moving from mainframe to cloud-native architectures on AWS
Conclusion
Many organizations are focused on building cloud-native applications and modernizing legacy workloads to increase business velocity and reduce costs. Kubernetes, with its underlying complexity, can make the cloud-native migration even tougher.
Wipro’s Cloud Native Acceleration Platform (CNAP) provides the ideal platform to start the modernization journey with built-in accelerators and open source tool integration to simplify the process and help organizations transform apps and deploy on Amazon EKS at scale.
To learn how CNAP can help modernize your legacy applications and deploy on Amazon EKS, contact Wipro at info@wipro.com.
.

.
Wipro – AWS Partner Spotlight
Wipro is an AWS Premier Consulting Partner and MSP that harnesses the power of cognitive computing, hyper-automation, robotics, cloud, analytics, and emerging technologies to help clients adapt to the digital world.
Contact Wipro | Partner Overview
*Already worked with Wipro? Rate the Partner
*To review an AWS Partner, you must be a customer that has worked with them directly on a project.
Say Hello to 125 New AWS Competency, Service Delivery, Service Ready, and MSP Partners Added in November
=======================
 The AWS Partner Network (APN) is the global community of partners who leverage Amazon Web Services (AWS) to build solutions and services for customers.
We enable AWS Partners to build, market, and sell their AWS offerings, and we help customers identify AWS Partners uniquely positioned to help businesses accelerate their journey to the cloud.
There are tens of thousands of AWS Partners across the globe. More than 90% of Fortune 100 companies and the majority of Fortune 500 companies utilize AWS Partner solutions and services.
To receive APN program designations such as AWS Competency, AWS Service Delivery, AWS Service Ready, and AWS Managed Services Provider (MSP), organizations must undergo rigorous technical validation and assessment of their AWS solutions and practices.
NEW! AWS Competency Partners
To succeed with cloud adoption in today’s complex IT environment, and to continue to advance in the future, team up with an AWS Competency Partner!
The AWS Competency Program is designed to identify, validate, and promote AWS Partners with demonstrated AWS technical expertise and proven customer success in specialized areas across industries, use cases, and workloads. Guidance from these skilled professionals can lead to better business and bigger results.

Introducing our newest AWS Competency Partners:
ChaosSearch | NAMER
Exasol | EMEA
N-iX | EMEA
Caylent | NAMER
47Lining, a Hitachi Vantara Company | NAMER
Accenture | NAMER
Ambyint | NAMER
AspenTech | NAMER
Business Technology Consulting (BTC) | EMEA
Cloudreach | EMEA
Contino | EMEA
EnergySys | EMEA
EPAM Systems | NAMER
Escala24x7 | LATAM
Flutura Business Solutions | NAMER
Fugro | EMEA
IBM | NAMER
Interactive Network Technologies (INT) | NAMER
KBR | NAMER
Landmark | NAMER
Larsen and Toubro Infotech (LTI) | NAMER
Minfy Technologies | APAC
NVIDIA | NAMER
Pariveda Solutions | NAMER
QRI | NAMER
Reply | EMEA
Seeq Corporation | NAMER
Slalom | NAMER
SoftServe | NAMER
SOPTIM | EMEA
TDE Group | EMEA
TensorIoT | NAMER
Unleash | APAC
Validere | NAMER
Vyntelligence | EMEA
WellAware | NAMER
Cloud Comrade | APAC
Cartegraph | NAMER
Hugging Face | NAMER
Capgemini | EMEA
Comunet | APAC
Hangzhou Qineasy Technology | China
High Cloud | China
Smile Shark | APAC
Xiamen Hanwei Software Technology | China
AveriSource | NAMER
Cast Software | EMEA
CloudHedge | APAC
Cloudsphere | NAMER
Cloudwiry | NAMER
Matilda | NAMER
Transitional Data Services (TDS) | NAMER
Arinet Tech | NAMER
Cartegraph | NAMER
Bluesoft Sistemas | LATAM
Treasure Data | NAMER
Atos | EMEA
Almaviva | EMEA
Aviatrix Systems | NAMER
Nextlink Technology | China
Snyk | NAMER
Coforge | APAC
NEW! AWS Service Delivery Partners
The AWS Service Delivery Program validates AWS Partners that have a deep understanding of AWS services, demonstrated experience, and proven customer success in delivering these services to customers.
They are technically validated for having experience delivering and providing consultancy on specific AWS services to our customers. To receive this designation, AWS Partners must undergo service-specific technical validation by AWS Partner Solutions Architects, including review of architecture, customer documentation, and customer case study details to ensure they follow AWS best practices for each AWS service.
Introducing our newest AWS Service Delivery Partners:
Metal Toad | NAMER
Nuage It’s Everywhere | LATAM
Quantori | NAMER
Open | EMEA
Daugherty Business Solutions | NAMER
Hostersi | EMEA
Nuage It’s Everywhere | LATAM
NuriCloud | APAC
Rapyder Cloud Solution | APAC
CJG Consultores | LATAM
Nuage It’s Everywhere | LATAM
Solvimm | LATAM
Acumen Solutions | NAMER
Local Measure | APAC
Mobilise | EMEA
T-Systems International | EMEA
Larsen and Toubro Infotech (LTI) | NAMER
Sinnet Cloud Valley Technology | China
Tigo Business | LATAM
Cloud4C Services | APAC
Dedalus | LATAM
Flentas Technologies | APAC
Honne Services | LATAM
IVCISA | LATAM
Servicios Especializados de Tecnologia e informatica | LATAM
Solvimm | LATAM
Commerce Architects | NAMER
NTT DATA Deutschland | EMEA
Nuage It’s Everywhere | LATAM
Simform | NAMER
Green Custard | EMEA
ITTStar Consulting | NAMER
BSP Cloud | LATAM
Compucloud | LATAM
Triumph Technology Solutions | NAMER
Cloud.in – Hostin Services | APAC
NEW! AWS Service Ready Products
The AWS Service Ready Program validates products built by AWS Partners that work with specific AWS services.
To receive this designation, AWS Partners must undergo service-specific technical validation by AWS Partner Solutions Architects, including review of architecture, customer documentation, and customer case study details to ensure they follow AWS best practices for integrating their products with specific AWS services.

Say hello to our newest AWS Service Ready Partners:
Aqua Security | NAMER
Aviatrix Systems | NAMER
Buildkite | APAC
Canonical | EMEA
CircleCI | NAMER
Cribl | NAMER
Datadog | NAMER
Docker | NAMER
Dynatrace | NAMER
Elastic | NAMER
Genymobile | EMEA
GitLab | NAMER
Granulate | EMEA
Honeycomb | NAMER
InterSystems | NAMER
Lacework | NAMER
New Relic | NAMER
Qualys | NAMER
Red Hat | NAMER
Starburst | NAMER
SUSE | EMEA
Tenable | NAMER
Trend Micro | NAMER
ZOHO Corporation | APAC
SUSE | EMEA
Couchbase | NAMER
Talend | NAMER
NEW! AWS Managed Service Providers (MSPs)
The AWS Managed Service Provider (MSP) Program recognizes leading AWS Consulting Partners that are highly skilled at providing full lifecycle solutions to customers.
To receive this designation, AWS MSP Partners must undergo and pass an extensive third-party validation audit to demonstrate next-generation managed service practices.
Next-gen AWS MSPs provide guidance through the entire customer engagement lifecycle: plan/design >> build/migrate >> run >> optimize. AWS customers have increased confidence when working with AWS MSP Partners.
Introducing our newest AWS MSP Partners:
Effectual | NAMER
How AWS Partners Can Differentiate Their Business with APN Navigate
If you’re already an AWS Partner, APN Navigate provides you with a prescriptive path to building a specialized practice.
APN Navigate offers AWS Partners the guidance to become AWS experts and deploy innovative solutions. Each track includes foundational and specialized e-learnings, advanced tools and resources, and clear calls to action for both business and technical tracks.
Get started today with APN Navigate >>
Developing a Serverless, Fully-Managed Connected Vehicle Platform with Real-Time Analytics on AWS
=======================
By Sanchit Jain, Lead Solution Architect, AWS – Quantiphi
 |
| Quantiphi |
 |
In a recent customer engagement, Quantiphi developed a serverless, fully-managed connected vehicle platform that enabled real-time analytics on telematics data for one of the world’s leading car-as-a-service companies.
This organization has 1.8 million vehicles spread across 30 countries and specializes in automobile leasing and fleet management. The proposed solution saved 50% of the monthly costs and resulted in 70% of the production release for the client.
In this post, we’ll understand the significance of Internet of Things (IoT)-based telematics solutions in transforming the fleet management industry.
I will also highlight the critical aspects of Quantiphi’s serverless, fully-managed connected vehicle solution built on Amazon Web Services (AWS) and describe how it helped a U.S.-based fleet management organization make better decisions and improve customer and asset service.
Quantiphi is an AWS Competency Partner and leading artificial intelligence-first company driven by the desire to solve transformational problems at the heart of the business.
What is Telematics Data and Connected Vehicle Technology?
Innovation in the automotive industry has resulted in vehicles evolving into even more powerful manifestations of the internet. Connected vehicle technology promises a potential for a reduction in speeding, improvement in fuel economy, and reduction in accidents of vehicles.
In a novice way, any vehicle or car which can connect to the internet is called a “connected vehicle.” Normally, such vehicles connect to the internet via Wireless Local Area Network (WLAN).
A connected vehicle can also receive the internet with devices inside and outside the car, and at the same time can also share data with any external device or services.
Fleet managers shifted their gear to connected vehicle technologies in the early 2010s partly because telematics data can help them remotely monitor every aspect of driver and vehicle behaviors.
Maintenance schedules and mechanical repairs can also integrate into telematics systems to minimize vehicle downtime and reduce instances of mechanical failure. This results in savings on lifetime vehicle repair costs, tow bills, and driver downtime.
A telematics system is only valuable, however, if fleet owners can identify and act on issues as they emerge in real-time to make decisions at the right time. This is not possible in the current setup which lacks real-time insight and notifications.
Connected Vehicle Platform Solution on AWS
Quantiphi’s client had an existing platform that ran on-premises in a rudimental way and was built using the monolithic framework, leading to the some pain points:
No real-time analytics due to lack of on-demand scalability, in terms of storage and compute power, and the existing support capability to summarize the data in a weekly batch mode.
Lack of dynamic scalability because existing systems fail to provide elasticity in terms of storage and compute, which makes the existing solution cost infective.
Difficult troubleshooting because the system was designed using monolithic patterns and fails to provide the capability to isolate issues and troubleshoot the problem.
Quantiphi developed a novel solution to set up a connected vehicle platform that adjusted to the client’s existing on-premises setup and design using AWS-native services.
The connected vehicle platform answers queries on a vehicle and driver behavior such as:
Has the vehicle fastened safety belts while en route?
Has the vehicle reached the maximum speed limit?
Is the driver idling or hard braking?
Where is the vehicle?
What is the battery life percent?
Understanding the driver’s behavior from raw telematics data was a key focus for Quantiphi, as it offers extensive data points to the client to efficiently identify and improve the field workforce’s driving skills and safety.
There are several benefits to utilizing driver telematics data, including:
Improved safety: Drivers can instantly recognize risky driving practices and modify their practices to enhance their on-road performance.
Better insurance pricing: Fleets use telematics data to help facilitate usage-based insurance programs by following vehicle driving data. These programs offer better incentives and lower prices to fleets who adopt safer driving habits or reduce their mileage.
Better claims ratios and fraud detection: With the aid of telematics data, fleets claims ratios can be improved and claims costs reduced.
Vehicle tracking: Telematics data includes GPS data, which is used to locate fleet vehicles. It’s often used to reroute vehicles, as well as to assist drivers in discovering the economical routes.
Maintenance improvements: Telematics data assists in predictive maintenance, meaning fleets can maintain and repair issues with less downtime.
Connected Vehicle Platform Overview
Quantiphi devised a serverless and fully managed pull-push mechanism to fetch raw data and ingest processed data to Amazon Redshift, a cloud data warehouse system, to provide analytics and visualization capabilities around the telematics data with the best price-performance at any scale.

Figure 1 – Solution overview.
Data Collection
AWS Lambda is leveraged to pull raw telematics data seamlessly from Internet of Things (IoT) devices installed in the fleet to AWS in real-time.
With every pull, a pagination token is captured and stored in Amazon DynamoDB. In case of any temporary platform failure, the Lambda function always pulls data from the token’s last read point, resulting in no real-time data loss.
Data Pre-Processing and Data Storage
Telematics data is extracted from IoT devices and buffered into Amazon Kinesis Data Firehose, containing diagnostic-level data such as oil pressure and battery life percent.
A Lambda function invoked via Kinesis Data Firehose enriches the data with the ‘OpenStreetMap’ public dataset via Amazon Athena.
Amazon Kinesis Data Analytics analyzes the events in the combined raw data by parsing them, and then generates event logs data. This data is persisted to Amazon Simple Storage Service (Amazon S3) via Kinesis Data Firehose in an Apache Parquet format.
Event Generation: Real-Time Analytics and Summary Generation
Real-time event generation:
Amazon Kinesis Data Analytics analyzes the events in the combined raw data by parsing them, and then generates event logs data in a near real-time mode.
Different data points extracted from raw data by Kinesis Data Analytics are hard braking, harsh acceleration, max speed, and posted speed.
Daily summary:
AWS Glue jobs are leveraged to generate and load daily summary data of vehicles and event summary data into Amazon Redshift.
Different data points extracted from the processed data for summarization are tire pressure, average miles per hour, average miles per gallon, and total trip distance.
Data Consumption
Processed actual events and summarized data are loaded into Amazon Redshift and then integrated with Amazon QuickSight to present different visualization.
Rest APIs are also designed on Amazon Redshift to provide data extraction capabilities to the end client and different internal business tools.
Connected Vehicle Platform Architecture
Quantiphi’s solution is designed to provide a framework for connected vehicle services, focusing on extending the solution’s functionality rather than managing the underlying infrastructure operations.
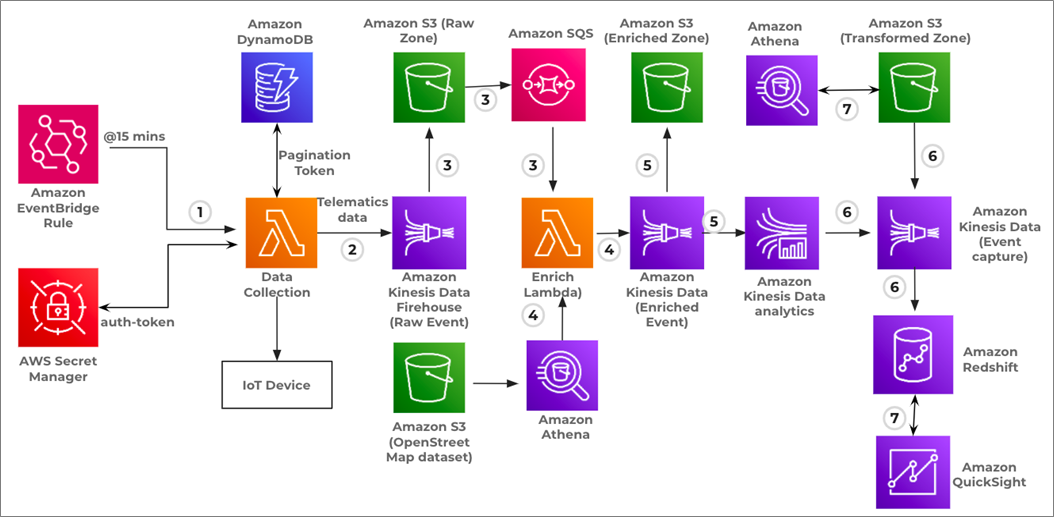
Figure 2 – Solution architecture of event generation pipeline.
Event Generation Pipeline
- The Data Collection Lambda function is triggered via an Amazon EventBridge Rule every 15 minutes. It establishes a secured connection with the IoT device, and the time to live for auth-token is two hours.
.
After the connection is established, a post request is executed to pull the data buffered in the IoT device for which client-id and auth-token passed as request body. The response from the IoT device is the telematics data in a JSON format and the pagination token. Telematics data is buffered to Amazon Kinesis Data Firehose, and the pagination token is preserved in the DynamoDB for a subsequent call.
.
- Data from Kinesis Data Firehose is persisted to the S3 bucket if the data size in the buffer is less than 5 MB, or the duration of data in the buffer is less than 300 seconds.
.
- As data is persisted to S3 by Kinesis Data Firehose, an upload event is generated and captured in Amazon Simple Queue Service (Amazon SQS), which triggered Enrich Lambda.
.
- Enrich Lambda processes the raw data, executes the Amazon Athena query against the ‘OpenStreetMap’ data set, and retrieves the max speed value for the provided latitude and longitude. This max speed value assists in identifying the speeding event. Finally, the enriched data is sent to Amazon Kinesis Data Firehose.
.
- Amazon Kinesis Data Firehose, which holds enriched data, is connected with Amazon Kinesis Data Analytics which helps extract near-real-time events like speeding, idling, harsh acceleration, and hard acceleration braking.
.
Simultaneously, enriched data from Kinesis Data Firehose is persisted to an S3 bucket under a processed zone in either of the situations if the data size buffered is less than five MB, or the duration of data in the buffer is less than 300 seconds.
.
- Events generated by Amazon Kinesis Data Analytics are stored in Amazon Redshift for QuickSight visualization, and in S3 with the help of Kinesis Data Firehose.
.
- Amazon Athena is deployed on the output bucket for any ad-hoc analysis. Similarly, different visualization charts are created in QuickSight based on the data persisted in the warehouse. QuickSight dashboards are embedded into the web application and offered to end clients to understand the driver behavior.
Summary Generation Pipeline
Below is the architecture that summarizes the events generated daily and persisting the data into the Amazon Redshift warehouse system, which is then connected with Amazon QuickSight to provide visualization capability.

Figure 3 – Solution architecture of summary generation pipeline.
- The Daily Summary Lambda function is scheduled to trigger via Amazon EventBridge Rule every 2 a.m. EST. On invocation, Lambda fires an AWS Glue job for different clients.
.
- AWS Glue job operates on the enriched data stored in the processed Amazon S3 bucket. It generates the summarized output stored in Parquet format in S3 for future reference and loads it into the Amazon Redshift warehouse for QuickSight visualization.
.
- Amazon Athena is deployed on the output bucket for any ad-hoc analysis. Similarly, different visualization charts are created in QuickSight based on the data persisted in the warehouse.
.
- Amazon QuickSight dashboards are finally embedded into the web application and offered to end clients to understand the driver behavior.
DevOps Practice for Connected Vehicle Platform
Quantiphi demonstrated the power of serverless and provided advisory support on security and deployment best practices.
The following DevOps practices resulted in a 70% increase in production release for the client:
Continuous integration using Jenkins and AWS CloudFormation templates:
Quantiphi used Jenkins for easy deployment of code present in the Github repository. The workflow was specified in the form of a release cycle, starting from the dev stage to the QA stage and finally into the production stage.
Reusable nested CloudFormation templates were developed to plug in and out resources without much change in the parent template.
Continuous delivery using AWS managed services:
The entire connected vehicle platform uses services such as AWS Lambda, AWS Glue, and Amazon DynamoDB. Amazon SQS was used for decoupling, ensuring continuous delivery in a distributed system.
Monitoring mechanism:
A complete configuration monitoring mechanism was implemented with the help of Amazon CloudWatch and Amazon Simple Notification Service (Amazon SNS). AWS Config was enabled to monitor all the services.
AWS CloudTrail was enabled to monitor all of the API calls done on all the resources configured in the AWS environment.
Distributed tracing:
Services like AWS X-Ray and Amazon CloudWatch Logs Insights were used for a performance review to get the memory usage and time consumption of Lambda functions.
Summary
Through the evolutions of telematics, commercial fleets are provided crucial learning to efficiently optimize their operations. Driver telematics data eventually contributes to long-term value and cost savings, as well as effective insights to increase workforce productivity.
By using Quantiphi’s cloud-native connected vehicle solution built on AWS, fleet companies can process up to 200,000 events per month, generate real insights, and facilitate better decision making.
The content and opinions in this blog are those of the third-party author and AWS is not responsible for the content or accuracy of this post.
.

.
Quantiphi – AWS Partner Spotlight
Quantiphi is an AWS Competency Partner and leading artificial intelligence-first company driven by the desire to solve transformational problems at the heart of the business.
Contact Quantiphi | Partner Overview
*Already worked with Quantiphi? Rate the Partner
*To review an AWS Partner, you must be a customer that has worked with them directly on a project.
Experience Digital’s Purpose-Built Assessment Tool Created Using AWS Lambda
=======================
By Holly Hudson, AWS Community Lead – Experience Digital
 |
| Experience Digital |
 |
Many industries are beginning to recognize the vast value proposition of serverless architecture, which drives observability, lowers cost, and increases the potential for scalability.
In the medical industry, paper-based resources were traditionally the preferred method of data storage due to the slower adoption of digital technologies. The primary concern regarding transitioning to the cloud often relates to data security, as the process is commonly misassociated with a loss of control when outsourcing.
Given the sensitive nature of the data capture process within the health landscape, humanizing the experience when digitizing information is crucial, with a keen focus on a personalized user experience not to be compromised on.
For some organizations, the reluctance stems from these key challenges, resulting in the healthcare industry having one of the lowest cloud technology adoption rates within the market.
The key to addressing these reservations lies in the approach taken to design and deliver on the fundamental capabilities of serverless architecture, building a strong business case for the transition.
In this post, I will dive into the process of converting offline resources into a broadscale digital toolset for MedHealth as part of a roll-out across Australia. I’ll explore how the core components, reliant on AWS Lambda, are complementary and why keeping user experience top of mind is critical in driving project success.
Experience Digital is an AWS Advanced Consulting Partner specializing in IT automation, mobile, cloud, and data solution implementation. Experience Digital is a validated AWS Lambda Service Delivery Partner as a result of our deep expertise and demonstration of successful customer delivery.
A Customer-Focused Approach to Serverless
The advantages of AWS Lambda are extensive, so intertwining this service within the project delivery for MedHealth was a key aspect of its success.
MedHealth is a broad set of industry-leading health, medical, and employment brands in the government and private health sector designed to deliver the best possible health and employment outcomes. With a core focus on personal support, they cover all major medical and allied health disciplines to provide support to those seeking assistance with returning to employment, mental health issues, and major injuries.
Arguably the most enticing feature of AWS Lambda is automation, which provides businesses with the opportunity to focus on operations and scalability to support growth.
Personalization is also key when offering a cloud solution; this ensures alignment with specific scalable requirements, as opposed to simply replicating traditional processes when taking them online.
According to Rowlands (2019), the “digital health era is citizen-centric. It is driven by citizens’ demands that their health and wellbeing are controlled by them, and citizens’ expectations that health services respond to their needs—digitally, with workflows embedded within their life patterns rather than within the patterns of the convenience of health service providers.”
With this intent, Experience Digital focused strongly on customized design when delivering MedHealth’s brief to develop their assessment tool and health coaching program for the web application Positivum.
Positivum is an online assessment and health coaching tool developed in partnership with Monash University. It is designed as a platform aimed to gather information and tailor guided coaching to shift beliefs and perceptions in relation to the user’s health, ability, and work.
For companies focused on business optimization, it’s integral they focus on measurable results such as increased return on investment (ROI), and factor in tangible outcomes such as productivity and consistency.
Focusing on user experience for customer-centric applications, especially those seeking to gain insight from data collection, should be a primary objective. This goes in tandem with a clear understanding of the functional requirements to ensure maximum quantifiable benefits are also seized.
The goal of streamlining the return-to-work process for MedHealth meant the scope of work centered on building an application containing data-sensitive questions. These focus on perceptions and beliefs and serve to provide health, wellness, and employment support for those returning to work who have challenges in relation to obtaining employment (which may include psychological or physical disabilities).
Due to the nature of the project requirements, Positivum was designed as the go-to platform operating as a tailored diagnostic tool to capture customers’ important personal data. With the user’s data input serving as a gateway for further analysis to distinguish the categorized level of support delivered, the application’s design had to reflect confidentiality and professionalism.
An AWS-Integrated Cloud Solution
Experience Digital’s approach to this project involved utilizing a microservices architecture, as the solution needed to be scalable and low cost.
AWS Lambda was chosen because it lowered the cost for MedHealth, and it reduced the infrastructure and environment maintenance load on the MedHealth team. Lambda essentially removed the challenges associated with environmental and security updates.
Lambda is highly scalable, so the solution can grow as demand grows over time. The flexible pricing model also means MedHealth is only billed for the function minutes plus network egress.
Following the roll-out of the Positivum tool and its inevitable success, the framework was duplicated to scale further, adding in additional features and new assessment categories. This was made seamless through Lambda utilization.
The solution also leveraged Amazon Simple Storage Service (Amazon S3) for its capability to minimize wait times and provide higher availability. This captured the necessity for demand flexibility, whilst not paying for unused compute capacity.
The component-driven design meant that each Lambda function could serve a decoupled task, such as the authentication system or survey creation. Lambda operates to process assets like profile images to Amazon S3 buckets; it also uploads files and transforms completed surveys into PDF files.
Experience Digital’s analysis concluded MedHealth’s existing database had deeply nested data that caused unnecessary reads. It was a matter of consistency, so Experience Digital migrated a messy, unoptimized database to Amazon RDS for PostgreSQL. This provided the benefit of low maintenance and optimal performance outcomes, as well as fit-for-purpose data security and risk profile.
The migration further allowed for object manipulation due to how relational the datasets were, combined with the fact the third-party tools being used by MedHealth were compatible with relational databases. Additionally, it allowed for further scalability and task automation.

Figure 1 – Positivum horizontal framework.
Transformation Through Goal-Driven Migration
Moodl is a learning management system (LMS) that uses the power of open source technology to provide an efficient, customizable platform. Moodl provisions a high level of functionality and integration accompanied by an attractive price point.
These benefits drove Experience Digital to migrate MedHealth to this hosting solution.
Recognizing and upgrading outdated code, combined with focusing on the sharp, intuitive design, was made even simpler using Moodl.
The goal of humanizing the data capture process involved allowing the Positivum platform to manage users as cases instead of entities. This proved instrumental in streamlining the integration, as users were guided through the questionnaires.

Figure 2 – Positivum dashboard’s preliminary assessment results.
Once the user has completed their first assessment, the relevant interactive SCORM packages are matched to the individual’s needs, and associated health coaching and resources are provided.
Positivum facilitates the delivery of metric-based scores to users and provides re-assessments to determine progress and reallocate resources, if necessary.

Figure 3 – Positivum dashboard’s assessment results overview.
Optimized Outcomes
Through itemized integration, Positivum was implemented across the sites of MedHealth, serving to shift traditional perceptions and beliefs within the medical industry through the update of technology.
The platform currently transcends industries, serving clients with injuries as a result of worker’s compensation and motor vehicle accidents and disabilities. Furthermore, MedHealth has multiple large contracts with national employers and insurers who utilize Positivum to support their employee’s wellbeing.
Optimized user experience exists as a result of incorporating clear and simple action-oriented prompts formulating behavioral insights.
Hosting the solution on AWS provides enhanced privacy and security, provisioning the ability to manage different access levels for associated clients—something that was not a possibility before migration.
Improved analytics and self-service capabilities provide opportunities for further categorization, providing aggregate data and updates on utilization—by company, nationally, or state-wide. This is extremely beneficial functionality to support reporting requirements as the tool experiences higher adoption and further scaling.
The cost-saving benefits deliver on the fundamental capability of serverless architecture, which further shifts outdated perceptions of digital transformation. This is achieved by offering the tool as an additional option, alongside delivering programs face-to-face, knowing user engagement has not been compromised.
To further aid cost optimization, the ability to add additional features and new assessment types is provided for minimal investment through straightforward replication of the key frameworks.
Conclusion
Since its launch, MedHealth has seen a 100% successful shift to the use of the digitized tool, with over 20,000 registered users nationally.
Positivum has been referred to as “life-changing” in the ability to provide a tailored experience, as well as the opportunity to reach customers in regional areas which were often not able to previously partake in these assessments.
Positivum is an example of where the health industry has further adopted serverless architecture driving business practices. The application acts as a continual gateway in shifting traditional processes.
Experience Digital’s innovative use of AWS Lambda was the keystone in the delivery of this successful project and acts as a framework for replication to exemplify further scalable opportunities in future projects.
The content and opinions in this blog are those of the third-party author and AWS is not responsible for the content or accuracy of this post.
.

.
Experience Digital – AWS Partner Spotlight
Experience Digital is an AWS Partner that specializes in IT automation, mobile, cloud, and data solution implementation.
Contact Experience Digital | Partner Overview
*Already worked with Experience Digital? Rate the Partner
*To review an AWS Partner, you must be a customer that has worked with them directly on a project.
Signing Data Using Keys Stored in AWS CloudHSM with Python
=======================
By Elliot Morris, Software Engineer at BJSS
 |
| BJSS |
 |
AWS CloudHSM is a cloud-based hardware security module (HSM) that enables you to generate and use your own encryption keys on Amazon Web Services (AWS).
BJSS, an AWS Advanced Consulting Partner with multiple AWS Competencies, has been working with a large public sector client for several years and helping them to build multiple workloads on AWS. Most recently, the client asked BJSS to enable the secure signing of sensitive documents relating to individuals.
The standard service for managing keys for signing would usually be AWS Key Management Service (KMS). However, due to legacy requirements from the customer side, the team at BJSS needs to support both SHA256 and SHA1.
SHA1 is only available in KMS for use with encryption, but we need support for signing. AWS CloudHSM allows us to create and manage our own keys in an isolated HSM, whilst still keeping them in the cloud.
As a software engineer at BJSS, I spent many hours researching how to manage keys that are stored in an HSM for cryptographic operations. There are many resources online, but I couldn’t find clear instructions on how to implement an AWS CloudHSM-based solution using Python.
In this post, I’ll show you how to successfully sign some data with a key from AWS CloudHSM using Python. I will walk you through the setup of an AWS CloudHSM cluster and test it using a sample application.
Please note that AWS CloudHSM does not offer an AWS free tier, so implementing the solution described in this tutorial will incur a cost.
Cryptography for Document Signing
A digital signature is a mathematical scheme to verify the authenticity of digital messages or documents. By comparing a hash enclosed in the signature of a signed document to one they decrypt using the sender’s public key, a recipient can ensure no changes have been made to the document after signing. This process is shown below.
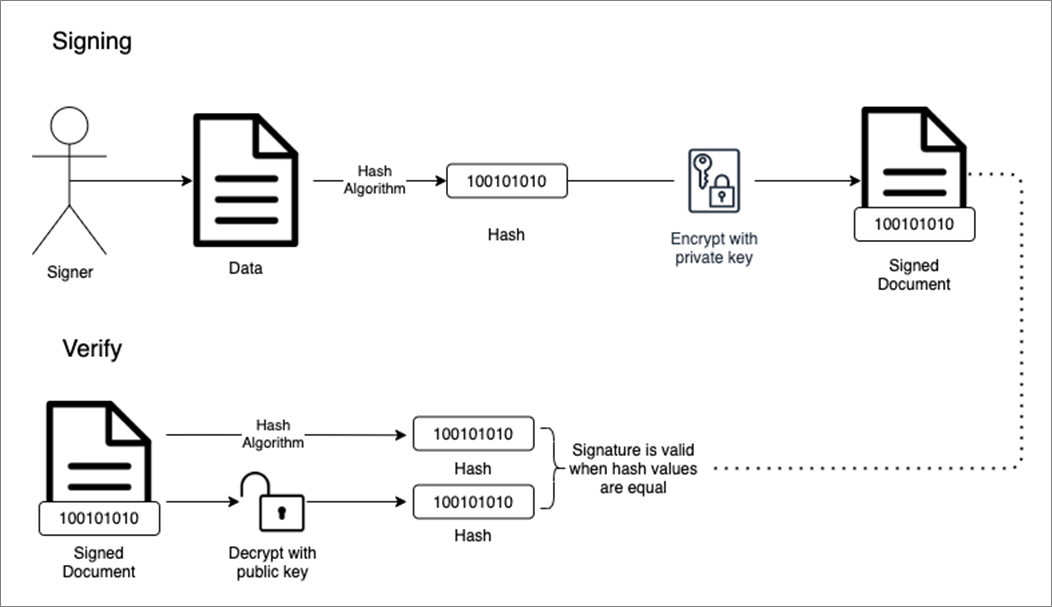
Figure 1 – How digital signatures work.
In this tutorial, I will leverage AWS CloudHSM to create and verify a digital signature, using PKCS#11.
What is PKCS#11?
PKCS is a group Public-Key Cryptography Standards devised and published by RSA Security. The PKCS#11 standard defines a platform-independent API to access cryptographic tokens, such as HSM and smart cards.
AWS CloudHSM offers an implementation of the PKCS#11 library, which is what we’re going to use to interface with the HSM.
HSM User Types
Several roles are associated with managing an HSM. Unlike other AWS services, CloudHSM does not use AWS Identity and Access Management (IAM) users. Rather, you use Crypto Officer (CO) and Crypto User (CU) users directly on the HSM.
During the setup of CloudHSM for the sample application, you’ll see how to create these users. More information on understanding HSM users can be found in the documentation.
Prerequisites for Running the Sample Application
This tutorial assumes you already have an AWS account and an IAM user with AWS CloudHSM Power User permissions as described in the Identity and Access Management for AWS CloudHSM section of the AWS CloudHSM User Guide.
We can use the default virtual private cloud (VPC) for this tutorial.
Step 1: Prepare the EC2 Instance and AWS CloudHSM Cluster
Create the Amazon EC2 Instance
We will use ‘amazonlinux2’ as our Amazon Machine Image (AMI) for this instance, as the commands I will be showing have been tested against this distro.
To create and launch an Amazon Elastic Compute Cloud (Amazon EC2) instance, you can follow the user guide tutorial.
Install Required Packages to Your EC2 Instance
Once the EC2 instance is ready, connect to it using SSH or the AWS Systems Manager Session Manager to install the following required packages:
cloudhsmclient – This is how we talk to our CloudHSM cluster from our EC2 instance.
cloudhsmclient-pkcs11 – This is how we talk to CloudHSM via our application.
python3 and dependencies are able to install the python package PyKCS11.
Install yum packages by running these commands:
yum install -y \
https://s3.amazonaws.com/cloudhsmv2-software/CloudHsmClient/EL7/cloudhsmclient-latest.el7.x86_64.rpm \
https://s3.amazonaws.com/cloudhsmv2-software/CloudHsmClient/EL7/cloudhsmclient-pkcs11-latest.el7.x86_64.rpm \ ncurses-compat-libs python3 python3-devel gcc gcc-c++ swig openssl
Install pip:
curl -O https://bootstrap.pypa.io/get-pip.py && python3 get-pip.py
Install Python packages:
pip3 install PyKCS11
Create, Initialize, and Activate the CloudHSM Cluster
Below are the steps you need to take to set up an AWS CloudHSM cluster ready for use in the demo application:
Create a cluster.
Initialize the cluster.
Configure CloudHSM Client for the Linux operating system (Windows instructions are also available in the documentation). We have already installed the CloudHSM client. We just need to follow the Edit the client configuration step.
Activate the cluster.
Once your cluster is activated, you can now create an HSM.
Set Up AWS CloudHSM for the Sample Application
To create a Crypto User (CU), ensure the HSM client is started:
/opt/cloudhsm/bin/cloudhsm_client /opt/cloudhsm/etc/cloudhsm_client.cfg &>
/tmp/cloudhsm_client_start.log &
Start the user management tool, which will give you an aws-cloudhsm> prompt:
/opt/cloudhsm/bin/cloudhsm_mgmt_util
/opt/cloudhsm/etc/cloudhsm_mgmt_util.cfg
Log in in with the previously created Crypto Officer (CO) credentials:
loginHSM CO <user_name> <password>
Create a CU:
createUser CU <user_name> <password>
Create an RSA Key Pair for the CU
Now that you have a CU, let’s create a key pair.
If you still have an aws-cloudhsm> prompt, press ctl-c to exit the user management tool. Start the key management tool with the following command:
/opt/cloudhsm/bin/key_mgmt_util
Log in as in the CU:
loginHSM -u CU -s <user_name> -p <password>
Create an RSA keypair within the HSM:
genRSAKeyPair -m 2048 -e 65541 -l rsa_test_key_pair -nex -attest
The table below explains the flags for this command:
| Flag |
Description |
| -m |
Specifies the length of the modulus in bits. The minimum value is 2048. |
| -e |
Specifies the public exponent. |
| -l |
Key pair label. |
| -attest |
Runs an integrity check that verifies the firmware on which the cluster runs on has not been tampered with. |
| -nex |
Makes the private key nonextractable. |
If you still have a Command> prompt, press ctl-c to exit the user management tool.
Step 2: Deploy the Sample Application
This application will sign the text ‘Sign me please.’ with the RSA private key we created in the HSM using SHA256.
The below code uses the PyKCS11 package to call functions in the CloudHSM PKCS#11 library.
PyKCS11
PyKCS11 is an open source wrapper for Python, which allows us to interface with the AWS CloudHSM PKCS#11 library without having to use C. The PyKCS11 project is located on GitHub, and you can check out the documentation for more information about the AWS CloudHSM PKCS#11 library.
Running the Python Code
The below code signs the payload ‘Sign me please.’ using a key stored in CloudHSM.
The code performs the following actions:
Load the cloudhsmclient-pkcs11 lib.
Create a session with the HSM.
Log in to the HSM and identify the user’s private key to be used for signing the payload.
Sign the payload and log the signature to the console.
"""CloudHSM Demo"""
import base64
import PyKCS11
from PyKCS11.LowLevel import CKF_RW_SESSION, CKA_CLASS, CKO_PRIVATE_KEY, CKM_SHA256_RSA_PKCS
def request_signature():
"""
Request the HSM for a signature of the payload.
"""
# This should be your CU username and password formatted like this 'user_name:password'.
hsm_credentials = 'user_name:password'
# This will be the data you want to sign.
payload = 'Sign me please.'
session = create_hsm_session()
private_key = login_hsm_get_key(session, hsm_credentials)
signature = sign_payload(session, payload, private_key)
session.logout()
session.closeSession()
print(base64.b64encode(bytes(signature)).decode("utf-8"))
def create_hsm_session():
"""
Creates a HSM session and returns the session.
:return: The HSM session.
"""
# Load PKCS#11 LIB.
pkcs11 = PyKCS11.PyKCS11Lib()
pkcs11.load('/opt/cloudhsm/lib/libcloudhsm_pkcs11.so')
try:
# Get first slot as CloudHSM only has one slot.
slot = pkcs11.getSlotList()[0]
# Create Session.
session = pkcs11.openSession(slot, CKF_RW_SESSION)
return session
except PyKCS11.PyKCS11Error:
return {"ERROR": "PKCS#11 Error when creating session."}
def login_hsm_get_key(session, credentials):
""""
Logs in to HSM with credentials returns users private key.
:param session: The HSM session.
:param credentials: The credentials to login to the HSM.
:return: The users private key.
"""
try:
# Login to HSM.
session.login(credentials)
# Get private key for user.
private_key = session.findObjects([(CKA_CLASS, CKO_PRIVATE_KEY)])[0]
return private_key
except PyKCS11.PyKCS11Error:
return {"ERROR": "PKCS#11 Error when logging in and getting private key."}
def sign_payload(session, payload, private_key):
"""
Signs a payload and returns a signed payload.
:param session: The HSM session.
:param payload: The payload to sign.
:param private_key: The private key to use.
:return: The signature.
"""
try:
# You can change this to desired mechanism such as 'CKM_SHA1_RSA_PKCS'.
mechanism = PyKCS11.Mechanism(CKM_SHA256_RSA_PKCS, None)
signature = session.sign(private_key, payload, mechanism)
return signature
except PyKCS11.PyKCS11Error:
return {"ERROR": "PKCS#11 Error when signing payload."}
if __name__ == "__main__":
request_signature()
Copy the code above, edit a new file in your home folder on your EC2 instance, and paste the code into the file:
vi request_signature.py
To save and quit, press ESC then : and then wq!
Now run the code:
python3 request_signature.py
Below is the expected response from this demo application. The response is the string ‘Sign me please.’ hashed using SHA256 and then signed using the RSA private key. This is our digital signature.
VHi0Krvnmt8+fn9VXFWfrpHE9Uzq8M7s2gwektRmDkd9i6nOolGYEsW2HSL26l6IJYnrGmLDTu
HHJKd7lSrtJNfEkensELgkPH0xXXdn6k512K0JHDn9ZyPipSBAbdV/RP16l6j4t7ZzFzAY07eJ Qjn+LzXQWQ/2U7XJGmHWVODOjDG6KZSr0hB/O3Oov8iyjIEkkhSwQTiKOu8IXtR8A0hrX+aeAM dprzGcj8le8XF6CoKgxWs7hPezmGn2DtWfUa56VMeJSqHTsbJfekC+ANSEm21S5btvvLkK2253
UBqdvwuIt4c2UGS1ksB5hEyz9Q32mqJk0vegvbfKwwEsFA==
Troubleshooting: CloudHSM Not Started
If you come across the below error:
Cfm3Initialize() returned 0x40000040 : LIQUIDSECURITY: Daemon socket connection error
Using the service to start the client appears to cause this issue.
Ensure you have started the CloudHSM client using the below command:
/opt/cloudhsm/bin/cloudhsm_client /opt/cloudhsm/etc/cloudhsm_client.cfg &> /tmp/cloudhsm_client_start.log &
Clean Up
To clean up after this demo, you need to remove any active HSMs from you cluster. You can leave the cluster there empty if you would like to use it again, as you are only billed for the HSMs in your cluster.
Conclusion
In this post, I showed how to successfully sign data using keys stored in a CloudHSM using Python and PKCS#11.
As part of our AWS Security practice at BJSS, we run a free AWS Well-Architected Review to assess your current security posture in the cloud. As an outcome, we’ll share with you a detailed plan and roadmap for improvements.
Organizations can now benefit from BJSS Enterprise Cloud—a secure and scalable landing zone accelerator that has helped both public and private sector clients accelerate their journeys to AWS.
The content and opinions in this blog are those of the third-party author and AWS is not responsible for the content or accuracy of this post.
.

.
BJSS – AWS Partner Spotlight
BJSS is an AWS Competency Partner and leading delivery-focused IT and business consultancy providing a wide range of IT delivery and advisory services.
Contact BJSS | Partner Overview
*Already worked with BJSS? Rate the Partner
*To review an AWS Partner, you must be a customer that has worked with them directly on a project.
Simplify Protection of AWS Workloads with Cohesity’s Data Management as a Service
=======================
By Girish Chanchlani, Sr. Partner Solutions Architect – AWS
By Edwin Galang, Cloud Solutions Architect – Cohesity
 |
| Cohesity |
 |
In today’s business environment, many enterprises adopt a hybrid cloud strategy with a wide variety of applications and data distributed across on-premises and the public cloud.
This includes applications like VMware, Network Attached Storage (NAS) filers, SQL, Oracle, SAP, and others running in on-premises data centers, and cloud workloads including Amazon Elastic Compute Cloud (Amazon EC2), Amazon Elastic Block Store (Amazon EBS), and Amazon Relational Database Service (Amazon RDS). Businesses also use software-as-a-service (SaaS) applications like Salesforce and Microsoft 365.
For protecting these virtualized, non-virtualized, and cloud-based applications, enterprises often use multiple point products. This approach has many challenges, including requiring specialized IT resources familiar with multiple products. It is also time-consuming and complex to manage, and can be expensive.
To meet this challenge of simplifying data protection for hybrid environments, Cohesity introduced Data Management as a Service (DMaaS), powered by AWS. Cohesity’s DMaaS portfolio encompasses multiple as-a-service offerings, including Backup-as-a-Service (BaaS) which is available in AWS Marketplace as Cohesity DataProtect. BaaS can protect a wide variety of cloud-based and on-premises applications.
As the DMaaS solution is provided as a service, customers do not need to deploy or manage any backup infrastructure or storage; all of that is provisioned behind the scenes in Cohesity’s AWS accounts. The service is presented via Cohesity’s globally available web interface, so for protecting workloads not running in AWS customers do not even need to have an AWS account.
In this post, we will walk through the process of configuring Cohesity DataProtect for protecting AWS workloads. This highlights the simplicity of using a single solution for protecting and managing your AWS workloads running in one or multiple AWS accounts, in addition to your non-AWS workloads.
Cohesity is an AWS Partner with the AWS Storage Competency that is redefining data management to lower total cost of ownership (TCO) while simplifying the way businesses manage and protect their data.
Configuring Cohesity DataProtect
Cohesity Helios is the centralized control plane that provides enterprises a single pane of glass for managing workloads protected by its BaaS service, DataProtect.
DataProtect supports on-premises workloads including VMware, NAS, SQL, physical servers running Windows and Linux, and cloud workloads such as Amazon EC2 instances and Amazon RDS, among others.

Figure 1 – Cohesity Helios dashboard.
From the Cohesity Helios dashboard, you can start using DataProtect to back up and recover workloads in your environment.
After signing in, the first step is to select the AWS region where you want your backup data to be stored.
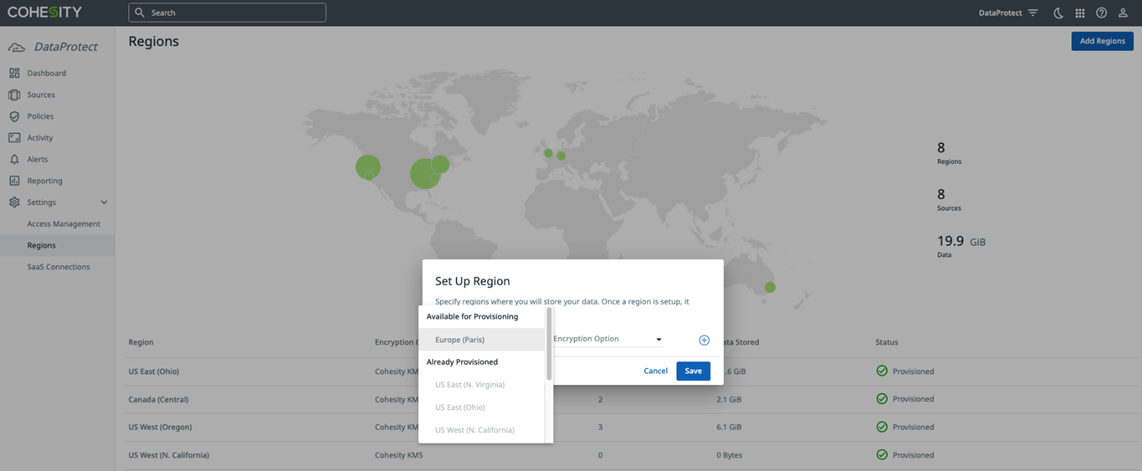
Figure 2 – Cohesity DataProtect delivered as a service region configuration.
Once the region is selected, DataProtect will automatically provision a secure and encrypted environment for you to begin using the service.
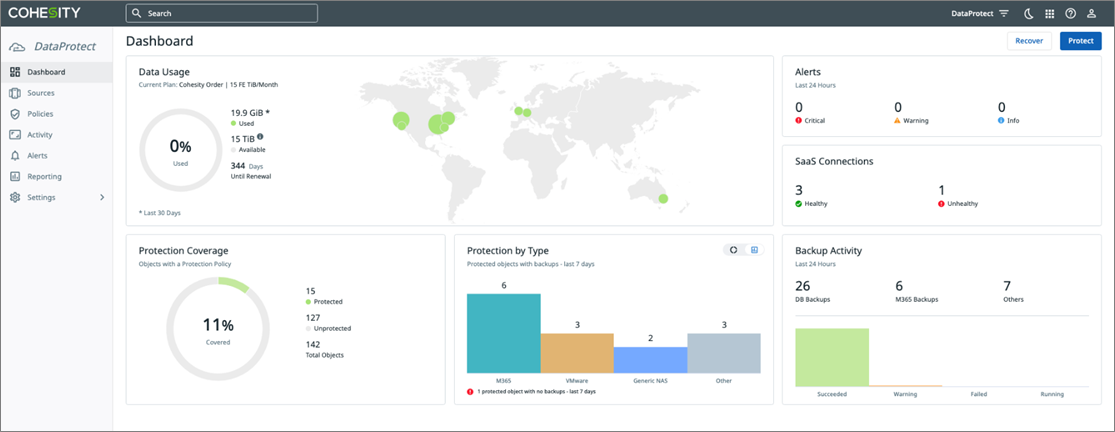
Figure 3 – Cohesity DataProtect dashboard.
The next step is to register workloads you want to back up. For on-premises workloads, a lightweight agent called “SaaS connector” is deployed in your environment to transfer data over a secure and encrypted connection, between your on-premises environment and Cohesity DataProtect. It also provides client-side compression and deduplication to maximize the efficiency of this data transfer.
Protecting AWS Resources
For cloud-native workloads, Cohesity DataProtect will use the environment’s native APIs to back up and recover the data directly to and from the service. To register an AWS source to protect Amazon EC2 and Amazon RDS workloads, enter your AWS credentials in the Register AWS Source, as shown below.
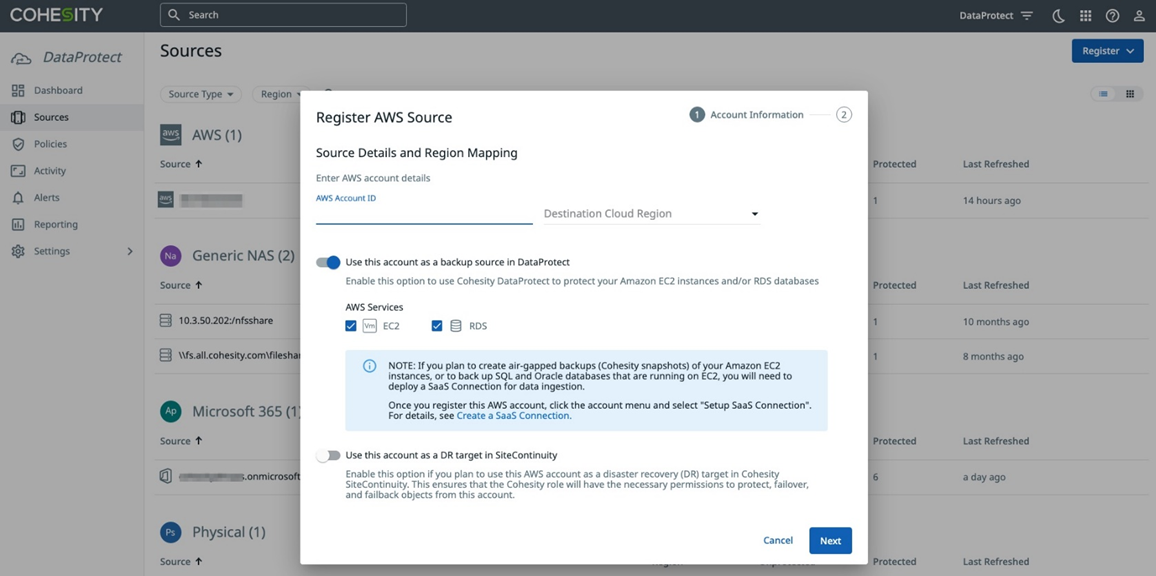
Figure 4 – Registering an AWS source in Cohesity DataProtect.
Download the AWS CloudFormation template and execute in all AWS accounts that have resources that need to be protected. This template creates an AWS Identity and Access Management (IAM) role in your AWS account that grants Cohesity’s AWS account necessary permissions to access EC2 and RDS resources.
Make sure to verify the permissions granted to this IAM role are in-line with the security policies of your organization.
Once you have registered your sources, you can start backing up data to the Cohesity DataProtect service. To protect EC2 instances, select the instances you want to protect and then choose or create a backup policy that specifies backup frequency and retention duration for your instance backup data.
For EC2 instance data protection, you have the ability to protect with AWS snapshots and/or Cohesity Snapshots to meet your data protection requirements.
AWS snapshots use EBS snapshots to back up and recover EC2 instances. The data is stored in the customer’s AWS account.
Cohesity Snapshots create a backup of the EC2 instance and stores the data in DataProtect. This provides a more secure account separation, and allows for more flexible instance and data recovery with full and granular options and long-term retention. Note that for Amazon RDS, only AWS snapshots are supported.
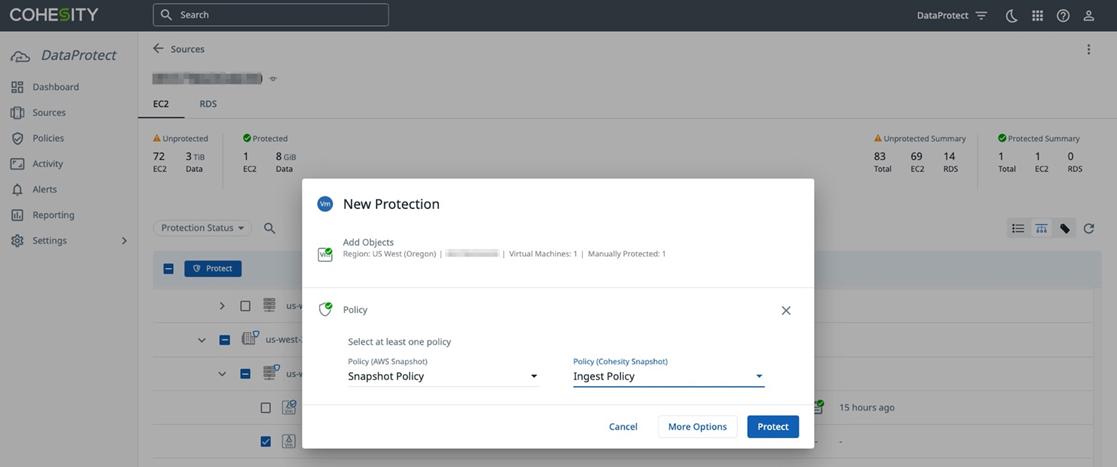
Figure 5 – Protecting Amazon EC2 instances in Cohesity DataProtect.
To monitor activity in Cohesity DataProtect, the Activity Dashboard (see Figure 6) provides detailed information about tasks that are currently running and tasks that have completed in your DataProtect environment.

Figure 6 – Activity dashboard in Cohesity DataProtect.
To recover data in Cohesity DataProtect, select the object (virtual machine, instance, file share, databases) that you want to recover in the user interface (UI) and select the recovery type. With Cohesity DataProtect, you can recover full virtual machines, databases, EC2 instances, or perform granular recoveries of individual files and folders depending on your data recovery needs.
To restore EC2 instances, select the instance you want to recover and choose the recovery option. You have the option to restore EC2 instances to the same region, cross-region, or cross-account to a different AWS account.
To complete the restore process, specify the networking settings including subnets and security groups for the EC2 instances.
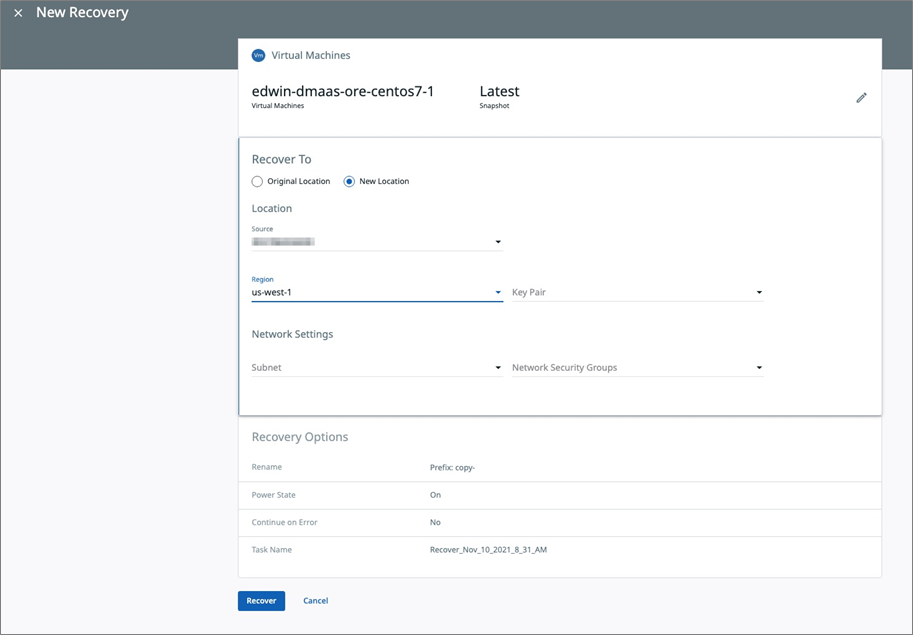
Figure 7 – Recovering Amazon EC2 instances in Cohesity DataProtect.
To perform granular recovery of a file or folder from an EC2 instance backup, select the instance and choose the file or folder (see Figure 8) that you want to restore. After selecting the file or folder, you have the option of either downloading the file directly from the UI to the local machine, or restoring the file to the original location or a new location.

Figure 8 – Granular recovery of files and folders in Cohesity DataProtect.
The method is similar for protecting Amazon RDS and other on-premises and cloud-based workloads, providing the simplicity of managing your hybrid environment via a single solution.
Conclusion
In this post, we introduced Cohesity’s Data Management as a Service (DMaaS) portfolio and walked through the process of configuring and using DataProtect for protecting AWS workloads.
From a single management interface, you protect and manage AWS workloads running in multiple AWS accounts, while also protecting SaaS and on-premises applications as well. This offers customers a simple but powerful solution for managing hybrid workloads.
For more information on DataProtect, including a free 30-day trial, visit cohesity.com or sign-up directly on AWS Marketplace.
.

.
Cohesity – AWS Partner Spotlight
Cohesity is an AWS Storage Competency Partner that is redefining data management to lower TCO while simplifying the way businesses manage and protect their data.
Contact Cohesity | Partner Overview | AWS Marketplace
*Already worked with Cohesity? Rate the Partner
*To review an AWS Partner, you must be a customer that has worked with them directly on a project.
Using AWS PrivateLink for Amazon S3 for Private Connectivity Between Snowflake and Amazon S3
=======================
By Maxwell Moon, Sr. Solutions Architect – AWS
By Bosco Albuquerque, Sr. Partner Solutions Architect – AWS
 |
| Snowflake |
 |
Amazon Web Services (AWS) customers running on-premises workloads that leverage Amazon Simple Storage Service (Amazon S3) previously needed to set up proxies running on Amazon Elastic Compute Cloud (Amazon EC2) to access S3 gateway endpoints.
This creates additional complexity for operations and considerations for bandwidth to S3, which becomes more complex when adding another service that support AWS PrivateLink for Amazon S3 such as Snowflake.
With AWS PrivateLink for Amazon S3, you can provision interface VPC endpoints (interface endpoints) in your virtual private cloud (VPC).
These endpoints are directly accessible from applications that are on-premises over virtual private network (VPN) and AWS Direct Connect, or in a different AWS region over VPC peering.
You can use AWS PrivateLink for Amazon S3 to connect to a software-as-a-service (SaaS) provider such as Snowflake, which allows users to ingest data from their own S3 buckets into Snowflake-managed S3 buckets.
In this post, you’ll learn how to set up AWS PrivateLink for Amazon S3 using Snowflake-provided S3 PrivateLink endpoints. We’ll walk through verifying connectivity over AWS PrivateLink to Snowflake’s staging buckets via an Amazon EC2 instance.
Snowflake is an AWS Partner with the Data and Analytics Competency and AWS PrivateLink Service Ready designation. Snowflake has reinvented the data warehouse, building a new enterprise-class SQL data warehouse designed from the ground up for the cloud and today’s data.
Solution Overview
Previously, VPC endpoints only supported gateway endpoints for Amazon S3. This works well for workloads already operating on AWS, but for workloads operating on-premises a set of proxy EC2 instances needed to be set up to allow for connectivity between the data center and S3 using gateway endpoints.
Interface endpoints use private IP addresses within your VPC to access Amazon S3. This allows workloads operating on-premises or connected by either AWS Direct Connect or AWS Site-to-Site VPN to connect to S3 without the need for proxy servers.
The architecture demonstrated in this post should only be used in test VPCs and VPCs that are used to connect resources running on-premises to AWS. It requires making changes to domain name system (DNS) that may impact your ability to connect to other S3 buckets in the same AWS region.

Figure 1 – On-premises workloads connecting to AWS using Direct Connect or AWS VPN can leverage AWS PrivateLink for S3 to connect to Snowflake.
If you’re interested in learning more about using AWS PrivateLink for Amazon S3 with resources in your VPC, examples are provided in the S3 documentation for the AWS Command Line Interface (CLI) and software development kits (SDKs).
Prerequisites
To complete this solution, you need the following:
AWS account
Snowflake account
Snowflake database and table
Snowflake warehouse
Sufficient AWS Identity and Access Management (IAM) privileges to create VPC endpoints, route tables, security groups, and Amazon Route 53 hosted zones and resource record sets
Walkthrough
We’ll start in Snowflake to retrieve the Amazon S3 URL for the Snowflake stage. Once this step is complete, all other steps will be performed on AWS.
This post assumes you have the permissions required on AWS to create VPC endpoints and Amazon Route 53 private hosted zones, as well as EC2 instances for testing connectivity.
Retrieve the Configuration for the S3 Stage in Snowflake
First, retrieve the S3 URL that will be used when creating the VPC endpoint that will use AWS PrivateLink for Amazon S3.
From Snowflake, execute the following select statement:
select key, value from table(flatten(input=>parse_json(system$get_privatelink_config())));
This command will output a table containing several rows. Retrieve the value for privatelink-internal-stage. This value is required later when creating the Amazon Route 53 internal hosted zone. Copy it and paste it in the text editor of your choice temporarily.
Create a VPC Endpoint for AWS PrivateLink for Amazon S3
Next, we’ll set up the VPC endpoint that will allow us to use AWS PrivateLink for Amazon S3 to connect to Snowflake stages.
Navigate to the VPC Menu in the AWS Management Console, and then select Endpoints from the left panel.
Select Create Endpoint in the top left corner, leave the radio icon for AWS Services selected for Service category, and then search for S3 in the Service name field.
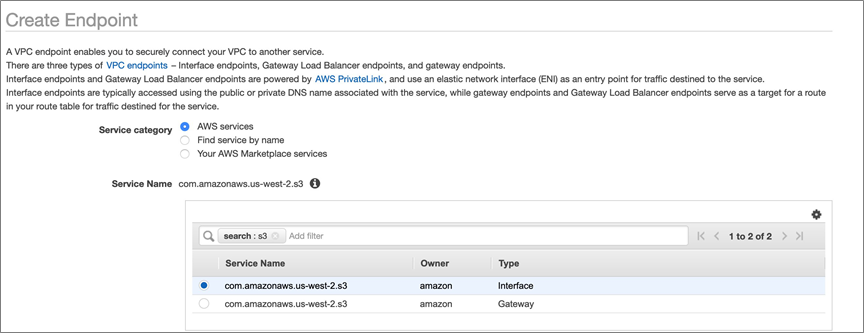
Figure 2 – Options for S3 endpoints; for PrivateLink select the Interface type.
Next, from the VPC drop-down, select the VPC in which the endpoint will be deployed. After selecting the VPC, a series of dropdowns for Subnets will be automatically populated per AWS Availability Zone in the region (in us-west-2, for example, there are four AZs so there are four drop-downs).
Select the subnets in which you would like the endpoint to be available.

Figure 3 – Associating subnets from a VPC with the PrivateLink endpoint.
For security group, create a new security group that will allow access to the endpoint. Select create a new security group, which will automatically redirect you in a new tab to the Security Groups menu in the AWS console.
Select create security group in the upper right corner, and give your security group a name and description that you’ll remember; for example, s3-privatelink-interface-endpoint.
For now, don’t create any inbound rules and leave the default outbound rules.

Figure 4 – Creating a new security group for the PrivateLink for S3 endpoint.
Select the create security group button in the lower right corner. You’ll be automatically redirected to the details menu for the security group. Copy the value for Security group ID.
Switch back to the tab where you are creating the VPC endpoint and paste the value of Security group ID in the input field of the Security group section. Once the search results populate, select the security group by clicking the box on the left side of the row. Be sure to remove any security groups that were added automatically, if present (such as the default security group).
Leave the policy section as-is for full access.
An optional step is to select Add Tag to add tags, if required by your organization for asset tracking or cost attribution. We won’t be adding tags in this post.
Next, select the Create endpoint button in the bottom right. Once created, take note of the VPC endpoint ID, which will be displayed in a green box stating the VPC endpoint was created successfully, and then select close.
Create an Amazon Route 53 Private Hosted Zone
In this section, we’ll cover the steps required to resolve DNS to the Snowflake internal stage S3 bucket. This requires the use of Amazon Route 53 private hosted zones to create a CNAME record for the S3 URL for host value of the stage that points to our newly-created VPC endpoint.
Navigate to the Amazon Route 53 console and select Hosted zones from the left panel. Choose Create hosted zone, and in the domain name input enter s3.<region>.amazonaws.com. In this post, we are deploying the solution in us -west-2, so we enter s3.us-west-2.amazonaws.com.
Select the radio icon for Private hosted zone.

Figure 5 – Creating a private hosted zone in Amazon Route 53.
In the VPCs to associate with the hosted zone section, select the region and VPC in which the VPC endpoint was created. For example, us-west-2, and vpc-xxxxxxxxxxx.
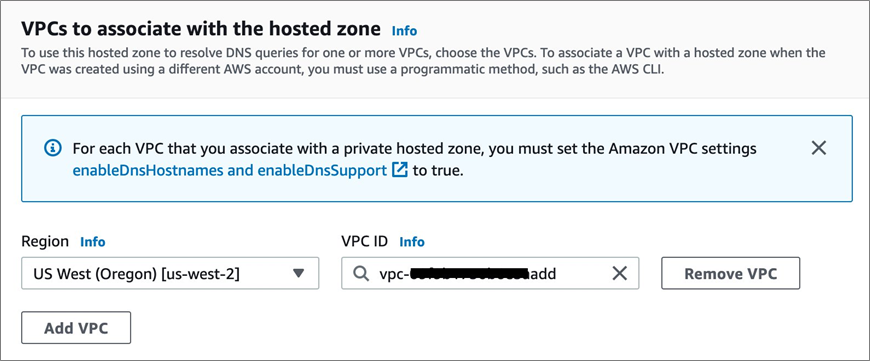
Figure 6 – Associating a VPC with a private hosted zone.
An optional step here is to select Add Tag to add tags, if required by your organization for asset tracking or cost attribution.
Select the Create hosted zone button in the bottom right.
Next, we’ll create a CNAME record in the private hosted zone that will point the URL for host value of the Snowflake stage S3 bucket to the VPC Endpoint created above.
Select the private hosted zone you just created from the list of hosted zones. Click the Create record button in the records section.
For the Record name, use the value preceding the first period in the host value for the Snowflake stage which should start with sfc and end with customers-stage.
For the Record type, select CNAME from the drop-down.
For the Value, retrieve the DNS record from the VPC endpoint for the region (it does not a have zonal letter as the suffix). This should be the topmost value in the DNS names section of the VPC endpoint (such as *.vpce-xxxxxxxx-xxxxxxxx.s3.us-west-2.vpce.amazonaws.com).
Replace the asterisk in the DNS name for the VPC endpoint with the name of the S3 bucket in the host value for the Snowflake stage. This will reduce the potential impact of accessing other S3 buckets, outside of the Snowflake stage.

Figure 7 – Creating a DNS record for AWS PrivateLink for Amazon S3 endpoint.
Finally, select the Create records button in the bottom right.
Verify Private Connectivity to the Snowflake Stage
In this section, we’ll cover testing private connectivity to the Snowflake internal stage. This requires you to spin up an EC2 instance in the VPC in which the VPC endpoint to S3 was created.
Once created, we’ll access get shell access to the EC2 instance using AWS Systems Manager Session Manager.
First, we’ll create an IAM role that allows us to connect to the EC2 instance via AWS Systems Manager Session Manager.
Navigate to the IAM menu in the AWS console, select Roles from the left panel, and then select Create role. Leave the box for AWS Service selected as the trusted entity, select EC2 in the common use cases section, and then select Next: Permissions in the bottom right corner.

Figure 8 – Create role page showing EC2 selected for trusted entity.
Next, search for AmazonSSMManagedInstanceCore in Filter policies. This is an AWS managed policy that allows an instance to use AWS Systems Manager service core functionality, including connecting to the instance using Session Manager. For more information, see Create an IAM instance profile for Systems Manager.
Select Next: Tags. Optionally, you can apply tags and select Next: Review.
Give the role a name you will remember. For example, snowflake-s3-privatelink-ssm-role. Then, click Create role in the bottom right corner.
Next, we’ll launch an Amazon EC2 instance in the same VPC as the VPC endpoint. To get started, navigate to the EC2 menu in the AWS console and select Launch instances in the top right corner.
Choose Select for the latest Amazon Linux 2 AMI. It should be the top-most result. Then, choose the t2.micro instance type, which is free tier eligible, and select Next: Configure Instance Details.
In the Configure Instance Details menu, select a VPC and subnet in which there is a VPC endpoint for S3 PrivateLink from the Network and Subnet drop-downs. Then, select the IAM role snowflake-s3-privatelink-ssm-role from the IAM role drop-down.
Select Next: Add storage, leave the default 8GiB GP2 volume configuration, and then select Next: Add Tags.
Select Add Tag using Name as the Key and snowflake-s3-privatelink-connectivity-test as the value. Click on Next: Configure Security Group.
Leave the radio icon for Create a new security group selected. Enter a name and description you will remember; for example, snowflake-s3-privatelink-connectivity-test-sg.
Remove the default SSH rule, since we’ll use AWS Systems Manager Session Manager to connect to the instance. We need no other ingress rules for this test.

Figure 9 – Creating a new security group.
Select Review and Launch to review the configuration, and then select Launch.
When prompted to select an existing key pair or create a new key pair, select proceed without a key pair from the drop-down. You don’t need a key pair for the instance when using AWS Systems Manager Session Manager to connect.
Select the checkbox acknowledging that without a key pair you will only be able to connect to this instance by using EC2 instance connect.
Click on Launch instances and you’ll be redirected to a success screen that shows the instance ID of the instance. Select the instance ID, which will take you to the EC2 menu.

Figure 10 – Amazon EC2 console with running EC2 instance.
Next, we need to modify the security group for the S3 interface endpoint to allow for traffic over HTTPS from the security group assigned to the EC2 instance.
Navigate to the Security Group menu in the AWS console, and select the security group you created for the S3 interface endpoint. Add an inbound rule for HTTPS from the security group that was created for the EC2 instances, and then save the changes.
Now, we’ll connect to the EC2 instance using AWS Systems Manager Session manager to test connectivity to Snowflake over AWS PrivateLink for Amazon S3.
If you’re following the steps, you will already be in the EC2 menu with the newly-launched EC2 instance selected. If not, navigate to the EC2 menu in the AWS console.
Select Connect from top menu. You’ll be navigated to a page that outlines Session Manager usage, and select the connect button in the bottom right.

Figure 11 – Options to connect to an EC2 instance.
Click on Connect, which opens a new tab in your browser that allows shell access to the EC2 instance.
Finally, we’ll test connectivity to the instance. We will run dig for the S3 URL for the internal stage to ensure it returns private IP address for the VPC endpoint, rather than a public IP address.
#!/bin/bash
# Replace <internal stage bucket> with the name of the Snowflake internal stage S3 bucket
dig <internal stage bucket>.s3.us-west-2.amazonaws.com
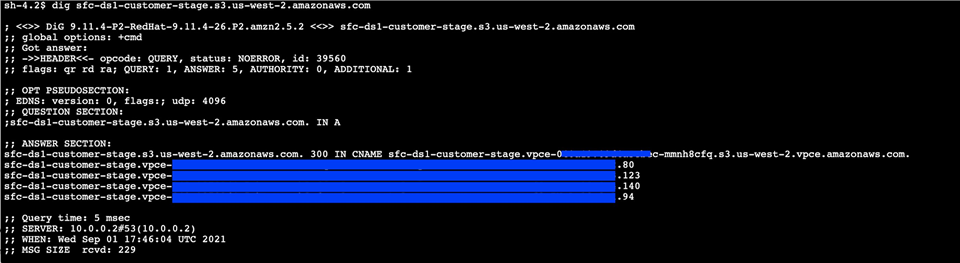
Figure 12 – DNS answers for Snowflake internal stage S3 bucket.
Cleaning Up
If your work with AWS PrivateLink for Amazon S3 and Snowflake is complete, shut down the resources created in this post to avoid incurring additional fees:
Amazon Route 53 internal hosted zone and CNAME record.
Interface VPC endpoint for S3.
EC2 instance that was launched for the connectivity test.
IAM role that was created for EC2 instance.
Conclusion
In this post, we showed you how to use AWS PrivateLink for Amazon S3 to establish private connectivity between resources in your AWS account and a Snowflake internal stage. We ran a test to show connectivity to the stage over the AWS network from an Amazon EC2 instance in a virtual private cloud (VPC).
This architecture ensures that data loading and data unloading from your account or on-premises infrastructure to Snowflake internal stages uses the AWS internal network and does not take place over the public internet.
After you set up these resources, you can further extend your use of VPC endpoints using gateway endpoints for S3 for workloads operating in your VPC. You can also extend your use of AWS PrivateLink and Snowflake with other services such as Amazon QuickSight or Amazon SageMaker.
To use AWS PrivateLink for Amazon S3 with resources inside of your VPC, you can configure your SDK client to use the VPC endpoint URL that’s provided when the endpoint is created.
Learn more about AWS PrivateLink for Amazon S3 in the AWS documentation.
.

.
Snowflake – AWS Partner Spotlight
Snowflake is an AWS Competency Partner that has reinvented the data warehouse, building a new enterprise-class SQL data warehouse designed from the ground up for the cloud and today’s data..
Contact Snowflake | Partner Overview | AWS Marketplace
*Already worked with Snowflake? Rate the Partner
*To review an AWS Partner, you must be a customer that has worked with them directly on a project.
Anatomy of a Supply Chain Ransomware Attack and How to Prevent it with Barracuda’s CloudGen WAF on AWS
=======================
By Brett Wolmarans, Director of Solutions, Application Security – Barracuda
 |
| Barracuda |
 |
Ransomware hardly needs an introduction for those of us who work in cybersecurity, maintain web properties, or work in corporate IT.
During the past several months, a steady stream of blogs, webinars, videos, and other types of content regarding the topic of ransomware has filled our screens and inboxes on an almost daily basis.
So much so that we may even feel desensitized and a degree of alert fatigue when it comes to this particular topic. “Oh great, another blog on ransomware.” But you should read this one, and I’ll tell you why—because ransomware is likely to increase and can spread in ways you may not have thought about.
According to a recent alert from the U.S. Cybersecurity and Infrastructure Security Agency (CISA), ransomware markedly increases on holidays and weekends. Your organization’s best defense is to stay alert, learn as much as you can, and implement a ransomware defense strategy in a proactive manner.
In my role as director of application security solutions at Barracuda Networks, I listen carefully to customers about their security needs and help shape the product development of Barracuda’s application security solutions accordingly.
In this post, I will describe the role application security plays in preventing the spread of ransomware, and I’ll give several examples of how you can use Barracuda’s solutions to further protect your applications running on Amazon Web Services (AWS).
Barracuda CloudGen WAF on AWS
With Barracuda being an AWS Security Competency Partner, businesses trust Barracuda CloudGen Web Application Firewall (WAF) to secure their applications.
With dynamic profiling and application-awareness to minimize false positives, Barracuda CloudGen WAF protects against today’s advanced, persistent, and zero-day threats. Support for AWS CloudFormation templates enables automated bootstrap and cluster initialization for higher throughput and resiliency.
Barracuda CloudGen WAF is available on AWS Marketplace, and has an accompanying AWS Quick Start to streamline the deployment using CloudFormation templates.
Application Security and Ransomware
While ransomware is often thought to be associated mainly with phishing or remote desktop protocol (RDP) attack vectors, most web applications, if unprotected, may well play a pivotal role in the ransomware attack chain. This post addresses the importance of web application security in the context of various stages of a ransomware attack.
Let’s take the recent example of a major supply chain hack that made headlines in July 2021, where SQL injection vulnerabilities in a public-facing internet managed service provider (MSP) application were exploited to spread ransomware to their customers.
SQL injection has existed for decades but remains a common vulnerability that may exist on many web applications. By itself, SQL injection is reason enough to justify web application security for every web property you own, but it’s only an initial step in a longer attack chain that can lead to ransomware. Attackers need more than just a SQL injection exploit in order to be successful.
We need to double-click on this topic to understand how unprotected web applications can unwittingly be enablers of ransomware. The following is an imaginary (yet probable) story told as a series of steps that an average attacker might follow to exploit weak application security.
Please note that many details have been omitted intentionally so I don’t literally provide a recipe for disaster in this post. The key points are in place, however, to help convey the big picture.
Use Case: A Hacker’s Story
In this story, our first actor is an imaginary attacker named “Miyuki.”
Miyuki has decided to leverage a combination of technical and social engineering to achieve their goal of obtaining a large payment in cryptocurrency. Miyuki needs a way to attract victims and has chosen to take advantage of the (re)emerging wave of browser extensions or plug-ins that offer coupon and cash-back incentives based around the most popular shopping websites.
There are four websites in our attack chain story, and we need to pay attention to these as we follow the twists and turns of this attack chain. We’ll call them websites A, B, C, and D, for the sake of anonymity.
There are two other actors in this story: Starbuck, an intermediary, and our final victim, Brett. Although there are only four websites and three actors here, this story scales to internet levels. If you were to picture the same scenario but extrapolated over the millions of websites and users in the world, you can begin to visualize the potential scope of this problem.
Next, I’ll dive into the detailed steps of how a web application hack opens the door for ransomware to take hold in an unsuspecting victim’s system.
Step 1: Constructing a Facade
In this step, there exists a website for one of these popular coupon extensions, which we’ll refer to as Website A. This website has basic OWASP Top 10 protection in place, so it’s immune to SQL injection. That’s the good news; the bad news is that this site doesn’t have protection against web scraping, which is a type of web application attack that doesn’t necessarily align with any of the OWASP Top 10.
Miyuki (our attacker) uses web scraping and domain impersonation to create a forged version of Website A. Let’s call Miyuki’s new creation Website B, which looks just like Website A right down to the page layout, graphics, and font. It’s also topped off with an almost-identical SSL certificate to go along with the typosquatting domain name.
Finally, thanks to an automated web scraping script, Website B is updated every time Website A changes, making the effect very convincing to users.
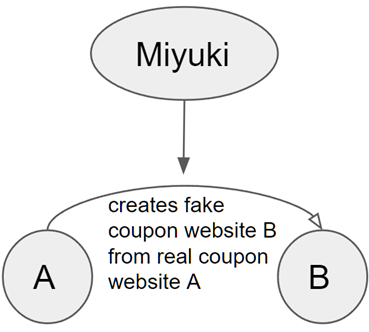
Figure 1 – Website impersonation.
Step 2: Credential Theft
Now, suppose we have a legitimate but poorly protected company website, which we’ll call Website C. Due to the almost complete lack of application security here, Miyuki easily exploits an OWASP Top 10 vulnerability (such as SQL injection, the same attack used in the notorious, afore-mentioned supply-chain attack) to perform a breach and steal data such as credentials, usernames, and passwords.
Among the database of stolen credentials, Miyuki steals the credentials of a user named Starbuck. There’s a good chance these credentials will be useful on the next website Miyuki attacks, because users tend to re-use credentials across multiple sites.
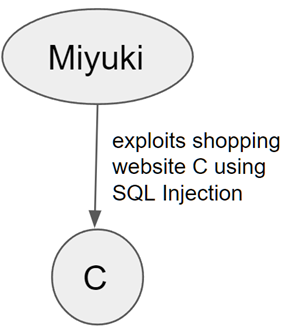
Figure 2 – SQL injection.
Step 3: Credential Stuffing
Next, let’s take a legitimate consumer-facing ecommerce website which we’ll call Website D. This has basic application security in place, and is thankfully fully protected against SQL injection so Miyuki can’t easily harvest credentials here. But Miyuki doesn’t have to, instead using the stolen credentials from Website C to begin a credential stuffing attack against this legitimate shopping site.
Unlike quick web attacks which need to execute in sub-second time frames, this type of account takeover is quite the opposite. Ideally, it will run at a slow drip over multiple weeks.
Slow (enough) is desirable in this case to fly under the radar of rate-based security controls that may block a high rate of failed logins. After all, we expect users to mistype their passwords from time to time, so we can’t simply block a user every time this happens.
Miyuki is using their database of stolen credentials from Website C to slowly stuff in usernames and passwords into the login form for Website D. This attack will fail for users that have different login credentials for all of their websites, but it will succeed for any users that used the same login credentials on Website C and Website D—one such user is Starbuck.
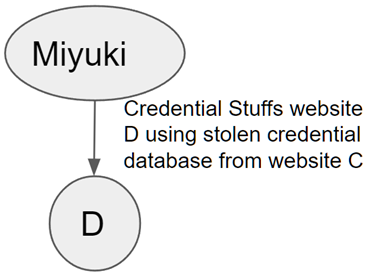
Figure 3 – Credential stuffing.
Step 4: Beware the Reviews
To Miyuki’s delight, while stuffing credentials into Website D, it appears the real user Starbuck not only uses the same password, they conveniently have a high reputation (5 stars!) on the ecommerce site by virtue of having completed many successful shopping transactions.
As the next step, Miyuki (now logged in as Starbuck) posts specially-crafted, short reviews under the listings of a random selection of the top hundred popular products. These reviews take the form of “This product is great! I don’t know how I lived without it, but I wish I had saved 50% off the price shown here with this coupon extension—go to Website A to install!”
After doing so, Miyuki logs out so as not to arouse suspicion. The link in the comment looks exactly like a real link to Website A (the real coupon website) but actually takes the clicker to Website B, the forged website that Miyuki set up in Step 1 of this post.

Figure 4 – Creating the trap.
Step 5: Establishing Trust
The trap has been set. Now, let’s imagine another real user of the ecommerce site—our ultimate victim named Brett.
Brett logs on to Website D, stumbles across the malicious product review, and follows the link to Website B. Unless Brett scrutinizes the domain name, URL, site certificate, and other details of Website B, they will be fooled. After all, the product review was written by a user with high reputation.
Website B looks identical to Website A in just about every way; even the domain is similar with maybe an extra dash or dot or Umlat.
Brett just wants to save money and only has a few minutes at lunch break to get this done, so their guard is lowered. Therefore, through a combination of social and technical engineering, Brett now trusts Website B and happily provides contact details in exchange for the 50% off coupon.
Brett may even have to complete a survey to get the coupon, and in doing so provides more personal information such as household income, age range, and favorite websites. All of these contact details are, of course, sent to Miyuki, who now has the email address and personal details of Brett.
Miyuki has truly gained Brett’s trust now, and Brett is impatiently expecting an email with the coupon.
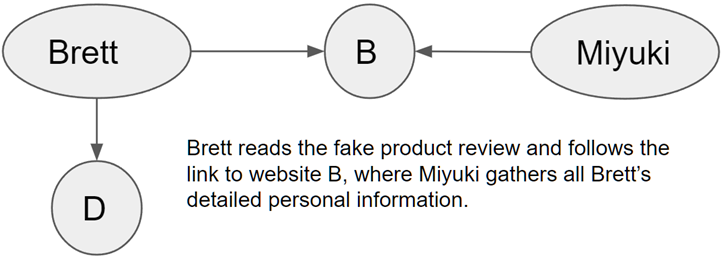
Figure 5 – Trust barriers falling.
Step 6: Same-Day Delivery
Brett receives a personalized email about the product and the coupon, with an attachment for the coupon they are told needs to be installed as a browser extension. Because this email is thoroughly personalized and is expected by the recipient, it’s likely to be allowed through traditional email defenses.
The email contains an executable attachment, and Brett’s operating system wisely prompts them not to install untrusted executables. Brett has attended company training which explained the dangers of opening attachments like this, but at this point Brett has complete trust due to the effective social engineering and spear-phishing.
Brett has been desensitized against installing extensions because of the proliferation of these coupon extensions. Besides, there’s only a minute left in the lunch break. Brett clicks through the warning and installs. The trap has been sprung.

Figure 6 – Spear phishing.
Step 7: Detonation and Regret
Brett installs the attachment, an executable file, and the ransomware attack is launched into memory on Brett’s system. Now, the ransomware can immediately cause havoc; for example, by infecting the master boot record or encrypting the file system table, both of which will lock up Brett’s system.
There are likely other systems connected to Brett’s network, which may be a home or business network. Therefore, Miyuki’s ransomware will also try to move laterally from Brett’s system to other systems on the network.
Shortly after the ransomware detonates, the inevitable demand for payment in cryptocurrency will be delivered to Brett once again using Brett’s email address, which Miyuki has possession of.
Figure 7 – Ransomware detonates on victim’s system.
This tale really is a series of unfortunate events. The ransomware only succeeds because—from the very beginning to almost the final step—web application security vulnerabilities, not phishing, are what allow the attack chain to proceed from one step to the next.
Unfortunately for Brett, social and technical engineering were used to great success in this example.
Recap: A Systemic Failure
To review, Miyuki’s attack chain was comprised of the following steps:
- Web scraping of a legitimate Website A and fake Website B
- Prevention: Web application security – Web scraping controls
- Credentials stolen on Website C
- Prevention: Web application security – SQL injection controls
- Credential stuffing on Website D
- Prevention: Web application security – Credential stuffing controls
- Comment spam and malicious URL on Website D
- Prevention: Web application security – Comment spam controls
- Penultimate spear-phishing email in Step 6
- Prevention: Training users to not run attachments
- Ultimate installation and running of the executable in Step 7
- Prevention: It’s too late for Brett’s system, but a Zero Trust architecture could prevent the ransomware from spreading laterally within the network
Would comprehensive application security at Websites A, B, C, and D have prevented this attack from succeeding? Yes, and with a high degree of certainty.
If adequate protections against web scraping, SQL injection, credential stuffing, and comment spam had been in place, Miyuki would have given up on this particular attack chain early on in the process.
It’s not worth Miyuki’s time to try to defeat a hardened website, as Miyuki will simply point the attack tools at different websites until a vulnerable site is found.
How to Protect Yourself
Application security is somewhat specialized, and application developers often don’t know enough about it to be confident in rolling their own, or they may just not have enough time.
Therefore, one of the most effective approaches to application security is by deploying a web application firewall (WAF).
Look for a WAF solution that has the following features:
Easy: A WAF cannot fully protect you if you’re not able to configure it for your environment or find it difficult to use, or if it slows down your business cycle. AWS customers should be looking for a solution with strong support for your cloud patterns.
Scalable: Business growth, digital transformation, and other factors can increase the demand on your applications and websites. Your WAF should be able to grow with your business as needed.
Comprehensive: OWASP Top 10 protection is table stakes, but organizations must go further. A comprehensive WAF should at least protect against the following, almost all of which were exploited in our ransomware example above:
Web scraping
SQL injection
Comment spam
Credential stuffing and account takeover
Client-side attacks, data-leakage, malicious bots, and more.
Contemporary: If you have an older WAF in place today, it may not have kept pace with modern attacks, so consider upgrading. Your WAF should have regular intelligence updates to improve the security and capabilities of the solution. Consider a hosted WAF solution if you prefer to have Barracuda manage the infrastructure. This allows you to focus your time on your security policies, not on managing infrastructure.
Continuous: New attacks emerge every day, and they can spread around the world within a matter of hours. Your WAF should receive continuous updates on these attacks and employ machine learning to adapt to variants.
Conclusion
Ransomware bad actors will exploit application security to achieve their ends. Per the AWS Shared Responsibility Model, application security is your responsibility. Fortunately, there are solutions available if you understand how your websites may be exploited.
Don’t be a victim, and don’t be a link in the attack chain. Be part of the solution by deploying a comprehensive Barracuda WAF solution from AWS Marketplace, and ensure your websites don’t become a stepping stone for ransomware.
The content and opinions in this blog are those of the third-party author and AWS is not responsible for the content or accuracy of this post.
.

.
Barracuda Networks – AWS Partner Spotlight
Barracuda is an AWS Security Competency Partner that provides CloudGen firewalls engineered for the cloud to give customers flexibility and control over how they deploy security on AWS.
Contact Barracuda | Partner Overview | AWS Marketplace
*Already worked with Barracuda? Rate the Partner
*To review an AWS Partner, you must be a customer that has worked with them directly on a project.
Implementing Centralized Fine-Grained Access Control with Immuta and AWS
=======================
By Chintan Sanghavi, Partner Solutions Architect – AWS
By Sumit Sarkar, Product Marketing and Strategy Leader – Immuta
 |
| Immuta |
 |
Amazon Web Services (AWS) is enabling a new era of data and analytics, fueled by the cloud, advanced data management, and data science tools.
It has become challenging, however, for data teams to control who has access to what data, ensure proper compliance, and enable safe data sharing.
In order to effectively govern data access, companies must:
Know their data landscape.
Create data access policies.
Automate enforcement of data access policies to restrict access to data to only the authorized users.
Update data access policies in real-time.
Understand who accessed what data, when, and for what purpose.
In this post, we’ll explore how organizations can leverage automation and modern access control models to scale cloud adoption, accelerate time to access data, and decrease risk.
Immuta is an AWS Partner that enables data engineering and operations teams to automate data access control across AWS data infrastructure.
With Immuta, organizations can finally unlock the full value of their data—even the most sensitive data—while improving productivity, reducing time to data, maintaining strong security, and enabling new data sharing use cases.
Immuta’s customers understand that data is the most critical asset for innovation. Secure, democratized, self-service access to cloud-based data is an imperative to accelerate business intelligence, data science, and data sharing outcomes. Immuta is key to scaled data innovation, putting more of the right data in the hands of more users, faster, to enable desired data outcomes.
Customer Use Case
A major disruption to access control is that the data landscape also changed as companies started moving data to the cloud and separating compute and storage for added efficiency, cost savings, and flexibility.
As a result, data platforms became more advanced and diverse, introducing new categories for best-of-breed technologies.
Data architectures have become heterogeneous and complex as well, comprising multiple compute platforms. Hence, those access controls become disparate and siloed. In order to comply with these regulations, companies should have centralized data policy management and enforcement.
Aon, for example, is a global professional services company that sells financial risk mitigation products including insurance, pension administration, and health insurance. Aon has a lot of data, including:
Public and private financial data sets.
Rules related to compliance, privacy, and regional/industry regulations, such as HIPAA, GDPR, PII, and CCPA.
Centralized data platform that includes both native AWS services like Amazon Redshift and Amazon EMR, and non-AWS services such as Databricks and Snowflake.
In this example, Aon’s requirement was to match data access policies with extensive processes, operational tasks, periodic reviews, automated alerts, and automated steps to identify discrepancies.
Even with this level of meticulous planning, gaps arise. Immuta was selected to scale user adoption with increased granularity and automation for fine-grained access and privacy controls across their heterogeneous data sources. This included centralized auditing and monitoring; and dynamic policies based on both role and attribute-based access controls leveraging metadata from the enterprise data catalog.
Immuta’s Solution Overview
Immuta is a universal cloud data access control platform, providing one platform to automate access control for any data, on any cloud service, across all compute infrastructure. It’s built for fast-moving DataOps environments that provides universal cloud compatibility and scalability.

Figure 1 – Solution overview.
As shown in the diagram above, Immuta can connect to various data stores on AWS as well as on-premises. This ensures a company will have centralized management of data policies via Immuta for their data stores.

Figure 2 – Global policy builder.
With Immuta, a user can create data policies that will be pushed to data sources for the native policy enforcement and for native data access. In addition, Immuta also exposes APIs to access data for on-premises data stores and for all non-native data accesses.
Immuta can be deployed as software-as-a-service (SaaS) or self-managed, which uses Amazon Elastic Kubernetes Service (Amazon EKS) to meet scalability and performance-related requirements.
Following are the key features of Immuta:
Centralized data policy management and enforcement.
Dynamic data masking and access control.
Sensitive data discovery and classification.
Integration with AWS services.
Row-based and attribute-based access control.
Tagging-based access control.
Integrations and Enforcement
Immuta natively enforces data policies for Amazon Redshift, Databricks on AWS, and Amazon EMR. In this case, users of the Amazon Redshift and EMR services will access data via directly connecting to these services.
The underlying complexity of managing roles and native controls for each platform is completely abstracted from data teams. The following examples provide some insight into how the enforcement works for different integrations.
Amazon EMR will be bootstrapped with Immuta’s libraries, and when a user queries EMR, it internally connects to Immuta servers to get the data policies applicable to the querying users.

Figure 3 – Amazon Redshift native integration.
With the Amazon Redshift access pattern, Immuta applies policies directly in Amazon Redshift. This allows data analysts to query their data natively with Amazon Redshift instead of going through the Immuta Query Engine.
Users can configure multiple Amazon Redshift integrations in a single instance of Immuta. This is an open architecture where native policies are automated by Immuta and will continue to be enforced without Immuta in place.
The Immuta Databricks integration allows users to protect access to tables and manage row-, column-, and cell-level controls without enabling table access control lists (ACLs) or credential passthrough.
Like other integrations, policies are applied to the plan that Apache Spark builds for a user’s query and enforced live on-cluster.
This enforcement of policies ensures that users can access data with minimum latency and can also access encrypted data.
Dynamic Enforcement with Attribute Based Access Control (ABAC)
Regardless of integration, policies are consistently enforced by Immuta across AWS using a dynamic attribute based access control (ABAC) model that works seamlessly with existing compute technologies.
This approach enables organizations to reduce the policy burden by up to 75X over traditional role-based access control (RBAC) approach to scale adoption of sensitive workloads across AWS data platforms.
Let’s consider a policy to segment the following table by country:
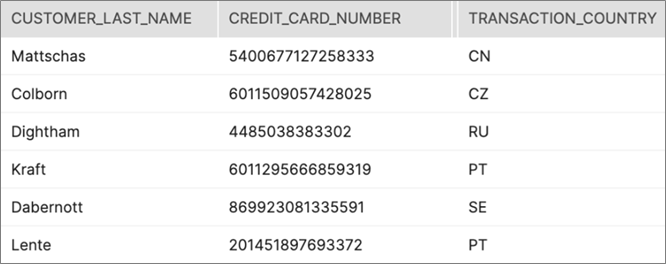
Figure 4 – Sample data.
To create a policy where users can only access data in their TRANSACTION_COUNTRY, static policies based on roles, such as in Apache Ranger, require knowing all the roles and rules in advance.
For example, a role can be created for each country and combinations of countries where access is permitted, which is not possible to define and manage up front.
Policy 1: Role: CN, Row Level Filter: TRANSACTION_COUNTRY = ‘CN’
Policy 2: Role: CZ, Row Level Filter: TRANSACTION_COUNTRY = ‘CZ’
Policy 3: Role: US or CN, Row Level Filter: TRANSACTION_COUNTRY = ‘US’ OR ‘CN’
…
Policy n: Role: PT, Row Level Filter: TRANSACTION_COUNTRY = ‘PT’
In contrast, Immuta introduces a dynamic approach where a single ABAC policy covers all possible scenarios and is enforced consistently for each data platform where the underlying complexity is completely abstracted.
Policy 1-n: TRANSACTION_COUNTRY IN (@groups)
This simplifies administration and reduces risk with plain English policies that explain who can access what data for compliance teams and response to investigations. Finally, the policy works for all country combinations meaning users get instant access to data without having to raise an IT ticket.
Conclusion
Immuta is a universal cloud data access control platform that provides automated access control across heterogeneous environments. With Immuta, data engineering and operations teams are better equipped to centralize data access control.
Using Immuta’s fine-grained access control, organizations can ensure sensitive data is used in accordance with applicable rules and regulations.
.

.
Immuta – AWS Partner Spotlight
Immuta is an AWS Partner that enables data engineering and operations teams to automate data access control across AWS data infrastructure.
Contact Immuta | Partner Overview | AWS Marketplace
*Already worked with Immuta? Rate the Partner
*To review an AWS Partner, you must be a customer that has worked with them directly on a project.
Design for Excellence with Automated Manufacturing Simulation in the Cloud from aPriori
=======================
By Rick Burke, Vice President, Marketing – aPriori Technologies
By Scott Robertson, Sr. Partner Solutions Architect – AWS
By Rajesh Gomatam, Sr. Partner Solutions Architect – AWS
 |
| aPriori |
 |
In today’s fast-paced world, it’s all about first-mover advantage. Manufacturers that innovative quickly and reliably are well positioned to capture significant market share.
Accelerating product development and manufacturing requires companies to get it right the first time: the right features, performance, product margins, and supply-chain partners to meet aggressive launch dates.
But product companies often miss their targets due to understaffed product design, engineering, and sourcing teams, as well as the lack collaboration among these teams.
Companies are addressing these challenges by implementing technology that’s highly automated, runs silently in the background, and only requires the product team to get involved when a problem is identified.
Manufacturing simulation software enables organizations to simulate each step of the product manufacturing process, including primary and secondary operations. The objective of manufacturing simulation is to identify and quickly eliminate potential issues that could delay a product launch due to performance or supply chain roadblocks or inflate manufacturing costs.
The digital manufacturing simulation platform from aPriori connects directly into industry-leading product lifecycle management (PLM) systems. Each time a new or modified digital twin CAD model is checked into a PLM vault, it automatically triggers a detailed manufacturability and cost analysis—with minimal interaction required by the end user.
If aPriori’s software solution detects a potential manufacturability issue, the end user is notified via email and can then use aPriori’s manufacturability guidance application to quickly eliminate the problem.
Additionally, the sourcing team can leverage the rich manufacturing data generated by aPriori and stored in the PLM vault to improve the outcome of negotiations with suppliers. Team leaders and business executives can also leverage aPriori’s enterprise business intelligence (BI) reporting solution to track progress on new product innovation (NPI) initiatives to ensure profitability goals are being met.
Digital Factories and Design for Excellence
The heart of the aPriori automated manufacturing simulation platform is its digital factories, which provide manufacturability analysis and directional costing.
Digital factories also enable sourcing teams to compare production environments across an extensive range of manufacturing criteria to evaluate fully burdened manufacturing costs (design to cost / DTC) and inform site selection.
For a given product design, customers can use digital factories to identify and select less expensive raw materials, cheaper manufacturing processes offering faster cycle times, and alternative finishing options. The digital manufacturing intelligence output from a digital factory is what enables a variety of design for excellence (DfX) initiatives.
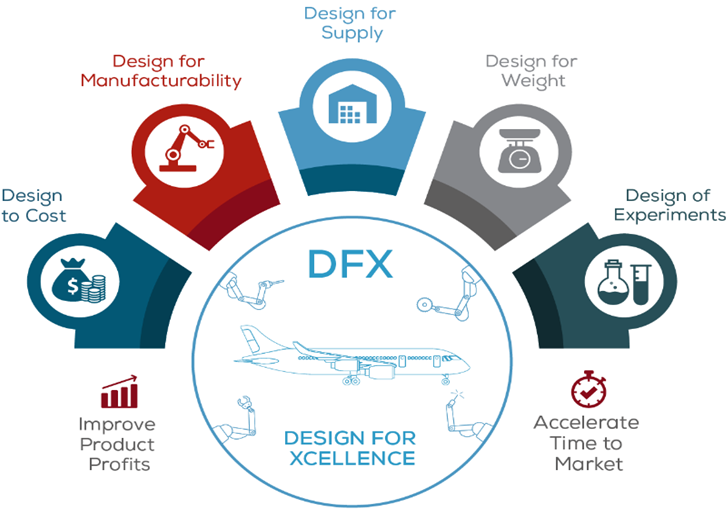
Figure 1 – aPriori digital factories enable DfX.
Maintain Security and Productivity at All Times
If the past year has taught us anything, it’s to prepare for the unexpected. Whether it’s the pandemic or environmental disasters, manufacturers must be prepared with a technology infrastructure that can be accessed by any authorized user, at any time, from anywhere.
Automated digital manufacturing simulation technology on the AWS Cloud leverages AWS services to provide the type of resilience that modern manufacturers need to withstand these kinds of crises and maintain productivity for critical new product innovation programs.
Leveraging the inherent security available with AWS, aPriori has implemented additional security protocols to ensure only authorized users are able to access information stored in a company’s database.
How it Works
aPriori is hosted on Amazon Web Services (AWS) and leverages the AWS Cloud to provide a secure and scalable infrastructure for users. A cloud-hosted solution means there are no customer resources to deploy, and resources are automatically provisioned to support user demand.
Users access aPriori through a centralized identity management system, and access to any aPriori service must be approved by a business lead at the customer.
Third-party provider Auth0 supports multi-factor authentication (MFA) and federated single sign-on (SSO) support for additional user security. All aPriori applications use HTTPS or secure web socket communication. AWS WAF combined with Elastic Load Balancing protects the environment from application-layer exploits and balances traffic across multiple aPriori container-based services.
Files can be uploaded by either a PLM agent (queries the customer-managed PLM environment for CAD files and associated metadata) or through local user file system. All user CAD data is encrypted both in transit and at rest using AES256 where keys are managed by AWS Key Management Service (KMS).
CAD files are uploaded to Amazon Simple Storage Service (Amazon S3) in customer/region-specific buckets where customers can configure a CAD file retention policy to remove CAD data after a specified time period. Amazon Aurora and Amazon ElastiCache combine to provide optimal user response times with sub-millisecond reads.
Finally, Amazon CloudWatch and Amazon GuardDuty continuously monitor the environment to protect accounts, workloads, and data stored in S3. Integrated threat intelligence, anomaly detection and machine learning, combine to provide near real-time alerting of events.

Figure 2 – Architecture diagram.
Summary
Manufacturers are faced with a wide variety of technical and macroeconomic challenges that often appear out of nowhere. These challenges trickle down to the department and individual contributor level and make an already difficult job even more demanding.
On a day-to-day basis, members of the design, engineering, sourcing, and manufacturing teams are wrestling with the twin challenges of creating innovative products and launching those products to market to gain first-mover advantage, along with an ever-collapsing product lifespan in the field.
The digital manufacturing simulation platform from aPriori is hosted on AWS enables design for excellence (DfX) initiatives. This helps manufacturers identify and eliminate issues early in the product lifecycle, reduce engineering change orders, accelerate time to market and reduce manufacturing costs—all with minimal disruption to your current operating environment.
.

.
aPriori – AWS Partner Spotlight
aPriori is an AWS Partner whose digital manufacturing simulation platform connects directly into industry-leading product lifecycle management (PLM) systems.
Contact aPriori | Partner Overview
*Already worked with aPriori? Rate the Partner
*To review an AWS Partner, you must be a customer that has worked with them directly on a project.
Page 1|Page 2|Page 3|Page 4