Contents of this page is copied directly from AWS blog sites to make it Kindle friendly. Some styles & sections from these pages are removed to render this properly in 'Article Mode' of Kindle e-Reader browser. All the contents of this page is property of AWS.
Page 1|Page 2|Page 3|Page 4
Network Address Management and Auditing at Scale with Amazon VPC IP Address Manager
=======================
Managing, monitoring, and auditing IP address allocation for at-scale networks, as the growth in cloud workloads and connected devices continues at a rapid pace, is a complex, time-consuming, and potentially error-prone task. Traditionally, network administrators have resorted to using combinations of spreadsheets, home-grown tools, and scripts to track address assignments across multiple accounts, virtual private clouds (VPCs), and Regions. Manually updating spreadsheets when application development teams request IP address assignments takes time, and care, to avoid errors. Errors which, should they go unnoticed, can lead to address conflicts and subsequent downtime, causing serious operational and business issues. In turn, the time taken to make these updates, sometimes several days, causes delays in onboarding new applications or expanding existing applications, impacting the velocity of development teams. The need to keep those home-grown tools and scripts up-to-date and error-free also results in taking staff hours away from more strategic and business-impacting projects.
Today, I’m happy to announce Amazon VPC IP Address Manager (IPAM), a new feature that provides network administrators with an automated IP management workflow. IPAM makes it easier for network administrators to organize, assign, monitor, and audit IP addresses in at-scale networks, lowering the management and monitoring burden and eliminating the manual processes that can lead to delays and unintended errors.
Introducing Amazon VPC IP Address Manager
IPAM enables management and auditing of IP address assignments across an organization’s accounts, Amazon Virtual Private Cloud (VPC)‘s, and AWS Regions, using a single operational dashboard. From this centralized view, you can manage your IP addresses across AWS.
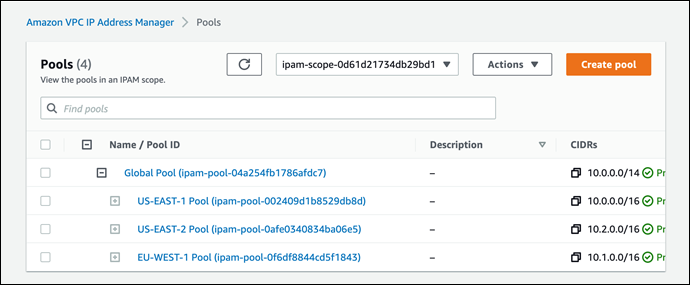
In each Region in which you have resources needing IP addresses, you create a regional pool. Pools are collections of CIDRs and help you to organize your IP space. Unused address space from your top-level pools can be used to fill your regional pools. Further, if you have applications or environments with different security needs, you can create additional pools. For example, you could create different pools for ‘dev’ and ‘prod’ environments if they are subject to different connectivity requirements. The screenshots below illustrate the process of creating a global pool and, from it, three regional pools. Although my example stops after configuring regional pools, in production, you would continue subdividing the regional pools further as needed.

Next, I configure a set of regional pools. Below, I’m creating a regional pool for my US East (N. Virginia) Region resources, scoped within my global pool.

As part of configuring a regional pool, I must specify the CIDRs to provision from the global pool and can optionally enable automatic discovery of resources and rules for allocation.

After repeating the process of creating and configuring regional pools for my two remaining Regions, US East (Ohio) and Europe (Ireland) in this example, this is my final pool hierarchy. As I noted above, this hierarchy ends at a regional set of pools but could be subdivided further.
Once the IPAM pools have been configured, development teams and resources needing new IP address assignments are able to make use of an automated, self-service process, unblocking the developers, and eliminating errors from using manual processes that can lead to connectivity issues. To govern IP address assignments, you can make use of automated and simple business rules. With IPAM‘s self-service model, developers can now directly create resources and receive IP addresses based on business rules in seconds, removing the delays in onboarding applications and improving the velocity of the development team. In the screenshot below, I’m referencing my pools to set the address ranges to be used when creating a new VPC.

You can also share your IPAM with your organization, created using AWS Organizations, and AWS Resource Access Manager (RAM). When you share your IPAM, you gain fully automated CIDR allocation to your Amazon VPCs across member accounts in your organization and Regions.
For network administrators, IPAM provides observability and auditing capabilities, helping to speed up troubleshooting, and providing oversight and monitoring of the used and unused addresses across an organization’s global network address pool using a single dashboard. For each assigned address, IPAM tracks critical information, for example, the AWS account, the VPC, routing, and the security domain, eliminating the bookkeeping work that burdens administrators. Having used IPAM to eliminate IP assignment errors, customers can use IPAM to monitor assigned addresses and receive alerts when potential issues are detected – for example, depleting IP addresses that can stall their network’s growth or overlapping IP addresses that can result in erroneous routing. You can proactively act on those alerts and fix issues before they can become major outages.
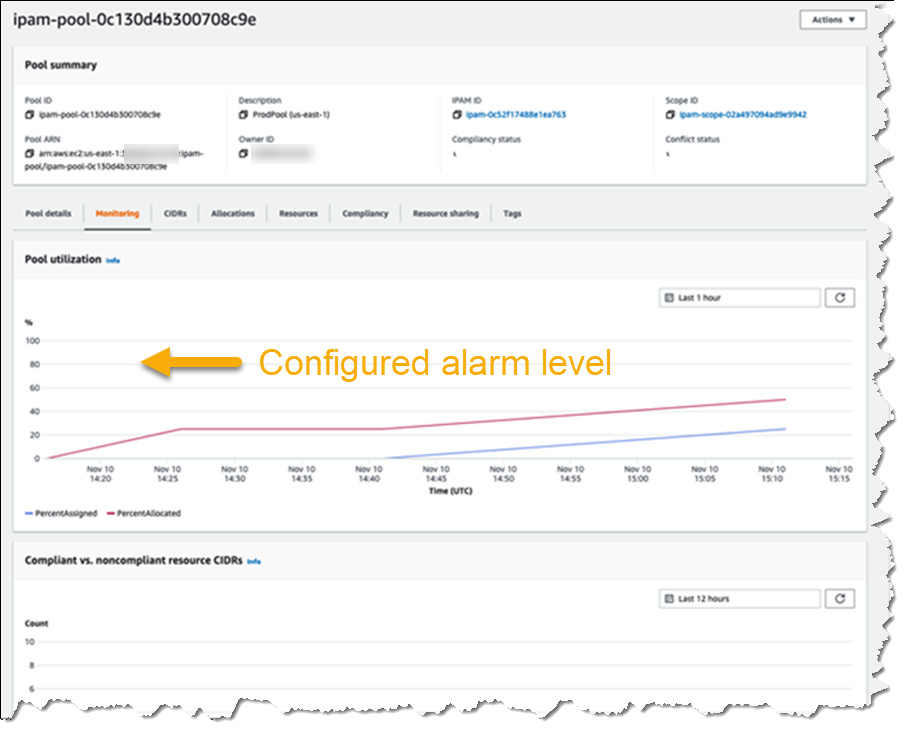
The screenshot below illustrates monitoring pool utilization across a set of VPCs.
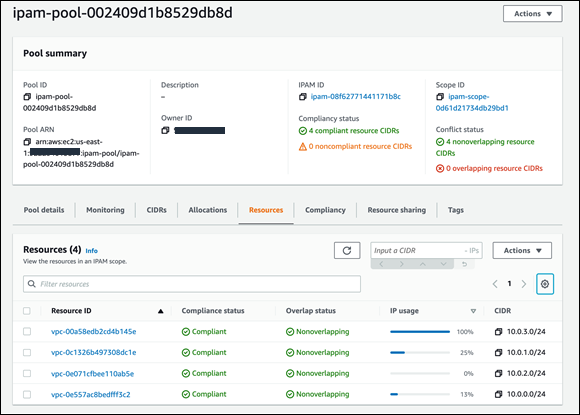
Utilization of address space within a pool can also be monitored. You can add Amazon CloudWatch Alarms that you can configure to trigger at your chosen utilization percentage value so that you can take proactive action before the address space is exhausted.
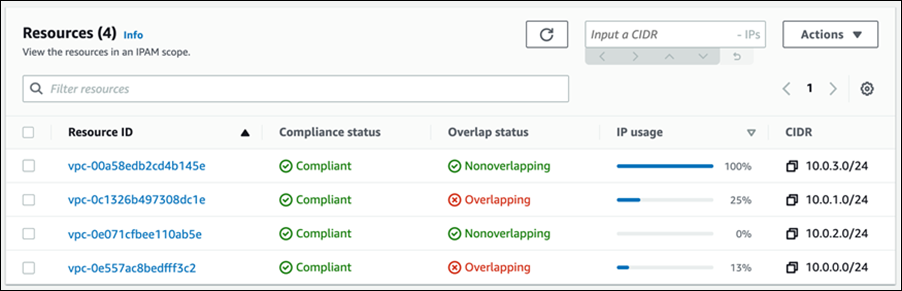
Overlapping address spaces are another headache that network administrators need to manage, usually discovered after the fact during an outage. IPAM can help lower the burden here, too, providing a view of resources that warns of overlapping address ranges.
To further help troubleshoot network issues and audits of network security and routing policies, network administrators can also take advantage of the current and historical data that IPAM makes available to gain usage insights.

IPAM works with any VPC resource where an IP address needs to be assigned, including public and private addresses and Elastic IP Addresses (EIP), and also supports bring your own IP (BYOIP) for both IPv4 and IPv6 addresses.
Start managing and auditing your IP addresses at scale today
Amazon VPC IP Address Manager (IPAM) is available today in all commercial AWS Regions. Get started today, first creating your IPAM for all Regions and accounts, then creating your pools, and finally setting application policy. Then, you can take advantage of IPAM to automate IP address assignment, monitor, troubleshoot, and audit your network addresses assignments.
For those of you with existing VPCs, after you create IPAM it will start monitoring, without any action on your part, to create an inventory of all your VPCs and EIPs. Once you create pools, IPAM will then backfill your VPCs into the pool. This means you can create VPCs today, using your existing workflow, and use IPAM for monitoring and audit only. Later on, you can switch your workflow to IPAM-based automated VPC assignment.
— Steve
New – Amazon VPC Network Access Analyzer
=======================
If you are a member of your organization’s networking, cloud operations, or security teams, you are going to love this new feature. The new Amazon VPC Network Access Analyzer helps you identify network configurations that lead to unintended network access. As you will see in a moment, it will point out ways that you can improve your security posture while still letting you and your organization be agile and flexible. In contrast to manual checking of network configurations, which is error prone and hard to scale, this tool lets you analyze your AWS networks of any size and complexity.
Introducing Network Access Analyzer
Network Access Analyzer takes advantage of our automated reasoning technology that already powers AWS IAM Access Analyzer, Amazon VPC Reachability Analyzer, Amazon Inspector Network Reachability, and other provable security tools.
This new tool uses Network Access Scopes to specify the desired connectivity between your AWS resources. You can get started with a set of Amazon-created scopes, and then either copy & customize them, or create your own from scratch. The scopes are high-level and independent of any particular network architecture or configuration, and can be thought of as a language for specifying the proper level of access & connectivity for your network. You can, for example, create a scope to verify that all web apps use a firewall to access Internet resources, or to indicate that AWS resources used by your Finance team are separate, distinct, and unreachable from the resources used by your Development team.
To evaluate your network against a particular scope, you select it and initiate an analysis. It runs for a few minutes and then generates a set of findings, each of which indicates an unexpected network path between the AWS resources defined in the scope. You can analyze the findings, adjust your configuration or modify the scope in response to the findings, and re-run the analysis, all in just a few minutes.
The analysis process examines a very wide range of AWS resources including Security Groups, CIDR blocks, prefix lists, Elastic Network Interfaces, EC2 instances, Load Balancers, VPC, VPC subnets, VPC endpoints, VPC endpoint services, Transit Gateways, NAT Gateways, Internet Gateways, VPN Gateways, Peering Connections, and Network Firewalls. Your scopes can use Resource Groups to reference all resources that are tagged in a particular way.
Using Network Access Analyzer
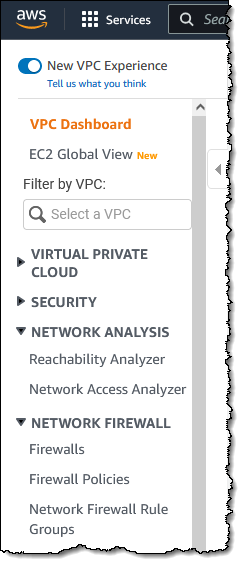
To get started, I open the VPC Console, find the Network Analysis section on the left-side navigation, and click Network Access Analyzer:
I can see all of my scopes. Initially, I have four, all created by Amazon and ready to use:
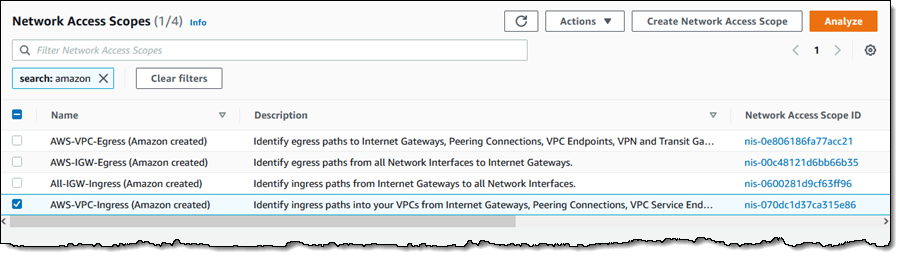
To conduct an analysis, I select a scope (AWS-VPC-Ingress (Amazon created)) and click Analyze. The scope’s description reads:
“Identify ingress paths into your VPCs from Internet Gateways, Peering Connections, VPC Service Endpoints, VPN and Transit Gateways.”
The analysis runs for a couple of minutes and displays the findings as soon as it is done:

There’s a lot of very useful information here! The spectrum chart provides an overview of the resources that are in the findings. I can hover my mouse over any of the segments to learn more, or click on one in order to filter the findings and show only those that reference a particular resource or resource type:

For example, I click VPC Peering Connections and I can see all of the findings that reference the VPC peering connection:
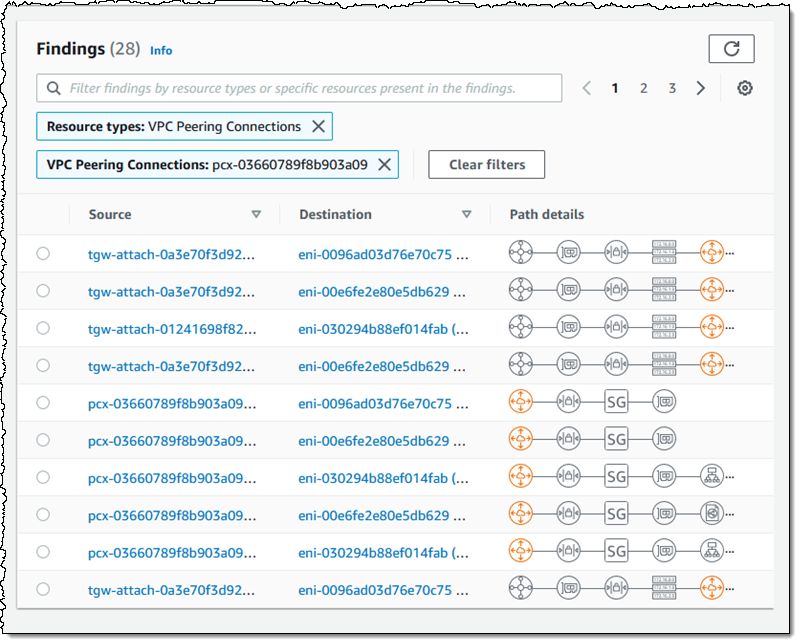
As you can see, the Path details highlight the VPC peering connection in the path! The next step is to examine the findings, decide which ones are expected, and to add them to the scope so that they are excluded from future findings (more on that in a bit).
Inside a Network Access Scope
Let’s take a quick look inside of the Network Access Scope that I used above, and then build another scope from scratch using the visual builder. Each scope is represented in JSON format, and indicates what is considered in-scope (acceptable) traffic between sources and destinations:
{
"networkInsightsAccessScopeId": "nis-070dc1d37ca315e86",
"matchPaths": [
{
"source": {
"resourceStatement": {
"resources": [],
"resourceTypes": [
"AWS::EC2::InternetGateway",
"AWS::EC2::VPCPeeringConnection",
"AWS::EC2::VPCEndpointService",
"AWS::EC2::TransitGatewayAttachment",
"AWS::EC2::VPNGateway"
]
}
},
"destination": {
"resourceStatement": {
"resources": [],
"resourceTypes": [
"AWS::EC2::NetworkInterface"
]
}
}
}
],
"excludePaths": []
}
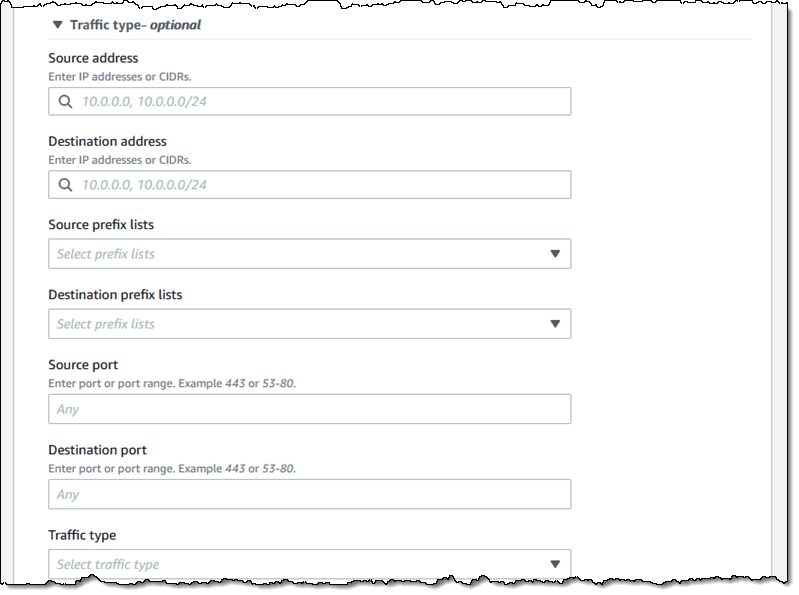
The matchPaths element contains source and destination elements. Each of these elements, in turn, identifies AWS resource types and specific resources. While not shown here, scopes can also contain source and destination IP addresses, ports, prefix lists, and traffic types (TCP or UDP). The excludePaths can contain resource types, specific resources, and so forth. I could, for example, define sources and destinations that match all Internet Gateway ingress traffic, but exclude traffic that flows through a Load Balancer, or I could exclude SSH traffic destined for my bastion instances.
Building a Network Access Scope
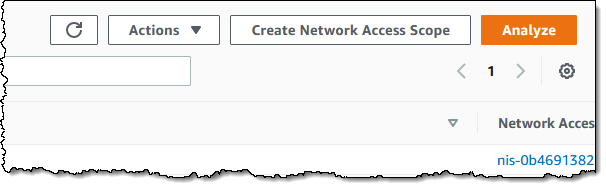
I can build a new scope in three ways. I can Duplicate and modify an existing one, I can start from scratch and use the visual builder, or I can write my own JSON and use either the CLI or the API to create a scope. I click Create Network Access Scope to use the builder:
I can start with one of five predefined templates, or I can build my own:

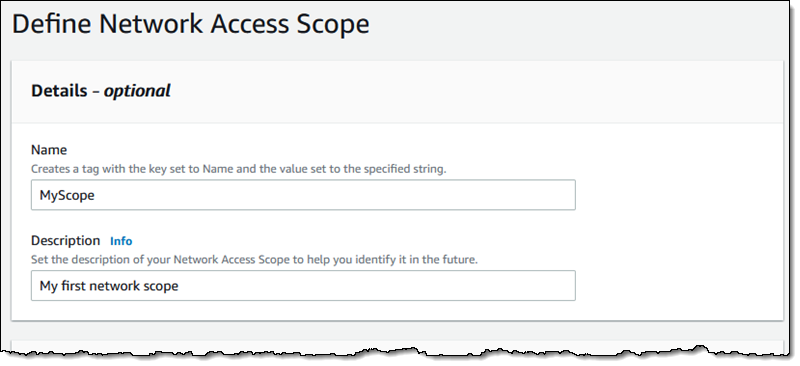
I enter a name and a description:
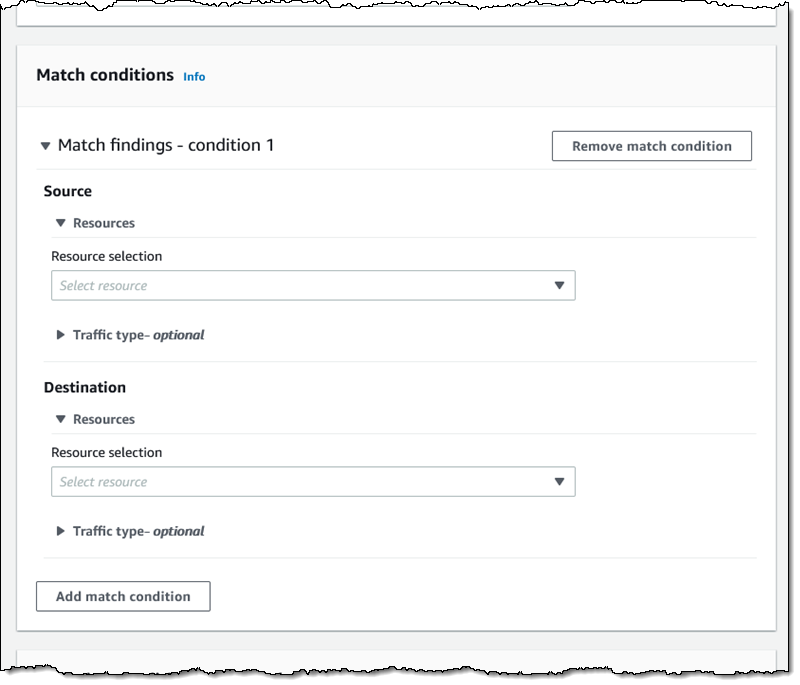
Then I define the source and destinations by resource type, id, traffic type, and so forth:
I have many options for matching the traffic type. This allows me to create scopes for very specific purposes:
I can use a similar interface to add any optional exclusions.
Things to Know
This is a very powerful tool and one that I think you are going to love. Here are a couple of things to know about it:
Pricing – You pay $0.002 for each Elastic Network Interface (ENI) analyzed as part of an assessment.
Regions – Network Access Analyzer is available in the US East (N. Virginia), US East (Ohio), US West (N. California), US West (Oregon), Africa (Cape Town), Asia Pacific (Hong Kong), Asia Pacific (Mumbai), Asia Pacific (Seoul), Asia Pacific (Singapore), Asia Pacific (Sydney), Asia Pacific (Tokyo), Canada (Central), Europe (Frankfurt), Europe (Ireland), Europe (London), Europe (Milan), Europe (Paris), Europe (Stockholm), South America (São Paulo), and Middle East (Bahrain) Regions.
In the Works – We have lots of additional features on the product roadmap including support for AWS Organizations, the ability to run your analyses on a regular schedule, and support for IPv6 address ranges and resources.
— Jeff;
AWS Shield Advanced Update – Automatic Application Layer DDoS Mitigation
=======================
In 2016, we launched AWS Shield, a managed Distributed Denial of Service (DDoS) protection service that safeguards applications running on AWS. AWS Shield provides always-on detection and automatic inline mitigations that minimize application downtime and latency without needing to contact AWS Support.
There are two tiers of AWS Shield: Standard and Advanced. All AWS customers benefit from the automatic network layer protections of AWS Shield Standard and at no cost. AWS Shield Standard defends against the most common, frequently occurring network and transport layer (Layer 3 and 4) DDoS attacks to maximize the availability of AWS services.
For customized protection against sophisticated (Layer 3 to 7) threats targeting your applications, you can subscribe to AWS Shield Advanced. AWS Shield Advanced provides more sensitive detection and tailored mitigations against large and complex DDoS attacks, near real-time visibility into attacks, and integration with AWS WAF, a web application firewall for defense against Layer 7 attacks. AWS Shield Advanced also gives you 24-7 access to the AWS Shield Response Team (SRT) and cost protection against scaling costs stemming from DDoS attacks.
AWS Shield Advanced establishes a traffic baseline for each protected resource. Significant deviations from this baseline are flagged as DDoS events and trigger alerts through Amazon CloudWatch. However, mitigating these events still requires manually crafting an AWS WAF rule that isolates the malicious traffic, deploying it through the AWS WAF console or API, and evaluating the rule’s effectiveness. AWS Shield Advanced customers can utilize the SRT to create such AWS WAF rules or rely on their own expertise, but the process is time-consuming, which increases the time it takes to mitigate a DDoS attack and prevent availability impact to applications.
Today, we are announcing Automatic Application Layer DDoS Mitigation for AWS Shield Advanced. This is a new set of capabilities included for all Shield Advanced customers that automatically mitigate malicious web traffic that threatens to impact application availability. This feature automatically creates, tests, and deploys AWS WAF rules to mitigate layer 7 DDoS events on behalf of customers.
Enabling Automatic Application Layer DDoS Mitigation
Visit the AWS Shield console to get started with automatic application layer DDoS mitigation. To get the benefits of Shield Advanced, you must subscribe to an annual subscription.
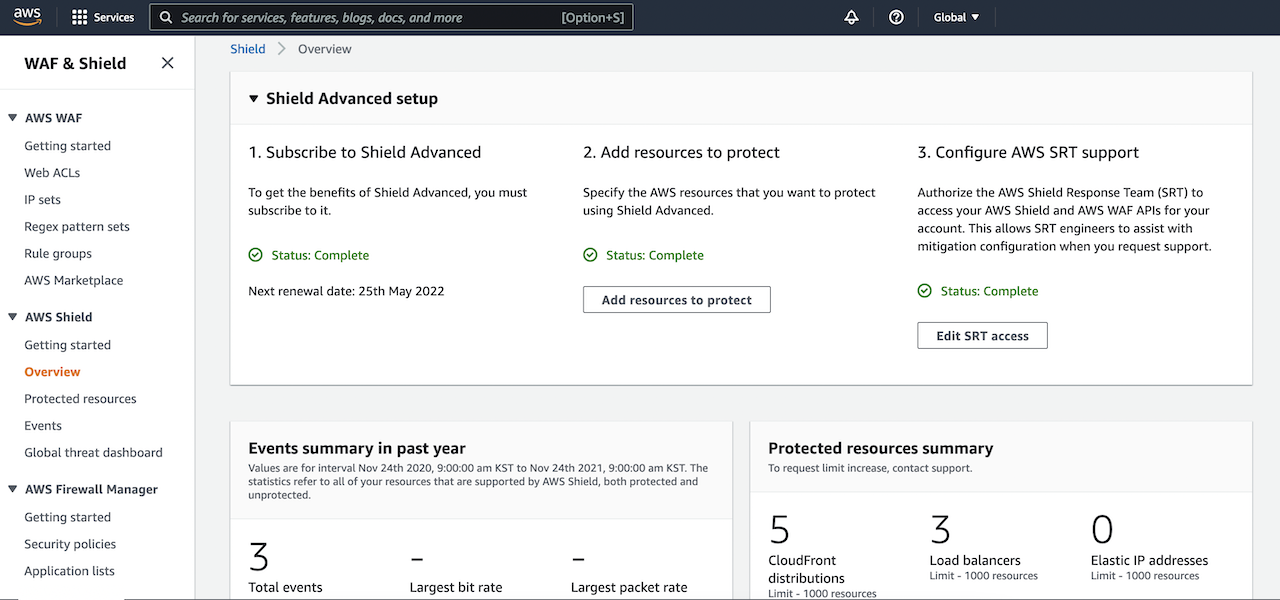
After you subscribe to AWS Shield Advanced, you specify the resources that you want to protect, configure a layer 7 DDoS mitigation, AWS SRT supports, and a dashboard in CloudWatch to monitor DDoS events. To learn more, see Getting started with AWS Shield Advanced in the AWS documentation.
To enable Shield Advanced automatic application layer DDoS mitigation, select your layer 7 AWS resources (e.g. CloudFront), and choose Configure protections from the drop down list.
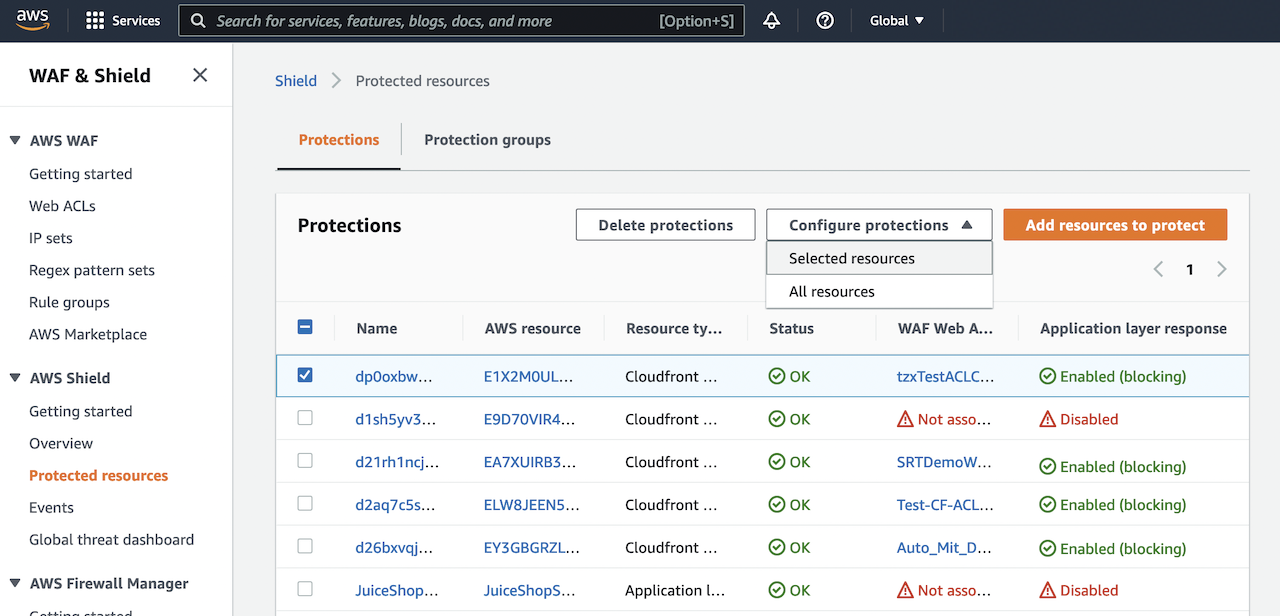
Next, in Configure protections, choose if you would like to enable automatic mitigation of layer 7 events and select if whether WAF rules should be created in Count or Block mode in Automatic response. Placing WAF rules in Count mode allows you to observe how resource traffic would be affected before deploying them in Block mode. Please note that a WebACL must be associated with a Shield protected resource in order to enable automatic layer 7 mitigation.

Mitigation actions can be changed to count or block mode at any time. Navigate to the Events tab of the console to view detected DDoS events, and select a detected event to see detection, mitigation, and top contributor metrics.

How to Mitigate Application Layer DDoS Automatically
When you want to protect layer 7 resources, such as CloudFront distributions, AWS Shield Advanced will establish a 30-day traffic baseline into each protected resource.
When automatic mitigation is enabled, only then will we create a Shield managed rule group in which AWS Shield Advanced will create AWS WAF rules in response to DDoS events.
Traffic that significantly deviates from the established baseline will be flagged as a potential DDoS event. After an event is detected, Shield Advanced will attempt to identify a signature based on offending request patterns. If a signature is identified, WAF rules will be created to mitigate traffic with that signature.
Once rules are confirmed to be safe, they will be added to the Shield-managed rule group, and customers can choose whether the rules are deployed in count or block mode. Customers can also create CloudWatch alerts based on when requests are being blocked or counted.
Customers can change the action that automatic mitigation takes (count or block) or disable it entirely at any time. Shield Advanced will automatically remove AWS WAF rules after it has determined that an event has fully subsided. To learn more, see Shield Advanced automatic application layer DDoS mitigation in the AWS Shield Developer Guide.
Available Now
Automatic Application Layer DDoS Mitigation is now available for CloudFront distributions protected by AWS Shield Advanced, and it can be enabled at no additional cost.
You can send feedback to the AWS forum for AWS Shield or through your usual AWS Support contacts.
— Channy
New AWS Scholarship Program Helps Underrepresented and Underserved Students Prep for Careers in AI and ML
=======================
As a woman working in information technology (IT) for many years, it has always been close to my heart to challenge long-standing gender stereotypes and inspire more young learners to consider a career in tech. With artificial intelligence (AI) and machine learning (ML) defining the future of technology, this future also depends on diverse representation.
The World Economic Forum estimates that technological advances and automation will create 97 million new technology jobs by 2025, including in the field of AI and ML. Yet, according to their research, women make up just 32% of AI jobs globally. The Pew Research Center found that Black and Hispanic workers in the U.S. comprise just 9% and 8% of workers in the science, technology, engineering, and mathematics (STEM) careers respectively.
At Amazon, we believe that technology should be built in a way that’s inclusive, diverse, and equitable. We already offer STEM programs to enable underrepresented groups to build or advance their technical skills and open up new career possibilities. Programs such as We Power Tech, Amazon Future Engineer, AWS Girls’ Tech Day, and AWS GetIT aim to build a future of tech that is inclusive, diverse, and accessible.
Today, I am excited to announce the launch of the AWS AI & ML Scholarship program in collaboration with Intel and Udacity, designed to prepare underrepresented and underserved students globally for careers in ML.
AWS AI & ML Scholarship Program Debuts with AWS DeepRacer Student
The AWS AI & ML Scholarship program is launching as part of the all-new AWS DeepRacer Student service and Student League. This is a new student division of the popular AWS DeepRacer program, a cloud-based 3D car racing simulator that provides a fun way to learn about ML and reinforcement learning (RL). Through DeepRacer Student, you have access to free online trainings to learn the ML and RL basics. You also have access to 10 hours of model training and 5 GB of storage per month to participate in the DeepRacer Student League, a global autonomous racing competition exclusively for AWS AI & ML students.
As part of DeepRacer Student, the AWS AI & ML Scholarship program in collaboration with Intel and Udacity is geared toward underserved and underrepresented high school and college students globally who are at least 16 years old. These are students who may have faced financial barriers growing up or are part of underrepresented groups, including women, people with disabilities, LGBTQ+ persons, as well as people of color. Students in these groups who take part in the DeepRacer Student League are eligible for a chance to win one or two of 2,500 annual scholarships from Udacity, an online learning platform focused on technology skills.
How to Qualify for the AWS AI & ML Scholarship
 To be considered for a scholarship, you must successfully finish all AWS DeepRacer Student learning modules and achieve a score of at least 80% on all course quizzes, reach a certain lap time performance with your DeepRacer car in the Student League, and submit an essay.
Each year, 2,000 students will win a scholarship to the AI Programming with Python Udacity Nanodegree program. Udacity Nanodegrees are massive open online courses (MOOCs) designed to bridge the gap between learning and career goals. This aims to equip students with programming and ML fundamentals to solve real world problems with ML. The top 500 participants in this first Nanodegree will be eligible to join a second customized Nanodegree program curated specifically for AWS AI & ML Scholarship program recipients.
Coaching and Mentorship Opportunities for Scholarship Recipients
Scholarship recipients not only get access to the educational content, but also receive up to 85 hours of support from Udacity instructors to make sure that students successfully learn and progress through the Nanodegree. Instructors and students meet weekly in small groups, review the content for the week, answer questions, and work on a case study as a group exercise.
The top 500 participants who advance into the second Nanodegree will receive 12 months of mentorship from tenured technology leaders at Amazon and Intel to help prepare for a tech career.
All scholarship recipients will be given exclusive access to Ask-Me-Anythings (AMAs), fireside chats, and office hours with AI/ML professionals and diversity experts from Amazon, Intel, and AWS collaborators such as Girls in Tech. These will help familiarize students with different job functions in the AI/ML field.
Enroll via AWS DeepRacer Student
To enroll in the AWS AI & ML Scholarship program, first sign up at the AWS DeepRacer Student service with a valid email address. Note that this student player account is separate from an AWS account and doesn’t require you to provide any billing or credit card information.
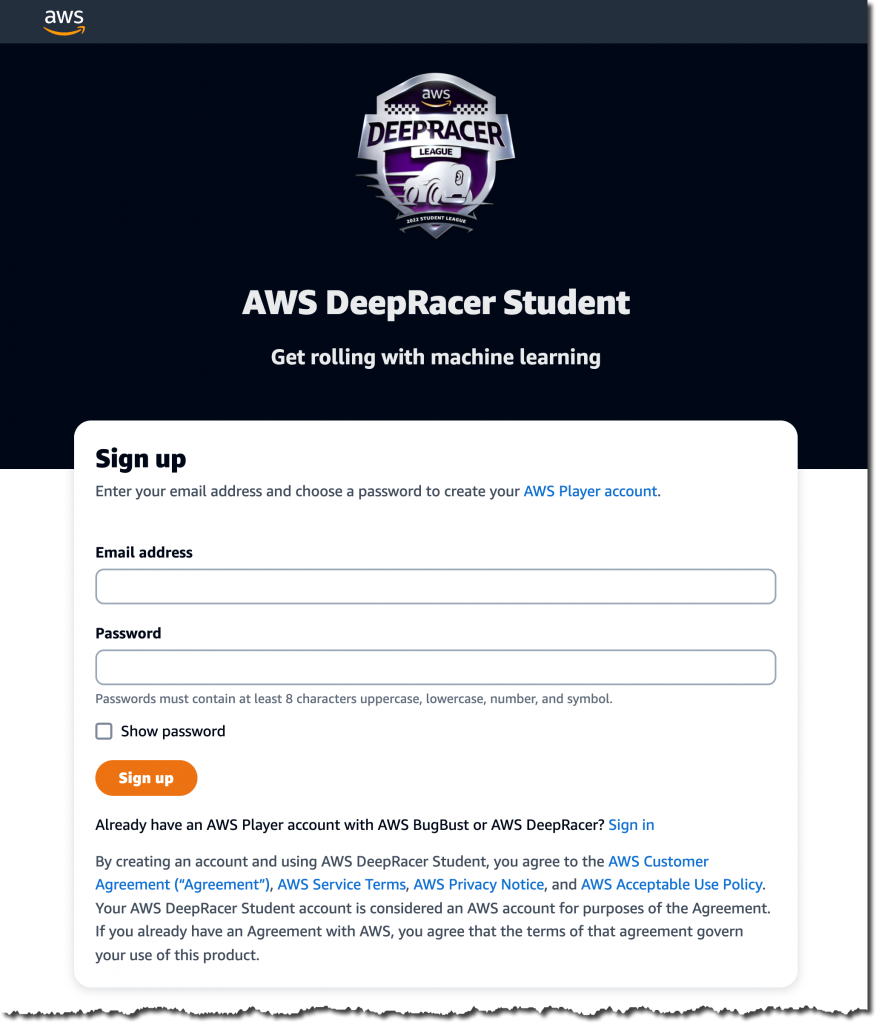
You will receive a verification code via email. Once you have verified your email address, log in to the DeepRacer Student service and complete the sign-up process.

The form will ask for some additional information, including your school, major, and planned year of graduation. You must also self-certify that you are a student enrolled in either high school, university, or community college.
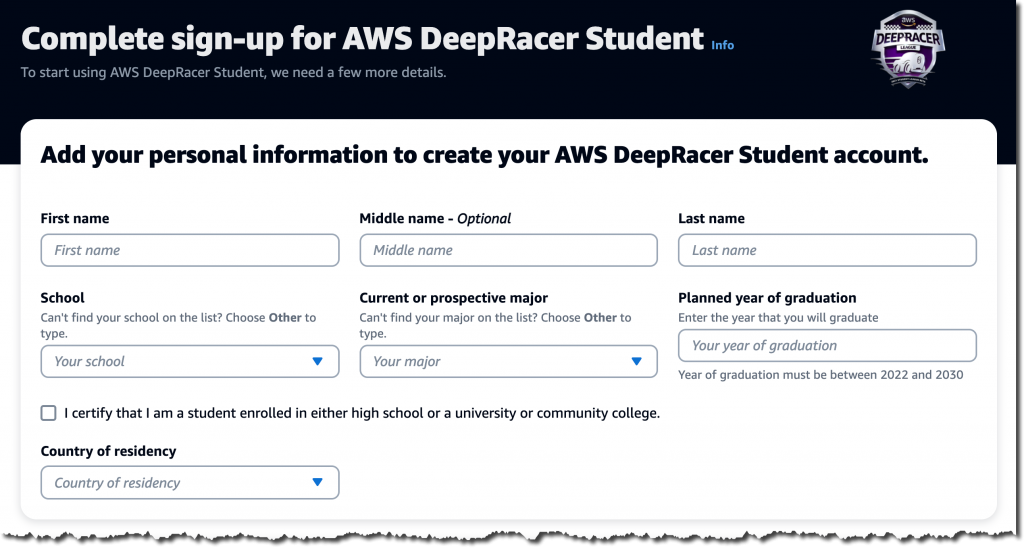
Next, enroll in the AWS AI & ML Scholarship program by selecting the corresponding checkbox. The scholarship qualification will start on March 1, 2022.

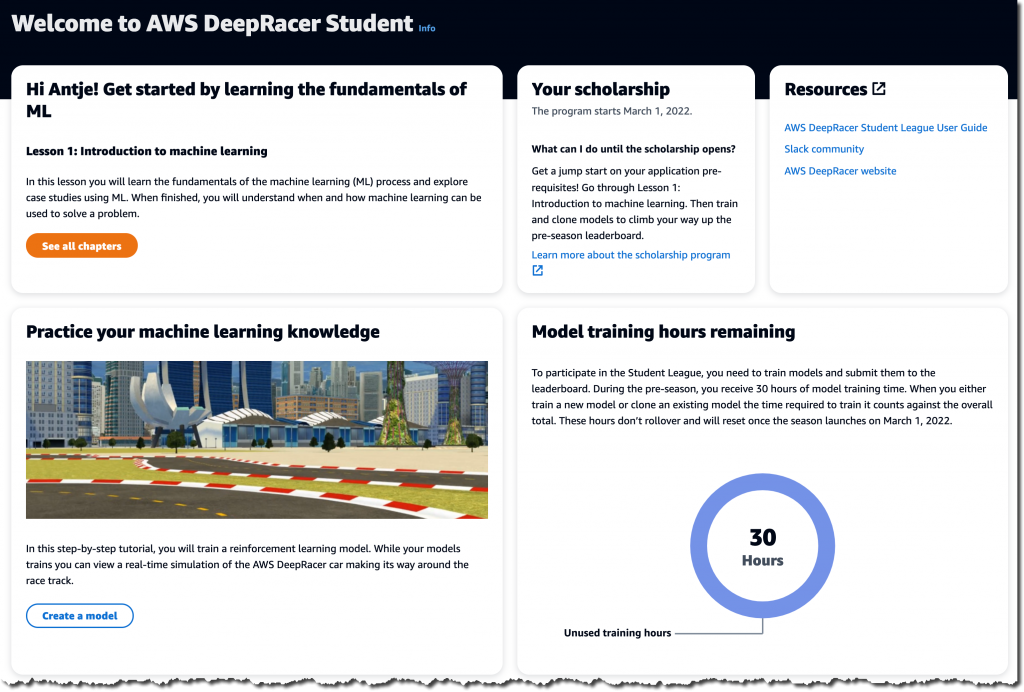
Welcome to AWS DeepRacer Student! Start learning the fundamentals of ML through the provided online trainings. You can also participate in the pre-season DeepRacer Student League before the qualifying races start on March 1, 2022.
Available Now
Start preparing for the AWS AI & ML Scholarship program by signing up for AWS DeepRacer Student, available globally today, and opt in to the scholarship program. Start learning with learning modules, train your first AWS DeepRacer model, and see how it performs in AWS DeepRacer Student League Pre-season happening now. Join the AWS Slack community to connect with experts and ask questions.
Sign up for AWS DeepRacer Student and the AWS AI & ML Scholarship program today.
– Antje
Now in Preview – Amazon SageMaker Studio Lab, a Free Service to Learn and Experiment with ML
=======================
Our mission at AWS is to make machine learning (ML) more accessible. Through many conversations over the past years, I learned about barriers that many ML beginners face. Existing ML environments are often too complex for beginners, or too limited to support modern ML experimentation. Beginners want to quickly start learning and not worry about spinning up infrastructure, configuring services, or implementing billing alarms to avoid going over budget. This emphasizes another barrier for many people: the need to provide billing and credit card information at sign-up.
What if you could have a predictable and controlled environment for hosting your Jupyter notebooks in which you can’t accidentally run up a big bill? One that doesn’t require billing and credit card information at all at sign-up?
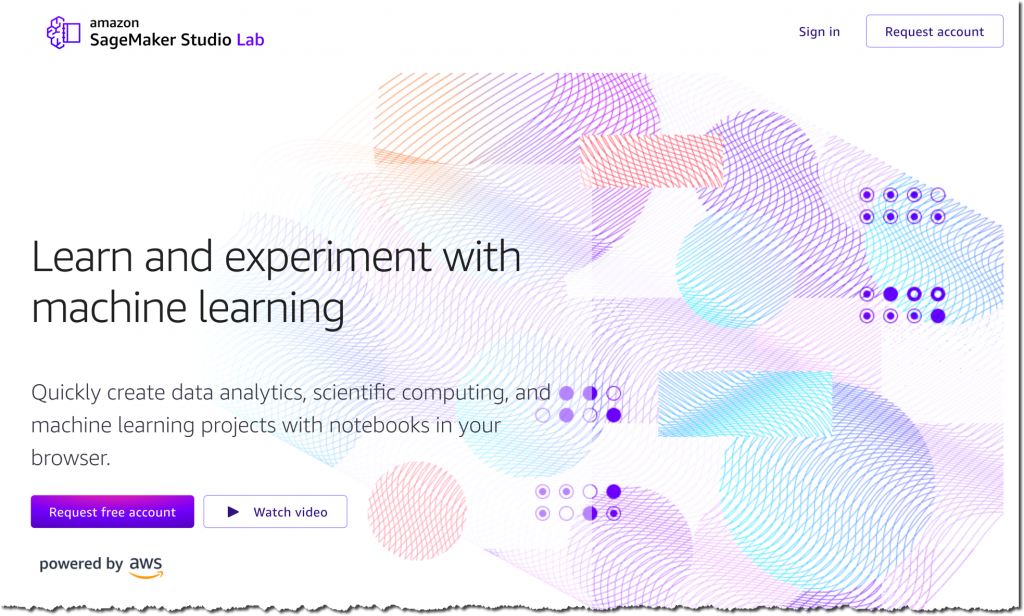
Today, I am extremely happy to announce the public preview of Amazon SageMaker Studio Lab, a free service that enables anyone to learn and experiment with ML without needing an AWS account, credit card, or cloud configuration knowledge.
At AWS, we believe technology has the power to solve the world’s most pressing issues. And, we proudly support the new and innovative ways that our customers are using these technologies to deliver social impacts.
This is why I am also excited to announce the launch of the AWS Disaster Response Hackathon using Amazon SageMaker Studio Lab. The hackathon, starting today and running through February 7, 2022, is a great way to start learning ML while doing good in the world. I will share more details on how to get involved at the end of the post.
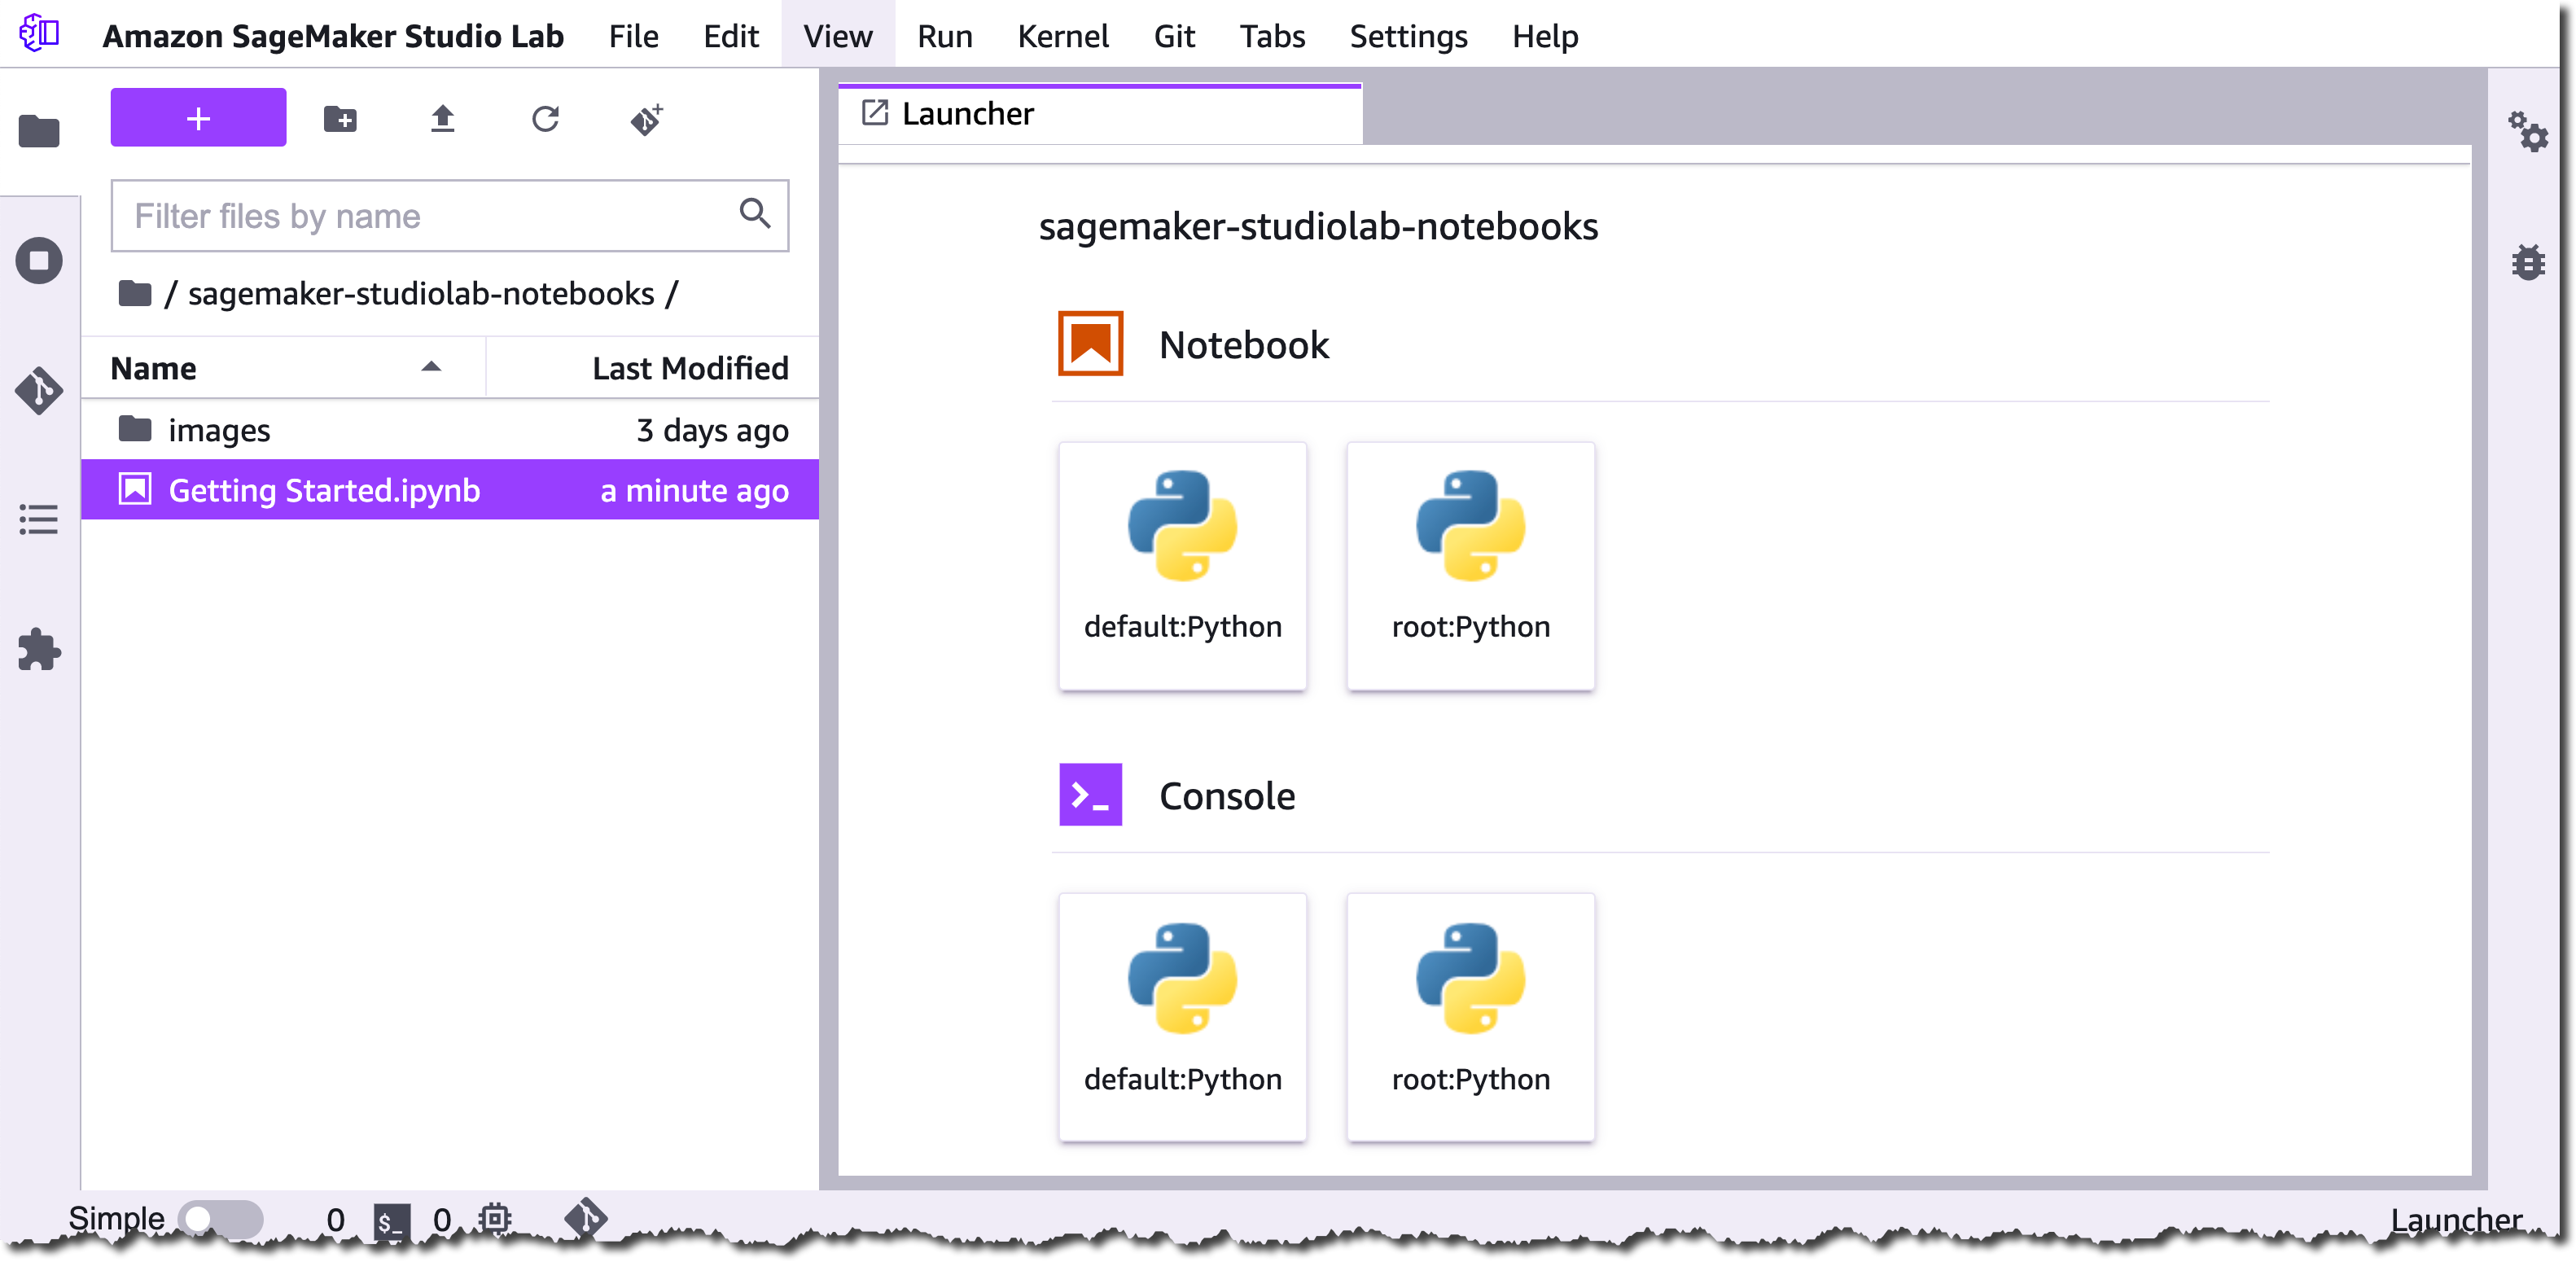
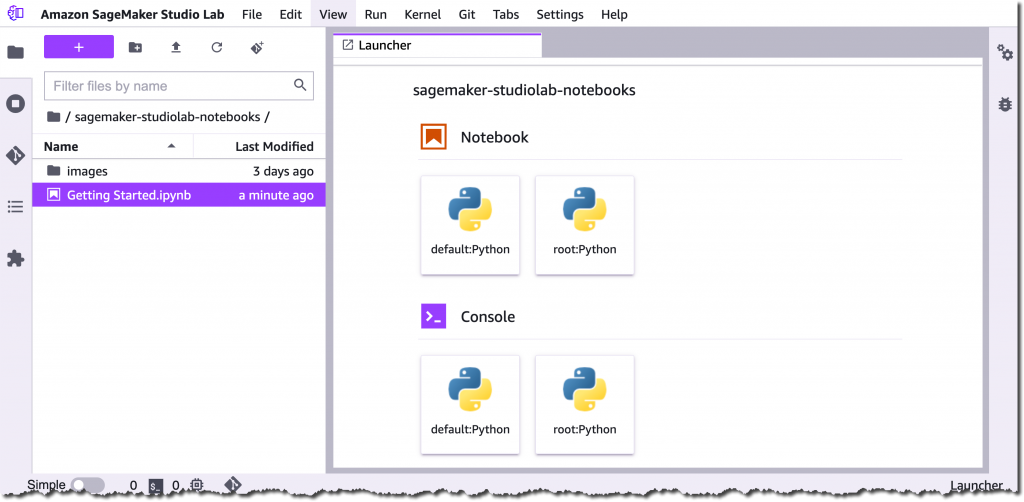
Getting Started with Amazon SageMaker Studio Lab
Studio Lab is based on open-source JupyterLab and gives you free access to AWS compute resources to quickly start learning and experimenting with ML. Studio Lab is also simple to set up. In fact, the only configuration you have to do is one click to choose whether you need a CPU or GPU instance for your project. Let me show you.
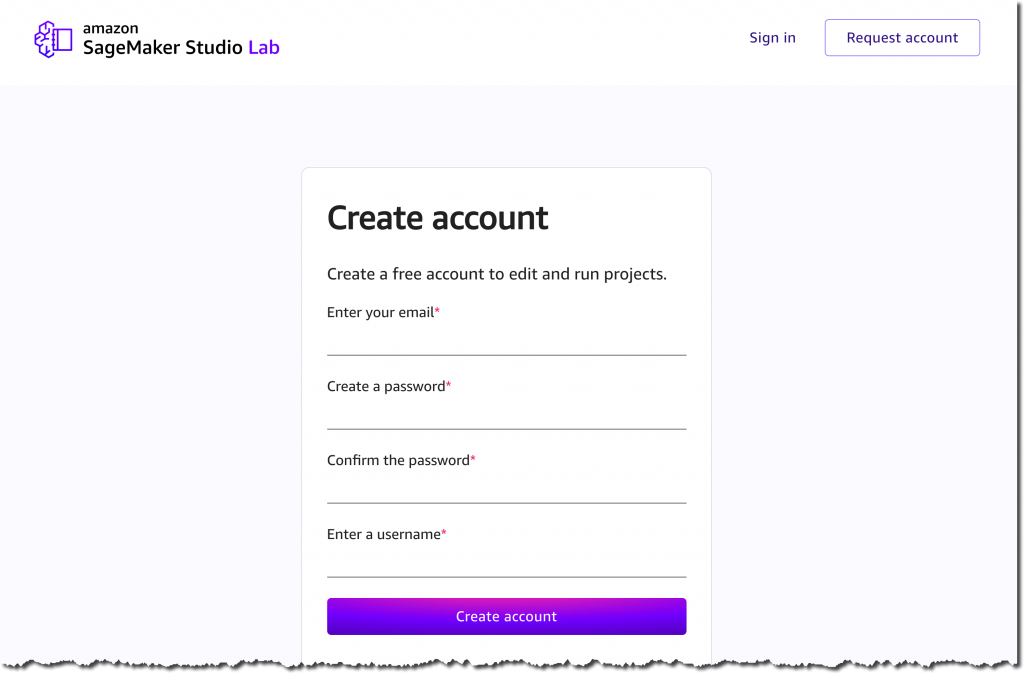
The first step is to request a free Studio Lab account here.
When your account request is approved, you will receive an email with a link to the Studio Lab account registration page. You can now create your account with your approved email address and set a password and your username. This account is separate from an AWS account and doesn’t require you to provide any billing information.
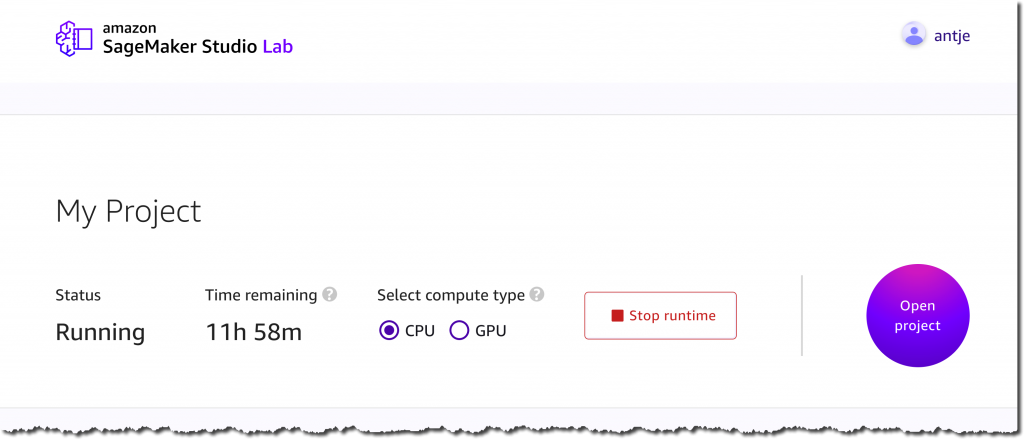
Once you have created your account and verified your email address, you can sign in to Studio Lab. Now, you can select the compute type for your project. You can choose between 12 hours of CPU or 4 hours of GPU per user session, with an unlimited number of user sessions available to you. Furthermore, you get a minimum of 15 GB of persistent storage per project. When your session expires, Studio Lab will take a snapshot of your environment. This enables you to pick up right where you left off. Let’s select CPU for this demo, and choose Start runtime.

Once the instance is running, select Open project to go to your free Studio Lab environment and start building. No additional configuration is required.
Customize your environment
Studio Lab comes with a Python base image to get you started. The image only has a few libraries pre-installed to save the available space for the frameworks and libraries that you actually need.

You can customize the Conda environment and install additional packages using the %conda install <package> or %pip install <package> command right from within your notebook. You can also create entirely new, custom Conda environments, or install open-source JupyterLab and Jupyter Server extensions. For detailed instructions, see the Studio Lab documentation.
GitHub integration
Studio Lab is tightly integrated with GitHub and offers full support for the Git command line. This lets you easily clone, copy, and save your projects. Moreover, you can add an Open in Studio Lab badge to the README.md file or notebooks in your public GitHub repo to share your work with others.

This will let everyone open and view the notebook in Studio Lab. If they have a Studio Lab account, then they can also run the notebook. Add the following markdown to the top of your README.md file or notebook to add the Open in Studio Lab badge:
[](https://studiolab.sagemaker.aws/import/github/org/repo/blob/master/path/to/notebook.ipynb)
Replace org, repo, path and the notebook filename with those for your repo. Then, when you click the Open in Studio Lab badge, it will preview the notebook in Studio Lab. If your repo is private within a GitHub account or organization and you would like other people to use it, then you must additionally install the Amazon SageMaker GitHub App at the GitHub account or organization level.
If you have a Studio Lab account, you can click Copy to project and choose to either copy just the notebook or to clone the entire repo into your Studio Lab account. Moreover, Studio Lab can check if the repository contains a Conda environment file and build the custom Conda environment for you.
Learn the Fundamentals of ML
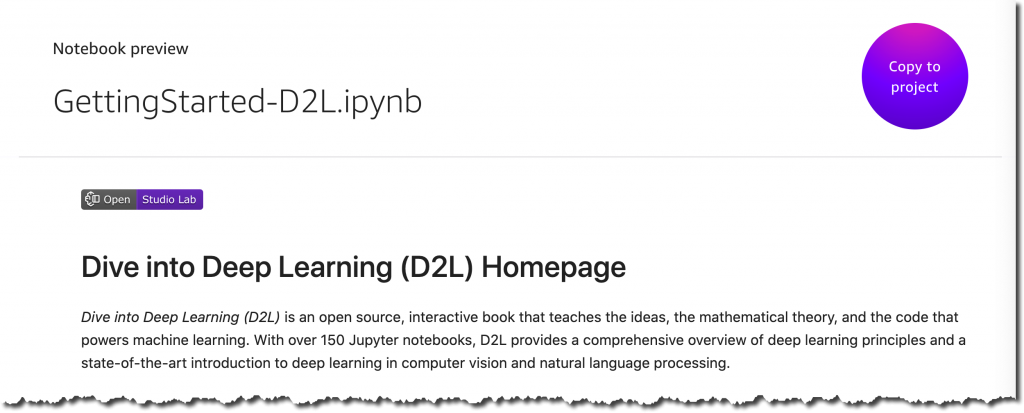
If you are new to ML, then Studio Lab provides access to free, educational content to get you started. Dive into Deep Learning (D2L) is a free interactive book that teaches the ideas, the math, and the code behind ML and DL. The AWS Machine Learning University (MLU) gives you access to the same ML courses used to train Amazon’s own developers on ML. Hugging Face is a large open source community and a hub for pre-trained deep learning (DL) models. This is mainly aimed at natural language processing. In just a few clicks, you can import the relevant notebooks from D2L, MLU, and Hugging Face into your Studio Lab environment.
Join the AWS Disaster Response Hackathon using Amazon SageMaker Studio Lab
The frequency and severity of natural disasters are increasing. This year alone, we have seen significant wildfires across the Western United States and in countries like Greece and Turkey; major floods across Europe; and Hurricane Ida’s impact to the coast of Louisiana. In response, governments, businesses, nonprofits, and international organizations are placing more emphasis on disaster preparedness and response than ever before.

Through the AWS Disaster Response Hackathon offering a total of $54,000 USD in prices, we hope to simulate ways of applying ML to solve pressing challenges in natural disaster preparedness and response.
Join the hackathon today, start building, and don’t forget to submit your project before February 7, 2022. This hackathon is also an attempt to set the Guinness World Record for the “largest machine learning competition.”
Join the Preview
You can request a free Amazon SageMaker Studio Lab account starting today. The number of new account registrations will be limited to ensure a high quality of experience for all customers. You can find sample notebooks in the Studio Lab GitHub repository. Give it a try and let us know your feedback.
Request a free Amazon SageMaker Studio Lab account.
– Antje
Announcing Amazon SageMaker Inference Recommender
=======================
Today, we’re pleased to announce Amazon SageMaker Inference Recommender — a brand-new Amazon SageMaker Studio capability that automates load testing and optimizes model performance across machine learning (ML) instances. Ultimately, it reduces the time it takes to get ML models from development to production and optimizes the costs associated with their operation.
Until now, no service has provided MLOps Engineers with a means to pick the optimal ML instances for their model. To optimize costs and maximize instance utilization, MLOps engineers would have to use their experience and intuition to select an ML instance type that would serve them and their model well, given the requirements to run them. Moreover, given the vast array of ML instances available, and the practically infinite nuances of each model, choosing the right instance type could take more than a few attempts to get it right. SageMaker Inference Recommender now gives MLOps engineers recommendations for the best available instance type to run their model. Once an instance has been selected, their model can be instantly deployed to the selected instance type with only a few clicks. Gone are the days of writing custom scripts to run performance benchmarks and load testing.
For MLOps engineers who want to get data on how their model will perform ahead of pushing to a production environment, SageMaker Inference Recommender also lets them run a load test against their model in a simulated environment. Ahead of deployment, they can specify parameters, such as required throughput, sample payloads, and latency constraints, and test their model against these constraints on a selected set of instances. This lets MLOps engineers gather data on how well their model will perform in the real world, thereby enabling them to feel confident in pushing it to production—or highlighting potential issues that must be addressed before putting it out into the world.
SageMaker Inference Recommender has even more tricks up its sleeve to make the lives of MLOps engineers easier and make sure that their models continue to operate optimally. MLOps Engineers can use SageMaker Inference Recommender benchmarking features to perform custom load tests that estimate model performance when accessed under load in a production environment given certain requirements. Results from these tests can be loaded with either SageMaker Studio or the AWS SDK or AWS CLI, giving the engineers an overview of model performance, comparisons of numerous configurations, and the ability to share the results with any stakeholders.
Find Out More
Get started with Amazon SageMaker Inference Recommender through Amazon SageMaker Studio, AWS SDKs and CLI. Amazon SageMaker Inference Recommender is available in all AWS commercial regions where SageMaker is available except the AWS China Regions.
For more information, visit the Amazon SageMaker Inference Recommender section of the Amazon SageMaker Deployment landing page.
To get started, see the SageMaker Inference Recommender documentation.
New – Introducing SageMaker Training Compiler
=======================
 Today, we’re pleased to announce Amazon SageMaker Training Compiler, a new Amazon SageMaker capability that can accelerate the training of deep learning (DL) models by up to 50%.
As DL models grow in complexity, so too does the time it can take to optimize and train them. For example, it can take 25,000 GPU-hours to train popular natural language processing (NLP) model “RoBERTa“. Although there are techniques and optimizations that customers can apply to reduce the time it can take to train a model, these also take time to implement and require a rare skillset. This can impede innovation and progress in the wider adoption of artificial intelligence (AI).
How has this been done to date?
Typically, there are three ways to speed up training:
- Using more powerful, individual machines to process the calculations
- Distributing compute across a cluster of GPU instances to train the model in parallel
- Optimizing model code to run more efficiently on GPUs by utilizing less memory and compute.
In practice, optimizing machine learning (ML) code is difficult, time-consuming, and a rare skill set to acquire. Data scientists typically write their training code in a Python-based ML framework, such as TensorFlow or PyTorch, relying on ML frameworks to convert their Python code into mathematical functions that can run on GPUs, commonly known as kernels. However, this translation from the Python code of a user is often inefficient because ML frameworks use pre-built, generic GPU kernels, instead of creating kernels specific to the code and model of the user.
It can take even the most skilled GPU programmers months to create custom kernels for each new model and optimize them. We built SageMaker Training Compiler to solve this problem.
Today’s launch lets SageMaker Training Compiler automatically compile your Python training code and generate GPU kernels specifically for your model. Consequently, the training code will use less memory and compute, and therefore train faster. For example, when fine-tuning Hugging Face’s GPT-2 model, SageMaker Training Compiler reduced training time from nearly 3 hours to 90 minutes.
Automatically Optimizing Deep Learning Models
So, how have we achieved this acceleration? SageMaker Training Compiler accelerates training jobs by converting DL models from their high-level language representation to hardware-optimized instructions that train faster than jobs with off-the-shelf frameworks. Under the hood, SageMaker Training Compiler makes incremental optimizations beyond what the native PyTorch and TensorFlow frameworks offer to maximize compute and memory utilization on SageMaker GPU instances.
More specifically, SageMaker Training Compiler uses graph-level optimization (operator fusion, memory planning, and algebraic simplification), data flow-level optimizations (layout transformation, common sub-expression elimination), and back-end optimizations (memory latency hiding, loop oriented optimizations) to produce an optimized model that efficiently uses hardware resources. As a result, training is accelerated by up to 50%, and the returned model is the same as if SageMaker Training Compiler had not been used.
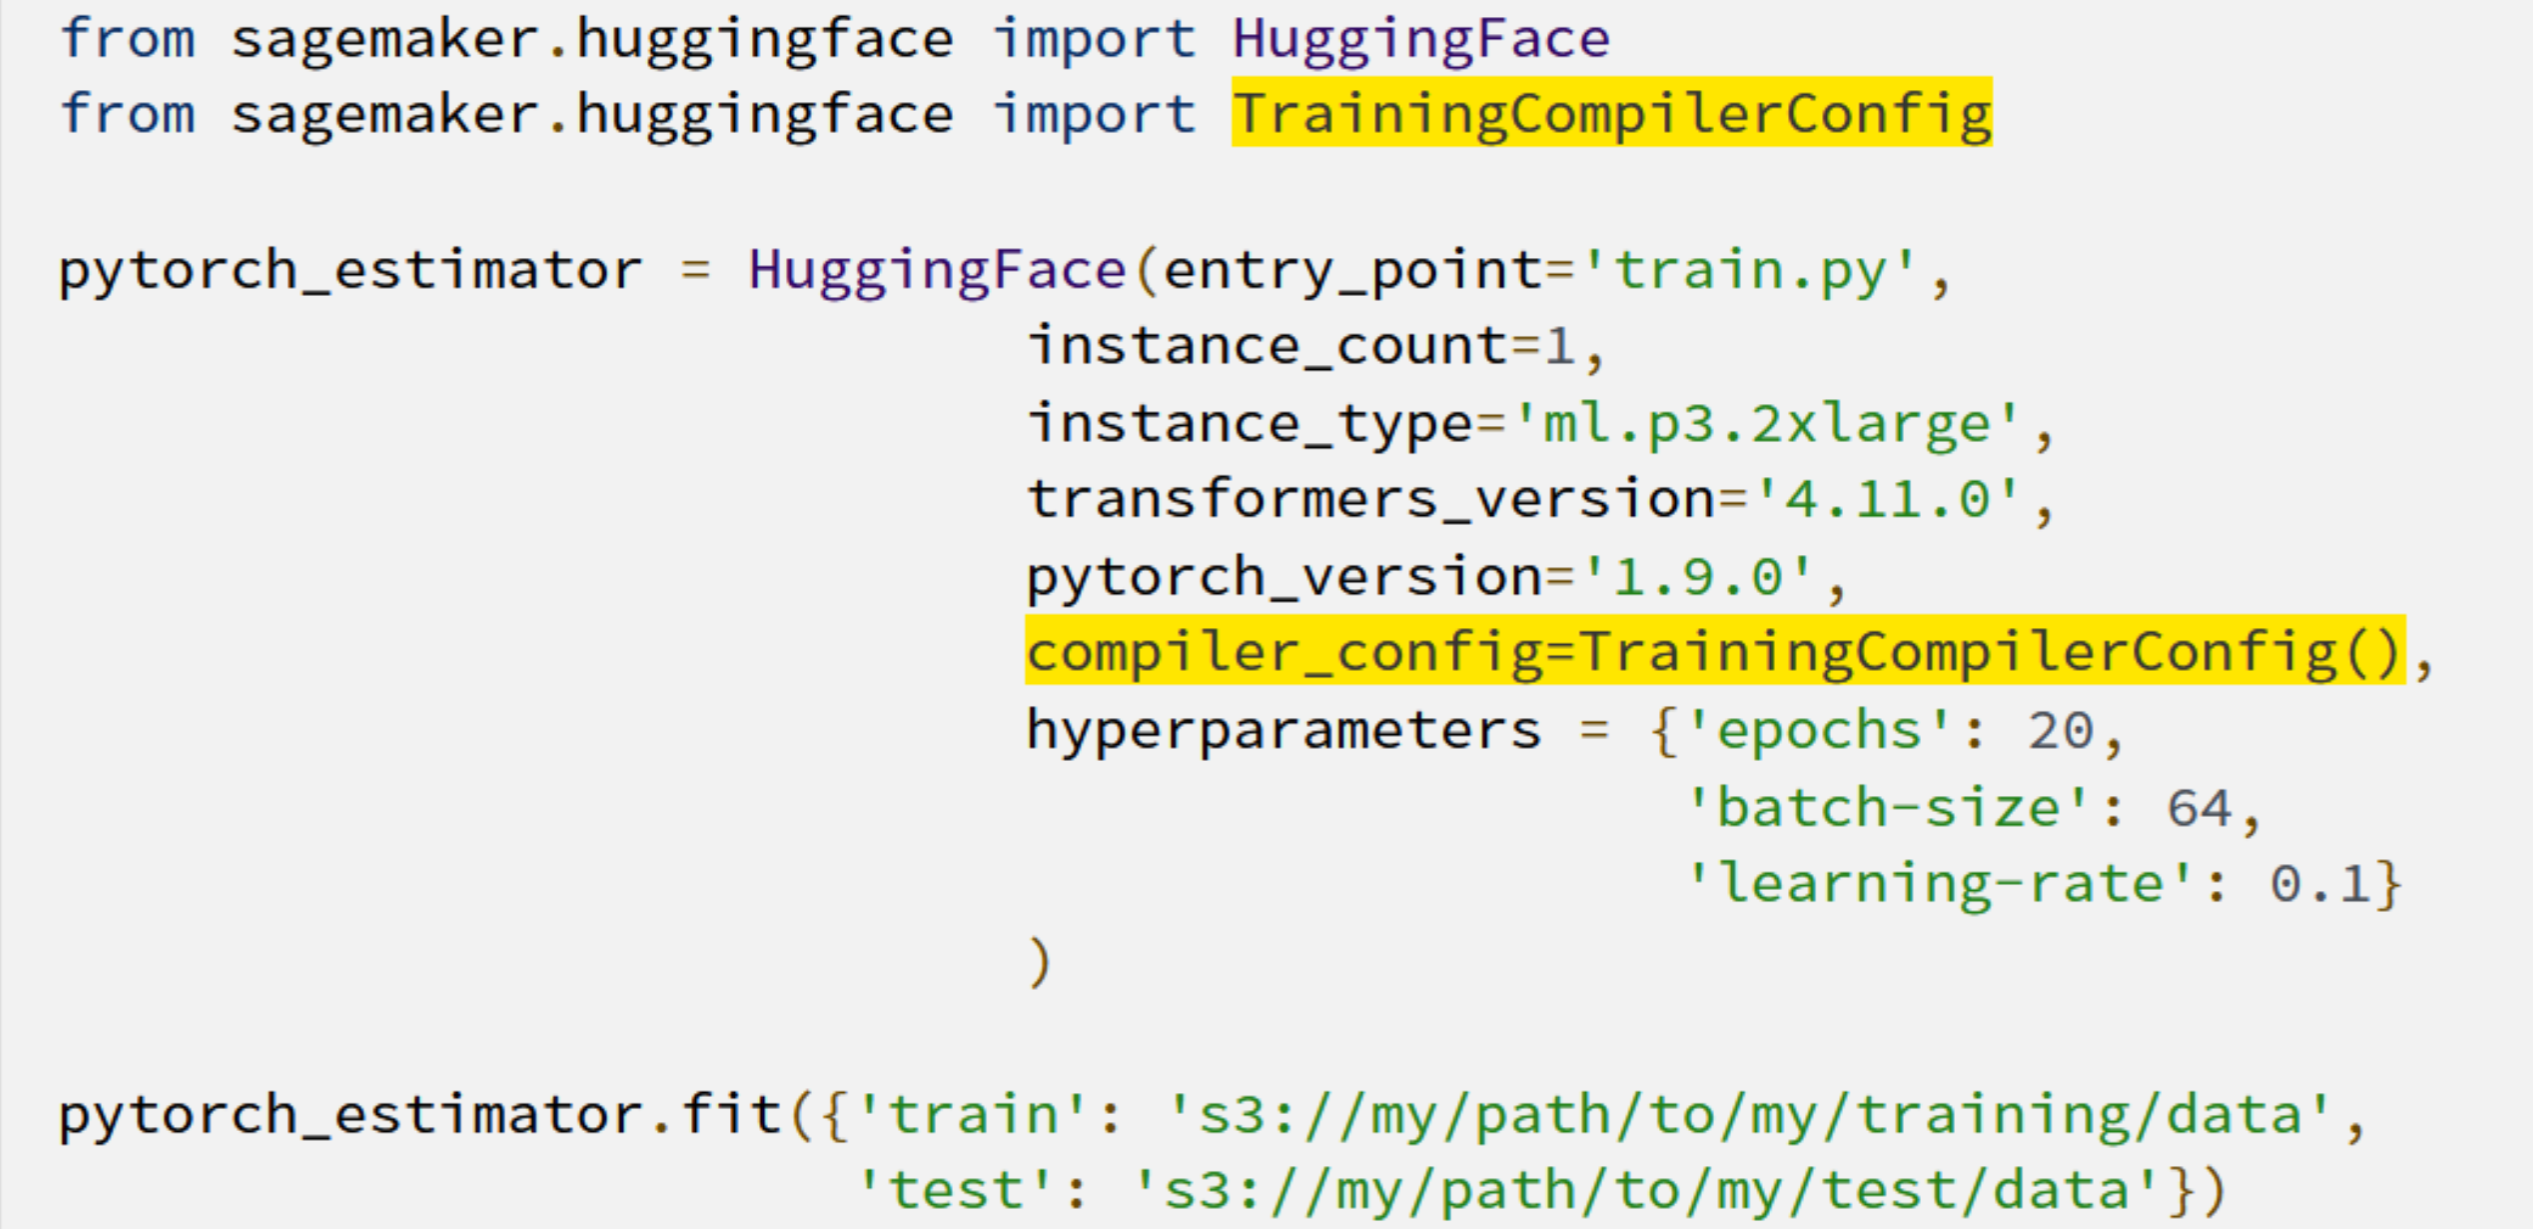
But how do you use SageMaker Training Compiler with your models? It can be as simple as adding two lines of code!
The shortened training times mean that customers gain more time for innovating and deploying their newly-trained models at a reduced cost and a greater ability to experiment with larger models and more data.
Getting the most from SageMaker Training Compiler
Although many DL models can benefit from SageMaker Training Compiler, larger models with longer training will realize the greatest time and cost savings. For example, training time and costs fell by 30% on a long-running RoBERTa-base fine-tuning exercise.
Jorge Lopez Grisman, a Senior Data Scientist at Quantum Health – an organization on a mission to “make healthcare navigation smarter, simpler, and more cost-effective for everyone” – said:
“Iterating with NLP models can be a challenge because of their size: long training times bog down workflows and high costs can discourage our team from trying larger models that might offer better performance. Amazon SageMaker Training Compiler is exciting because it has the potential to alleviate these frictions. Achieving a speedup with SageMaker Training Compiler is a real win for our team that will make us more agile and innovative moving forward.”
Further Resources
To learn more about how Amazon SageMaker Training Compiler can benefit you, you can visit our page here. And to get started see our technical documentation here.
New – Create and Manage EMR Clusters and Spark Jobs with Amazon SageMaker Studio
=======================
Today, we’re very excited to offer three new enhancements to our Amazon SageMaker Studio service.
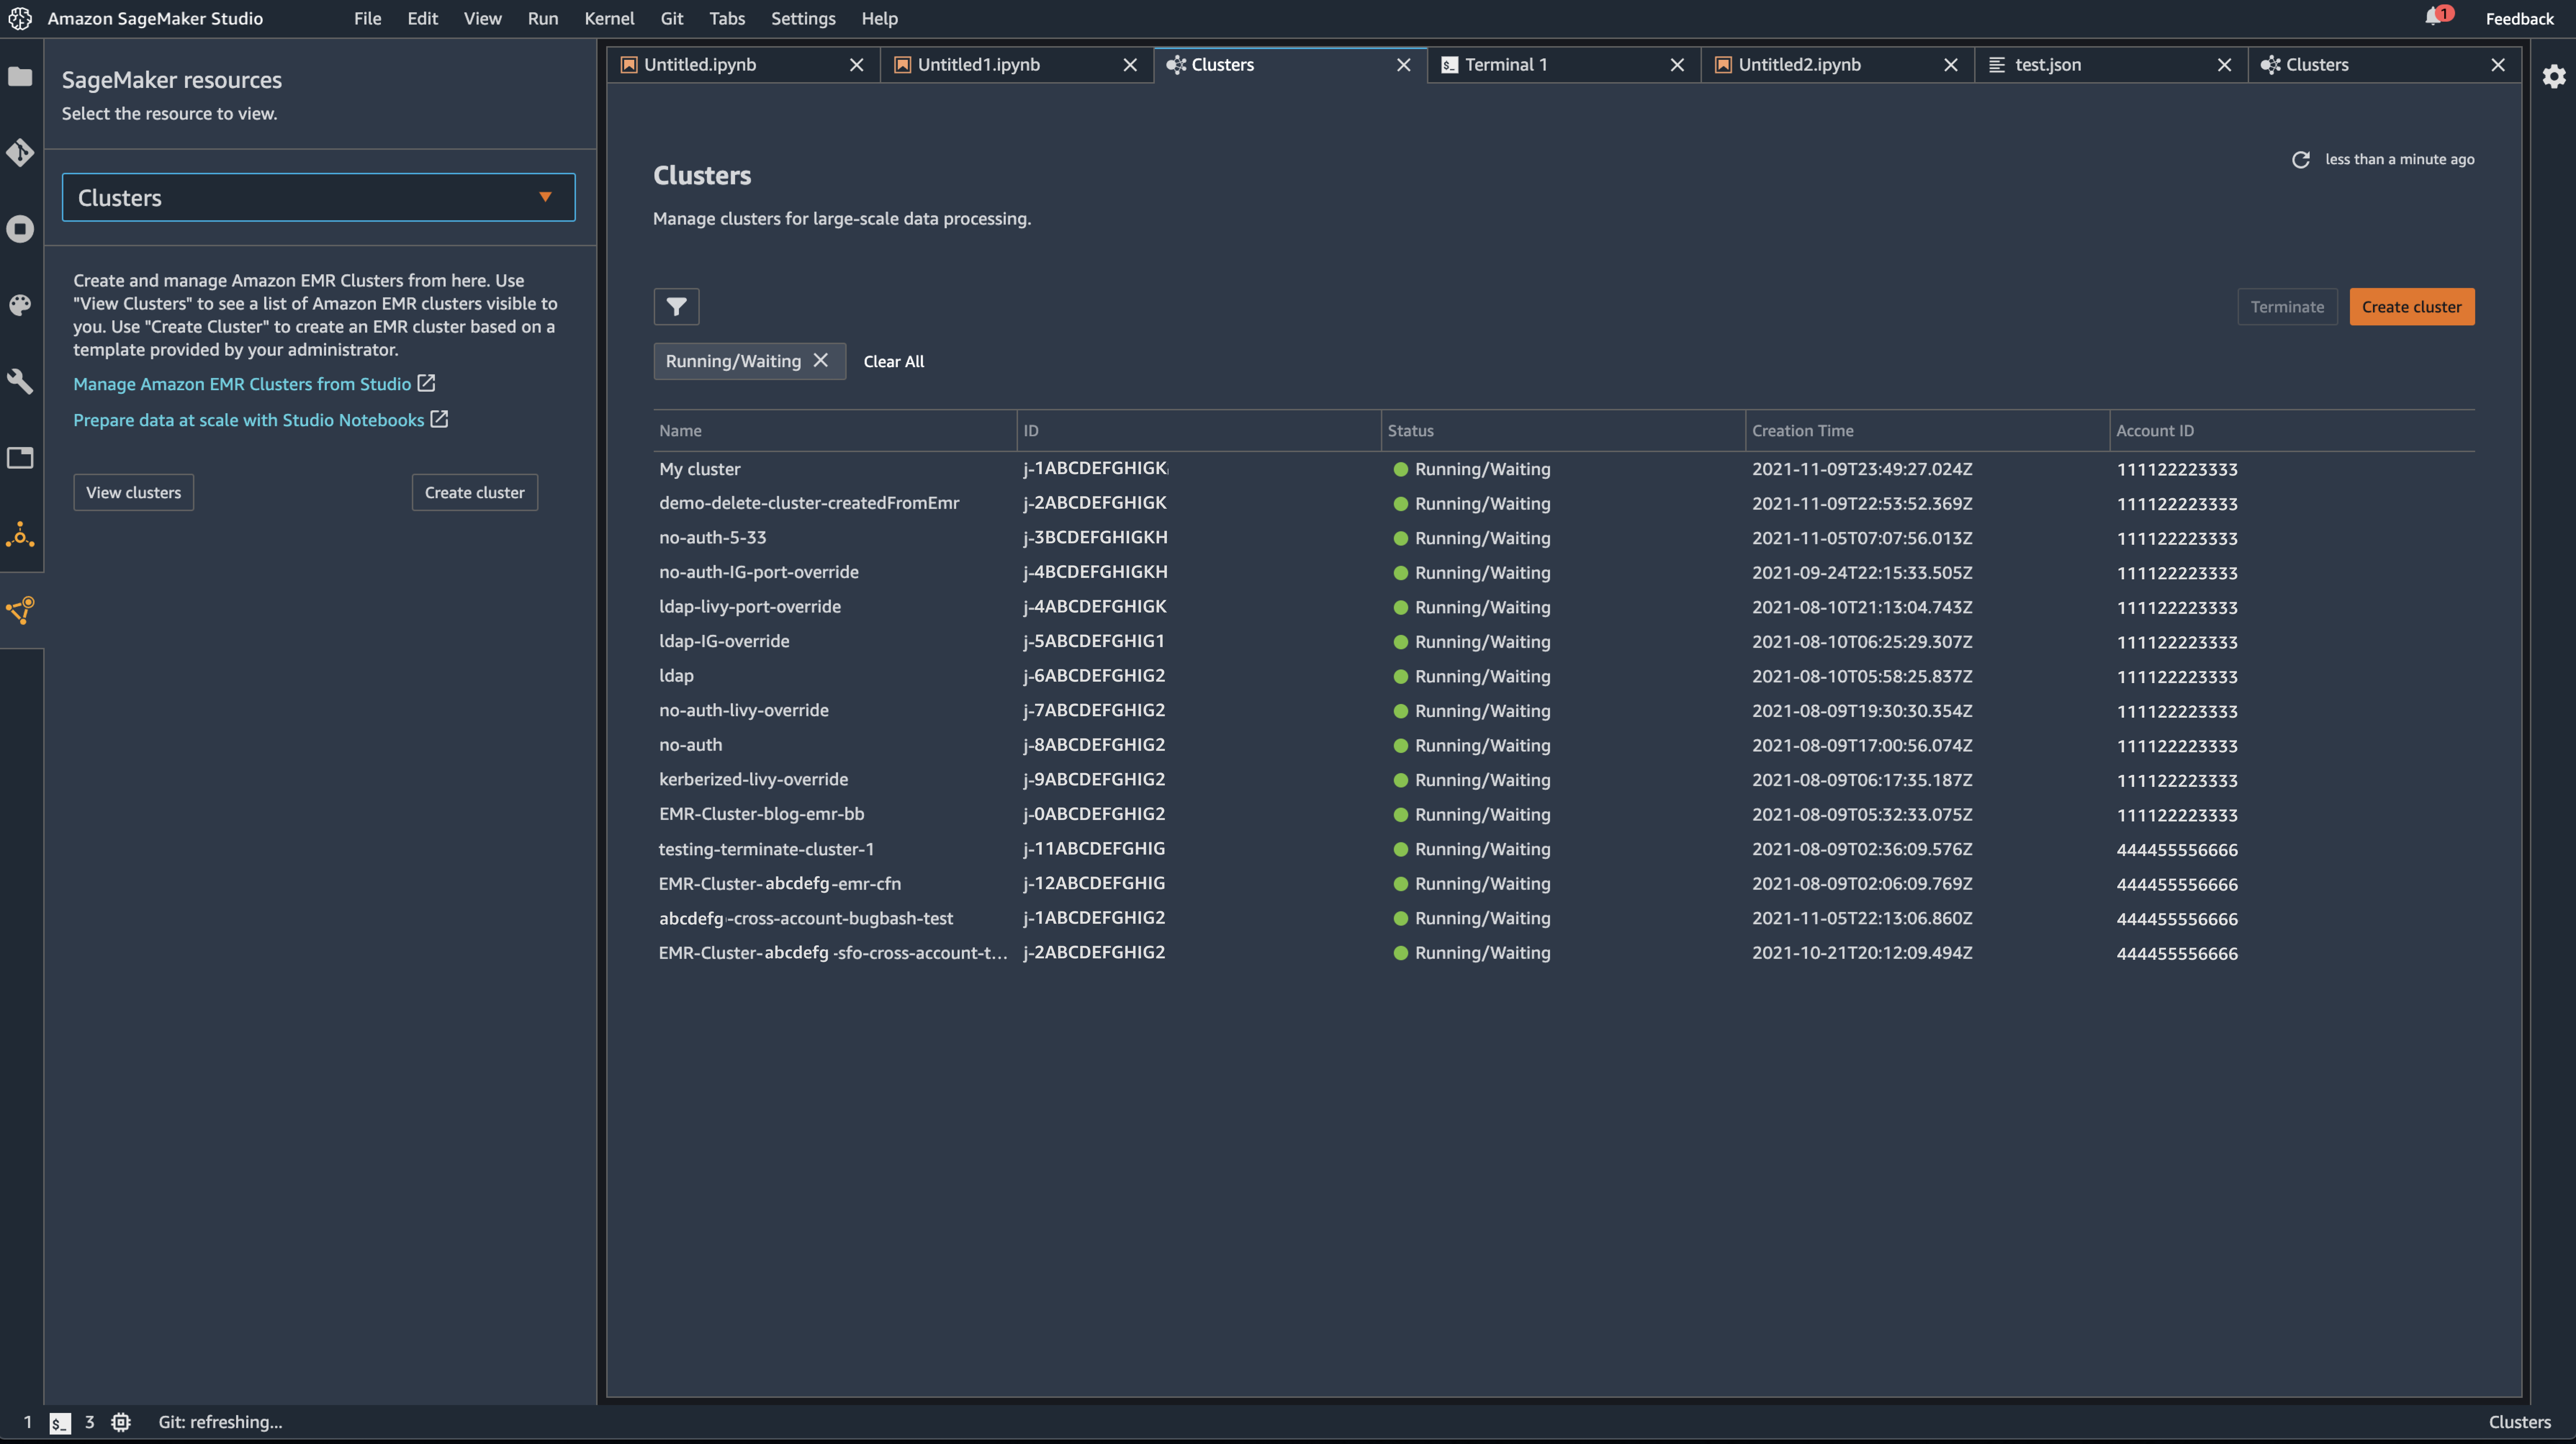
As of now, users of SageMaker Studio can create, terminate, manage, discover, and connect to Amazon EMR clusters running within a single AWS account and in shared accounts across an organization—all directly from SageMaker Studio. Furthermore, SageMaker Studio Notebook users can able to utilize SparkUI to monitor and debug Spark jobs running on an Amazon EMR cluster—directly from the SageMaker Studio Notebooks!
The story so far…
Before today, SageMaker Studio users had some ability to find and connect with EMR clusters, provided that they were running in the same account as SageMaker Studio. While useful in many circumstances, if a cluster did not exist that would suit the requirements of the model or analysis being run, then data scientists would have to leave their development environment and manually configure a cluster that suited their needs. As well as being disruptive to workflow of data scientists, there are no guarantees that the data scientists would have either the permissions or depth of knowledge required to provision a cluster that would enable them to continue with their work. Additionally, being restricted to creating and managing clusters in a single account could become prohibitive in organizations working across many AWS accounts.
What’s new?
Data scientists can:
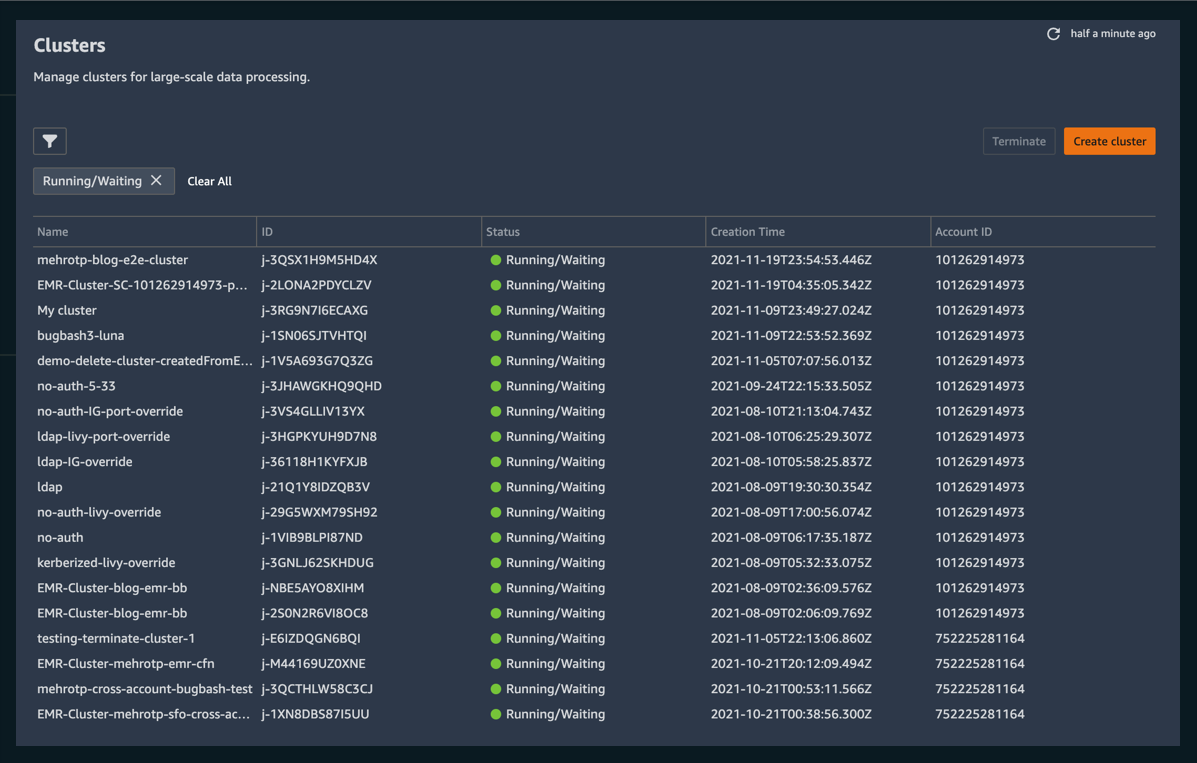
Discover, manage, create, terminate, and connect to Amazon EMR clusters from within SageMaker Studio
Utilize “templates” – a new way to configure and provision clusters for your workload needs with support from seasoned DevOps practitioners
Connect to, debug, and monitor Spark jobs running on an Amazon EMR cluster from within a SageMaker Studio Notebook
Creating, Connecting to, and Managing EMR Clusters
With the ability to connect to and manage EMR clusters from within SageMaker Studio, data scientists no longer have to leave their familiar environment to create, configure and provision the EMR clusters where they run their workloads.
Introducing Templates
A template is a collection of off-the-shelf cluster configurations optimized for numerous workloads. Templates can be created and managed by DevOps administrators and made available through the AWS Service Catalog to data scientists within SageMaker Studio. This lets them quickly spin up a cluster to meet their needs, all while safe in the knowledge that a trusted DevOps admin has correctly configured a cluster per the project’s requirements. Furthermore, this lets data scientists get on with the work they do best, and it gives DevOps administrators within these teams greater ability to manage the types of provisioned infrastructure.
Directly Connect to and monitor Spark Jobs
Finally, to make the job of data scientists even simpler, we’ve built the ability to connect to, debug, and monitor Spark jobs running on an Amazon EMR cluster from within a SageMaker Studio Notebook. Before now, to access the monitoring UI of a Spark Job, one needed to configure secure tunnels and web proxies to gain direct access to currently executing jobs, adding friction to the workflow of a data scientist trying to observe and debug their workloads. Now, with these new features, users will have one-click access directly from the interface that they already know. This enables them to build and put their workloads to work, rather than spending time on configuring infrastructure and workloads.

These new features let data scientists can use a simple, consistent UI to provision and manage infrastructure as needed without ever having to leave SageMaker Studio or dive into the minutiae of the provisioning of such hardware – Moreover, they won’t have to spend time configuring proxies and SSH tunnels to debug and monitor ongoing Spark jobs.
Find out more
These features are generally available in the following AWS Regions, and there are no additional charges to use this capability: US East (N. Virginia and Ohio), US West (N.California and Oregon), Canada (Central), Europe (Frankfurt), Europe (Ireland), Europe (Stockholm), Europe (Paris) and Europe (London), Asia Pacific (Mumbai), Asia Pacific (Seoul), Asia Pacific (Singapore), Asia Pacific (Sydney), and Asia Pacific (Tokyo) and South America (Sao Paolo). For complete information on pricing and regional availability, please refer to the SageMaker Studio pricing page .
To learn more, see our documentation.
Page 1|Page 2|Page 3|Page 4