Contents of this page is copied directly from AWS blog sites to make it Kindle friendly. Some styles & sections from these pages are removed to render this properly in 'Article Mode' of Kindle e-Reader browser. All the contents of this page is property of AWS.
Page 1|Page 2|Page 3|Page 4
Announcing Amazon SageMaker Ground Truth Plus – Create Training Datasets Without Code or In-house Resources
=======================
Today, we’re pleased to announce the latest service in the Amazon SageMaker suite that will make labeling datasets easier than ever before. Ground Truth Plus is a turn-key service that uses an expert workforce to deliver high-quality training datasets fast, and reduces costs by up to 40 percent.
The Challenges of Machine Learning Model Creation
One of the biggest challenges in building and training machine learning (ML) models is sourcing enough high-quality, labeled data at scale to feed into and train those models so that they can make an accurate prediction.
On the face of it, labeling data might seem like a fairly straightforward task…
Step 1: Get data
Step 2: Label it
…but this is far from the reality.
Even before you have labelers begin annotations, you need a custom labeling workflow and user interface specific to your project so that you get a high-quality dataset. This relies on a combination of robust tooling and skilled workers, and the effort spent can be significant.
Once the data labeling workflow and user interface has been constructed, a workforce to use those systems must be organized and trained – and this is all before a single point of data has been labeled!
Finally, once the labeling systems have been built, the workflows designed, and the workforce trained and deployed, the process of passing data through that system must be monitored and checked to ensure a consistent, high-quality output. After enough data has been passed through and labeled by the system, you have arrived at the point you’ve been trying to get to all along: you finally have enough data to train the ML model.
Each of these steps represents a significant investment in time, costs, and energy. You could be spending these resources building ML models instead of labeling and managing data, and using Ground Truth Plus can help free you up to do just that.
Introducing Amazon SageMaker Ground Truth Plus
Amazon SageMaker Ground Truth Plus enables you to easily create high-quality training datasets without having to build labeling applications and manage the labeling workforce on your own. Which means you don’t even need to have deep ML expertise or extensive knowledge of workflow design and quality management. You simply provide data along with labeling requirements and Ground Truth Plus sets up the data labeling workflows and manages them on your behalf in accordance with your requirements.
For example, if you need medical experts to label radiology images, you can specify that in the guidelines you provide to Ground Truth Plus. The service will then automatically select labelers trained in radiology to label your data, and from there an expert workforce that is trained on a variety of ML tasks will start labeling the data. Ground Truth Plus brings ML-powered automation to data labeling, which increases the quality of the output dataset and decreases the data labeling costs.
Amazon SageMaker Ground Truth Plus uses a multi-step labeling workflow including ML techniques for active learning, pre-labeling, and machine validation. This reduces the time required to label datasets for a variety of use cases including computer vision and natural language processing. Finally, Ground Truth Plus provides transparency into data labeling operations and quality management through interactive dashboards and user interfaces. This lets you monitor the progress of training datasets across multiple projects, track project metrics such as daily throughput, inspect labels for quality, and provide feedback on the labeled data.
How Does It Work?
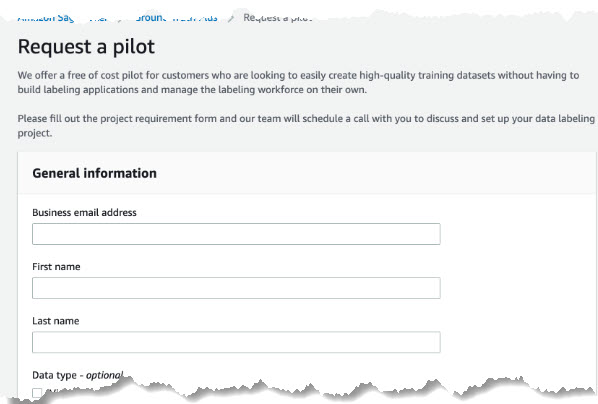
First, let’s head to the new Ground Truth Plus console and fill out a form outlining the requirements for the data labeling project. Following that, our team of AWS Experts will schedule a call to discuss your data labeling project.
After the call, you simply upload data in an Amazon Simple Storage Service (Amazon S3) bucket for labeling.
Once the data has been uploaded, our experts will set-up the data labeling workflow per your requirements and create a team of labelers with the expertise necessary to label your data effectively. This helps make sure that you have the best people possible working on your projects.
These expert labelers use the Ground Truth Plus tools we’ve built to label these datasets quickly and effectively.
Initially, labelers will annotate the data you’ve uploaded, much like the following example image that we’ve uploaded from the CBCL StreetScenes dataset. However, as the labelers start to submit examples of labeled data, something cool begins happening: our ML systems kick in and start to pre-label the images on behalf of the expert workforce!

As more and more data is labeled by the expert workforce, the ML model becomes better at pre-labeling those images. This means that there’s less need for a human to spend as much time creating each individual label for every object of interest in a dataset. Less time spent on labeling means lower costs for you, and it also means a quicker turnaround in creating a dataset that can be used for training a model – all without sacrificing quality.
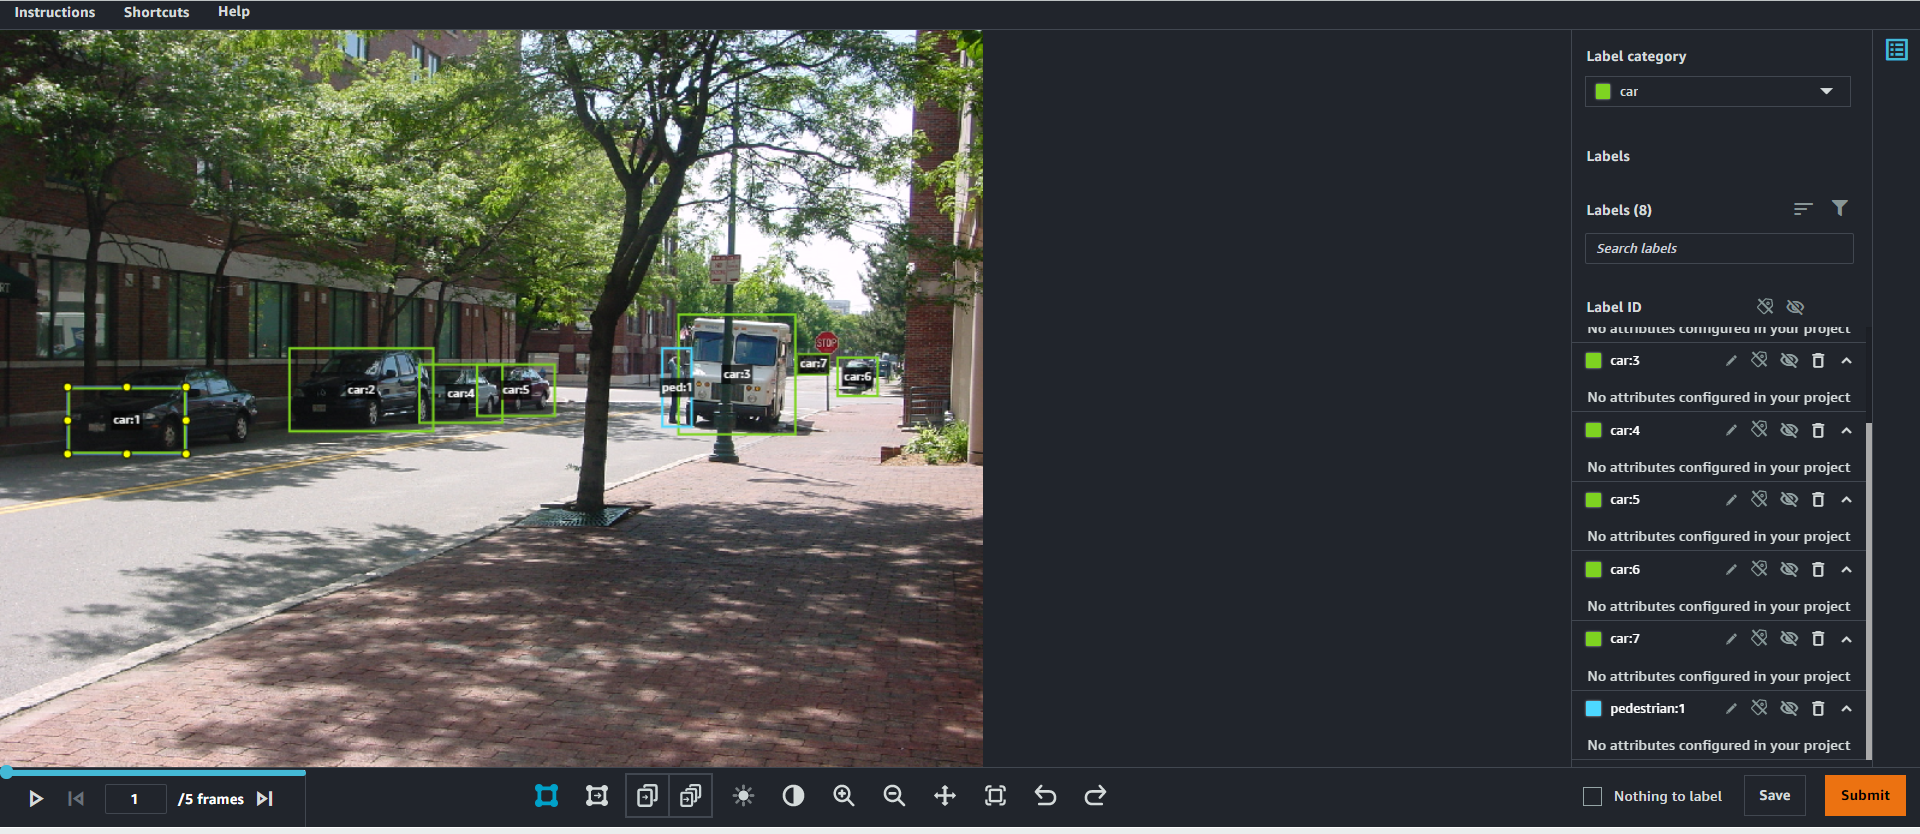
As the process continues, these ML models will also start to highlight potential areas of interest that the labeling workforce may have missed or incorrectly labeled through machine validation (indicated below by the purple box). Once an area of interest has been highlighted, a human labeler can view and either confirm or delete the suggestion that the model has made. This iteratively improves the pre-labeling and machine validation stages, further reducing the time needed by a labeler to manually label the data, and ensures a high-quality output throughout the process.
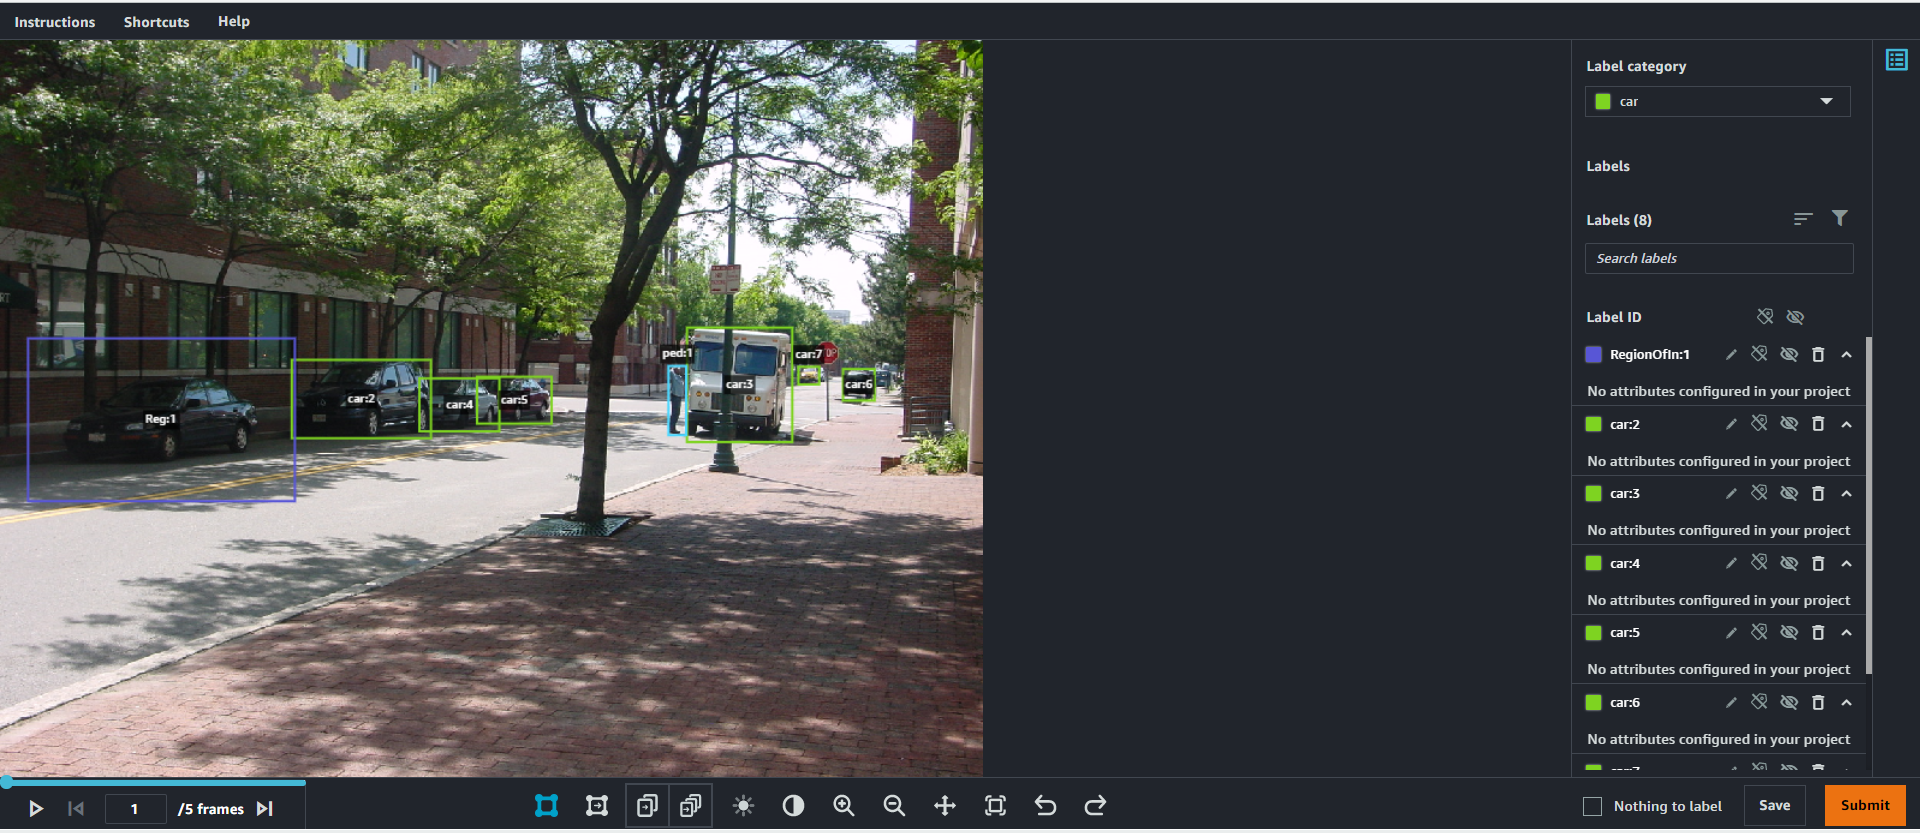
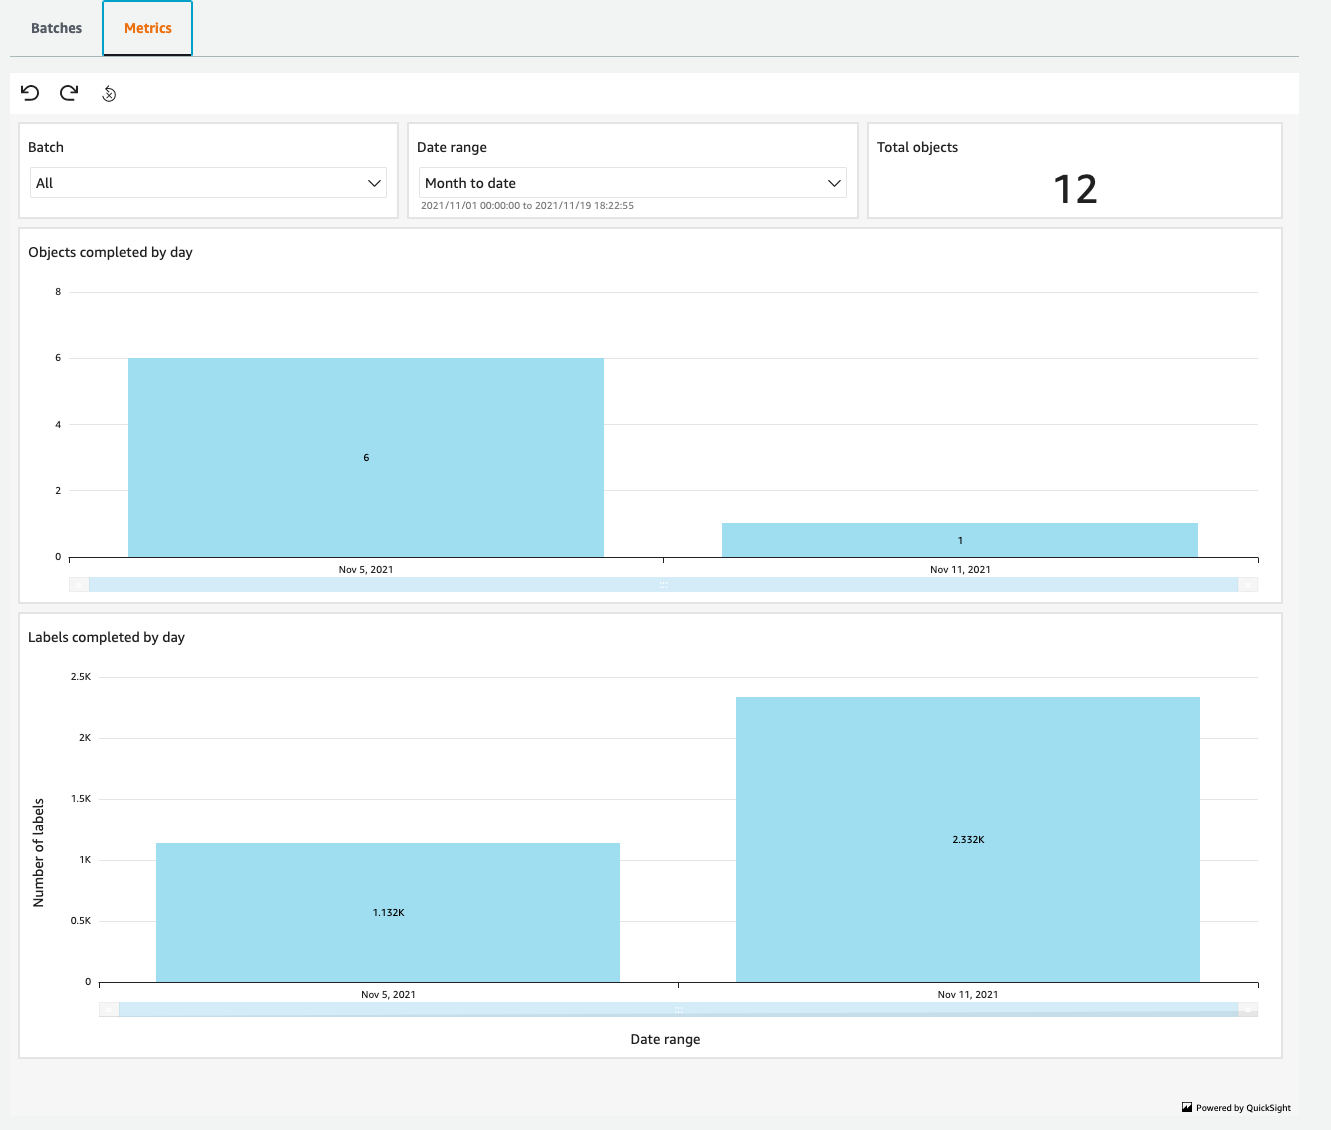
While this is all going on, you can monitor the progress and output of the project using the Ground Truth Plus Project Portal. Within this portal, you can track the amount of data labeled on a day-by-day basis, and make sure that the project is progressing at an acceptable rate.
With each batch of images uploaded and labeled, you can decide whether to accept them or send them back for relabeling if something has been missed.
Finally, when the labeling process has completed, you can retrieve the labeled data from a secure S3 bucket and get to the business of training models.
Find out more
Today, Amazon SageMaker Ground Truth Plus is available in the N. Virginia (us-east-1) region.
To learn more:
Visit the Amazon SageMaker Ground Truth Plus landing page
Access Ground Truth Plus directly by heading to the Amazon SageMaker Ground Truth Plus console page.
New DynamoDB Table Class – Save Up To 60% in Your DynamoDB Costs
=======================
Today we are announcing Amazon DynamoDB Standard-Infrequent Access (DynamoDB Standard-IA). A new table class for DynamoDB that reduces storage costs by 60 percent compared to existing DynamoDB Standard tables, and that delivers the same performance, durability, and scaling.
Nowadays, many customers are moving their infrequently accessed data between DynamoDB and Amazon Simple Storage Service (Amazon S3). This means that customers are developing a process to migrate the data and build complex applications that must support two different APIs—one for DynamoDB and another for Amazon S3.
DynamoDB Standard-IA table class is designed for customers who want a cost-optimized solution for storing infrequently accessed data in DynamoDB without changing any application code. Using this new table class, you get the single-digit millisecond read and write performance from DynamoDB and use all of the same APIs.
When you use DynamoDB Standard-IA table class, you will save up to 60 percent in storage costs as compared to using the DynamoDB Standard table class. However, DynamoDB reads and writes for this new table class are priced higher than the Standard tables. Therefore, it is important to understand your use cases before applying this new table class to your tables.
DynamoDB Standard-IA is a great solution if you must store terabytes of data for several years where the data must be highly available, but it is not frequently accessed. An example is social media applications where end users rarely access their old posts. However, these posts remain stored, because if someone scrolls on a profile to see an old photo from 2009, they should be able to retrieve it as fast as if it was a newer post.
E-commerce sites are another good use case. These sites might have a lot of products that are not frequently accessed, but administrators of the site still want to have them available in their store just in case someone wants to buy them. Furthermore, this is a good solution for storing a customer’s previous orders. DynamoDB Standard-IA table offers the ability to retain historical orders at a lower cost.
Get started using DynamoDB Standard-IA
Get started using DynamoDB Standard-IA by evaluating the best class for your existing tables.
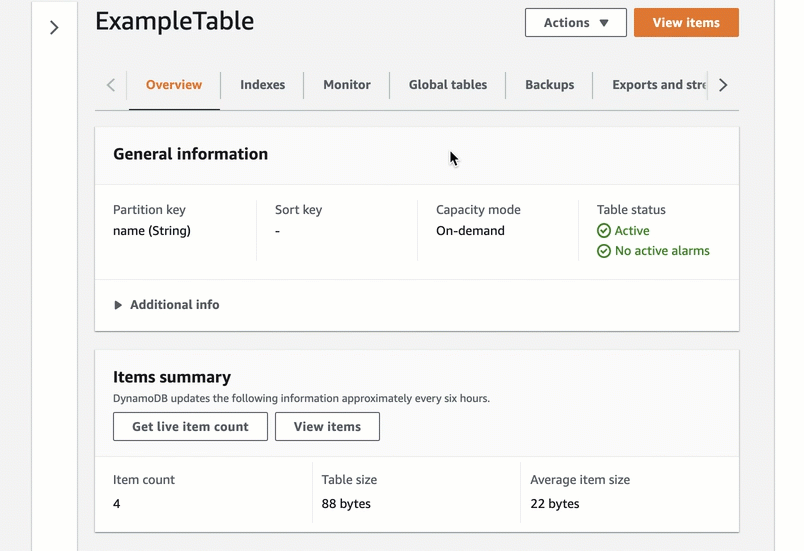
Go to the table page and select Update the table class in the Actions dropdown to change the table class. Then, choose the new table class and save the changes. You can change the table class for an existing table to be Standard-IA or Standard twice every 30-days with no impact on performance or availability. All of the features of DynamoDB are available when using a table in the Standard-IA table class.
Moreover, you can also create a new table with the DynamoDB Standard-IA table class.
Availability and Pricing
DynamoDB Standard-IA is available in all of the AWS Regions, except the China Regions and AWS GovCloud.
For example, DynamoDB Standard-IA storage pricing in US East (N. Virginia) is now $0.10 per GB (60 percent less than DynamoDB Standard), while reads and writes are 25 percent higher.
For more information about this feature and its pricing, see the DynamoDB Standard-IA Feature page and the DynamoDB pricing page.
— Marcia
New – Amazon RDS Custom for SQL Server Is Generally Available
=======================
On October 26, 2021, we launched Amazon RDS Custom for Oracle, a managed database service for applications that require customization of the underlying operating system and database environment. RDS Custom lets you access and customize your database server host and operating system, for example, by applying special patches and changing the database software settings to support third-party applications that require privileged access.
Today, I am happy to announce the general availability of Amazon RDS Custom for SQL Server to support applications that have dependencies on specific configurations and third-party applications that require customizations in corporate, e-commerce, and content management systems, such as Microsoft SharePoint.
With RDS Custom for SQL Server, you can enable features that require elevated privileges like SQL Common Language Runtime (CLR), install specific drivers to enable heterogenous linked servers, or have more than 100 databases per instance.
Through the time-saving benefits of a managed service, RDS Custom for SQL Server frees you up to focus on more business-impacting, strategic activities. The use of automating backups and other operational tasks let you rest easy, knowing your data is safe and ready to be recovered if needed.
Getting Started with RDS Custom for SQL Server
Get started by creating a DB instance of RDS Custom for SQL Server from an orderable engine version offered by RDS Custom. You can optionally access the server host to customize your software via AWS Systems Manager or a remote desktop client. Your application connects to the RDS Custom DB instance endpoint.

Before creating and connecting your custom DB instance for SQL Server, make sure that you meet some prerequisites, such as configuring the AWS Identity and Access Management (IAM) role and Amazon Virtual Private Cloud (Amazon VPC). See Setting up your environment for Amazon RDS Custom for SQL Server in the Amazon RDS User Guide to learn more.
Choose Create database in the Databases menu to create your custom DB instance for SQL Server in the RDS Console. When you choose a database creation method, select Standard create. You can set Engine options to Microsoft SQL Server and choose Amazon RDS Custom in the database management type.
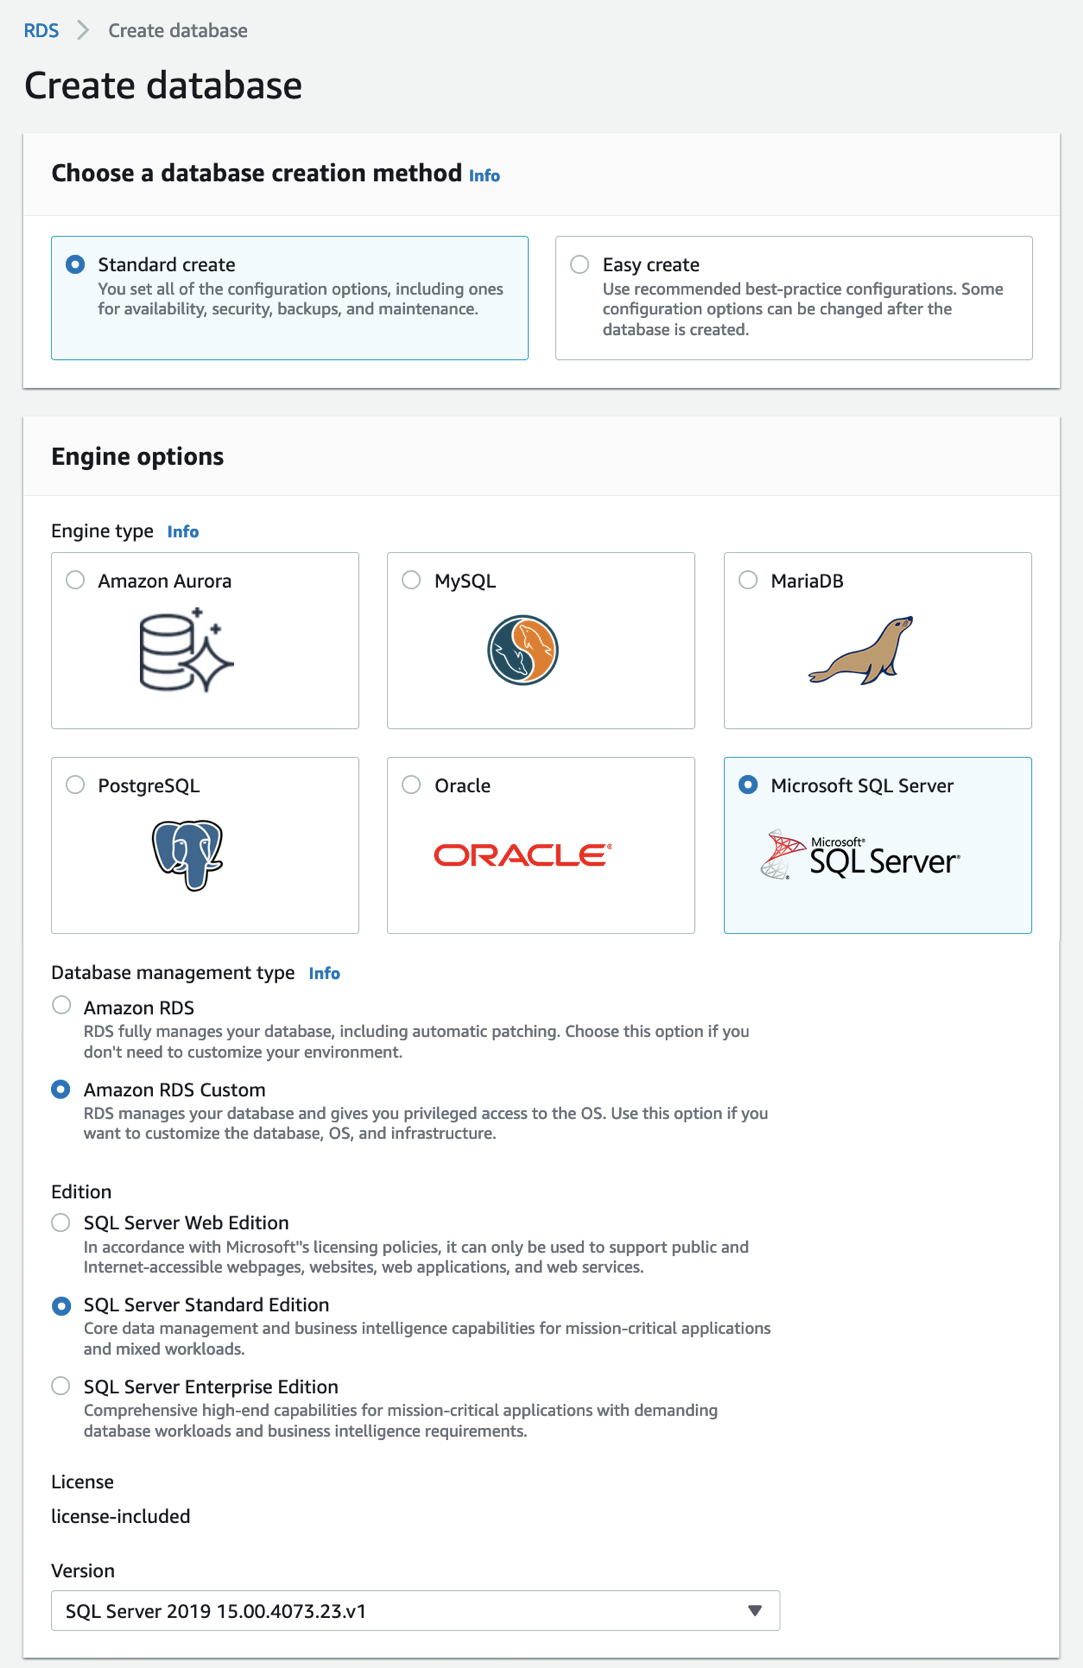
For Edition, choose the DB engine edition that you want to use in the choices of Enterprise, Standard, and Web with the Version of default SQL Server 2019.
For Settings, enter your favorite unique name for the DB instance identifier and your master username and password. By default, the new instance uses an automatically generated password for the master user.
In DB instance size, choose a DB instance class optimized to each DB engine edition.
| SQL Server edition |
RDS Custom support |
| Enterprise Edition |
db.r5.xlarge – db.r5.24xlarge
db.m5.xlarge – db.m5.24xlarge |
| Standard Edition |
db.r5.large – db.r5.24xlarge
db.m5.large – db.m5.24xlarge |
| Web Edition |
db.r5.large – db.r5.4xlarge
db.m5.large – db.m5.4xlarge |
See Settings for DB instances in the Amazon RDS User Guide to learn more about the remaining settings. Choose Create database. After creating the DB instance, the details for the new RDS Custom DB instance appear on the RDS console.
Alternatively, you can create an RDS Custom DB instance by using the create-db-instance command in the AWS Command Line Interface (AWS CLI).
$ aws rds create-db-instance \
--engine custom-sqlserver-se \
--engine-version 15.00.4073.23.v1 \
--db-instance-identifier channy-custom-db \
--db-instance-class db.m5.xlarge \
--allocated-storage 20 \
--db-subnet-group mydbsubnetgroup \
--master-username myuser \
--master-user-password mypassword \
--backup-retention-period 3 \
--no-multi-az \
--port 8200 \
--kms-key-id mykmskey \
--custom-iam-instance-profile AWSRDSCustomInstanceProfile
After you create your RDS Custom DB instance, you can connect to it using AWS Systems Manager Session Manager or an RDP client. Make sure that the Amazon VPC security group associated with your DB instance permits inbound connections on port 3389 for TCP to allow RDP connections.
You need the key pair associated with the instance to connect to the custom DB instance via RDP. RDS Custom creates the key pair for you. The pair name uses the prefix do-not-delete-rds-custom-DBInstanceIdentifier. AWS Secrets Manager stores your private key as a secret. Choose the secret that has the same name as your key pair and retrieve the secret value to decrypt the password later.
In the EC2 console, look for the name of your EC2 instance, and then choose the instance ID associated with your DB instance ID, for example, channy-custom-db-*. Select your custom DB instance, and then choose Connect. On the Connect to instance page, choose the RDP client tab, and then choose Get password with your private key as a secret.
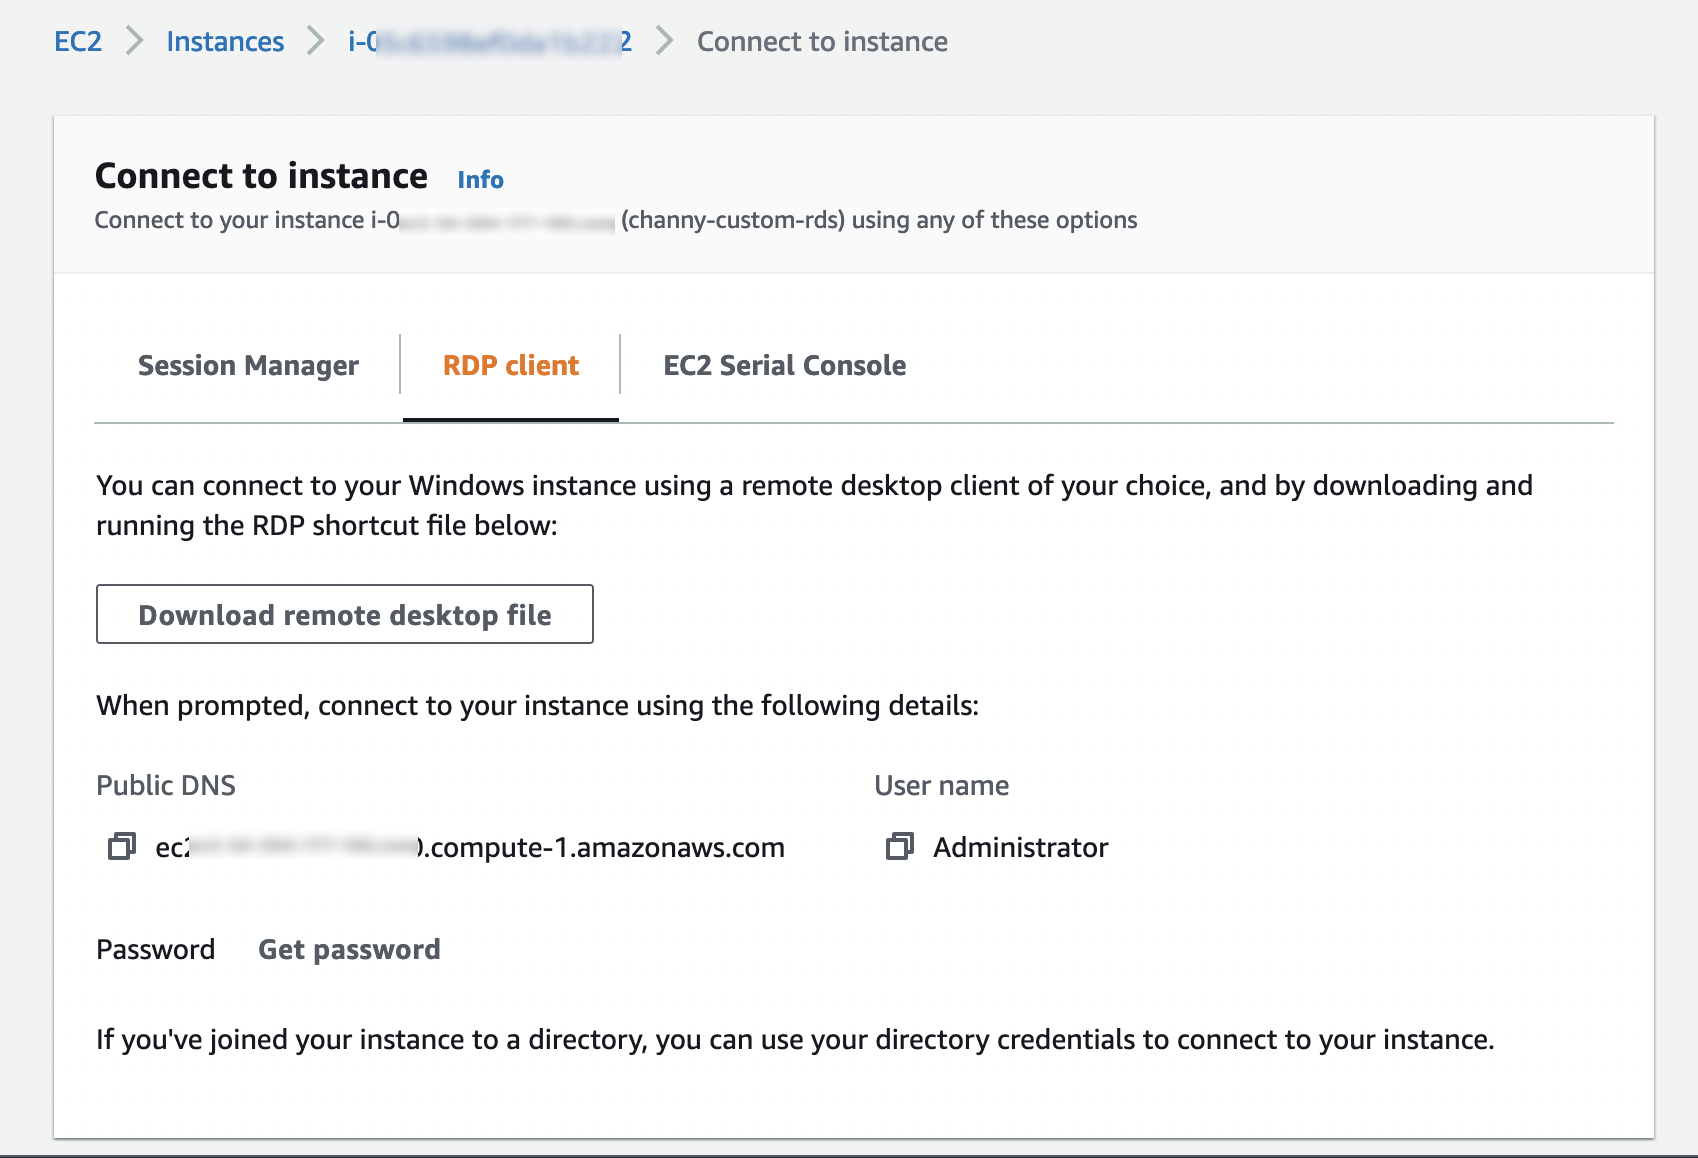
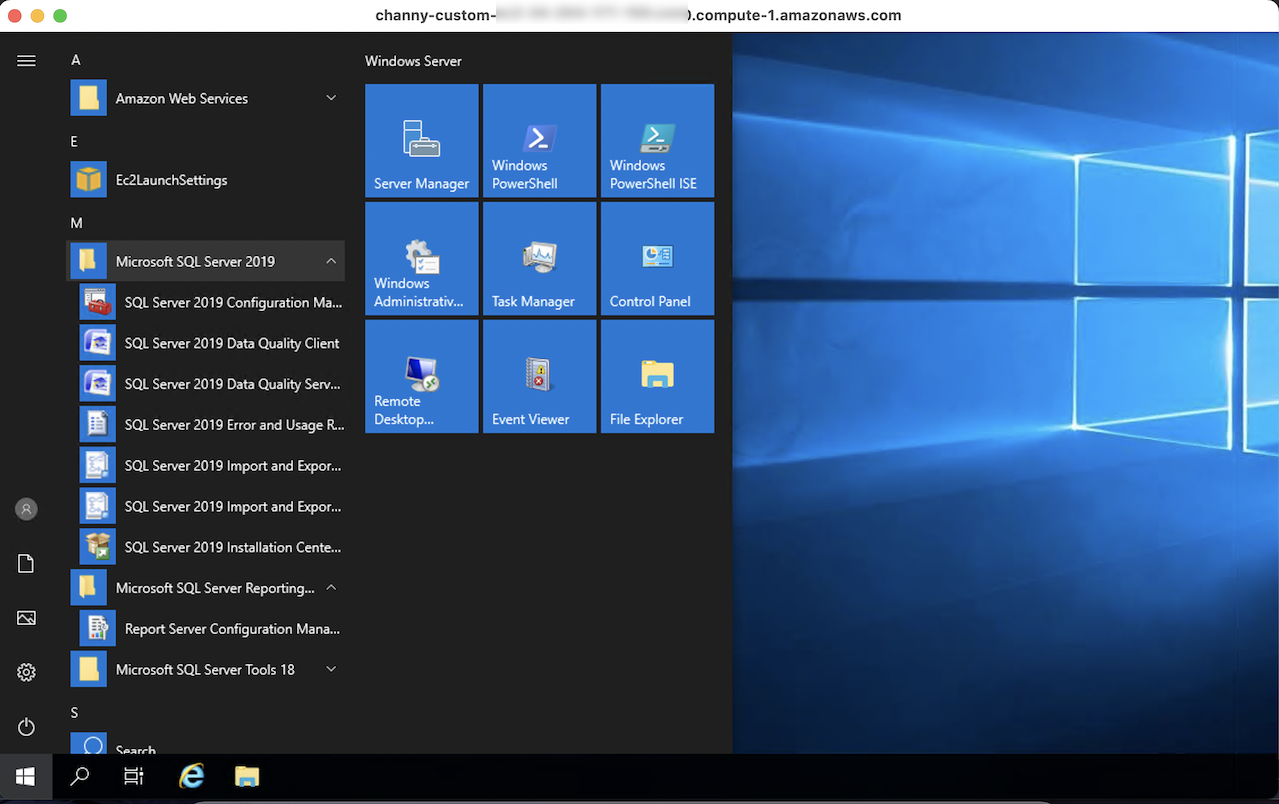
When you connect an RDP client with a downloaded remote desktop file and decrypted password, you can log in to the Windows Server and customize your SQL Server.
You can use AWS Systems Manager Session Manager to start a session with an instance in your account. After the session is started, you can run PowerShell commands as you would for any other connection type. See Connect to your Windows instance in the Amazon EC2 User Guide for more information.
Things to Know
Here are a couple of things to keep in mind about managing your DB instance:
Pausing RDS Custom Automation: RDS Custom for SQL Server automatically provides monitoring and instance recovery for your RDS Custom DB instance. If you need to customize the instance, then pause RDS Custom automation for a specified period. The pause makes sure that your customizations don’t interfere with RDS Custom automation. To pause or resume RDS Custom automation, you can set RDS Custom automation mode to Paused with the pause duration that you want (in minutes, default 60 minutes to 1,440 minutes maximum).
High Availability (HA): To support replication between RDS Custom for SQL Server instances, you can configure HA with Always On Availability Groups (AGs). We recommend that you set up the primary DB instance to synchronously replicate data to the standby instances in different Availability Zones (AZs) to be resilient to AZ failures. Moreover, you can migrate data by configuring HA for your on-premises instance and then failing over or switching over to the RDS Custom standby database.
Custom DB Management: Just like Amazon RDS, RDS Custom for SQL Server creates automated backups taking a snapshot of an Amazon RDS DB instance. Incremental snapshots are used to restore DB instances to a specific point in time. Furthermore, all changes and customizations to the underlying operating system are automatically logged for audit purposes using Systems Manager and AWS CloudTrail. See Troubleshooting an Amazon RDS Custom for DB instance in the Amazon RDS User Guide to learn more.
Available Now
Amazon RDS Custom for SQL Server is now available in the US East (Ohio), US East (N. Virginia), US West (Oregon), Asia Pacific (Singapore), Asia Pacific (Sydney), Asia Pacific (Tokyo), EU (Frankfurt), EU (Ireland), and EU (Stockholm) Regions.
Look at the product page and documentation of Amazon RDS Custom to learn more. Please send us feedback either in the AWS forum for Amazon RDS or through your usual AWS support contacts.
— Channy
New – Amazon DevOps Guru for RDS to Detect, Diagnose, and Resolve Amazon Aurora-Related Issues using ML
=======================
Today we are announcing Amazon DevOps Guru for RDS, a new capability for Amazon DevOps Guru. It allows developers to easily detect, diagnose, and resolve performance and operational issues in Amazon Aurora.
Hundreds of thousands of customers nowadays are using Amazon Aurora because it is highly available, scalable, and durable. But as applications grow in size and complexity, it becomes more challenging for these customers to detect and resolve operational and performance issues quickly.
During last year’s re:Invent, we announced DevOps Guru, a service that uses machine learning (ML) to automatically detect and alert customers of application issues, including database problems. Today we are announcing DevOps Guru for RDS to help developers using Amazon Aurora databases to detect, diagnose, and resolve database performance issues fast and at scale. Now developers will have enough information to determine the exact cause for a database performance issue. This launch will save developers and engineers many hours of work trying to uncover and remediate the performance-related database issues.
DevOps Guru for RDS uses ML to automatically identify and analyze a wide range of performance-related database issues, such as over-utilization of host resources, database bottlenecks, or misbehavior of SQL queries. It also recommends solutions to remediate the issues it finds. To use this capability, you don’t need to be a database or ML expert.
When an issue is detected, DevOps Guru for RDS displays the finding in the DevOps Guru console and sends notifications using Amazon EventBridge or Amazon Simple Notification Service (SNS). This allows developers to automatically manage and take real-time action on the issues.
How DevOps Guru for RDS Works
DevOps Guru for RDS uses anomaly detection on the database load (DB load) performance metric to detect issues. DB load is measured in units of Average Active Sessions (AAS). DB load measures the level of activity in your database, making it a great metric to understand the health of your database. If the DB load is high, this can result in performance issues. This metric can be compared to the number of virtual CPUs (vCPUs), and if the DB load is higher than that number, issues can arise.
The most useful dimensions for this metric are the wait events and the top SQL. The wait event describes what the system conditions that are currently running SQLs are waiting on. The most common reasons why a statement is waiting is that it is waiting for the CPU, waiting for a read or write, or waiting for a locked resource. The top SQL dimension shows which queries are contributing the most to DB load.
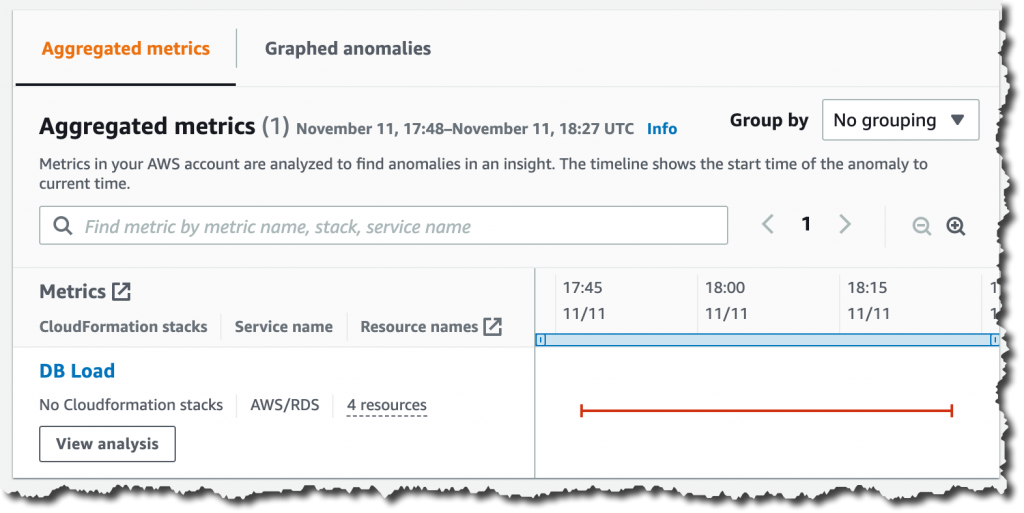
The following image is an example of a finding that DevOps Guru for RDS reported. The graph shows that from the AAS, most of them were waiting for access to a table or for CPU.

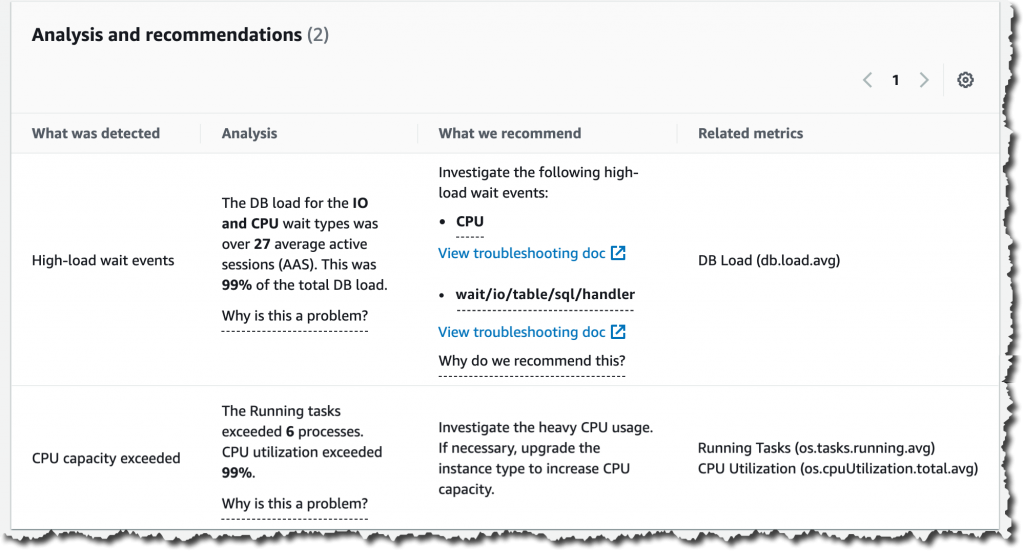
If you continue scrolling on the DevOps Guru for RDS analysis page, you can discover the cause for the problem and some recommendations to fix it. In this particular example, two problems were detected: high-load wait events and CPU capacity exceeded.
DevOps Guru for RDS looks more in-depth into these problems. First, it looks at the high-load wait events, where there were 27 AAS for the IO and CPU wait types, which is 99 percent of the total DB load.
Second, it tells us that the running tasks exceeded six processes. This database only has two vCPUs, and the recommended number of running processes should be a maximum of four (2x vCPUs). DevOps Guru for RDS also makes recommendations to fix these issues.
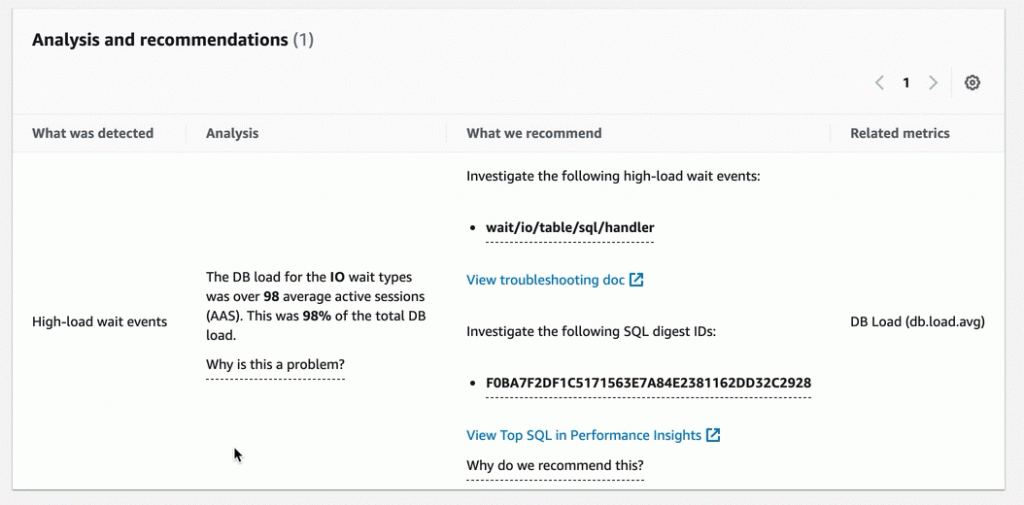
In another anomaly, the graph shows that there was a high load of wait events, and one SQL query was found to require further investigation. You can even see the exact SQL query if you click on the SQL digest IDs. The insight’s analysis and recommendation section is full of information on how to investigate further and fix the issue. You can get a lot of detailed information by clicking on the wait event, for example, on the wait event wait/io/table/sql/handler or in the View troubleshooting doc link.
Get started with DevOps Guru for RDS
To get started with this new capability of DevOps Guru, make sure that Performance Insights is enabled for your Amazon Aurora DB instances. It supports Amazon Aurora with MySQL- and PostgreSQL-compatibility. For instructions on how to enable Performance Insights, see Enabling and disabling Performance Insights.
The next step is to enable DevOps Guru to start monitoring your AWS resources. You can specify the resources you want to be covered by DevOps Guru.
If you are already using DevOps Guru, whenever there is a new insight for an Amazon Aurora database resource, you will see it in the console.
To see the detailed database analysis, navigate to the Insight page and select the new View analysis button under the DB load aggregated metric. That button will take you to the detailed analysis by DevOps Guru for RDS.
Pricing and Availability
DevOps Guru for RDS is offered to customers at no additional charge, as part of the existing price that DevOps Guru charges customers for RDS resources.
DevOps Guru for RDS is available in all Regions where DevOps Guru is available, US East (Ohio), US East (N. Virginia), US West (Oregon), Asia Pacific (Singapore), Asia Pacific (Sydney), Asia Pacific (Tokyo), Europe (Frankfurt), Europe (Ireland), and Europe (Stockholm).
Learn more about DevOps Guru for RDS and check out the talk at AWS re:Invent “Automatically detect and resolve performance issues with Amazon DevOps Guru for RDS” (Session Id 15877).
— Marcia
Enhanced Amazon S3 Integration for Amazon FSx for Lustre
=======================
Today, we are announcing two additional capabilities of Amazon FSx for Lustre. First, a full bi-directional synchronization of your file systems with Amazon Simple Storage Service (Amazon S3), including deleted files and objects. Second, the ability to synchronize your file systems with multiple S3 buckets or prefixes.
Lustre is a large scale, distributed parallel file system powering the workloads of most of the largest supercomputers. It is popular among AWS customers for high-performance computing workloads, such as meteorology, life-science, and engineering simulations. It is also used in media and entertainment, as well as the financial services industry.
I had my first hands-on Lustre file systems when I was working for Sun Microsystems. I was a pre-sales engineer and worked on some deals to sell multimillion-dollar compute and storage infrastructure to financial services companies. Back then, having access to a Lustre file system was a luxury. It required expensive compute, storage, and network hardware. We had to wait weeks for delivery. Furthermore, it required days to install and configure a cluster.
Fast forward to 2021, I may create a petabyte-scale Lustre cluster and attach the file system to compute resources running in the AWS cloud, on-demand, and only pay for what I use. There is no need to know about Storage Area Networks (SAN), Fiber Channel (FC) fabric, and other underlying technologies.
Modern applications use different storage options for different workloads. It is common to use S3 object storage for data transformation, preparation, or import/export tasks. Other workloads may require POSIX file-systems to access the data. FSx for Lustre lets you synchronize objects stored on S3 with the Lustre file system to meet these requirements.
When you link your S3 bucket to your file system, FSx for Lustre transparently presents S3 objects as files and lets you to write results back to S3.
Full Bi-Directional Synchronization with Multiple S3 Buckets
If your workloads require a fast, POSIX-compliant file system access to your S3 buckets, then you can use FSx for Lustre to link your S3 buckets to a file system and keep data synchronized between the file system and S3 in both directions. However, until today, there were a couple limitations. First, you had to manually configure a task to export data back from FSx for Lustre to S3. Second, deleted files on S3 were not automatically deleted from the file system. And third, an FSx for Lustre file system was synchronized with one S3 bucket only. We are addressing these three challenges with this launch.
Starting today, when you configure an automatic export policy for your data repository association, files on your FSx for Lustre file system are automatically exported to your data repository on S3. Next, deleted objects on S3 are now deleted from the FSx for Lustre file system. The opposite is also available: deleting files on FSx for Lustre triggers the deletion of corresponding objects on S3. Finally, you may now synchronize your FSx for Lustre file system with multiple S3 buckets. Each bucket has a different path at the root of your Lustre file system. For example your S3 bucket logs may be mapped to /fsx/logs and your other financial_data bucket may be mapped to /fsx/finance.
These new capabilities are useful when you must concurrently process data in S3 buckets using both a file-based and an object-based workflow, as well as share results in near real time between these workflows. For example, an application that accesses file data can do so by using an FSx for Lustre file system linked to your S3 bucket, while another application running on Amazon EMR may process the same files from S3.
Moreover, you may link multiple S3 buckets or prefixes to a single FSx for Lustre file system, thereby enabling a unified view across multiple datasets. Now you can create a single FSx for Lustre file system and easily link multiple S3 data repositories (S3 buckets or prefixes). This is convenient when you use multiple S3 buckets or prefixes to organize and manage access to your data lake, access files from a public S3 bucket (such as these hundreds of public datasets) and write job outputs to a different S3 bucket, or when you want to use a larger FSx for Lustre file system linked to multiple S3 datasets to achieve greater scale-out performance.
How It Works
Let’s create an FSx for Lustre file system and attach it to an Amazon Elastic Compute Cloud (Amazon EC2) instance. I make sure that the file system and instance are in the same VPC subnet to minimize data transfer costs. The file system security group must authorize access from the instance.
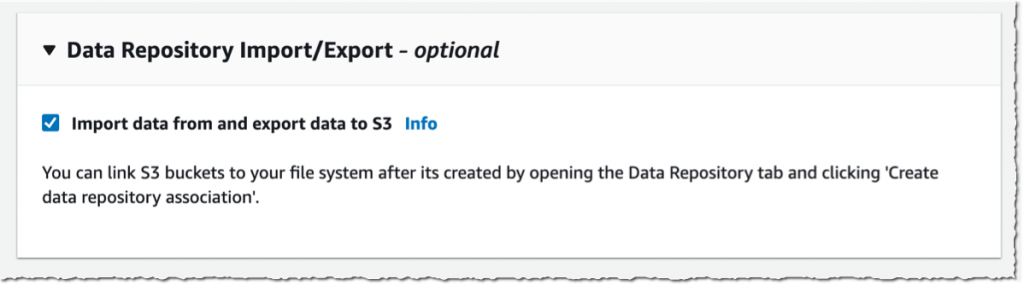
I open the AWS Management Console, navigate to FSx, and select Create file system. Then, I select Amazon FSx for Lustre. I am not going through all of the options to create a file system here, you can refer to the documentation to learn how to create a file system. I make sure that Import data from and export data to S3 is selected.
 It takes a few minutes to create the file system. Once the status is ✅ Available, I navigate to the Data repository tab, and then select Create data repository association.
I choose a Data Repository path (my source S3 bucket) and a file system path (where in the file system that bucket will be imported).

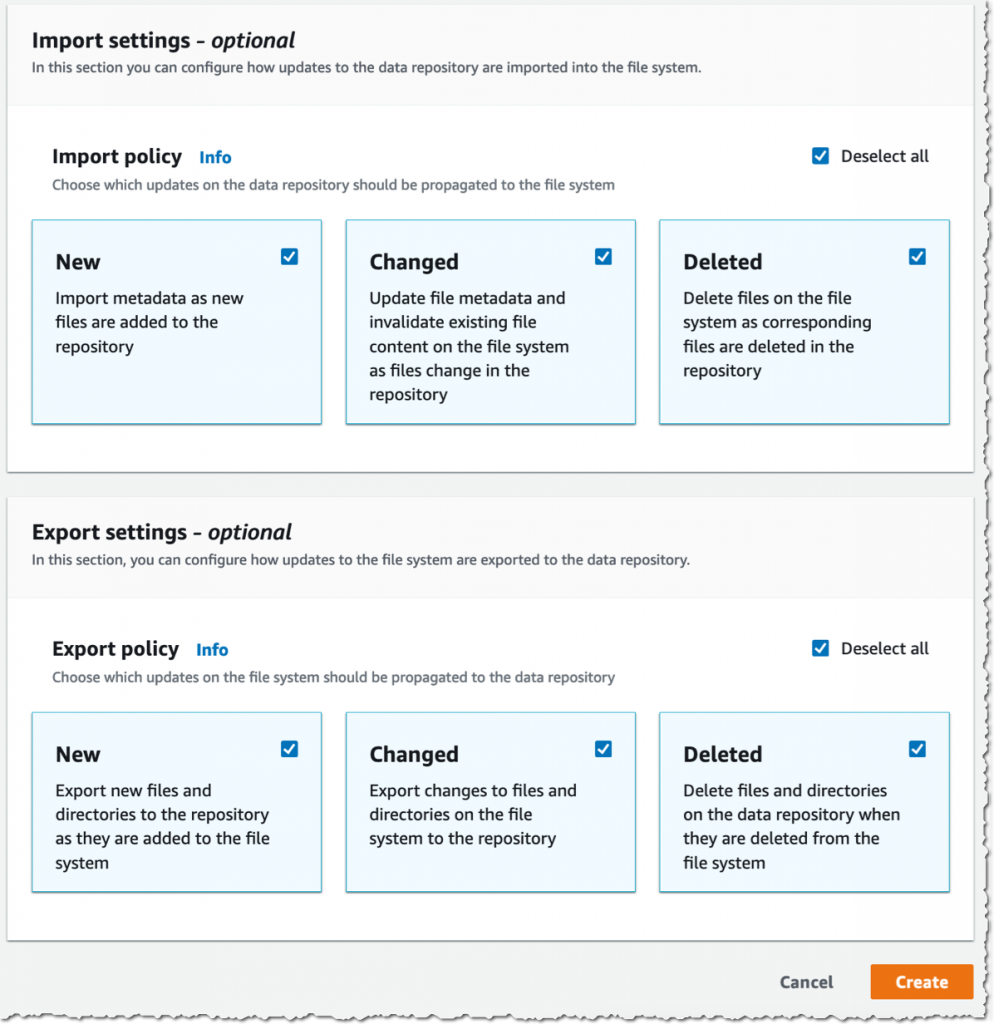
Then, I choose the Import policy and Export policy. I may synchronize the creation of file/objects, their updates, and when they are deleted. I select Create.
When I use automatic import, I also make sure to provide an S3 bucket in the same AWS Region as the FSx for Lustre cluster. FSx for Lustre supports linking to an S3 bucket in a different AWS Region for automatic export and all other capabilities.
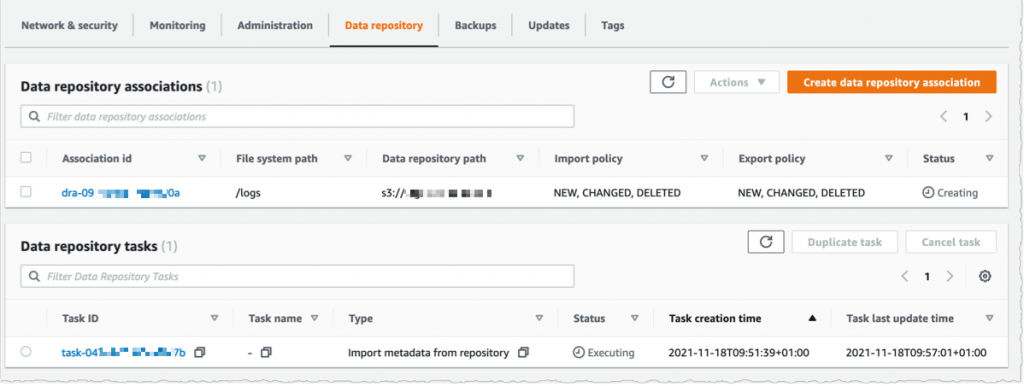
Using the console, I see the list of Data repository associations. I wait for the import task status to become ✅ Succeeded. If I link the file system to an S3 bucket with a large number of objects, then I may choose to skip Importing metadata from repository while creating the data repository association, and then load metadata from selected prefixes in my S3 buckets that are required for my workload using an Import task.
I create an EC2 instance in the same VPC subnet. Furthermore, I make sure that the FSx for Lustre cluster security group authorizes ingress traffic from the EC2 instance. I use SSH to connect to the instance, and then type the following commands (commands are prefixed with the $ sign that is part of my shell prompt).
# check kernel version, minimum version 4.14.104-95.84 is required
$ uname -r
4.14.252-195.483.amzn2.aarch64
# install lustre client
$ sudo amazon-linux-extras install -y lustre2.10
Installing lustre-client
...
Installed:
lustre-client.aarch64 0:2.10.8-5.amzn2
Complete!
# create a mount point
$ sudo mkdir /fsx
# mount the file system
$ sudo mount -t lustre -o noatime,flock fs-00...9d.fsx.us-east-1.amazonaws.com@tcp:/ny345bmv /fsx
# verify mount succeeded
$ mount
...
172.0.0.0@tcp:/ny345bmv on /fsx type lustre (rw,noatime,flock,lazystatfs)
Then, I verify that the file system contains the S3 objects, and I create a new file using the touch command.
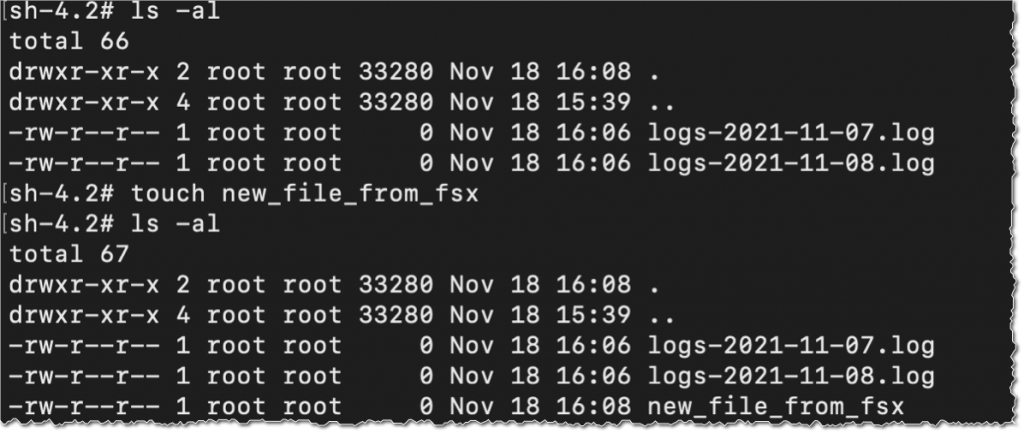
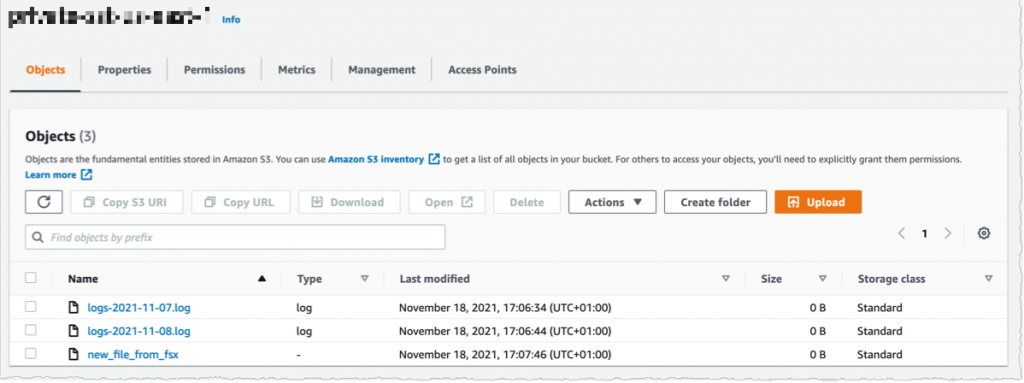
I switch to the AWS Console, under S3 and then my bucket name, and I verify that the file has been synchronized.
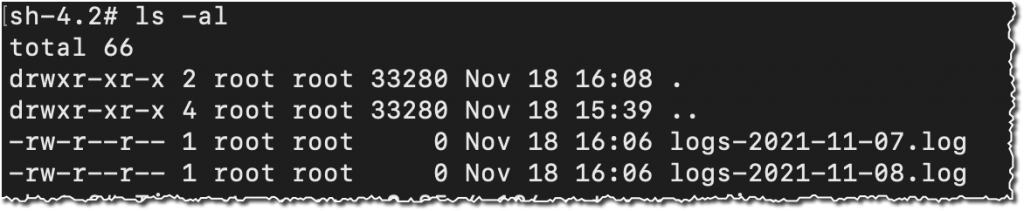
Using the console, I delete the file from S3. And, unsurprisingly, after a few seconds, the file is also deleted from the FSx file system.
Pricing and Availability
These new capabilities are available at no additional cost on Amazon FSx for Lustre file systems. Automatic export and multiple repositories are only available on Persistent 2 file systems in US East (N. Virginia), US East (Ohio), US West (Oregon), Canada (Central), Asia Pacific (Tokyo), Europe (Frankfurt), and Europe (Ireland). Automatic import with support for deleted and moved objects in S3 is available on file systems created after July 23, 2020 in all regions where FSx for Lustre is available.
You can configure your file system to automatically import S3 updates by using the AWS Management Console, the AWS Command Line Interface (CLI), and AWS SDKs.
Learn more about using S3 data repositories with Amazon FSx for Lustre file systems.
One More Thing
One more thing while you are reading. Today, we also launched the next generation of FSx for Lustre file systems. FSx for Lustre next-gen file systems are built on AWS Graviton processors. They are designed to provide you with up to 5x higher throughput per terabyte (up to 1 GB/s per terabyte) and reduce your cost of throughput by up to 60% as compared to previous generation file systems. Give it a try today!
-- seb
PS : my colleague Michael recorded a demo video to show you the enhanced S3 integration for FSx for Lustre in action. Check it out today.
New – Offline Tape Migration Using AWS Snowball Edge
=======================
Over the years, we have given you a succession of increasingly powerful tools to help you migrate your data to the AWS Cloud. Starting with AWS Import/Export back in 2009, followed by Snowball in 2015, Snowmobile and Snowball Edge in 2016, and Snowcone in 2020, each new device has given you additional features to simplify and expedite the migration process. All of the devices are designed to operate in environments that suffer from network constraints such as limited bandwidth, high connections costs, or high latency.
Offline Tape Migration
Today, we are taking another step forward by making it easier for you to migrate data stored offline on physical tapes. You can get rid of your large and expensive storage facility, send your tape robots out to pasture, and eliminate all of the time & effort involved in moving archived data to new formats and mediums every few years, all while retaining your existing tape-centric backup & recovery utilities and workflows.
This launch brings a tape migration capability to AWS Snowball Edge devices, and allows you to migrate up to 80 TB of data per device, making it suitable for your petabyte-scale migration efforts. Tapes can be stored in the Amazon S3 Glacier Flexible Retrieval or Amazon S3 Glacier Deep Archive storage classes, and then accessed from on-premises and cloud-based backup and recovery utilities.
Back in 2013 I showed you how to Create a Virtual Tape Library Using the AWS Storage Gateway. Today’s launch builds on that capability in two different ways. First, you create a Virtual Tape Library (VTL) on a Snowball Edge and copy your physical tapes to it. Second, after your tapes are in the cloud, you create a VTL on a Storage Gateway and use it to access your virtual tapes.
Getting Started
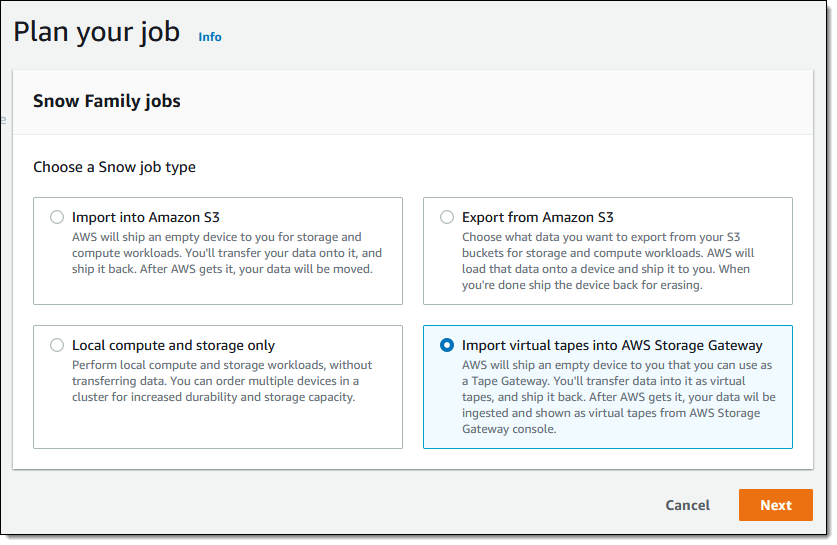
To get started, I open the Snow Family Console and create a new job. Then I select Import virtual tapes into AWS Storage Gateway and click Next:
Then I go through the remainder of the ordering sequence (enter my shipping address, name my job, choose a KMS key, and set up notification preferences), and place my order. I can track the status of the job in the console:
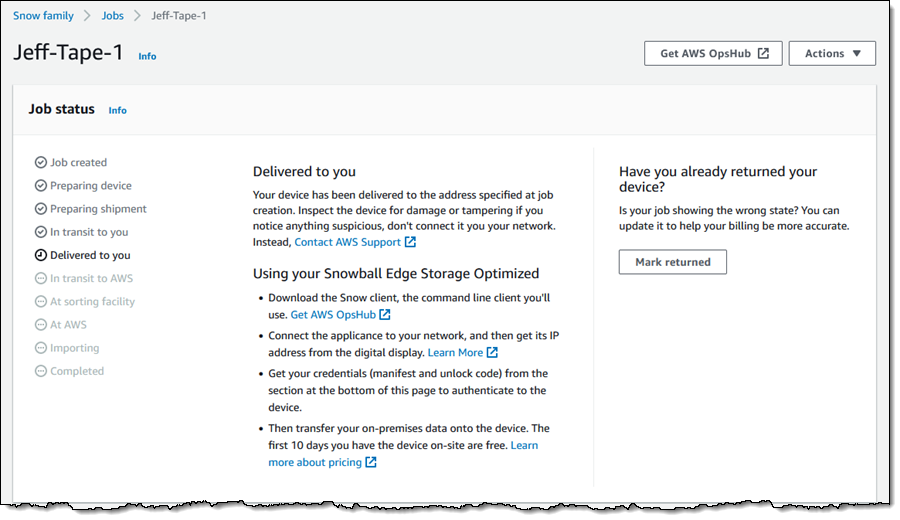
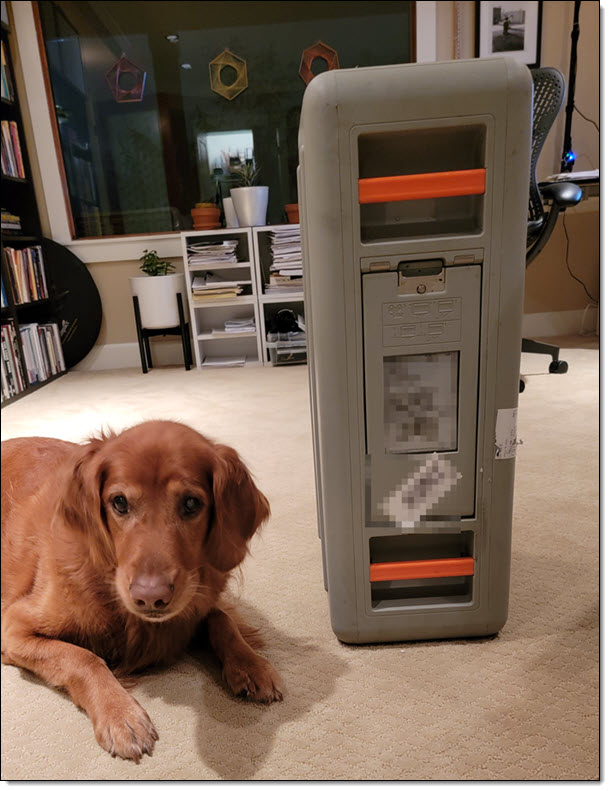
When my device arrives I tell the somewhat perplexed delivery person about data transfer, carry it down to my basement office, and ask Luna to check it out:
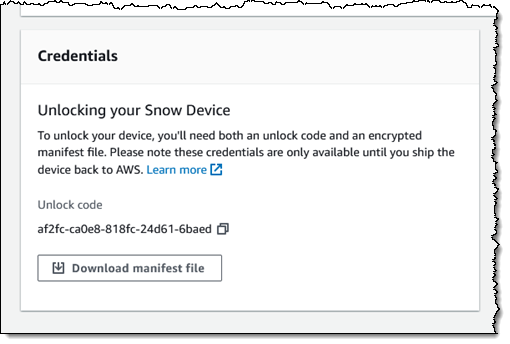
Back in the Snow Family console, I download the manifest file and copy the unlock code:
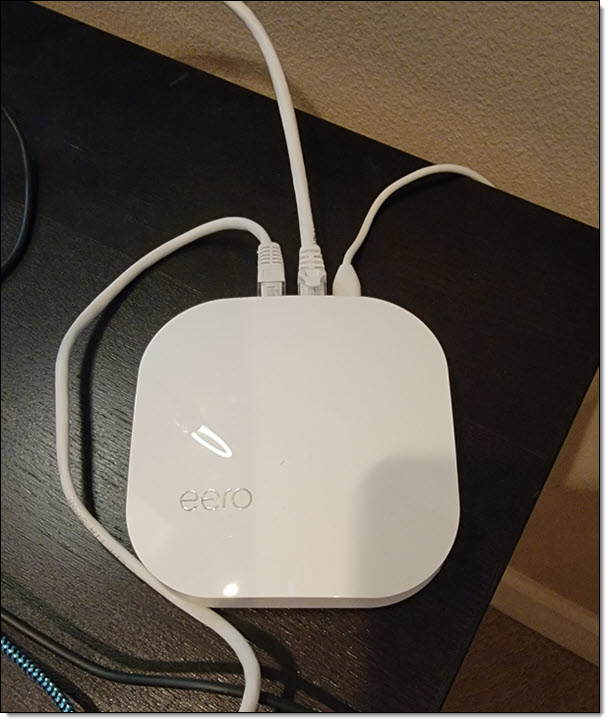
I connect the Snowball Edge to my “corporate” network:
Then I install AWS OpsHub for Snow Family on my laptop, power on the Snowball Edge, and wait for it to obtain & display an IP address:
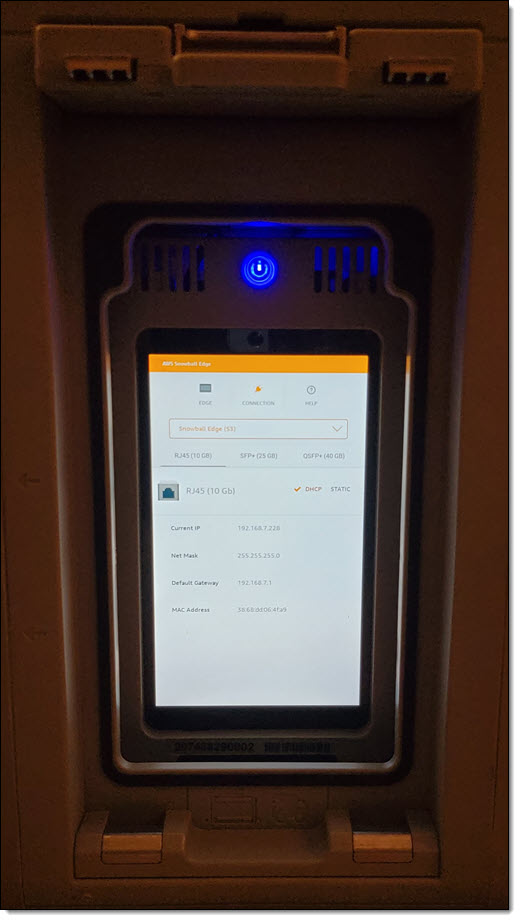
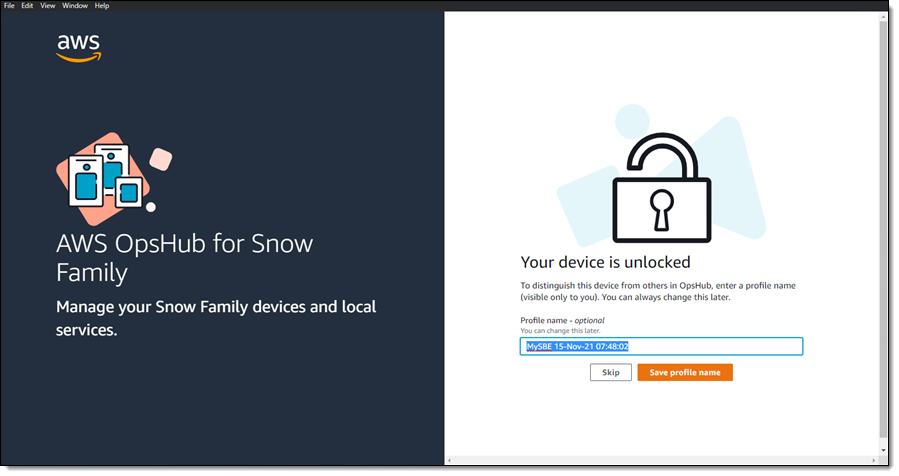
I launch OpsHub, sign in, and accept the default name for my device:
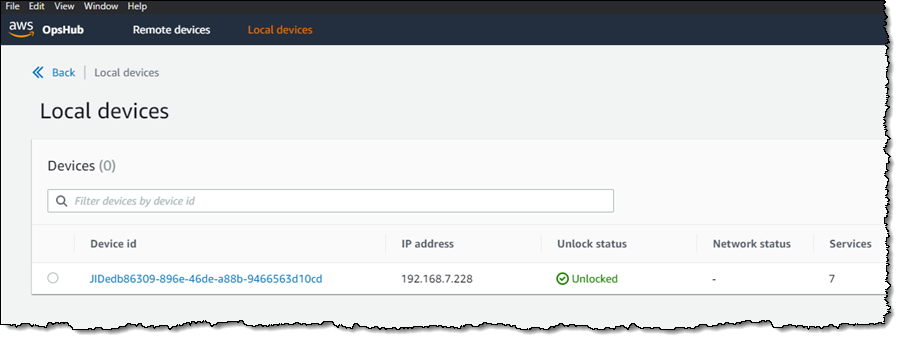
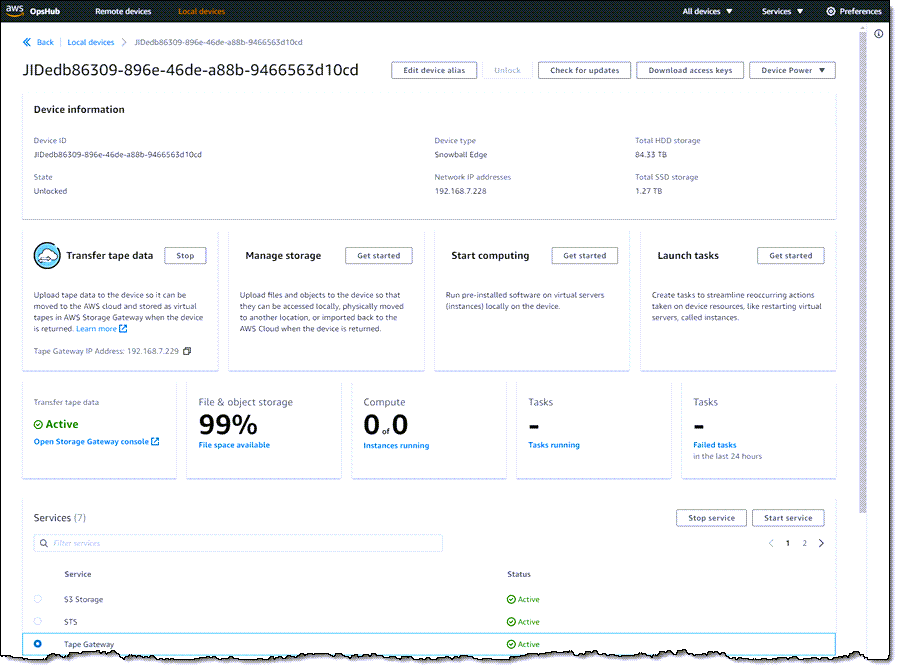
I confirm that OpsHub has access to my device, and that the device is unlocked:
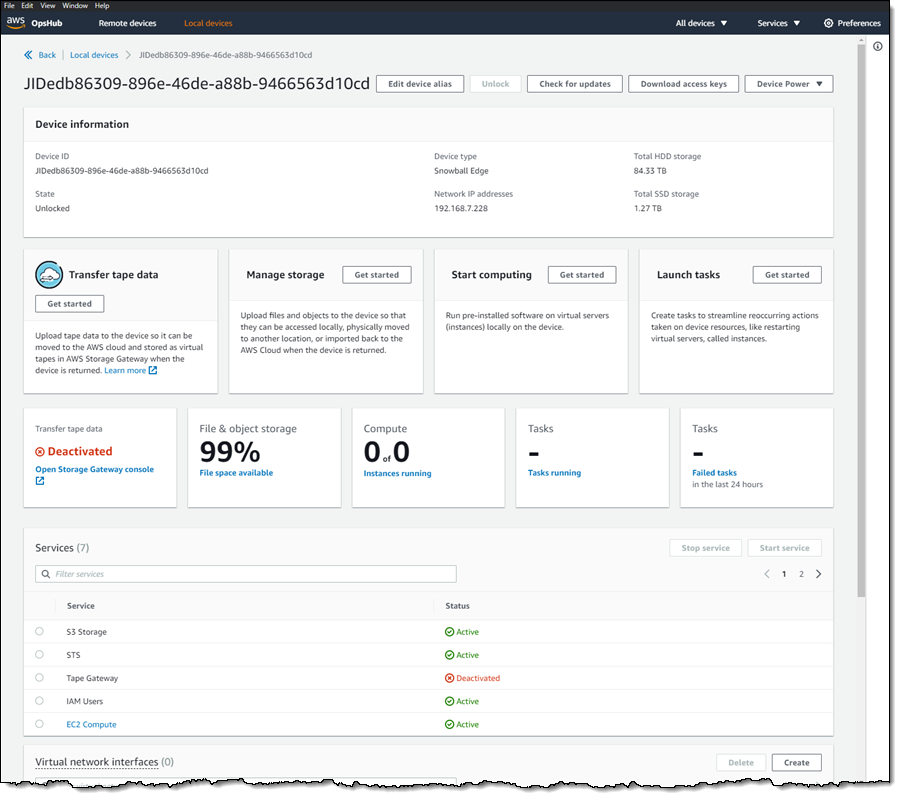
I view the list of services running on the device, and note that Tape Gateway is not running:
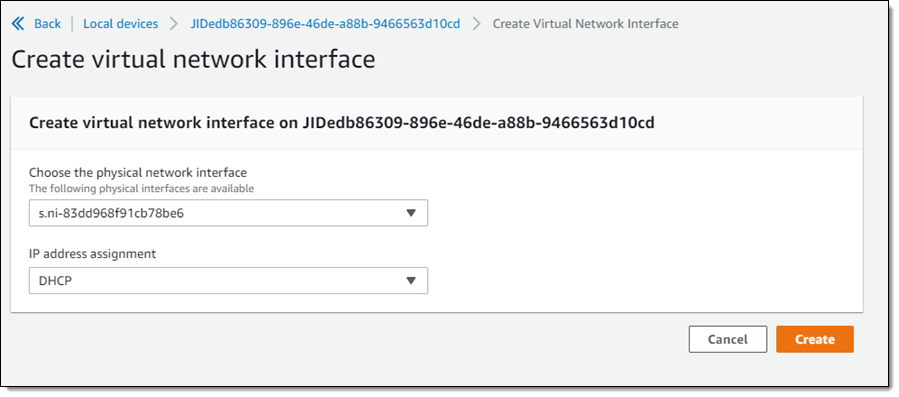
Before I start Tape Gateway, I create a Virtual Network Interface (VNI):
And then I start the Tape Gateway service on the Snow device:

Now that the service is running on the device, I am ready to create the Storage Gateway. I click Open Storage Gateway console from within OpsHub:
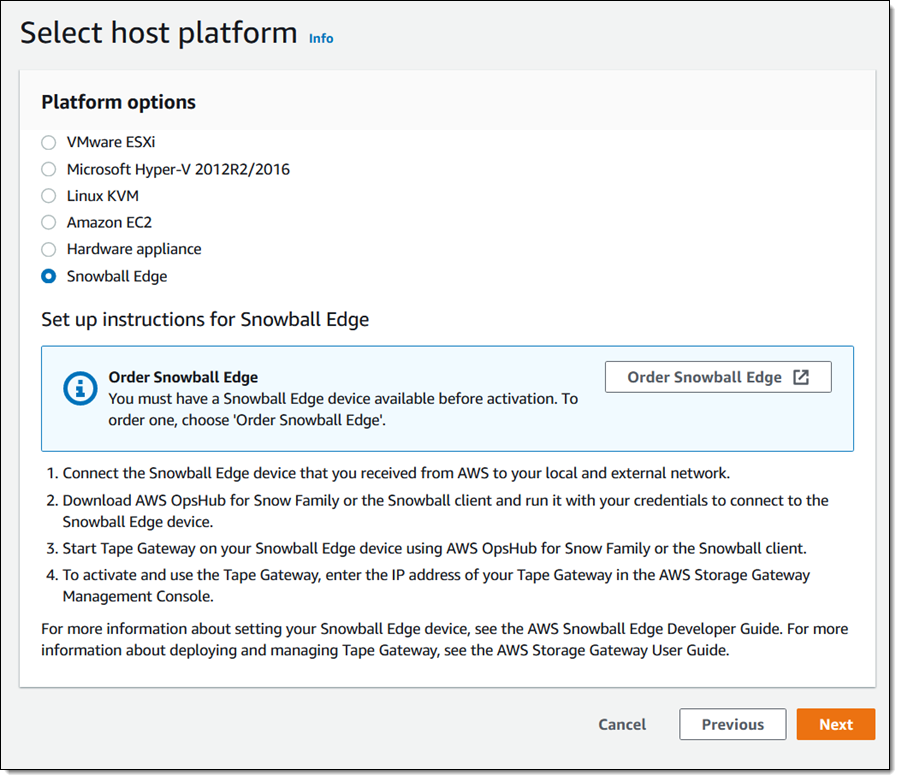
I select Snowball Edge as my host platform:
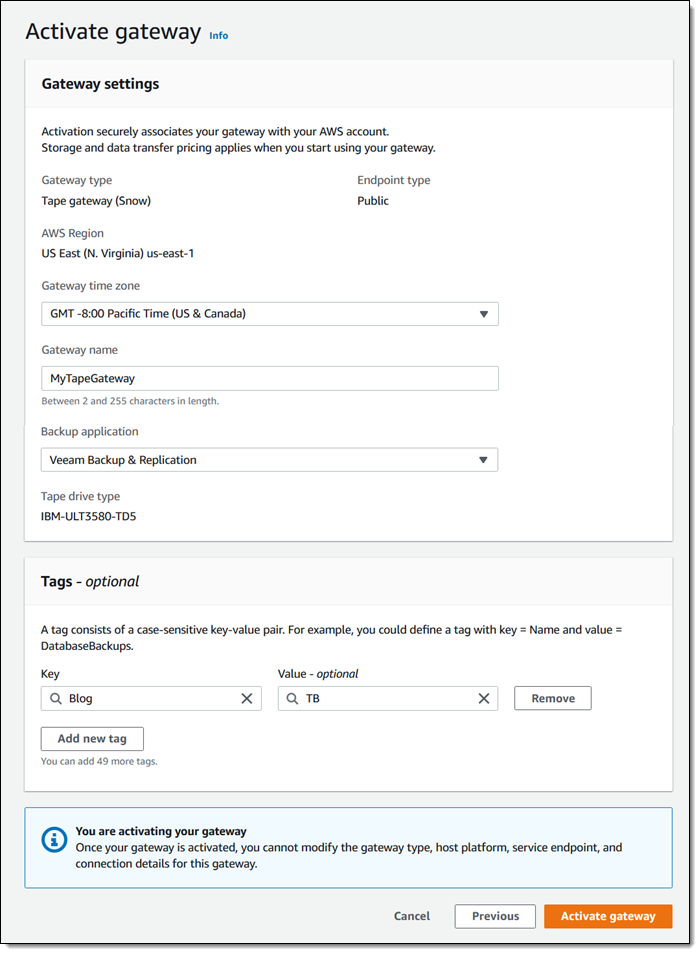
Then I give my gateway a name (MyTapeGateway), select my backup application (Veeam Backup & Replication in this case), and click Activate Gateway:
Then I configure CloudWatch logging:

And finally, I review the settings and click Finish to activate my new gateway:
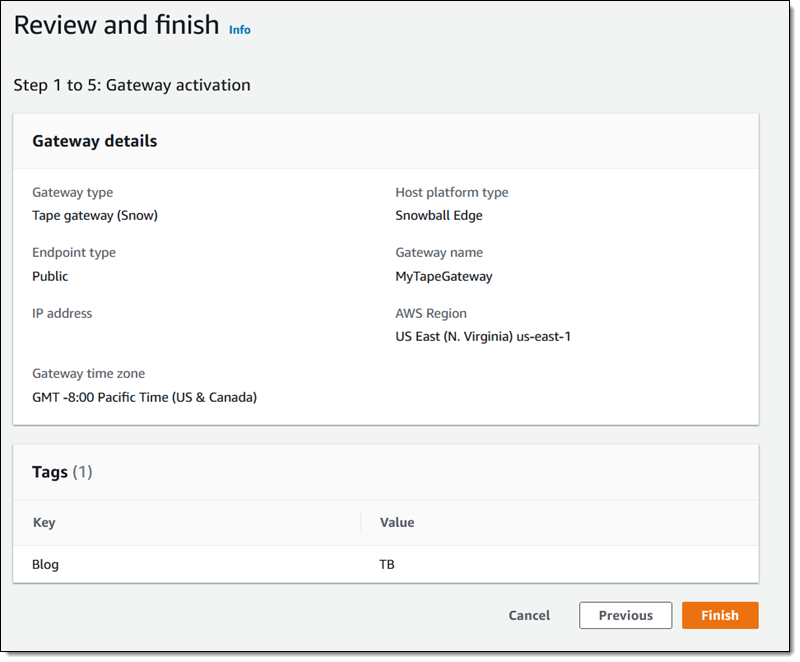
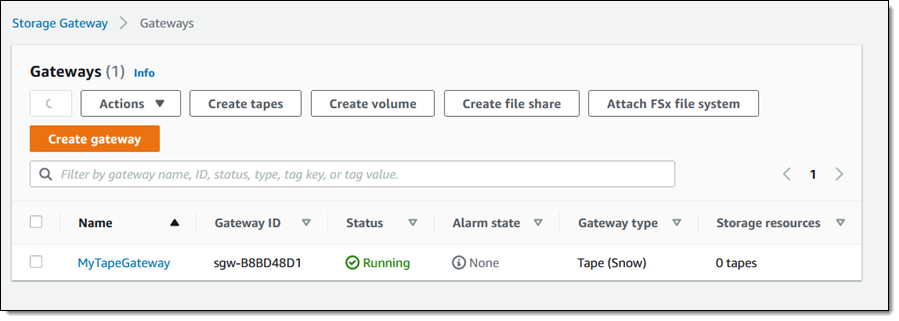
The activation process takes a few minutes, just enough time to take Luna for a quick walk. When I return, the console shows that the gateway is activated and running, and I am all set:
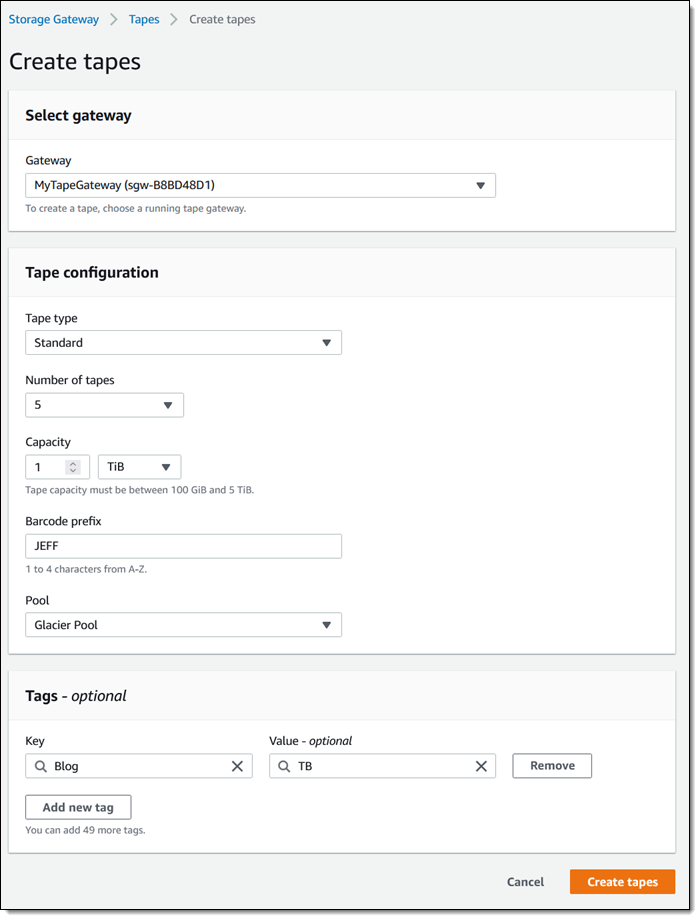
Creating Tapes
The next step is to create some virtual tapes. I click Create tapes and enter the requested information, including the pool (Deep Archive or Glacier), and click Create tapes:
The next step is to copy data from my physical tapes to the Snowball Edge. I don’t have a data center and I don’t have any tapes, so I can’t show you how to do this part. The data is stored on the device, and my Internet connection is used only for management traffic between the Snowball Edge device and AWS. To learn more about this part of the process, check out our new animated explainer.
After I have copied the desired tapes to the device, I prepare it for shipment to AWS. I make sure that all of the virtual tapes in the Storage Gateway Console have the status In Transit to VTS (Virtual Tape Shelf), and then I power down the device.
The display on the device updates to show the shipping address, and I wait for the shipping company to pick up the device.
When the device arrives at AWS, the virtual tapes are imported, stored in the S3 storage class associated with the pool that I chose earlier, and can be accessed by retrieving them using an online tape gateway. The gateway can be deployed as a virtual machine or a hardware appliance.
Now Available
You can use AWS Snowball Edge for offline tape migration in the US East (N. Virginia), US East (Ohio), US West (Oregon), US West (N. California), Europe (Ireland), Europe (Frankfurt), Europe (London), Asia Pacific (Sydney) Regions. Start migrating petabytes of your physical tape data to AWS, today!
— Jeff;
Preview – AWS Backup Adds Support for Amazon S3
=======================
Starting today, you can preview AWS Backup for Amazon Simple Storage Service (Amazon S3).
AWS Backup is a fully managed, policy-based service that lets you to centralize and automate the backup and restore of your applications spanning across 12 AWS services: Amazon Elastic Compute Cloud (Amazon EC2) instances, Amazon Elastic Block Store (EBS) volumes, Amazon Relational Database Service (RDS) databases (including Amazon Aurora clusters), Amazon DynamoDB tables, Amazon Neptune databases, Amazon DocumentDB (with MongoDB compatibility) databases, Amazon Elastic File System (Amazon EFS) file systems, Amazon FSx for Lustre file systems, Amazon FSx for Windows File Server file systems, AWS Storage Gateway volumes, and now Amazon S3 (in preview).
Modern workloads and systems are leveraging different storage options for different functionalities. In the 21st century, it is normal to build applications relying on non-relational and relational databases, shared file storage, and object storage, just to name of few. When operating and managing these applications, you told us that you wanted centralized protection and provable compliance for application data stored in S3 alongside other AWS services for storage, compute, and databases.
I can see three benefits when integrating Amazon Simple Storage Service (Amazon S3) with your data protection policies in AWS Backup.
First, it lets you centrally manage your applications backups: AWS Backup provides an automated solution to centrally configure backup policies, thereby helping you simplify backup lifecycle management. This also makes it easy to ensure that your application data across AWS services (including S3) is centrally backed up.
Second, it lets you easily restore your data: AWS Backup provides a single-click-restore experience for your S3 data. This lets you perform point-in-time restores of your S3 buckets and objects to a new or existing S3 bucket.
Finally, it improves backup compliance: AWS Backup provides built-in dashboards that let you to track backup and restore operations for S3.
AWS Backup for S3 (Preview) lets you create continuous point-in-time backups along with periodic backups of S3 buckets, including object data, object tags, access control lists (ACLs), and user-defined metadata. The first backup is a full snapshot, while subsequent backups are incremental. If there is a data disruption event, then you choose a backup from the backup vault, and restore an S3 bucket (or individual S3 objects) to a new or existing S3 bucket. AWS Backup is integrated with AWS Organizations, which let you use a single policy across AWS accounts (within your Organizations) to automate backup creation and backup access management.
Furthermore, you can turn on AWS Backup Vault Lock to enable delete protection of the data that you protect with AWS Backup, and thereby improving protection of your immutable backups from accidental deletion or malicious re-encryption.
How to Get Started
AWS Backup works with versioned S3 buckets. Before you get started, turn on S3 Versioning on your buckets to backup.
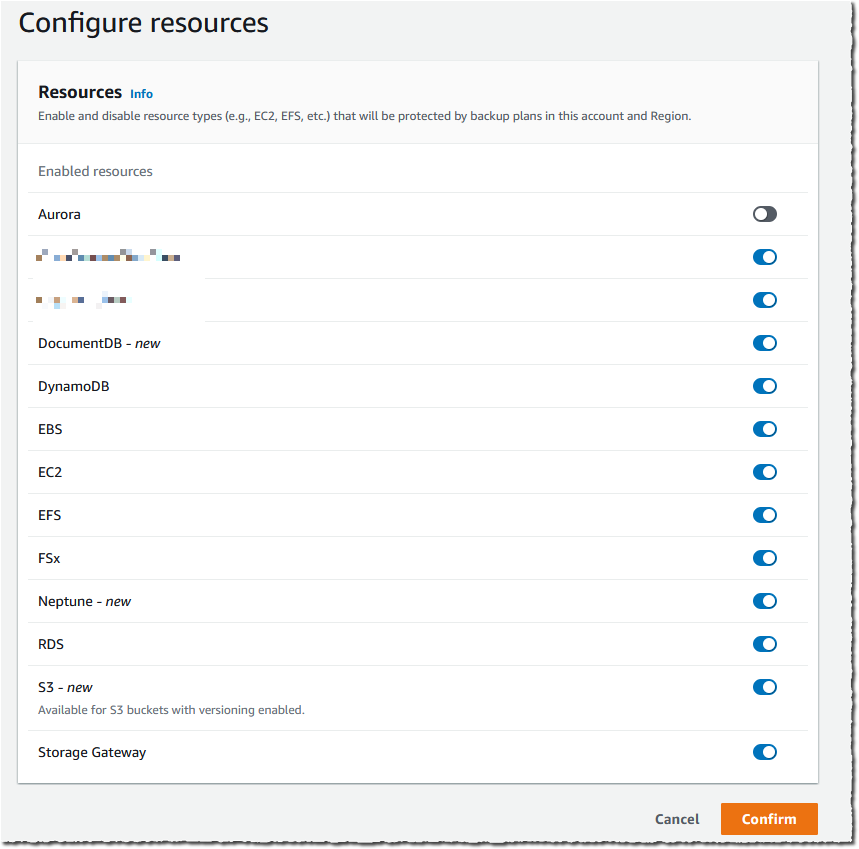
I must enable S3 in AWS Backup Settings when I use this feature for the first time. Using the AWS Management Console, I navigate to AWS Backup, then select Settings and Configure resources. I enable S3, and select Confirm. This is a one-time operation.
For this demo, I already have an existing backup plan, and I want to add an S3 bucket to this plan. If you want to create a new backup plan, then you can refer to AWS Backup‘s technical documentation.
To start including my S3 objects in my backup plan, I open the AWS Management Console, navigate to Backup plans, and select Assign resources.
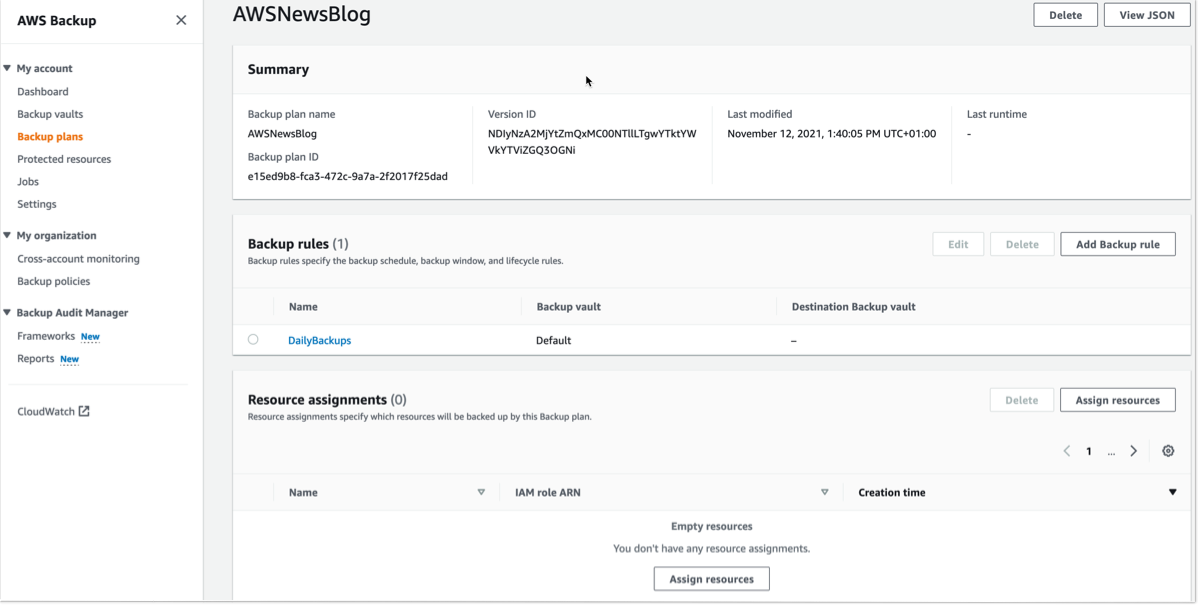
I give a name to my Resource assignment. I select Include specific resources types, then I select S3 as Resource type and one or several S3 Bucket names. When I am done, I select Assign resources.
Alternatively, I may use tags or resource IDs to assign S3 resources.
If you have thousands of S3 buckets, I recommend using tags to assign the S3 buckets to a backup plan. AWS Backup matches the tags in S3 buckets to the ones assigned to the backup plan, and it centrally backs up the S3 resources along with other AWS services that your application uses.
The other options are not different from what you know already.
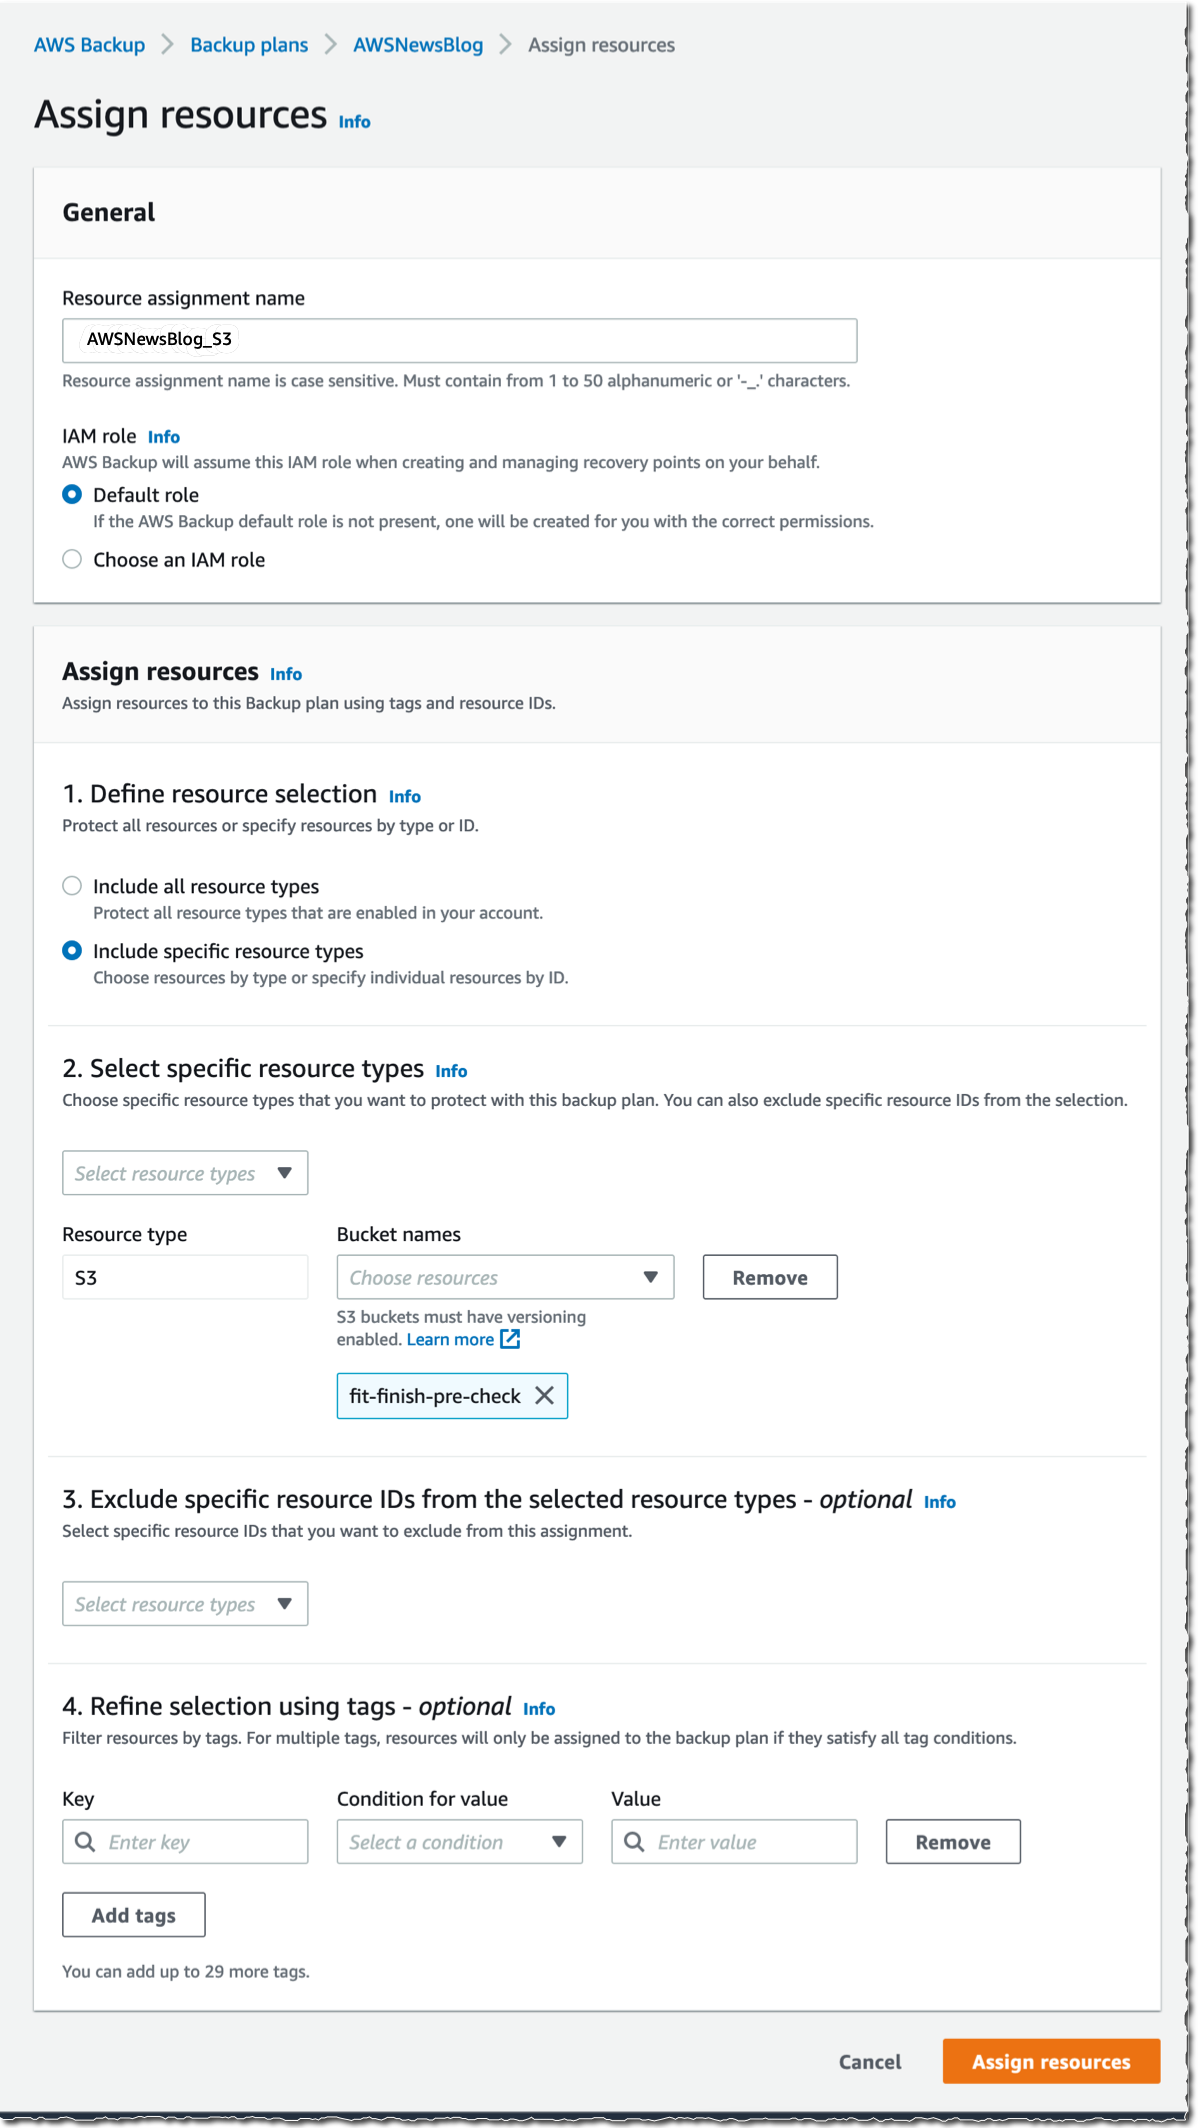
The Bucket names list in the previous screenshot only shows the S3 buckets in the same Region.
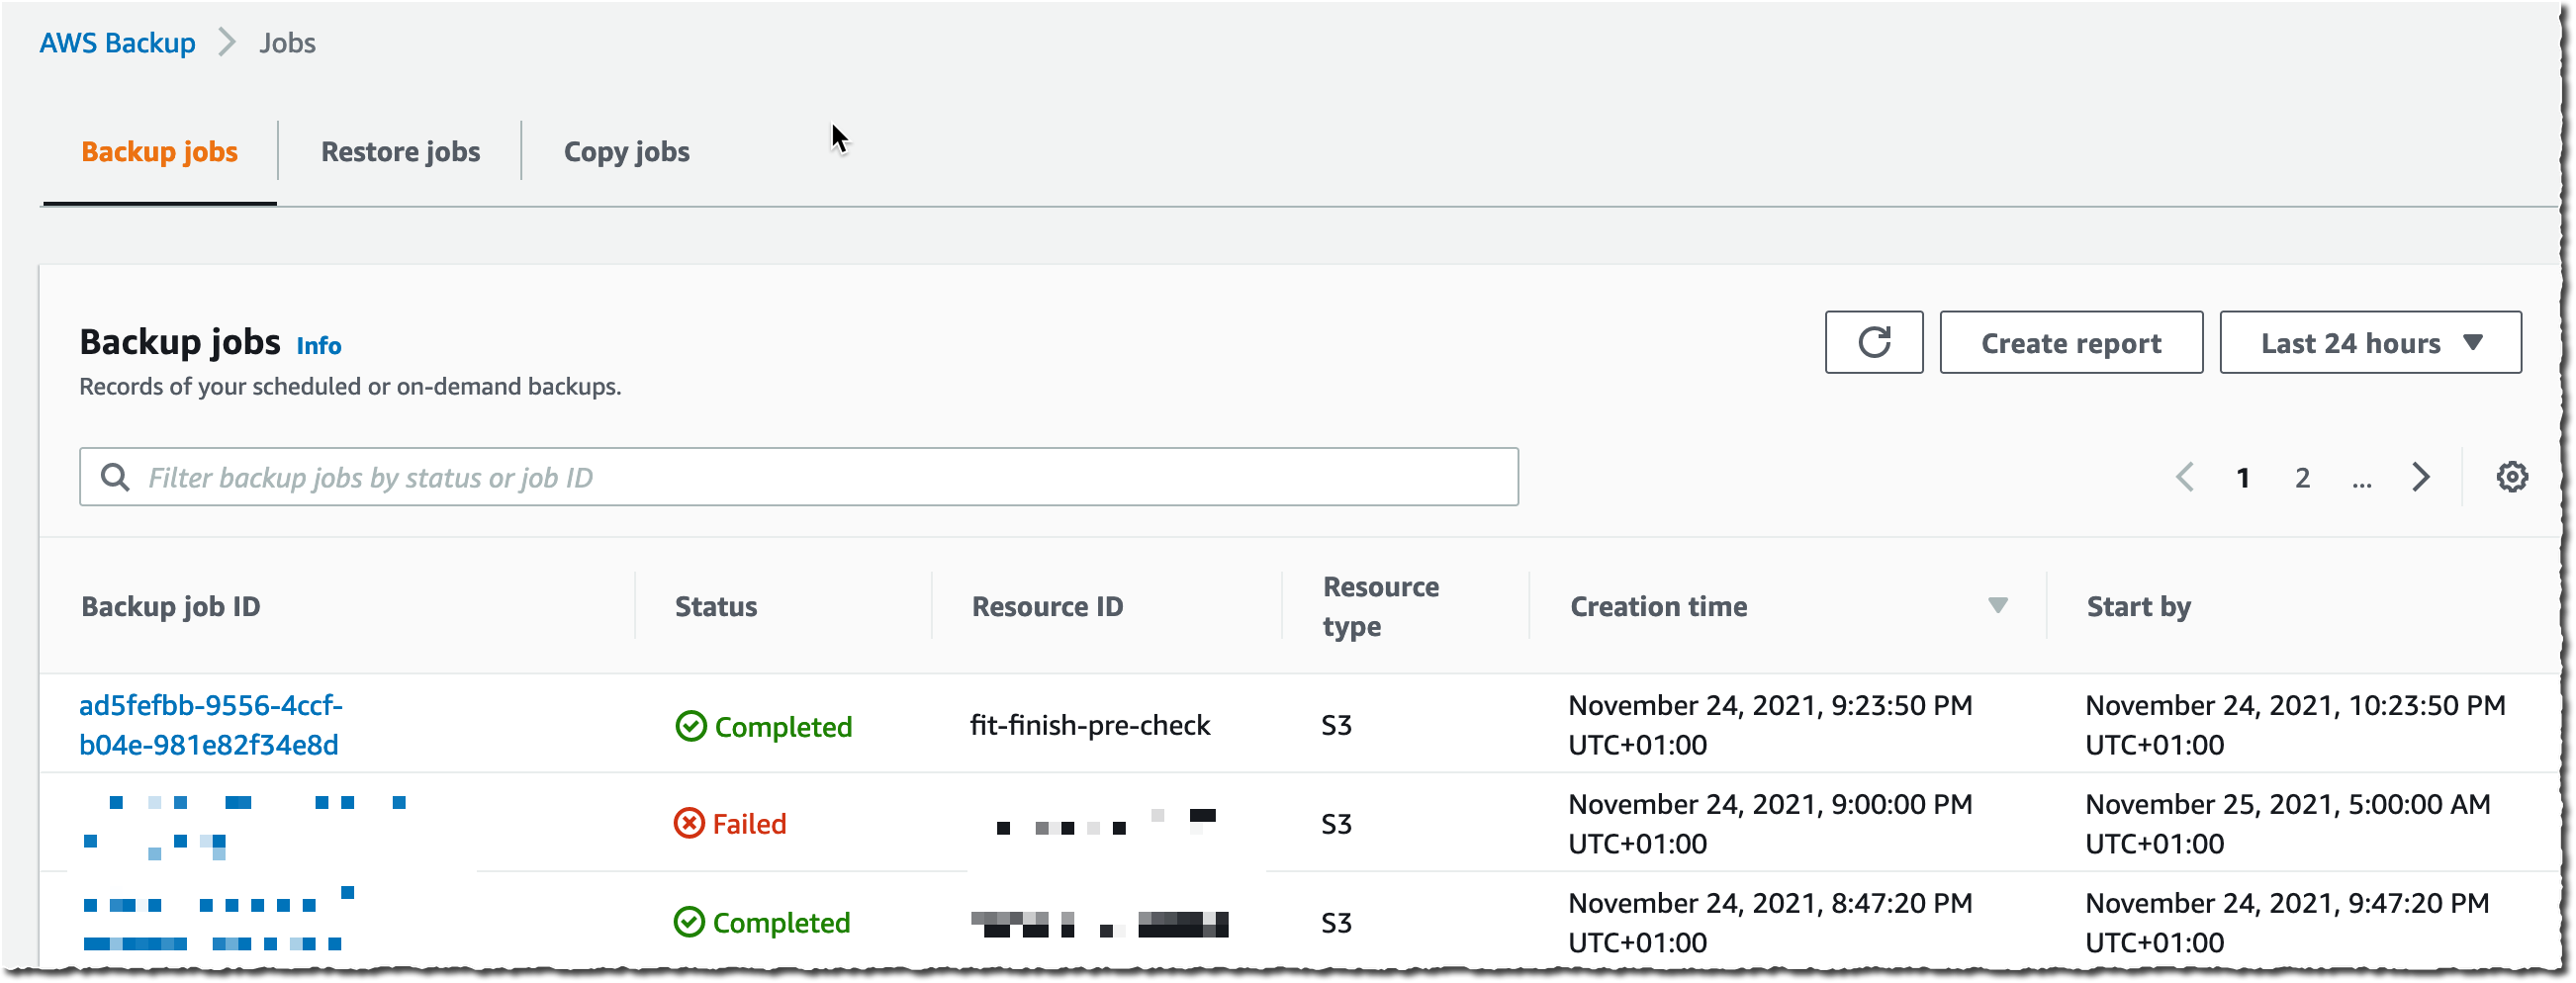
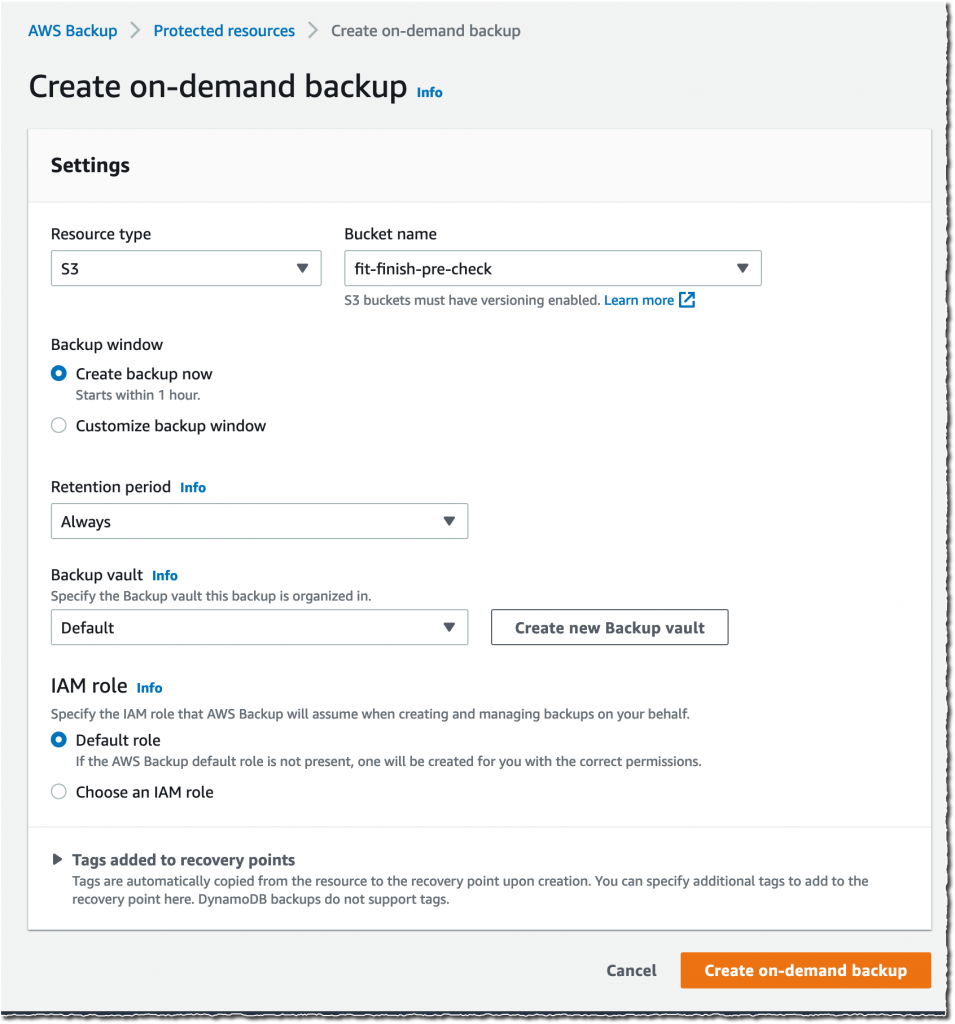
Alternatively, I may also create on-demand backups. I navigate to the Protected resources section, and select Create on-demand backup.
I select S3 as the Resource type, and select the Bucket name. As per usual, I choose a Backup Window, a Retention period, a Backup vault, and an IAM role. Then, I select Create on-demand backup.
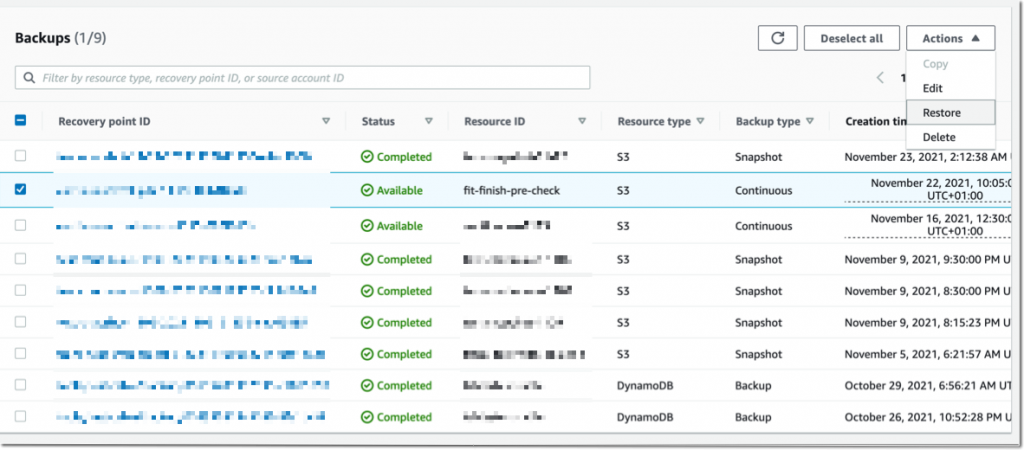
 After a while, depending on the size of my bucket, the backup is ✅ Completed.

All of the backups are encrypted and stored securely in a backup vault that I selected in the backup plan.
A backup vault (or backup storage vault) is an encrypted logical construct in my AWS account that stores and organizes my backups (recovery points). I may create new backup vaults in every AWS Region where AWS Backup is available. I may enable AWS Backup Vault Lock (delete-protection capability) on the backup vault to avoid accidental deletions and prevent malicious actors from re-encrypting my data. AWS Backup stores my continuous backups and periodic snapshots in the backup vault of my preference, and it lets me browse and restore as per my requirements.
How to Restore Objects
Let’s try to restore this backup.
The restore operation is very flexible. I may restore entire S3 buckets or individual S3 objects. I may restore the backups to the source S3 bucket, or to another existing bucket. Furthermore, I may create a new S3 bucket during restore. The S3 buckets must have Versioning enabled. Also, I may change the encryption key during restore.
I navigate to Backup vaults to restore the S3 bucket I just backed up. In the Backups section, I select the Recovery point ID that I want to restore, and I select Restore from the Actions menu.
Before starting the restore, I may select a few options:
The Restore time: I may restore my continuous backup to a point-in-time in the last 35 days, while I can restore my periodic backups to their original state.
The Restore type: I may choose to restore the entire bucket or a subset of objects within it.
The Restore destination: I may choose to restore on the same bucket, on another one, or create a new bucket during restore.
The Restored object encryption: this lets me select the key I want to use to encrypt the restored objects in the bucket.
I select Restore backup to start the restore.
 I can monitor the progress in the Jobs section, under the Restore jobs tab.
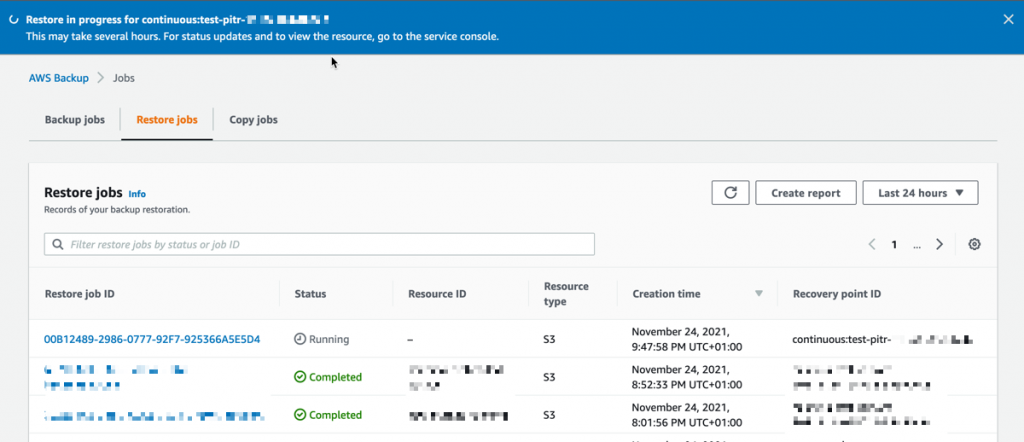
When the status turns green to ✅ Completed, my objects are ready to use!
Generally, the most comprehensive data-protection strategies include regular testing and validation of your restore procedures before you need them. Testing your restores also helps to prepare and maintain recovery runbooks. In turn, that ensures operational readiness during a disaster recovery exercise, or an actual data loss scenario.
Availability and Pricing
The preview is available in the US West (Oregon) Region only.
During the preview, there are no charges for creating and storing backups. You will pay the AWS charges for underlying resources, such as S3 storage, API usage, and versioning.
Send us an email at s3-backup-preview@amazon.com including your AWS account ID to register for the preview.
Go ahead and apply to the preview program today.
-- seb
Amazon S3 Glacier is the Best Place to Archive Your Data – Introducing the S3 Glacier Instant Retrieval Storage Class
=======================
Today we are announcing the Amazon S3 Glacier Instant Retrieval storage class. This new archive storage class delivers the lowest cost storage for long-lived data that is rarely accessed and requires millisecond retrieval.
We are also excited to announce that S3 Intelligent-Tiering now automatically optimizes storage costs for rarely accessed data that needs immediate retrieval with the new Archive Instant Access tier, which is ideal for data with unknown or changing access patterns. For existing customers, this will provide an immediate savings of 68 percent for data that hasn’t been accessed for more than 90 days, with no action needed. The Frequent, Infrequent, and now Archive Instant Access tiers are designed for the same milliseconds access time and high-throughput performance.
In addition, we are announcing the new name for the existing Amazon S3 Glacier storage class and several price reductions.
Amazon S3 Glacier Instant Retrieval
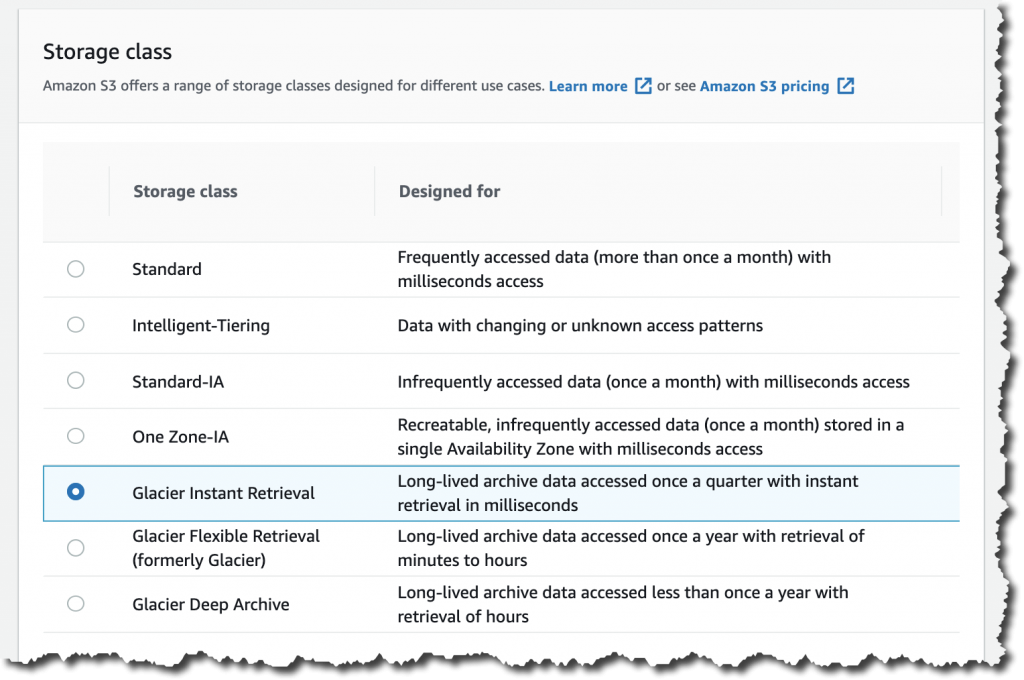
The Amazon S3 Glacier storage classes are extremely low-cost and built for data archiving. They are secure and durable, and they are designed to provide the lowest cost for data that does not require immediate access, with retrieval options from minutes to hours.
Many customers need to store rarely accessed data for several years. However the data must be highly available and immediately accessible. Today, these customers use the S3 Standard-Infrequent Access (S3 Standard-IA) storage class. This storage class offers low cost for storage and allows customers to retrieve their data instantly.
S3 Glacier Instant Retrieval is a new storage class that delivers the fastest access to archive storage, with the same low latency and high-throughput performance as the S3 Standard and S3 Standard-IA storage classes. You can save up to 68 percent on storage costs as compared with using the S3 Standard-IA storage class when you use the S3 Glacier Instant Retrieval storage class and pay a low price to retrieve data. For example, in the US East (N. Virginia) Region, S3 Glacier Instant Retrieval storage pricing is $0.004 per GB-month and data retrieval is $0.03 per GB. Learn more about pricing for your Region.
Media archives, medical images, or user-generated content are just a few examples of ideal use cases for S3 Glacier Instant Retrieval. Once created, this content is rarely accessed, but when it is needed it must be available in milliseconds.
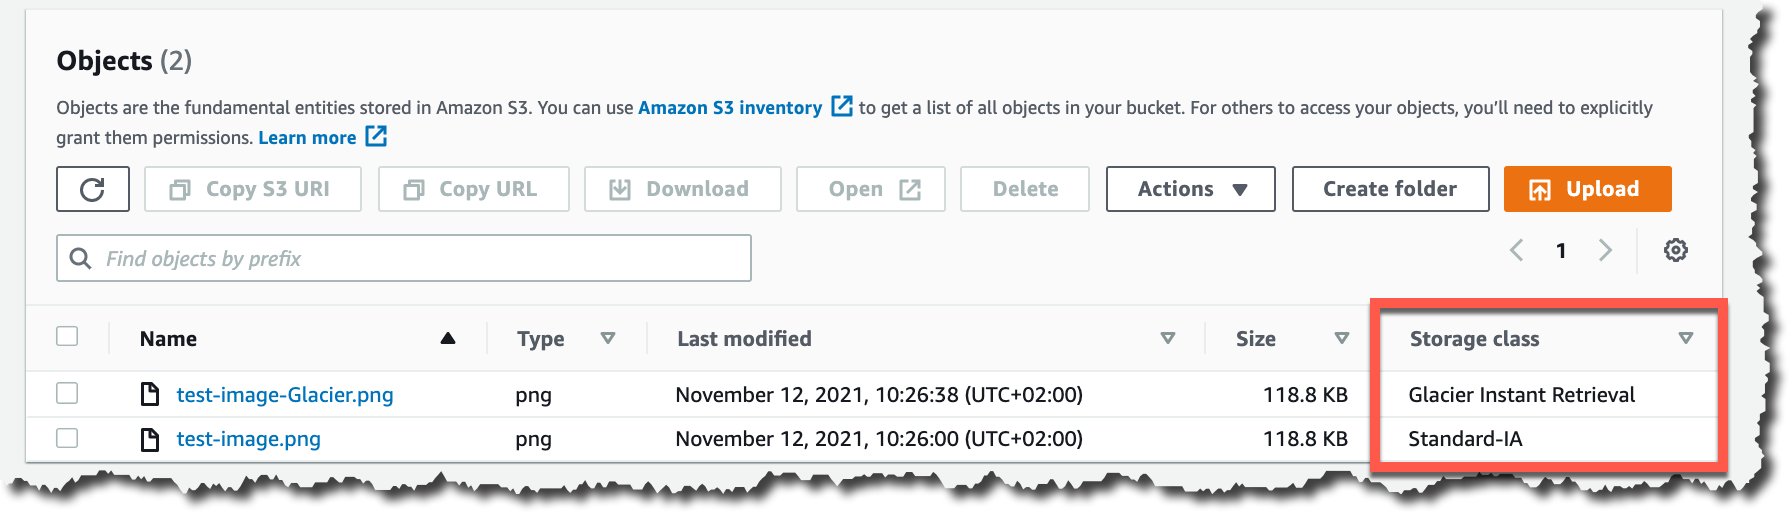
To get started using the new storage class from the Amazon S3 console, upload an object as you would normally, and select the S3 Glacier Instant Retrieval storage class.
This feature is available programmatically from AWS SDKs, AWS Command Line Interface (CLI), and AWS CloudFormation.
In my opinion, the easiest way to store data in S3 Glacier Instant Retrieval is to use the S3 PUT API using the CLI. When using this API, set the storage class to GLACIER_IR.
aws s3api put-object --bucket <bucket-name> --key <object-key> --body <name-file> --storage-class GLACIER_IR
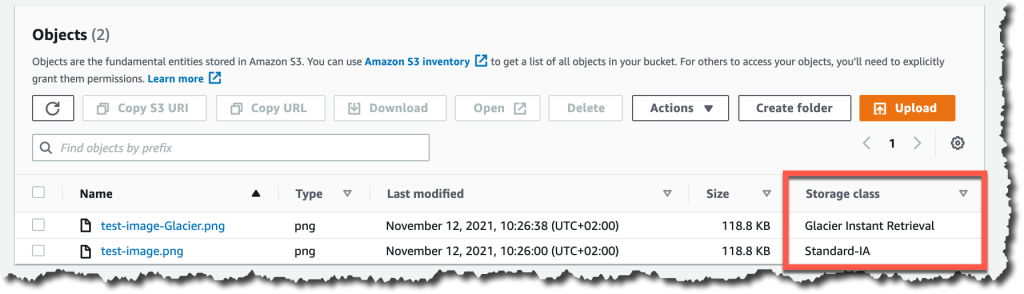
When the object is uploaded to Amazon S3, verify the storage class in the list of objects or on the object details page.
For data that already exists in Amazon S3, you can use S3 Lifecycle to transition data from the S3 Standard and S3 Standard-IA storage classes into S3 Glacier Instant Retrieval.
New Archive Instant Access Tier in S3 Intelligent-Tiering
S3 Intelligent-Tiering is a storage class that automatically moves objects between access tiers to optimize costs. This is the recommended storage class for data with unpredictable or changing access patterns, such as in data lakes, analytics, or user-generated content.
Until today, there were two low latency access tiers optimized for frequent and infrequent access, and two optional archive access tiers designed for asynchronous access optimized for rare access at a low cost.
Beginning today, the Archive Instant Access tier is added as a new access tier in the S3 Intelligent-Tiering storage class. You will start seeing automatic costs savings for your storage in S3 Intelligent-Tiering for rarely accessed objects.
The Archive Instant Access tier joins the group of low latency access tiers. This new tier is optimized for data that is not accessed for months at a time but, when it is needed, is available within milliseconds.
S3 Intelligent-Tiering automatically stores objects in three access tiers that deliver the same performance as the S3 Standard storage class:
Frequent Access tier
Infrequent Access tier
Archive Instant Access (new)
For a small monitoring and automation charge, S3 Intelligent-Tiering monitors access patterns and moves objects between the different access tiers. Objects that have not been accessed for 30 consecutive days are moved from the Frequent Access tier to the Infrequent Access tier for savings of 40 percent. When an object hasn’t been accessed for 90 consecutive days, S3 Intelligent-Tiering will move the object from the Infrequent Access tier to the Archive Instant Access tier, with a savings of 68 percent. If the data is accessed later, it is automatically moved back to the Frequent Access tier. No tiering charges apply when objects are moved between access tiers within the S3 Intelligent-Tiering storage class.
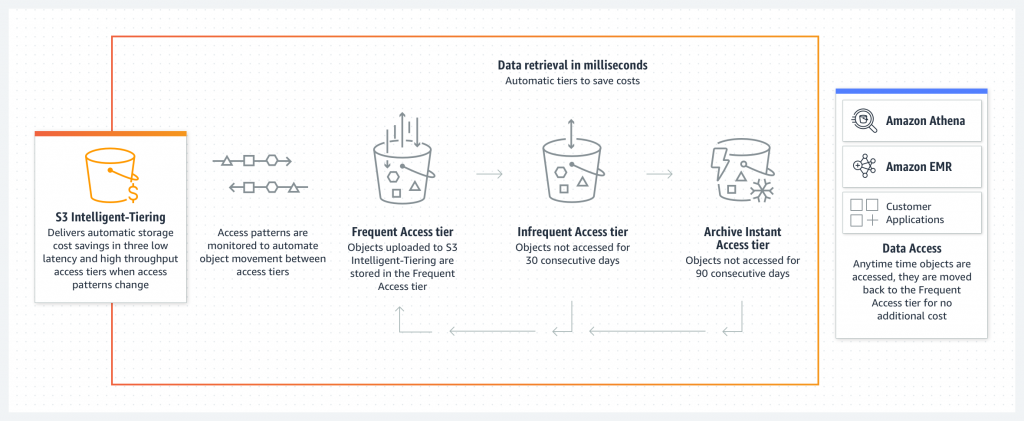
To get started with this new access tier, select Intelligent-Tiering as the storage class for an object when uploading an object using the S3 console. After 90 days of inactivity (30 days in Frequent Access tier and 60 days in Infrequent Access tier), S3 Intelligent-Tiering will automatically move the object to the Archive Instant Access tier. The introduction of the new Archive Instant Access tier has no impact on performance when you retrieve objects.
New name for the Amazon S3 Glacier storage class – S3 Glacier Flexible Retrieval
The existing Amazon S3 Glacier storage class is now named S3 Glacier Flexible Retrieval. This storage class now has free bulk retrievals in 5 to 12 hours, and the storage price has been reduced by 10 percent in all Regions, effective December 1, 2021. S3 Glacier Flexible Retrieval is now even more cost-effective, and the free bulk retrievals make it ideal for retrieving large data volumes.
These are the Amazon S3 archive storage classes:
S3 Glacier Instant Retrieval: The newest storage class is optimized for long-lived data that is rarely accessed (typically once per quarter). However when data is needed, it is available within milliseconds. For example, medical images and news media assets are perfect for this storage class.
S3 Glacier Flexible Retrieval: This newly renamed storage class is optimized for archiving data that can be retrieved in minutes or with free bulk retrievals in 5 to 12 hours. This storage class is ideal for backups and disaster recovery use cases, where you have large amounts of long-term, rarely accessed data, and you don’t want to worry about retrieval costs when you need the data.
S3 Glacier Deep Archive: This storage class is the lowest-cost storage in the cloud and is optimized for archiving data that can be restored in at least 12 hours. It’s great for storing your compliance archives or for digital media preservation.
Amazon S3 has reduced storage prices!
We are excited to announce that Amazon S3 has reduced storage prices of up to 31 percent in the S3 Standard-IA and S3 One Zone-IA storage classes across 9 AWS Regions: US West (N. California), Asia Pacific (Hong Kong), Asia Pacific (Mumbai), Asia Pacific (Osaka), Asia Pacific (Seoul), Asia Pacific (Singapore), Asia Pacific (Sydney), Asia Pacific (Tokyo), and South America (São Paulo). These price reductions are effective December 1, 2021.
Learn more about price reduction details.
Available Now
The new storage class, S3 Glacier Instant Retrieval, and the new Archive Instant Access tier in S3 Intelligent-Tiering are available today (November 30, 2021) in all AWS Regions.
The price cut for S3 Glacier and free bulk retrievals in all AWS Regions, and the S3 Standard-Infrequent Access/One Zone-Infrequent storage class in nine Regions will be effective on December 1, 2021.
Learn more about the storage classes changes and all the storage classes.
— Marcia
Page 1|Page 2|Page 3|Page 4