Contents of this page is copied directly from AWS blog sites to make it Kindle friendly. Some styles & sections from these pages are removed to render this properly in 'Article Mode' of Kindle e-Reader browser. All the contents of this page is property of AWS.
New – Simplify Access Management for Data Stored in Amazon S3
=======================
Today, we are introducing a couple new features that simplify access management for data stored in Amazon Simple Storage Service (Amazon S3). First, we are introducing a new Amazon S3 Object Ownership setting that lets you disable access control lists (ACLs) to simplify access management for data stored in Amazon S3. Second, the Amazon S3 console policy editor now reports security warnings, errors, and suggestions powered by IAM Access Analyzer as you author your S3 policies.
ACLs are an access control mechanism in which each bucket and object has an ACL attached to it. ACLs define which AWS accounts or groups are granted access as well as the type of access. When an object is created, the ownership of it belongs to the creator. This ownership information is embedded in the object ACL. When you upload an object to a bucket owned by another AWS account, and you want the bucket owner to access the object, then permissions need to be granted in the ACL. In many cases, ACLs and other kinds of policies are used within the same bucket.
The new Amazon S3 Object Ownership setting, Bucket owner enforced, lets you disable all of the ACLs associated with a bucket and the objects in it. When you apply this bucket-level setting, all of the objects in the bucket become owned by the AWS account that created the bucket, and ACLs are no longer used to grant access. Once applied, ownership changes automatically, and applications that write data to the bucket no longer need to specify any ACL. As a result, access to your data is based on policies. This simplifies access management for data stored in Amazon S3.
With this launch, when creating a new bucket in the Amazon S3 console, you can choose whether ACLs are enabled or disabled. In the Amazon S3 console, when you create a bucket, the default selection is that ACLs are disabled. If you wish to keep ACLs enabled, you can choose other configurations for Object Ownership, specifically:
Bucket owner preferred: All new objects written to this bucket with the bucket-owner-full-control canned ACL will be owned by the bucket owner. ACLs are still used for access control.
Object writer: The object writer remains the object owner. ACLs are still used for access control.
For existing buckets, you can view and manage this setting in the Permissions tab.
Before enabling the Bucket owner enforced setting for Object Ownership on an existing bucket, you must migrate access granted to other AWS accounts from the bucket ACL to the bucket policy. Otherwise, you will receive an error when enabling the setting. This helps you ensure applications writing data to your bucket are uninterrupted. Make sure to test your applications after you migrate the access.
Policy validation in the Amazon S3 console We are also introducing policy validation in the Amazon S3 console to help you out when writing resource-based policies for Amazon S3. This simplifies authoring access control policies for Amazon S3 buckets and access points with over 100 actionable policy checks powered by IAM Access Analyzer.
To access policy validation in the Amazon S3 console, first go to the detail page for a bucket. Then, go to the Permissions tab and edit the bucket policy.
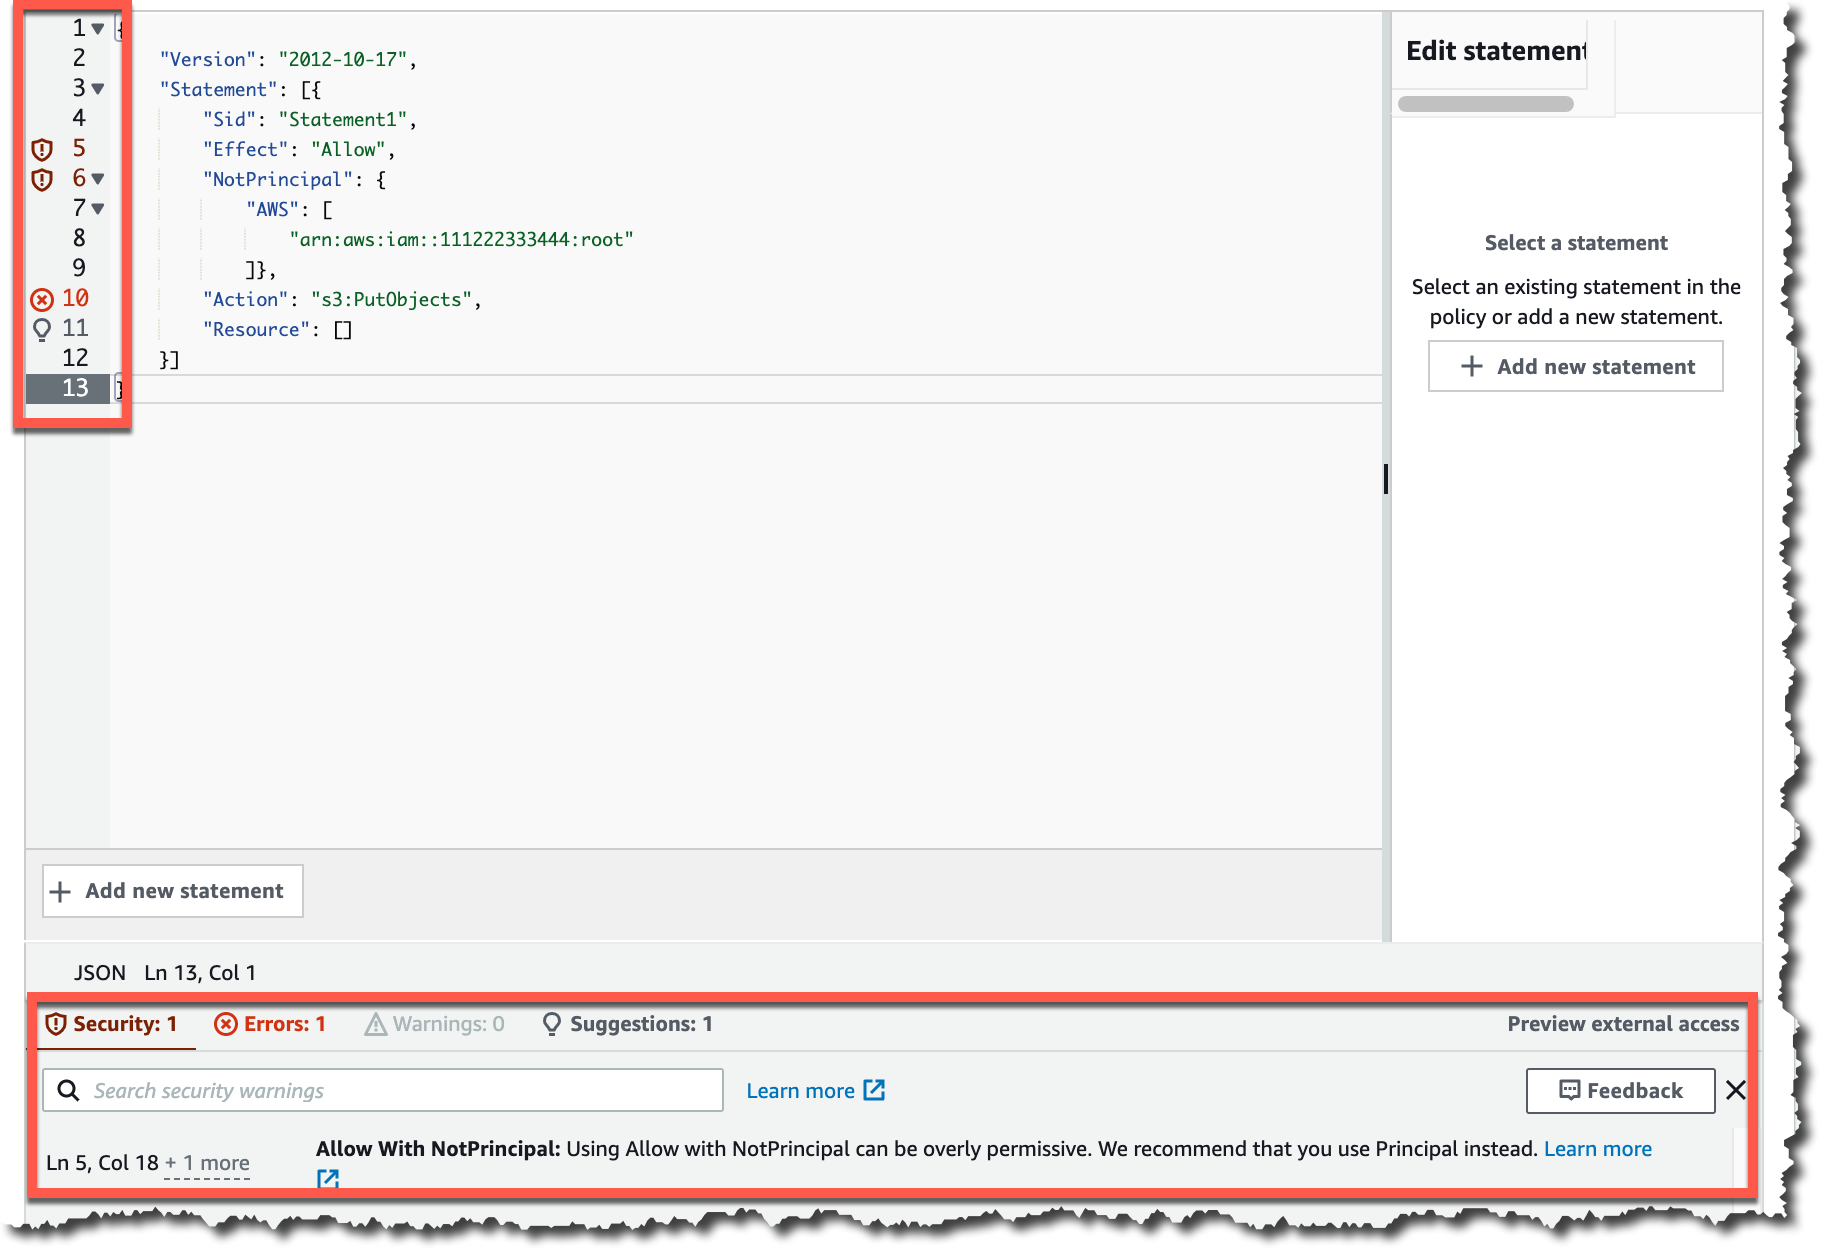
When you start writing your policy, you see that, as you type, different findings appear at the bottom of the screen. Policy checks from IAM Access Analyzer are designed to validate your policies and report security warnings, errors, and suggestions as findings based on their impact to help you make your policy more secure.
You can also perform these checks and validations using the IAM Access Analyzer’s ValidatePolicy API.
Availability Amazon S3 Object Ownership is available at no additional cost in all AWS Regions, excluding the AWS China Regions and AWS GovCloud Regions. IAM Access Analyzer policy validation in the Amazon S3 console is available at no additional cost in all AWS Regions, including the AWS China Regions and AWS GovCloud Regions.
New for AWS Backup – Support for VMware and VMware Cloud on AWS
=======================
Today, I am happy to announce AWS Backup support for VMware, a new capability that enables you to centralize and automate data protection of virtual machines (VMs) running on VMware on premises and VMware CloudTM on AWS. You can now use a single, centrally managed policy in AWS Backup to protect these VMware environments together with 12 AWS compute, storage, and database services already supported by AWS Backup. You can then use AWS Backup to restore VMware workloads to on-premises data centers and VMware Cloud on AWS.
Using AWS Backup Support for VMware There are three steps to back up VMware virtual machines (VMs) with AWS Backup:
Create a gateway to connect AWS Backup to your hypervisor.
Connect to your hypervisor through the gateway.
Assign virtual machines managed by your hypervisor to a backup plan.
On the left pane of the AWS Backup console, there is a new External resources section. There, I choose Gateways and then Create gateway. This AWS Backup gateway helps with discovery of the on-premises VMware environment and acts as a cloud gateway to send and receive data.
I download the Open Virtualization Format (OVF) file of the AWS Backup gateway and follow the instructions to deploy the gateway using the VMware vSphere client. I am using an internal test and development VMware environment for this walkthrough.
After deploying the gateway in my VMware environment, I come back to the AWS Backup console. I write a name for the gateway (for simplicity, I use the same name of the gateway VM) and the IP address of the gateway VM. Optionally, I can add tags to help organize and track my setup. I go on and create the gateway.
Now, I choose Add hypervisor. I write a name for the hypervisor and the IP address of the VMware vCenter server host.
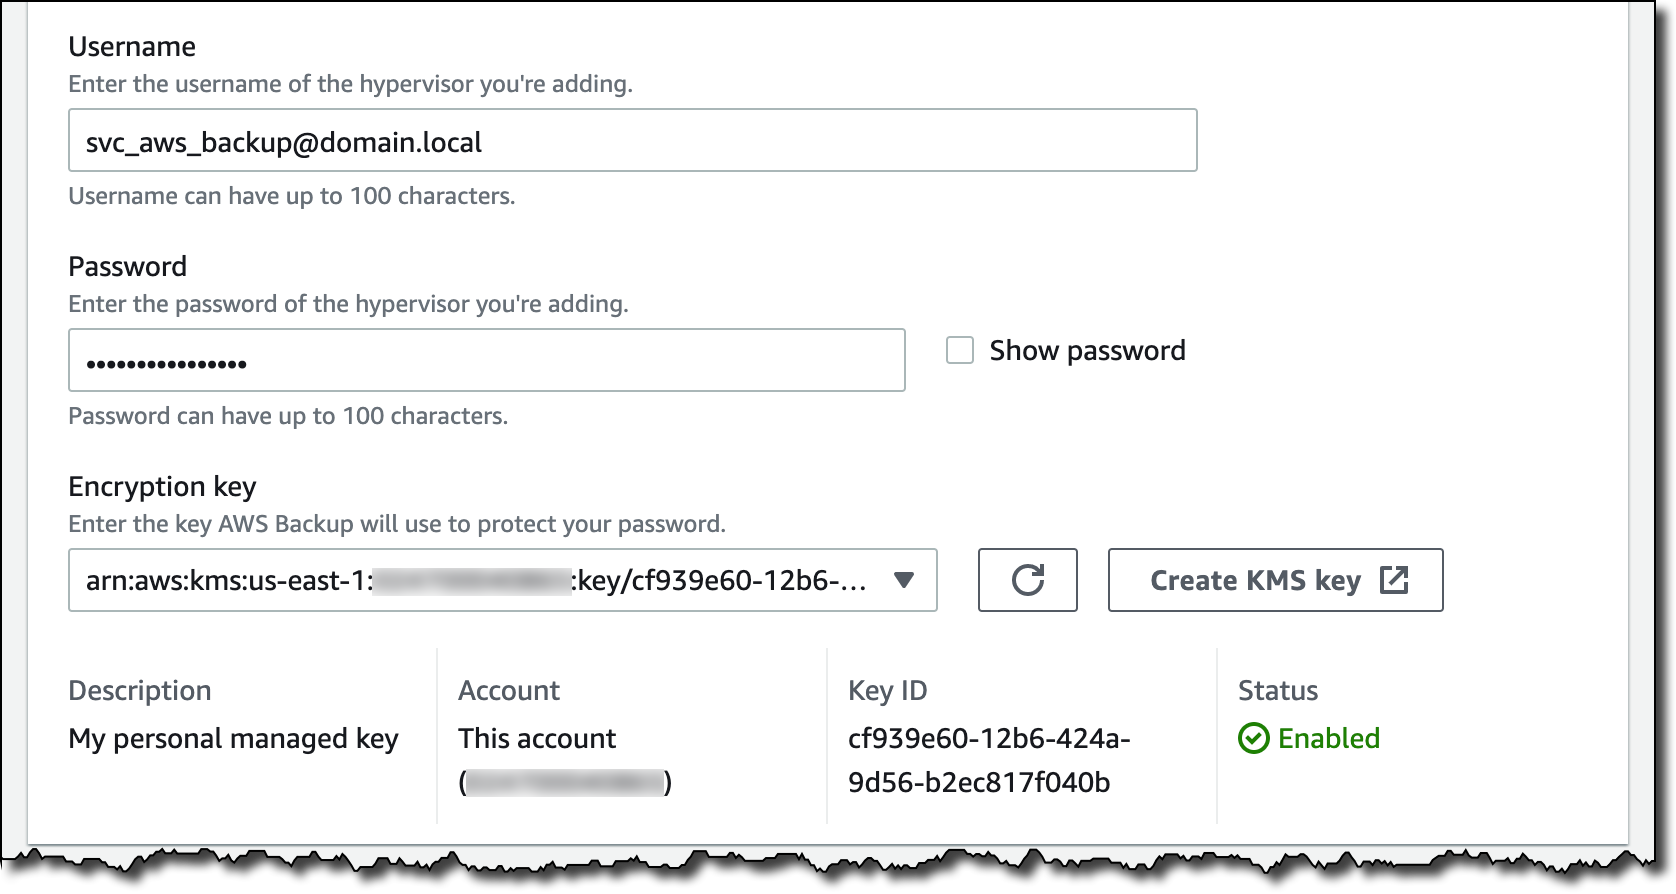
I enter the username and password of a service account that I created for AWS Backup on the Active Directory domain. The username should include the domain (for example, username@domain). Then, I choose the encryption key to protect the service account credentials. If I don’t choose my own AWS Key Management Service (KMS) key, AWS Backup encrypts the username and password using a key that AWS owns and manages.
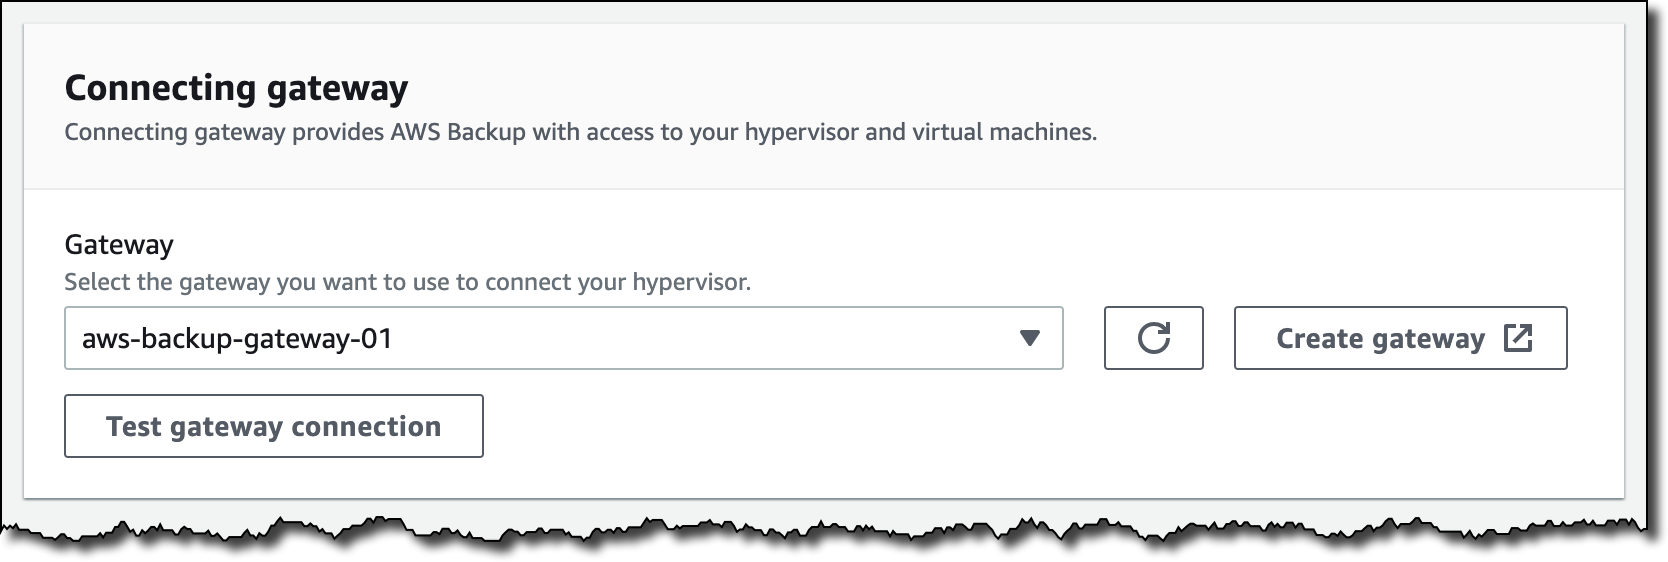
I select the gateway to connect to the hypervisor and choose Test gateway connection. This test helps ensure that the gateway can communicate with the hypervisor before I complete the configuration. Optionally, I can add tags to help organize and track my setup. I go on and add the hypervisor.
After a few minutes, the hypervisor is online, and I see the VMs managed by vCenter in the AWS Backup console. I can now use these virtual machines as resources in my backup plans in the same way as the other AWS compute, storage, and database resources supported by AWS Backup.
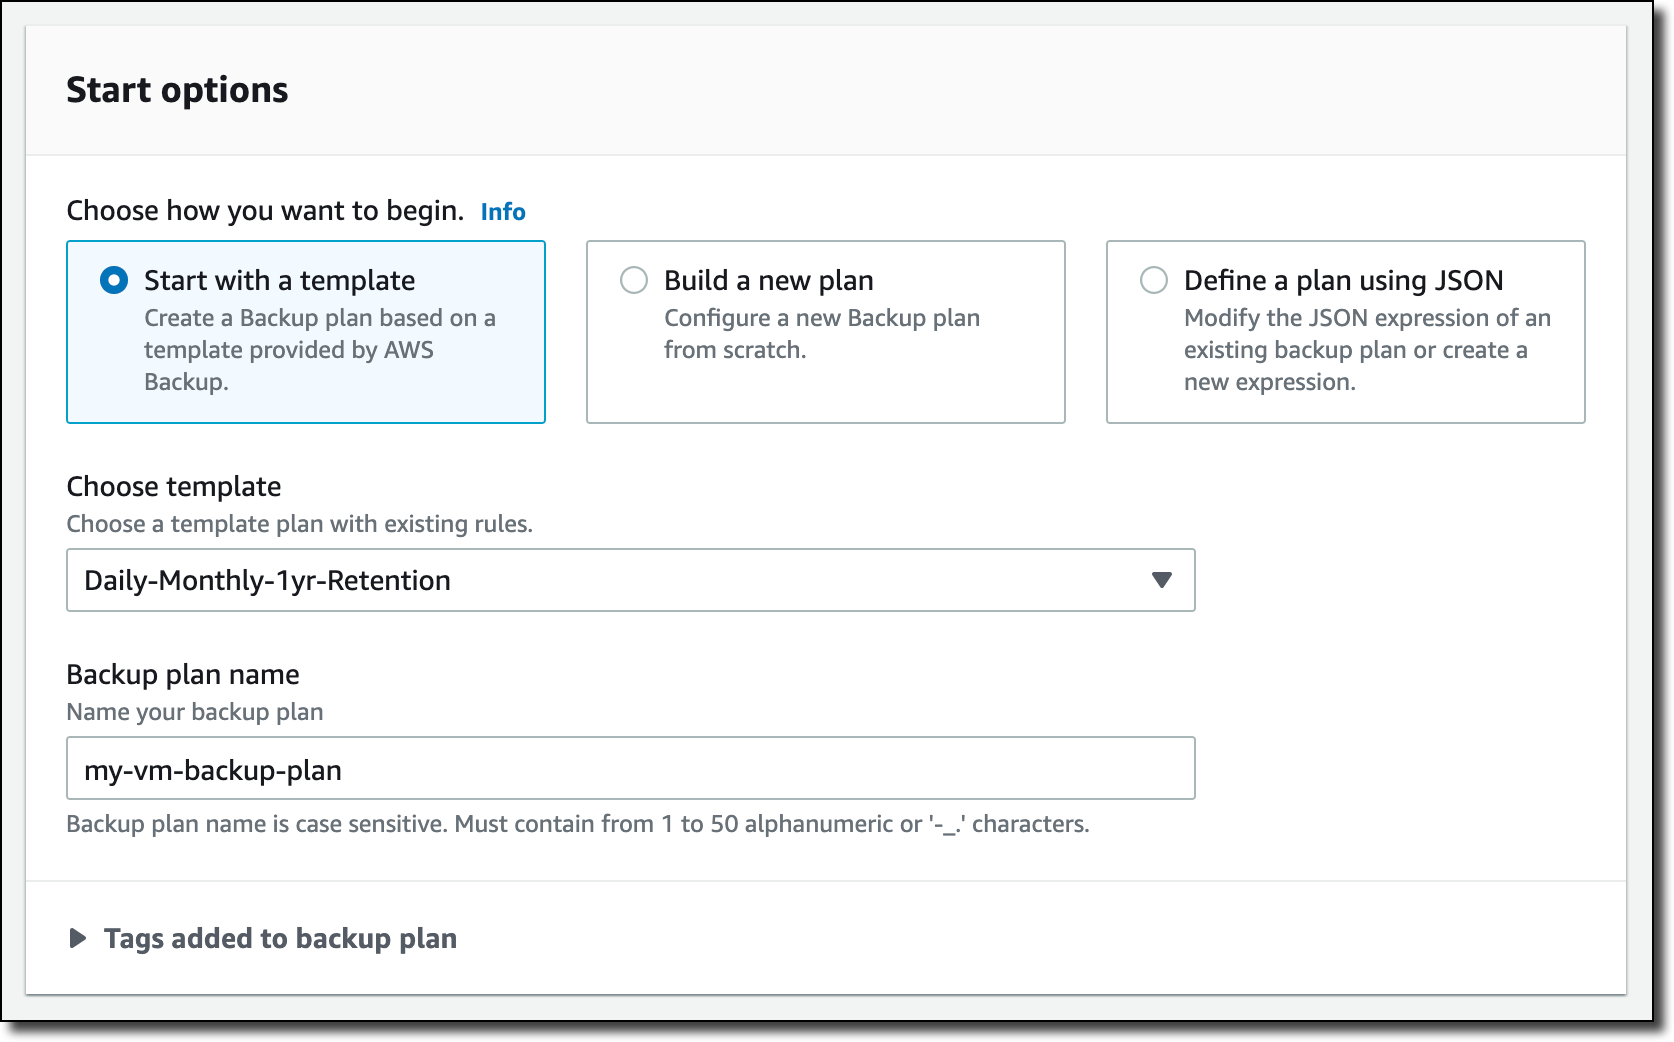
I create a new backup plan and start with a template. The rules of the template enforce daily backups with five weeks of retention and monthly backups with one year of retention. I can customize these rules based on my requirements.
Then, I choose to assign resources to the backup plan, and I select three VMs.
If you need, you can create an on-demand backup in the Protected resources section of the console. For example, here I am starting the on-demand backup for one of the VMs.
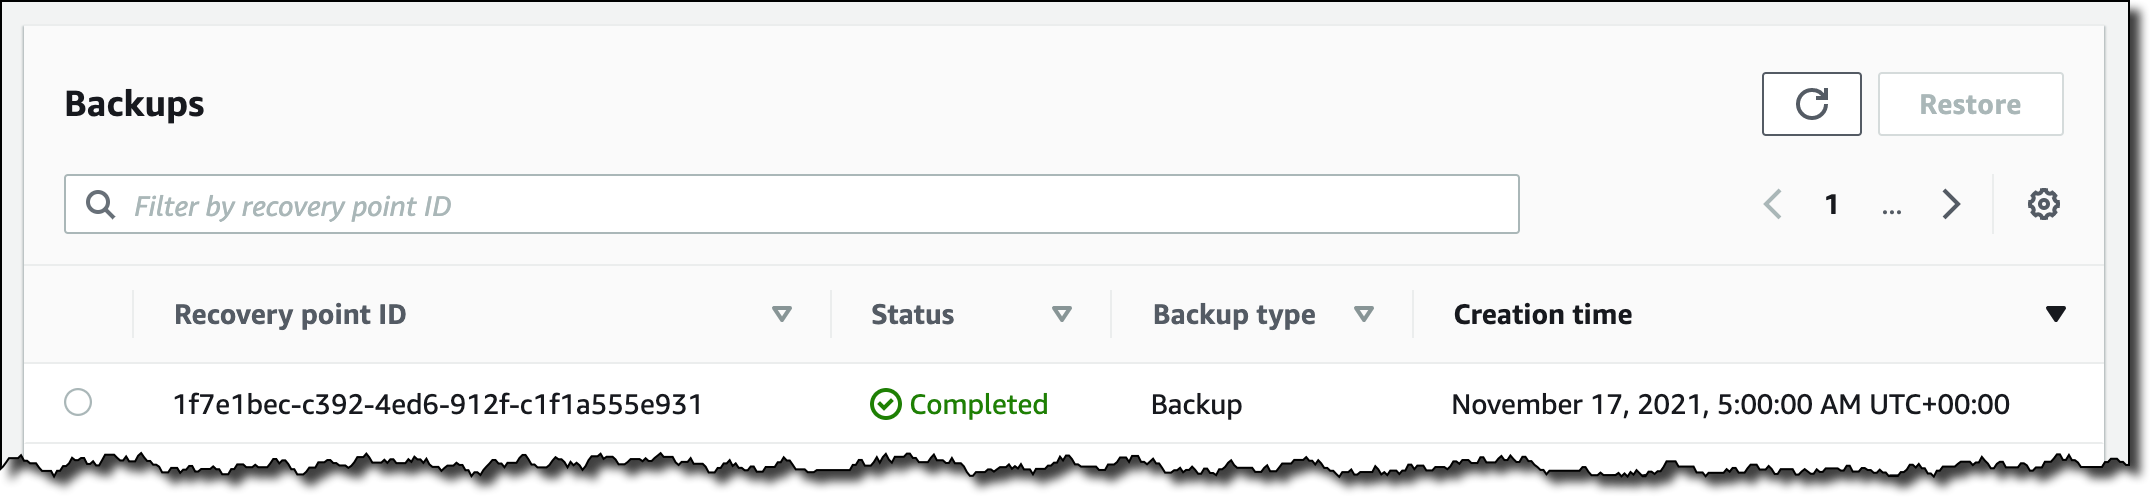
When a backup is complete, VMs are added to the list of the protected resources, and I can initiate a restore.
I select the backup and choose Restore. Then, I enter the restore location, which can be the same VMware environment I used for the backup or another (for example, on VMware Cloud on AWS). Below, I specify name, path, compute resource name, and datastore to use for the restore. Then, I choose Restore backup.
Availability and Pricing AWS Backup support for VMware is available in the US East (N. Virginia, Ohio), US West (N. California, Oregon), GovCloud (US-East, US-West), Canada (Central), Europe (Frankfurt, Ireland, London, Milan, Paris, Stockholm), South America (São Paulo), Asia Pacific (Hong Kong, Mumbai, Seoul, Singapore, Sydney, Tokyo, Osaka), Middle East (Bahrain), and Africa (Cape Town) Regions. Please see the AWS Regional Services List for more information.
AWS Backup supports VMware ESXi 6.7.x and 7.0.x VMs running on NFS, VMFS, and VSAN data stores on premises and in VMware Cloud on AWS. In addition, AWS Backup supports both SCSI Hot-Add and Network Block Device (NBD) transport modes for copying data from source VMs to AWS.
With AWS Backup support for VMware, you pay using the same dimensions that AWS Backup uses today: backup storage, restore, and cross-region data transfer. For more information, see the AWS Backup pricing page.
Your VM backups are stored in a backup vault. All backups stored and managed by AWS Backup are replicated to 3 Availability Zones (AZs) in the Region and designed for 99.999999999 percent (11 9s) durability and 99.99 percent (4 9s) of service availability.
AWS Backup supports first full, then incremental-forever, backups of VMs that you can create on-demand or via a schedule configured in your backup plan. AWS Backup always does full restores even though backups are stored as incremental, enabling you to benefit from storage efficiency cost savings while easily performing restores.
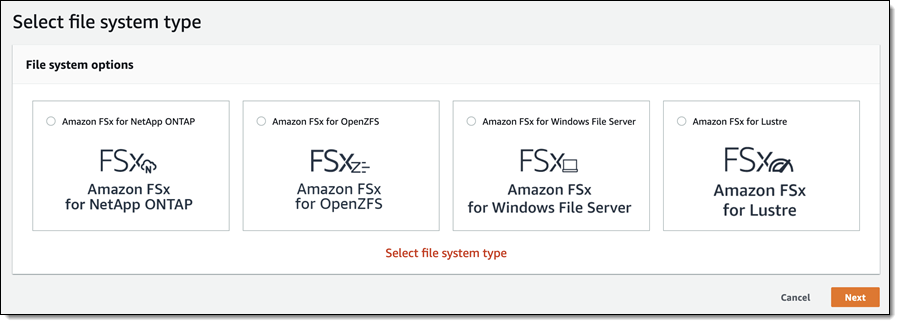
Amazon FSx for OpenZFS Today I am happy to announce Amazon FSx for OpenZFS, the newest addition to the Amazon FSx family. Just like the other members of the family, this new addition lets you use a popular file system without having to deal with hardware provisioning, software configuration, patching, backups, and the like. You can create a file system in minutes and begin to enjoy the benefits of OpenZFS right away: transparent compression, continuous integrity verification, snapshots, and copy-on-write. Even better, you get all of these benefits without having to develop the specialized expertise that has traditionally been needed to set up and administer OpenZFS.
FSx for OpenZFS is powered by the AWS Graviton family processors and AWS SRD (Scalable Reliable Datagram) Networking, and can deliver up to 1 million IOPS with latencies of 100-200 microseconds, along with up to 4 GB/second of uncompressed throughput, up to 12 GB/second of compressed throughput, and up to 12.5 GB/second throughput to cached data. FSx for OpenZFS supports the OpenZFS Adaptive Replacement Cache (ARC) and uses memory in the file server to provide faster performance. It also supports advanced NFS performance features such as session trunking and NFS delegation, allowing you to get very high throughput and IOPS from a single client, while still safely caching frequently accessed data on the client side.
You can use FSx for OpenZFS to address your highly demanding machine learning, EDA (Electronic Design Automation), media processing, financial analytics, code repository, DevOps, and web content management workloads. With performance that is close to local storage, FSx for OpenZFS is great for these and other latency-sensitive workloads that manipulate and sequentially access many small files. Finally, because you can create, mount, use, and delete file systems as needed, you can now use OpenZFS in a dynamic, agile fashion.
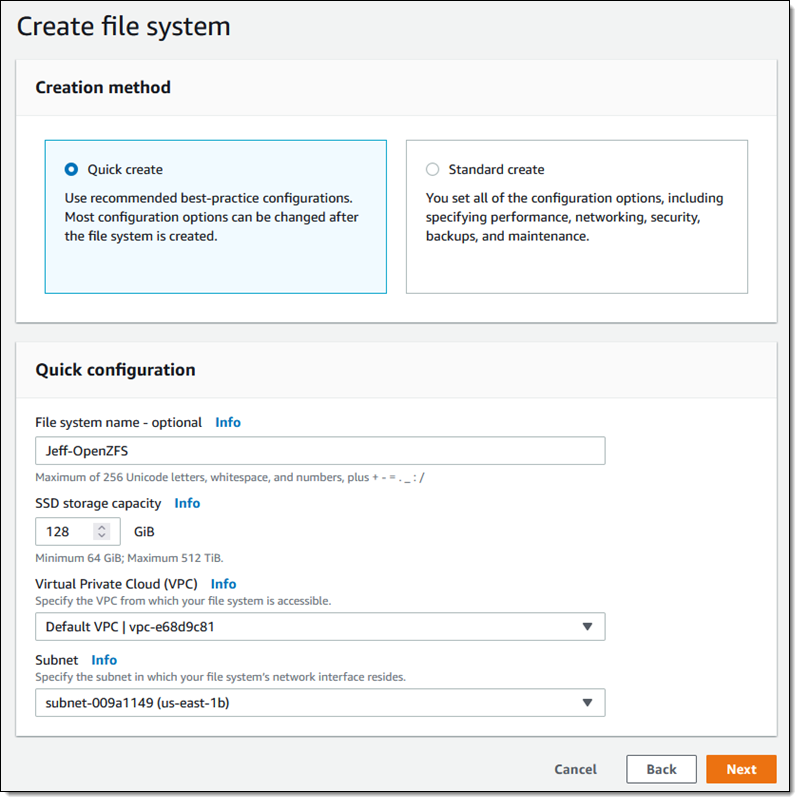
I can choose Quick create (and use recommended best-practice configurations), or Standard create (and set all of the configuration options myself). I’ll take the easy route and use the recommended best practices to get started. I enter a name (Jeff-OpenZFS) select the amount of SSD storage that I need, choose a VPC & subnet, and click Next:
The console shows me that I can edit many of the attributes of my file system later if necessary. I review the settings and click Create file system:
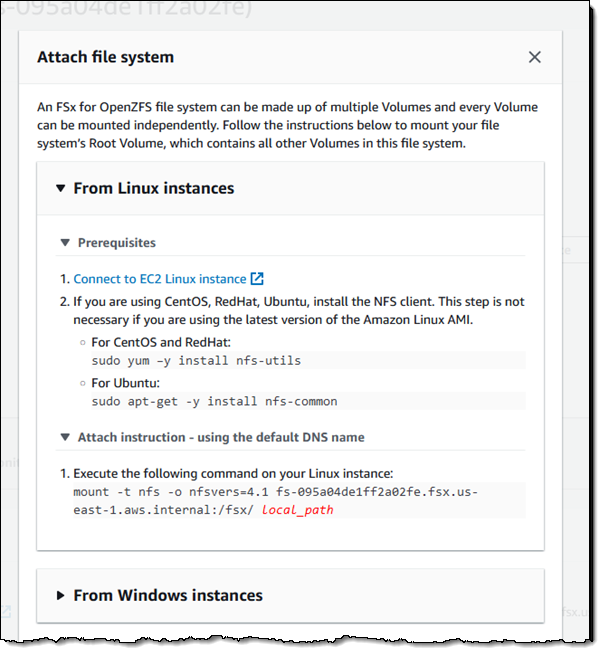
My file system is ready within a minute or two, and I click Attach to get the proper commands to mount it to my client:
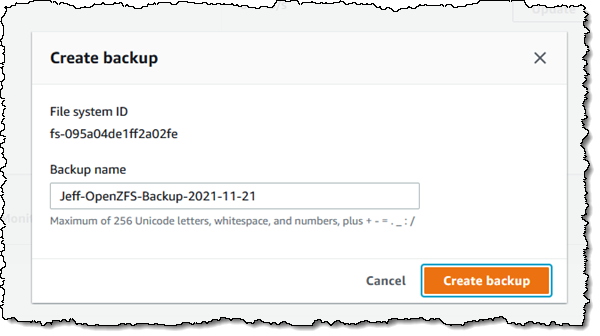
To be more precise, I am mounting the root volume (/fsx) of my file system. Once it is mounted, I can use it as I would any other file system. After I add some files to it, I can use the Action menu in the console to create a backup:
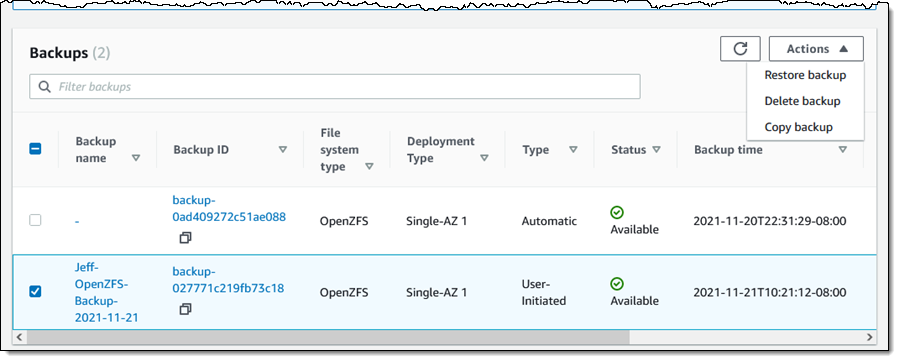
I can restore the backup to a new file system:
As I noted earlier, each file system can deliver up to 4 gigabytes per second of throughput for uncompressed data. I can look at total throughput and other metrics in the console:
I can set throughput capacity of each volume when I create it, and then change it later if necessary:
Changes take effect within minutes. The file system remains active and mounted while the change is put into effect, but some operations may pause momentarily:
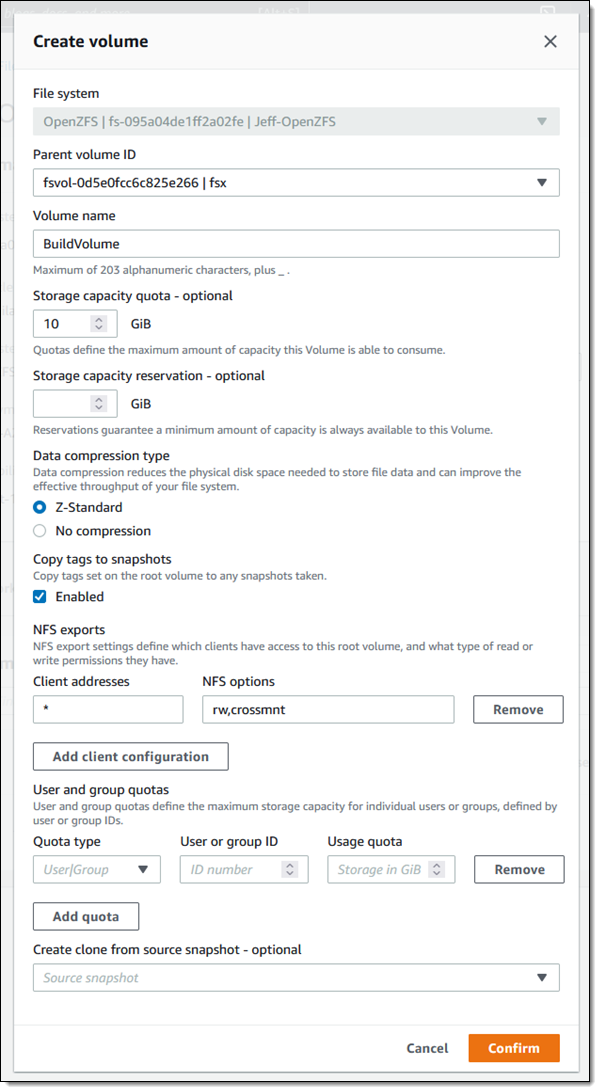
A single OpenZFS file system can contain multiple volumes, each with separate quotas (overall volume storage, per-user storage, and per-group storage) and compression settings. When I use the quick create option a root volume named fsx is created for me; I can click Create volume to create more volumes at any time:
The new volume exists within the namespace hierarchy of the parent, and can be mounted separately or accessed from the parent.
Things to Know Here are a couple of quick facts and to wrap up this post:
Pricing – Pricing is based on the provisioned storage capacity, throughput, and IOPS.
Regions – Amazon FSx for OpenZFS is available in the US East (N. Virginia), US East (Ohio), US West (Oregon), Europe (Ireland), Canada (Central), Asia Pacific (Tokyo), and Europe (Frankfurt) Regions.
In the Works – We are working on additional features including storage scaling, IOPS scaling, a high availability option and another storage class.
AWS Nitro SSD – High Performance Storage for your I/O-Intensive Applications
=======================
We love to solve difficult problems for our customers! As you have seen through the years, innovation at AWS takes many forms, and encompasses both hardware and software.
One of my favorite examples of customer-driven innovation is AWS Nitro System, which I first wrote about back in mid-2018. In that post I told you how Nitro System would allow us to innovate more quickly than ever, with the goal of creating instances that would run even more types of workloads. I also shared the basic building blocks, as they existed at that time, including Nitro Cards to accelerate and offload network and storage I/O, the Nitro Security Chip to monitor and protect hardware resources, and the Nitro Hypervisor to manage memory and CPU allocation with very low overhead.
Today I would like to tell you about one more building block!
AWS Nitro SSD For decades, traditional hard drives (sometimes jokingly referred to as spinning rust) were the primary block storage devices. Today, while spinning rust still has its place, most high-performance storage is based on more modern Solid State Drives (SSD). Open up an SSD and you will find lots of flash memory and a firmware-driven processor that manages access to the memory and supports higher-level functions such as block mapping, encryption, caching, wear leveling, and so forth.
The scale of the AWS Cloud and the range of customer use cases that it supports gives us some valuable insights into the ways that today’s applications, database engines, and operating systems make use of block storage. As a result, after delivering several generations of EC2 instances we saw an opportunity to do better. Our goal was to allow I/O-intensive workloads (relational databases, NoSQL databases, data warehouses, search engines, and analytics engines to name a few) to run faster and with more predictable performance.
Today I would like to tell you about the AWS Nitro SSD. The first generation of these devices were used to power io2 Block Express EBS volumes, and allow us to give you EBS volumes with lots of IOPS, plenty of throughput, and a maximum volume size of 64 TiB. The Im4gn and Is4gen instances that I wrote about earlier today make use of the second generation of AWS Nitro SSDs, as will many future EC2 instances, including the I4i instances that we preannounced today.
The AWS Nitro SSDs are designed to be installed and to operate at cloud scale. While this sounds like a simple exercise in manufacturing and installing more devices, the reality is a lot more complex and a lot more interesting. As I noted earlier, the firmware inside of each device is responsible for implementing many lower-level functions. As our customers push the devices to their limits, they expect us to be able to diagnose and resolve any performance inconsistencies they observe. Building our own devices allows us to design in operational telemetry and diagnostics, along with mechanisms that enable us to install firmware updates at cloud scale & at cloud speed. Taking this even further, we developed our own code to manage the instance-level storage in order to further improve the reliability and debug-ability, and to deliver consistent performance.
On the performance side, our deep understanding of cloud workloads led us to engineer the devices so that they can deliver maximum performance under a sustained, continuous load. SSDs are built from fast, dense flash memory. Due to the characteristics of this semiconductor memory, each cell can only be written, erased, and then rewritten a limited number of times. In order to make the devices last as long as possible, the firmware is responsible for a process known as wear leveling. I don’t understand the details, but I assume that this includes some sort of mapping from logical block numbers to physical cells in a way that evens out the number of cycles over time. There’s some housekeeping (a form of garbage collection) involved in this process, and garden-variety SSDs can slow down (creating latency spikes) at unpredictable times when dealing with a barrage of writes. We also took advantage of our database expertise and built a very sophisticated, power-fail-safe journal-based database into the SSD firmware.
The second generation of AWS Nitro SSDs were designed to avoid latency spikes and deliver great I/O performance on real-world workloads. Our benchmarks show instances that use the AWS Nitro SSDs, such as the new Im4gn and Is4gen, deliver 75% lower latency variability than I3 instances, giving you more consistent performance.
Putting all of this together, there’s a very tight, rapidly rotating flywheel in action here because the team that builds the Nitro SSDs is part of the AWS storage team, and also has operational responsibilities. Like all teams at AWS, they watch the metrics day-in and day-out, and can efficiently deploy new firmware using a CI/CD model.
Join the Team As is always the case, there’s always more innovation ahead, and we have some awesome positions on the teams that design the AWS Nitro SSDs. For example:
New Storage-Optimized Amazon EC2 Instances (Im4gn and Is4gen) Powered by AWS Graviton2 Processors
=======================
EC2 storage-optimized instances are designed to deliver high disk I/O performance, and plenty of storage. Our customers use them to host high-performance real-time databases, distributed file systems, data warehouses, key-value stores, and more. Over the years we have released multiple generations of storage-optimized instances including the HS1 (2012) , D2 (2015), I2 (2013) , I3 (2017), I3en (2019), and D3/D3en (2020).
As I look back on all of these launches, it is interesting to see how we continue to provide an ever-increasing set of options that make each successive generation an even better fit for the diverse (and also ever-increasing) needs of our customers. HS1 instances were available in just one size, D2 and I2 in four, I3 in six, and I3en in eight. These instances give our customers the freedom to choose the size that best meets their current needs while also giving them room to scale up or down if those needs happen to change.
Im4gn and Is4gen Today I am happy to introduce the two newest families of storage-optimized instances, Im4gn and Is4gen, powered by Graviton2 processors. Both instances offer up to 30 TB of NVMe storage using AWS Nitro SSD devices that are custom-built by AWS. As part of our drive to innovate on behalf of our customers, we turned our attention to storage and designed devices that were optimized to support high-speed access to large amounts of data. The AWS Nitro SSDs reduce I/O latency by up to 60% and also reduce latency variability by up to 75% when compared to the third generation of storage-optimized instances. As a result you get faster and more predictable performance for your I/O-intensive EC2 workloads.
Im4gn instances are a great fit for applications that require large amounts of dense SSD storage and high compute performance, but are not especially memory intensive such as social games, session storage, chatbots, and search engines. Here are the specs:
Instance Name
vCPUs
Memory
Local NVMe Storage (AWS Nitro SSD)
Read Throughput (128 KB Blocks)
EBS-Optimized Bandwidth
Network Bandwidth
im4gn.large
2
8 GiB
937 GB
250 MB/s
Up to 9.5 Gbps
Up to 25 Gbps
im4gn.xlarge
4
16 GiB
1.875 TB
500 MB/s
Up to 9.5 Gbps
Up to 25 Gbps
im4gn.2xlarge
8
32 GiB
3.75 TB
1 GB/s
Up to 9.5 Gbps
Up to 25 Gbps
im4gn.4xlarge
16
64 GiB
7.5 TB
2 GB/s
9.5 Gbps
25 Gbps
im4gn.8xlarge
32
128 GiB
15 TB (2 x 7.5 TB)
4 GB/s
19 Gbps
50 Gbps
im4gn.16xlarge
64
256 GiB
30 TB (4 x 7.5 TB)
8 GB/s
38 Gbps
100 Gbps
Im4gn instances provide up to 40% better price performance and up to 44% lower cost per TB of storage compared to I3 instances. The new instances are available in the AWS US West (Oregon), US East (Ohio), US East (N. Virginia), and Europe (Ireland) Regions as On-Demand, Spot, Savings Plan, and Reserved instances.
Is4gen instances are a great fit for applications that do large amounts of random I/O to large amounts of SSD storage. This includes shared file systems, stream processing, social media monitoring, and streaming platforms, all of which can use the increased storage density to retain more data locally. Here are the specs:
Instance Name
vCPUs
Memory
Local NVMe Storage (AWS Nitro SSD)
Read Throughput (128 KB Blocks)
EBS-Optimized Bandwidth
Network Bandwidth
is4gen.medium
1
6 GiB
937 GB
250 MB/s
Up to 9.5 Gbps
Up to 25 Gbps
is4gen.large
2
12 GiB
1.875 TB
500 MB/s
Up to 9.5 Gbps
Up to 25 Gbps
is4gen.xlarge
4
24 GiB
3.75 TB
1 GB/s
Up to 9.5 Gbps
Up to 25 Gbps
is4gen.2xlarge
8
48 GiB
7.5 TB
2 GB /s
Up to 9.5 Gbps
Up to 25 Gbps
is4gen.4xlarge
16
96 GiB
15 TB (2 x 7.5 TB)
4 GB/s
9.5 Gbps
25 Gbps
is4gen.8xlarge
32
192 GiB
30 TB (4 x 7.5 TB)
8 GB/s
19 Gbps
50 Gbps
Is4gen instances provide 15% lower cost per TB of storage and up to 48% better compute performance compared to I3en instances. The new instances are available in the AWS US West (Oregon), US East (Ohio), US East (N. Virginia), and Europe (Ireland) Regions as On-Demand, Spot, Savings Plan, and Reserved instances.
Available Now As I never get tired of saying, these new instances are available now and you can start using them today. You can use Amazon Linux 2, Ubuntu 18.04.05 (and newer), Red Hat Enterprise Linux 8.0, and SUSE Enterprise Server 15 (and newer) AMIs, along with the container-optimized ECS and EKS AMIs. Learn more about the Im4gn and Is4gen instances.
PS – As of this launch twelve EC2 instance types are now powered by Graviton2 processors! To learn more, visit the Graviton2 page.
Machine Learning-Powered Amazon Connect, Now With Call Summarization
=======================
At AWS our mission is to make machine learning (ML) accessible to data scientists, developers, and business users. To help businesses easily leverage the power of ML, we create purpose-built solutions that embed ML and deep learning technologies directly into a business process to address real customer needs, rather than leaving companies to sort it out on their own.
One place where we have seen ML have an impact is within the contact center—the place you receive and respond to customer inquiries and issues. Because of the growing role of customer experience (CX) and the increase in contact less commerce via phone or email, contact centers are essentials to maintaining the human connections that businesses depend on. However, analog or outdated methods make it difficult to address every customer need in an effective way that delivers timely resolutions, delivers great experiences, and fosters customer loyalty.
Embedding AWS ML technologies into a cloud contact center solution helps decrease the friction of calls, chats, and other engagements. It also makes it possible to automate outdated processes.
Amazon Connect is an easy-to-use, cloud-based, ML-powered contact center service that helps companies of any size deliver superior customer service at a lower cost.
Let me take three examples with Voice ID, Wisdom, and Contact Lens.
Amazon Connect Voice ID ML capabilities might help streamline customer experience for authentication. Instead of asking customers to repeat their email address and their mother’s maiden name several times, ML-powered voice identification can establish a digital voice print associated with each customer’s unique voice. Then, it can recognize it at the beginning of each subsequent call. Voice identification provides a confidence score that may be used to automate authentication workflows.
Amazon Connect Wisdom ML might also help search the vast documentation and knowledge base to find the most relevant answers to the questions raised by the customer. ML helps resolve customer issues faster and better.
Contact Lens for Amazon Connect ML technologies also shine at analyzing the tone and content of a conversation, capturing customer sentiment in the moment, and learning from it. ML can help transcribe calls, track customer sentiment, detect common issues and customer trends, or even pinpoint discrepancies.
Contact Lens Adds Call Summarization But we didn’t stop there. Today, I am pleased to announce the addition of a new capability that helps you improve customer experience and agent and supervisor productivity by automatically summarizing the important aspects of each customer call.
You told us that keeping notes of customer conversations is time consuming, especially, for agents that must take notes during the call and import them manually in your CRM tool afterward. In the end, this is more time for us, the customers, waiting in queue for an agent to become available. Likewise, using automatically generated call transcripts doesn’t save time for supervisors. It is time consuming for supervisors to read these full call transcripts to understand what happened during customer conversations.
How it Works Starting today, Contact Lens has added a summary of the key moments in a conversation. It is enabled by default, and there is no additional configuration step. You may toggle the Show transcript summary button to show or hide the summary when you don’t need it.
Once a call is analyzed, the summary is available on the contact detail page.
Contact Lens identifies and summarizes the sections corresponding to Issue (e.g., lost package), Outcome (e.g., customer refund), and Action item (e.g., send a follow-up mail confirming the refund was processed). A manager can quickly see where there’s an action to send a customer a follow-up email and take action to ensure it happens.
... redacted for brevity ...
"IssuesDetected": [
{
"CharacterOffsets": {
"BeginOffsetChar": 31,
"EndOffsetChar": 73
},
"Text": "I would like to cancel my subscription"
}
]
...
"ActionItemsDetected": [
{
"CharacterOffsets": {
"BeginOffsetChar": 32,
"EndOffsetChar": 116
},
"Text": "I will send you an email with details"
}
]
Availability and Pricing Call summarization by Contact Lens is available in all AWS Regions where Contact Lens is available today. We support post-call analytics in the US West (Oregon), US East (N. Virginia), Canada (Central), Europe (London), Europe (Frankfurt), Asia Pacific (Singapore), Asia Pacific (Seoul), Asia Pacific (Tokyo), and Asia Pacific (Sydney) regions. We support real-time analytics in the US West (Oregon), US East (N. Virginia), Canada (Central), Europe (London), Europe (Frankfurt), Asia Pacific (Seoul), Asia Pacific (Tokyo), and Asia Pacific (Sydney) regions.
Call summary comes at no additional cost on top of the usual charges for Contact Lens. This is why we choose to enable it by default. Contact Lens is charged $0.015 per minute of voice conversation analyzed. Most of our Contact Lens customers analyze millions of conversation minutes per month. The price is $0.0125 per minute when you analyze more than 5 millions minutes per month.
-- sebNew for AWS Control Tower – Region Deny and Guardrails to Help You Meet Data Residency Requirements
=======================
Many customers, such as those in highly regulated industries and the public sector, want to have control over where their data is stored and processed. AWS already offers many tools and features to comply with local laws and regulations, but we want to provide a simplified way to translate data residency requirements into controls that can be applied to single- and multi-account environments.
Starting today, you can use AWS Control Tower to deploy data residency preventive and detective controls, referred to as guardrails. These guardrails will prevent provisioning resources in unwanted AWS Regions by restricting access to AWS APIs through service control policies (SCPs) built and managed by AWS Control Tower. In this way, content cannot be created or transferred outside of your selected Regions at the infrastructure level. In this context, content can be software (including machine images), data, text, audio, video, or images hosted on AWS for processing or storage. For example, AWS customers in Germany can deny access to AWS services in Regions outside of Frankfurt with the exception of global services such as AWS Identity and Access Management (IAM) and AWS Organizations.
AWS Control Tower also offers guardrails to further control data residency in underlying AWS service options, for example, blocking Amazon Simple Storage Service (Amazon S3) cross-region replication or blocking the creation of internet gateways.
The AWS account used for managing AWS Control Tower is not restricted by the new Region deny settings. That account can be used for remediation if you have data in an unwanted Region before enabling Region deny.
Detective guardrails are implemented via AWS Config rules and can further detect unexpected configuration changes that should not be allowed.
You still retain a shared responsibility model for data residency at the application level, but these controls can help you restrict what infrastructure and application teams can do on AWS.
Using Data Residency Guardrails in AWS Control Tower To use the new data residency guardrails, you need to have created a landing zone using AWS Control Tower. See Plan your AWS Control Tower landing zone for more information.
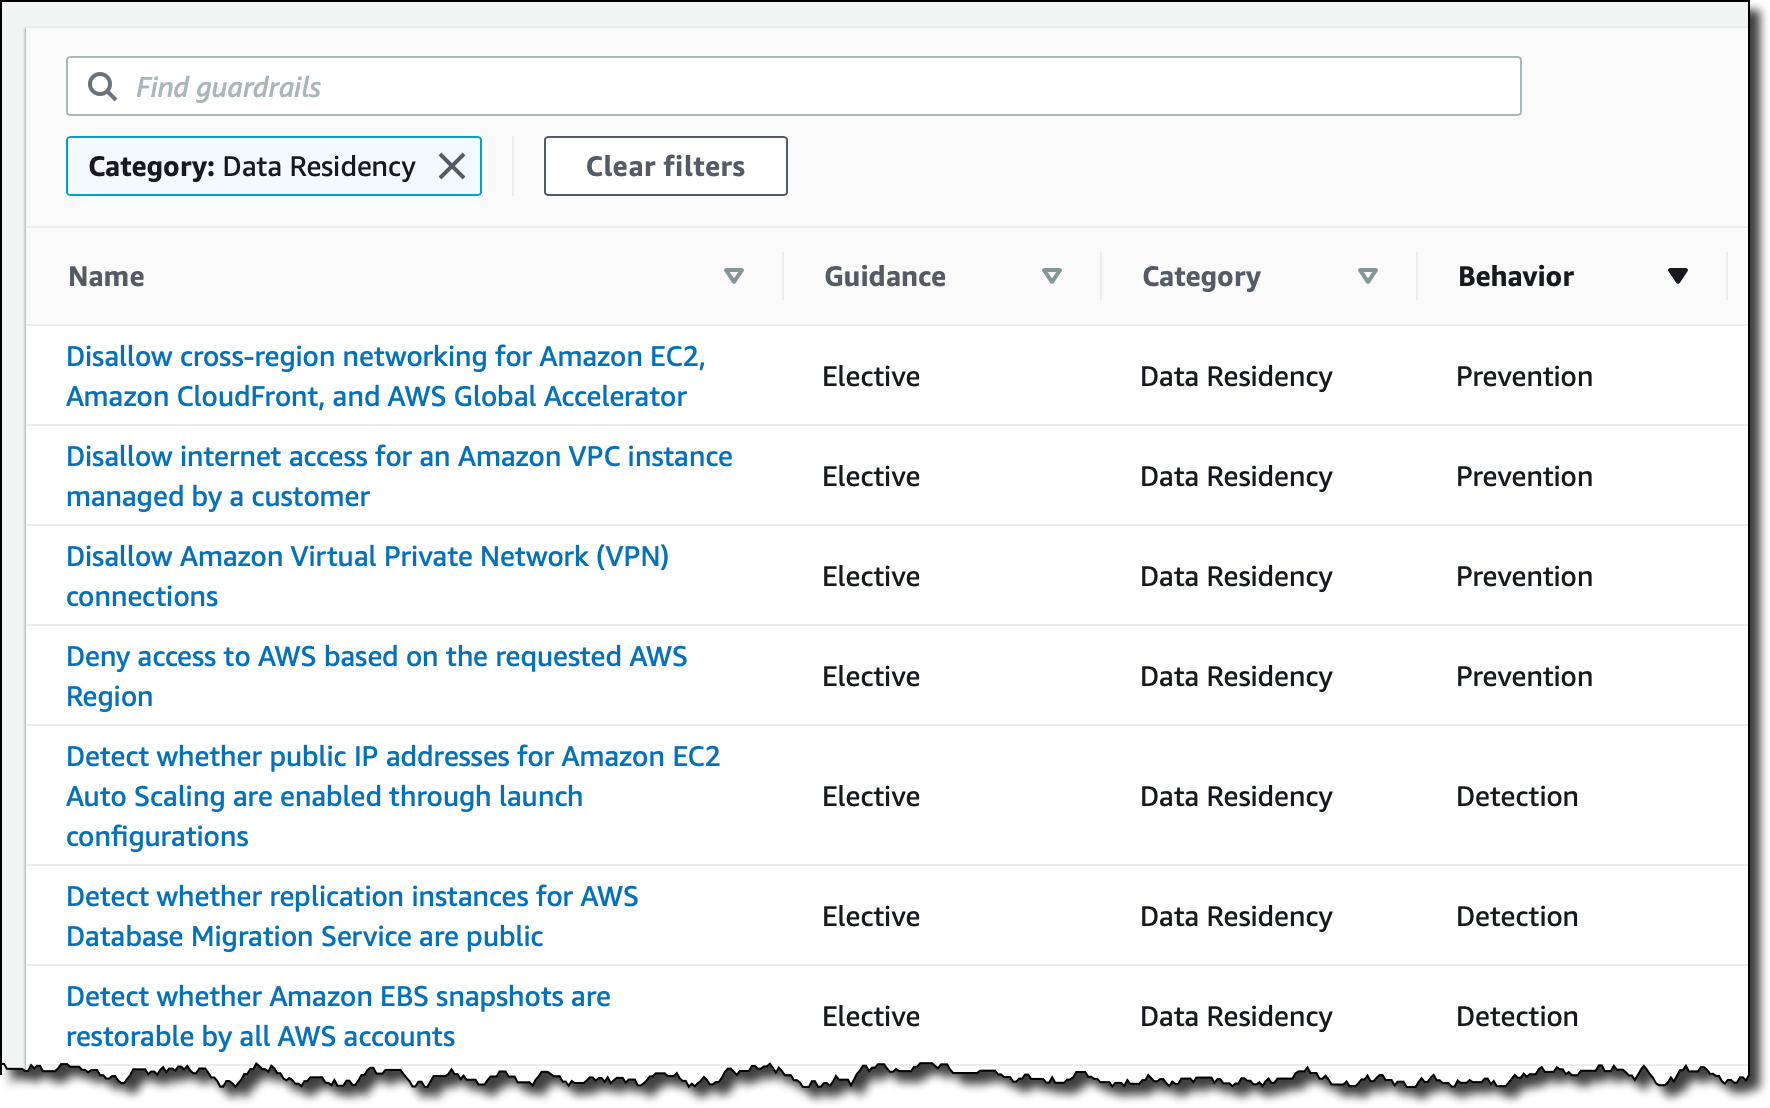
To see all the new controls that are available, I select Guardrails on the left pane of the AWS Control Tower console and then find those in the Data Residency category. I sort results by Behavior. Guardrails that have a Prevention behavior are implemented as SCPs. Those that have a Detection behavior are implemented as AWS Config rules.
The most interesting guardrail is probably the one denying access to AWS based on the requested AWS Region. I choose it from the list and find that it is different from the other guardrails because it affects all Organizational Units (OUs) and cannot be activated here but must be activated in the landing zone settings.
Below the Overview, in the Guardrail components, there is a link to the full SCP for this guardrail, and I can see the list of the AWS APIs that, when this setting is enabled, are still going to be allowed towards non-governed Regions. Depending on your requirements, some of those services, such as Amazon CloudFront or AWS Global Accelerator, can be further limited by a custom SCP.
In the Landing zone settings, the Region deny guardrail is currently not enabled. I choose Modify settings and then enable the Region deny settings.
Below the Region deny settings, there is the list of AWS Regions governed by the landing zone. Those will be the regions allowed when I enable Region deny.
In my case, I have four governed Regions, two in the US and two in Europe:
US East (N. Virginia), which is also the home Region for the landing zone
US West (Oregon)
Europe (Ireland)
Europe (Frankfurt)
I choose Update landing zone at the bottom. The update of the landing zone takes a few minutes to complete. Now, the vast majority of the AWS APIs are blocked if they are not directed to one of those governed Regions. Let’s do a few tests.
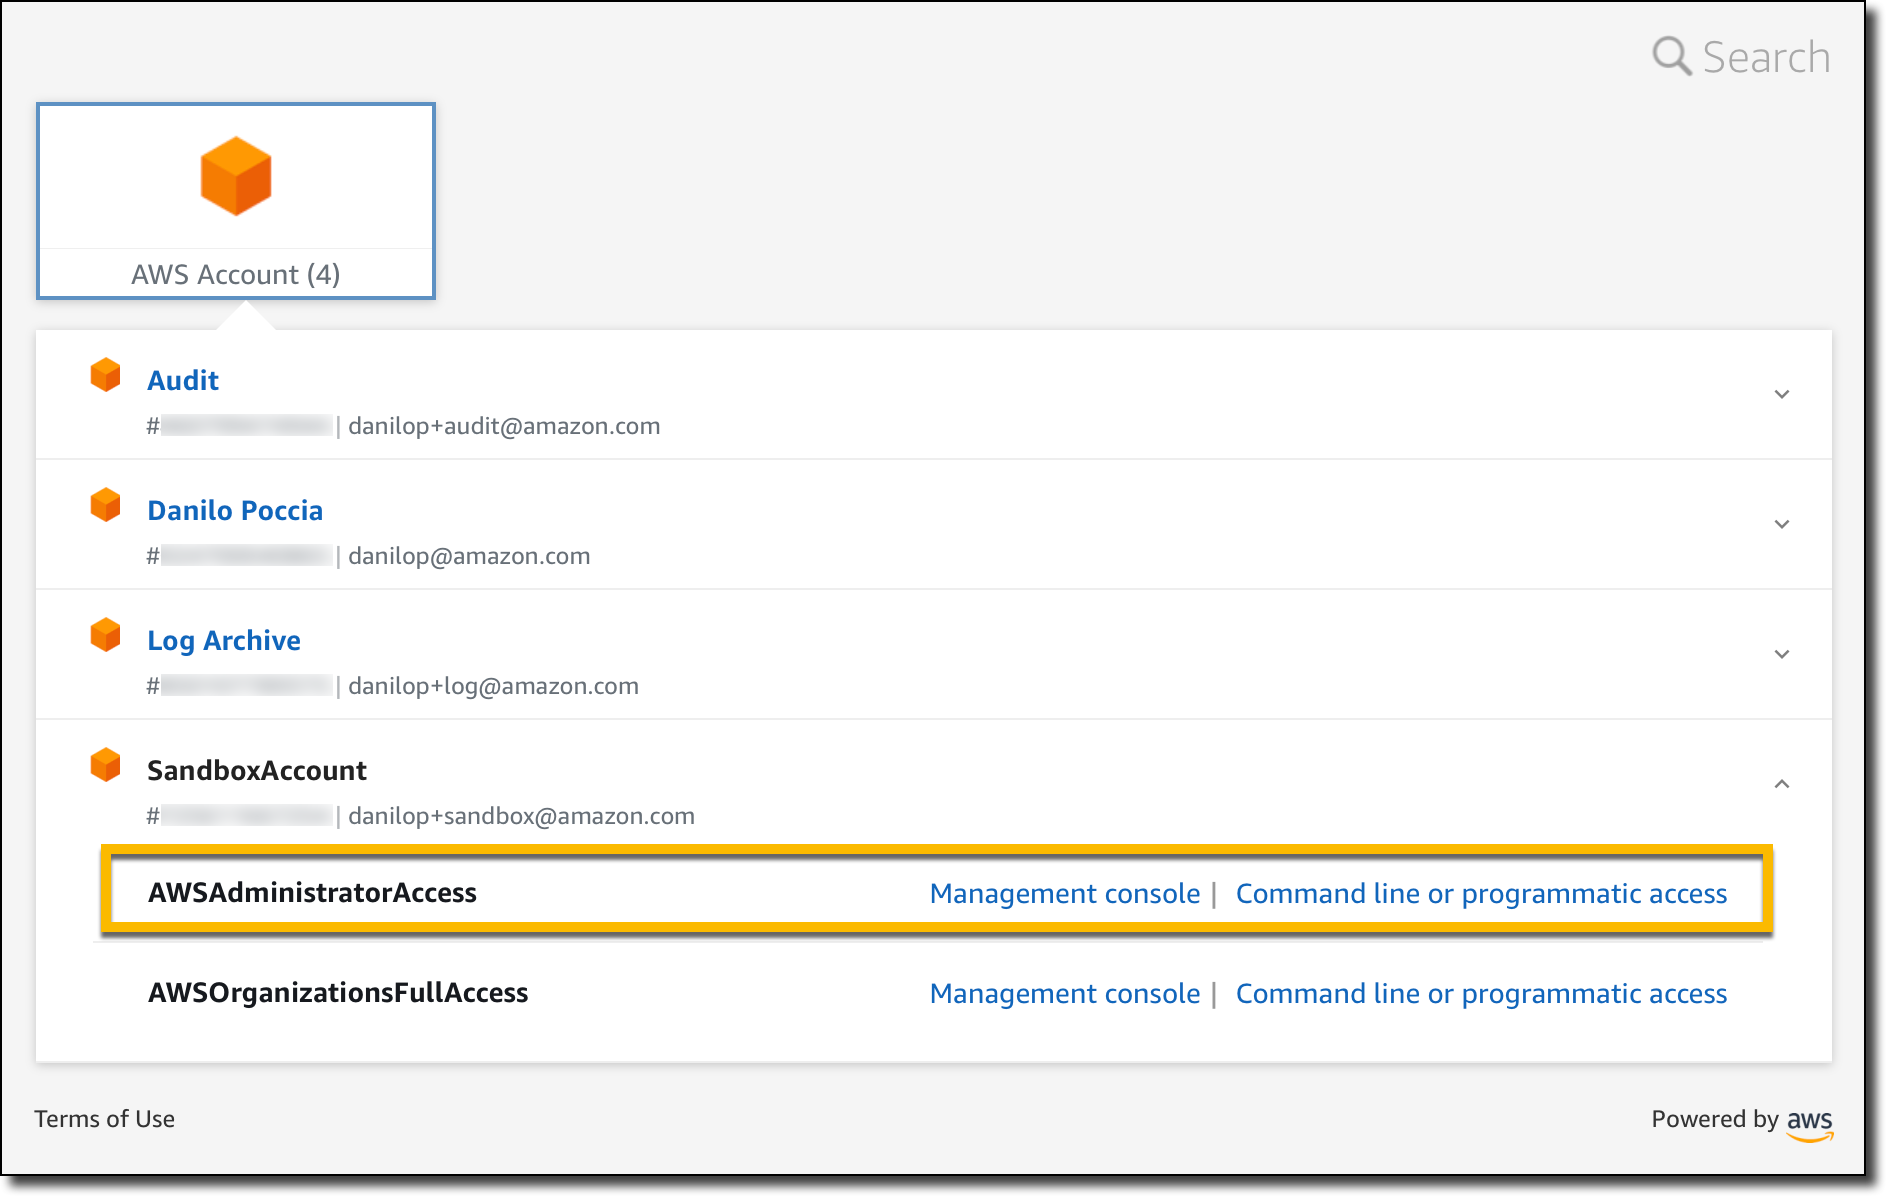
Testing Region Deny in a Sandbox Account I follow the instructions to configure the AWS CLI to use AWS Single Sign-On. Now, I can use the the sandbox account with AWSAdministratorAccess permissions to run commands with the AWS CLI.
aws ec2 describe-subnets --query 'Subnets[0].SubnetId' --region us-east-2
An error occurred (UnauthorizedOperation) when calling the DescribeSubnets operation:
You are not authorized to perform this operation.
As expected, I am not authorized to perform this operation in US East (Ohio). Let’s try to start an EC2 instance without passing the subnet ID.
aws ec2 run-instances --image-id ami-0dd0ccab7e2801812 --region us-east-2 \
--instance-type t3.small
An error occurred (UnauthorizedOperation) when calling the RunInstances operation:
You are not authorized to perform this operation.
Encoded authorization failure message: <ENCODED MESSAGE>
Again, I am not authorized. More information is included in the encoded authorization failure message that I can decode as described in this article:
The decoded message (that I have omitted for brevity) tells me that there was an explicit deny to my request and includes the full SCP that caused the deny. This information is really useful for debugging these kind of errors.
Now, let’s try in US East (N. Virginia), one of the four governed regions.
This time, the command returns the subnet ID of the first subnet returned by the request. Let’s start an instance in US East (N. Virginia) using this subnet.
Testing Detective Guardrails in a Sandbox Account I enable the following guardrails for all accounts in the sandbox OU:
Detect whether Amazon EBS snapshots are restorable by all AWS accounts
Detect whether public routes exist in the route table for an internet gateway
Now, I want to see what happens if I go against these guardrails. In the EC2 console, I create an EBS snapshot for the volume of the EC2 instance I started before. Then, I modify permissions to share it with all AWS accounts.
Then, in the VPC console, I create an internet gateway, attach it to the AWS Control Tower managed VPC, and update the route table of one of the private subnets to use the internet gateway.
After a few minutes, the noncompliant resources in the sandbox account are found by the detective guardrails.
I look at the information provided by the guardrails and update my configuration to fix the issues. In a multi-account setup I’d contact the account owner and ask for remediation.
Availability and Pricing You can use data-residency guardrails to control resources in any AWS Region. To create a landing zone, you should start from one of the Regions where AWS Control Tower is offered. For more information, see the AWS Regional Services List. There is no additional cost for this feature. You pay the costs of other services used, such as AWS Config.
This feature provides you with a framework of controls and guidance for setting up a multi-account environment that addresses data residency requirements. Depending on your use case, you may use any subset of the new data residency guardrails.
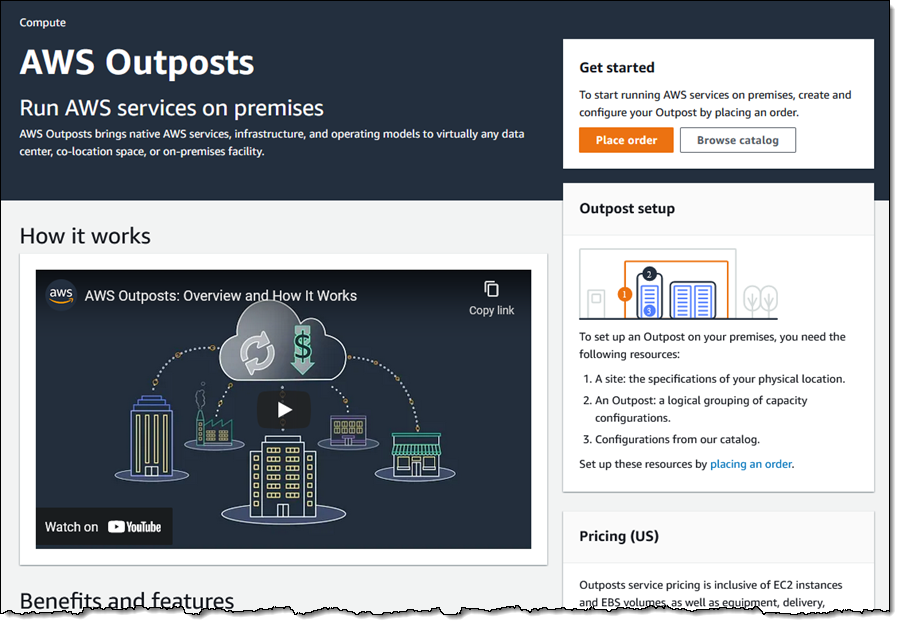
AWS Outposts gives you on-premises compute and storage that is monitored and managed by AWS, and controlled by the same, familiar AWS APIs. You may already know about the AWS Outposts rack, which occupies a full 42U rack.
Last year I told you that we were working on new sizes of Outposts suitable for locations such as branch offices, factories, retail stores, health clinics, hospitals, and cell sites that are space-constrained and need access to low-latency compute capacity. Today we are launching three AWS Outposts servers, all powered by AWS Nitro System and with your choice of x86 or Arm/Graviton2 processors. Here’s an overview:
You can create VPC subnets on each Outpost, and you can launch Amazon Elastic Compute Cloud (Amazon EC2) instances from EBS-backed AMIs in the parent region. The c6gd.16xlarge model supports six instance sizes, as follows:
Instance Name
vCPUs
Memory
Local Storage
c6gd.large
2
4 GiB
118 GB
c6gd.xlarge
4
8 GiB
237 GB
c6gd.2xlarge
8
16 GiB
474 GB
c6gd.4xlarge
16
32 GiB
950 GB
c6gd.8xlarge
32
64 GiB
1.9 TB
c6gd.16xlarge
64
128 GiB
3.8 TB
The c6id.16xlarge model supports all but the largest of the following instance sizes, and the c6id.32xlarge supports all of them:
Instance Name
vCPUs
Memory
Local Storage
c6id.large
2
4 GiB
118 GB
c6id.xlarge
4
8 GiB
237 GB
c6id.2xlarge
8
16 GiB
474 GB
c6id.4xlarge
16
32 GiB
950 GB
c6id.8xlarge
32
64 GiB
1.9 TB
c6id.16xlarge
64
128 GiB
3.8 TB
c6id.32xlarge
128
256 GiB
7.6 TB
Within each of your Outposts servers, you can launch any desired mix of instance sizes as long as you remain within the overall processing and storage available. You can create Amazon Elastic Container Service (Amazon ECS) clusters (Amazon Elastic Kubernetes Service (EKS) is coming soon) , and the code you run on-premises can make use of the entire lineup of services in the AWS Cloud.
Each Outposts server connects to the cloud via the public Internet or across a private AWS Direct Connect line. Additionally, each Outpost server supports a Local Network Interface (LNI) that provides a layer 2 presence on your local network for AWS service endpoints.
Outposts servers incorporate many powerful Nitro features including high speed networking and enhanced security. The security model is locked-down and prevents administrative access, preventing tampering or human error. Additionally, data at rest is protected by a NIST-compliant physical security key.
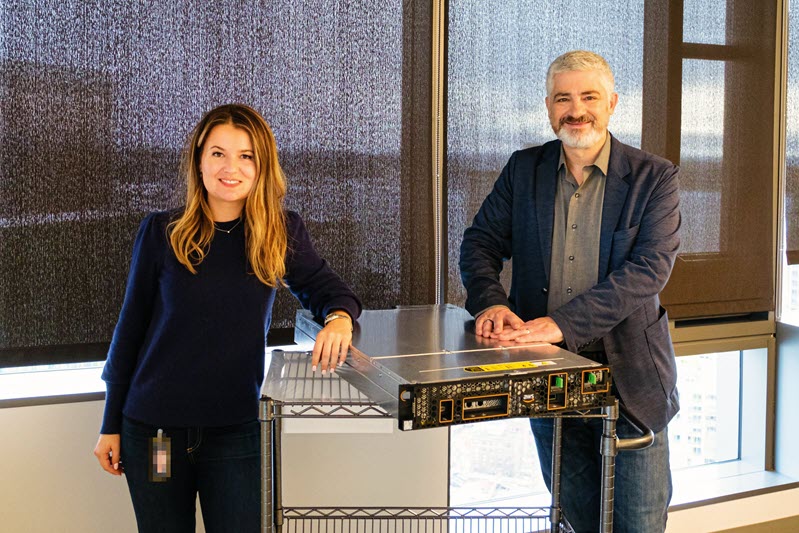
While I was writing this post, I stopped in to say hello to the design and development team, and met with my colleague Bianca Nagy to learn more about the Outposts server:
Ordering Outposts Servers Let’s walk through the process of ordering an Outposts server from the AWS Management Console. I visit the AWS Outposts Console, make sure that I am in the desired AWS Region, and click Place order to get started:
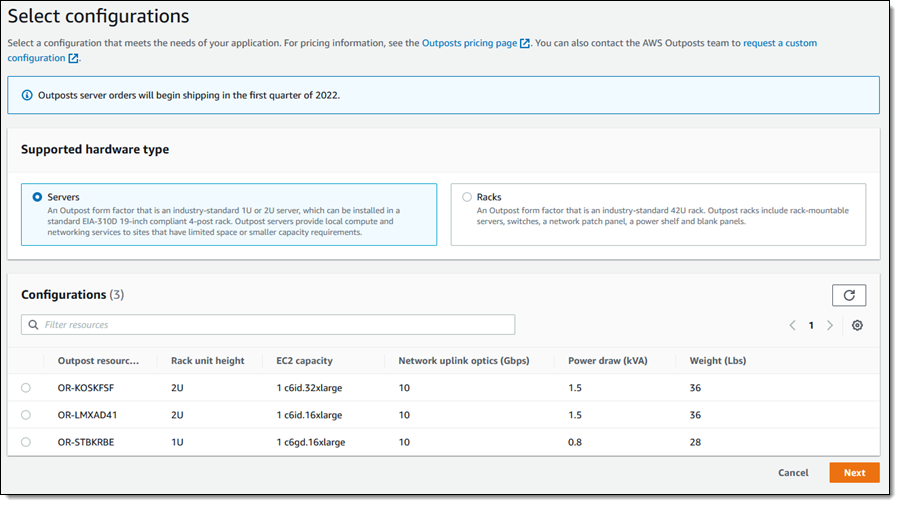
I click Servers, and then choose the desired configuration. I pick the c6gd.16xlarge, and click Next to proceed:
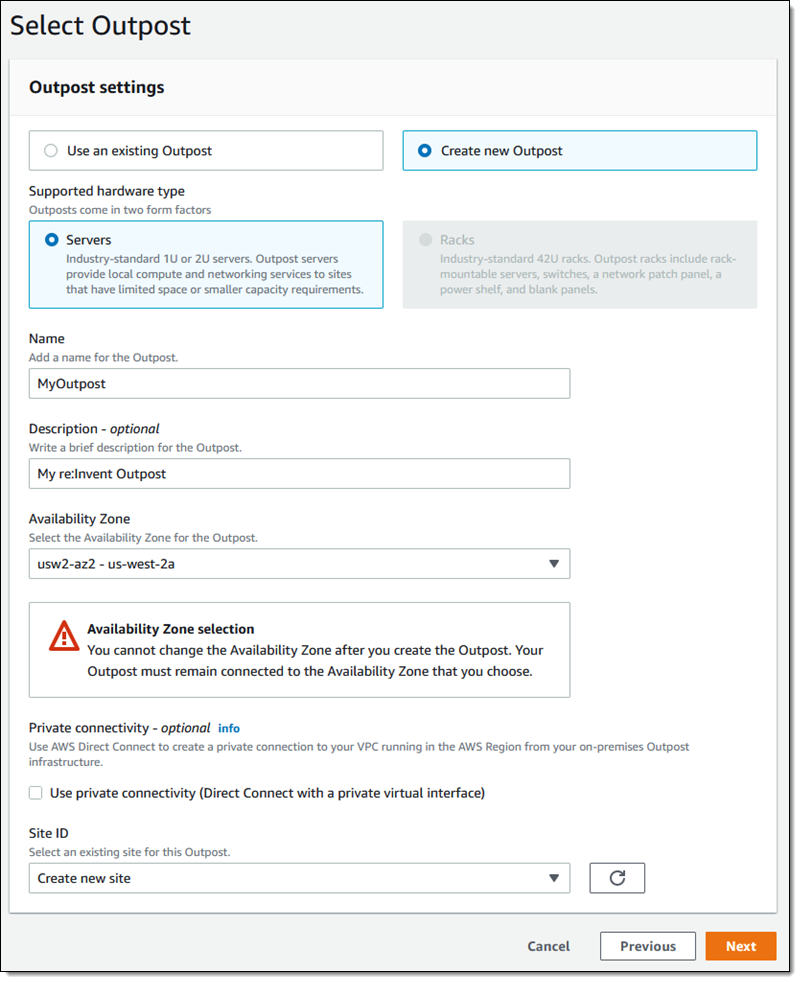
Then I create a new Outpost:
And a new Site:
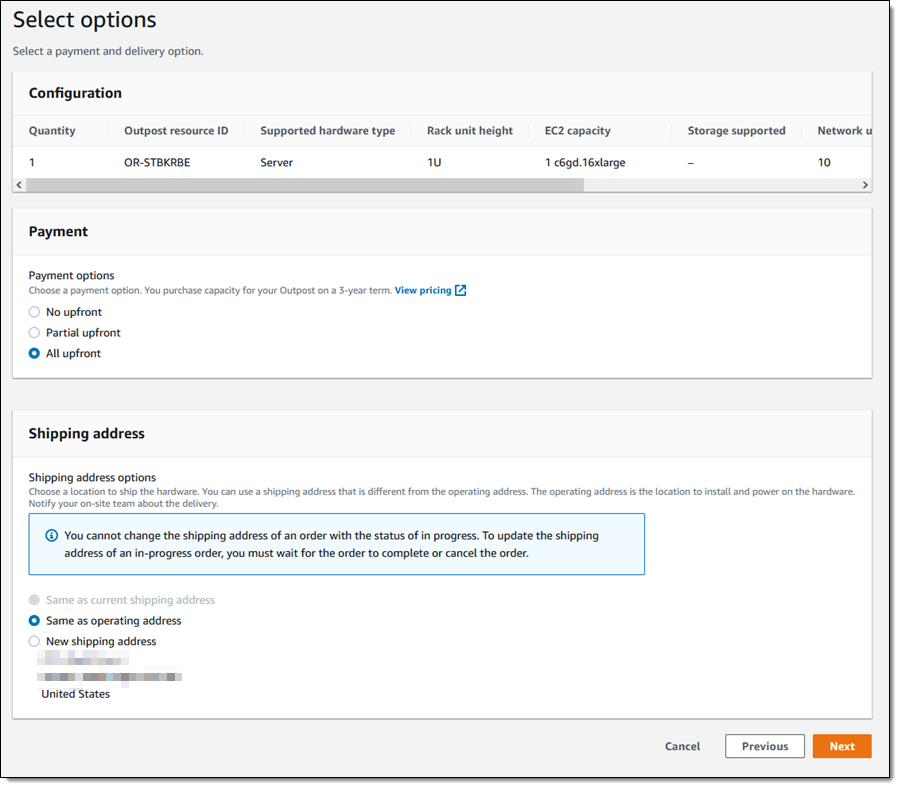
Then I review my payment options and select my shipping address:
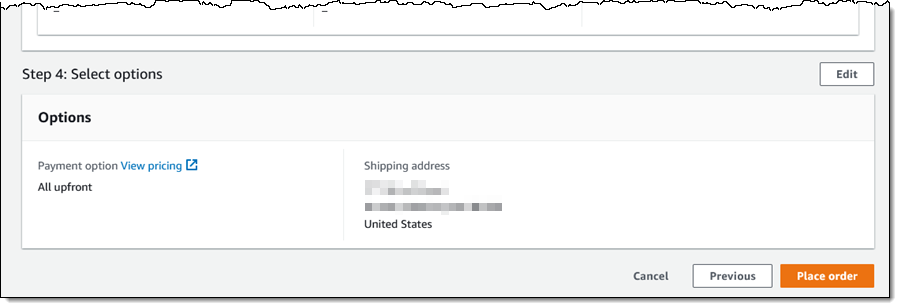
On the next page I review all of my options, click Place order, and await delivery:
In general, we expect to be able to deliver Outposts servers in two to six weeks, starting in the first quarter of 2022. After you receive yours, you or a member of your IT team can mount it in a 19″ rack or position it on a flat surface, cable it to power and networking, and power the device on. You then use a set of temporary AWS credentials to confirm the identity of the device, and to verify that the device is able to use DHCP to obtain an IP address. Once the device has established connectivity to the designated AWS parent region, we will finalize the provisioning of EC2 instance capacity and make it available to you.
After that, you are ready to launch instances and to deploy your on-premises applications.
We will monitor hardware performance and will contact you if your device is in need of maintenance. We will ship a replacement device for arrival within 2 business days. You can migrate your workloads to a redundant device, and use tracking information & notifications to track delivery status. When the replacement arrives, you install it and then destroy the physical security key in the old one before shipping it back to AWS.
Outposts API Update We are also enhancing the Outposts API as part of this launch. Here are some of the new functions:
ListCatalogItem – Get a list of items in the Outposts catalog, with optional filtering by EC2 family or supported storage options.
GetCatalogItem – Get full information about a single item in the Outposts catalog.
GetSiteAddress – Get the physical address of a site where an Outposts rack or server is installed.
You can use the information returned by GetCatalogItem to place an order that contains the desired quantity of one or more catalog items.
Things to Know Here are a couple of important things to know about Outposts servers:
Availability – Outposts servers are available for order to most locations where Outposts racks are available (currently 23 regions and 49 countries), with more to follow in 2022.
Ordering at Scale – I showed you the console-based ordering process above, and also gave you a glimpse at the Outposts API. If you need hundreds or thousands of devices, get in touch and we will give you a template that you can fill in and then upload.
re:Invent 2021 Outposts Server Selfie Challenge If you attend AWS re:Invent, be sure to visit the AWS Hybrid kiosk in the AWS Booth (#1719) to see the new Outposts Servers up close and personal. While you are there, take a fun & creative selfie, tag it with #AWSOutposts & #AWSPromotion, and share it on Twitter. I will post my three favorites at the end of the show!

 When you start writing your policy, you see that, as you type, different findings appear at the bottom of the screen. Policy checks from IAM Access Analyzer are designed to validate your policies and report security warnings, errors, and suggestions as findings based on their impact to help you make your policy more secure.