Contents of this page is copied directly from AWS blog sites to make it Kindle friendly. Some styles & sections from these pages are removed to render this properly in 'Article Mode' of Kindle e-Reader browser. All the contents of this page is property of AWS.
Page 1|Page 2|Page 3|Page 4
Creating AWS Lambda environment variables from AWS Secrets Manager
=======================
This post is written by Andy Hall, Senior Solutions Architect.
AWS Lambda layers and extensions are used by third-party software providers for monitoring Lambda functions. A monitoring solution needs environmental variables to provide configuration information to send metric information to an endpoint.
Managing this information as environmental variables across thousands of Lambda functions creates operational overhead. Instead, you can use the approach in this blog post to create environmental variables dynamically from information hosted in AWS Secrets Manager.
This can help avoid managing secret rotation for individual functions. It ensures that values stay encrypted until runtime, and abstracts away the management of the environmental variables.
Overview
This post shows how to create a Lambda layer for Node.js, Python, Ruby, Java, and .NET Core runtimes. It retrieves values from Secrets Manager and converts the secret into an environmental variable that can be used by other layers and functions. The Lambda layer uses a wrapper script to fetch information from Secrets Manager and create environmental variables.
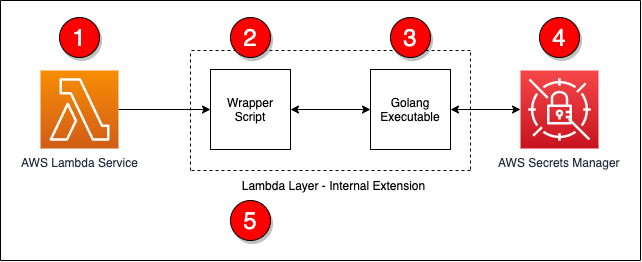
The steps in the process are as follows:
- The Lambda service responds to an event and initializes the Lambda context.
- The wrapper script is called as part of the Lambda init phase.
- The wrapper script calls a Golang executable passing in the ARN for the secret to retrieve.
- The Golang executable uses the Secrets Manager API to retrieve the decrypted secret.
- The wrapper script converts the information into environmental variables and calls the next step in processing.
All of the code for this post is available from this GitHub repo.
The wrapper script
The wrapper script is the main entry-point for the extension and is called by the Lambda service as part of the init phase. During this phase, the wrapper script will read in basic information from the environment and call the Golang executable. If there was an issue with the Golang executable, the wrapper script will log a statement and exit with an error.
# Get the secret value by calling the Go executable
values=$(${fullPath}/go-retrieve-secret -r "${region}" -s "${secretArn}" -a "${roleName}" -t ${timeout})
last_cmd=$?
# Verify that the last command was successful
if [[ ${last_cmd} -ne 0 ]]; then
echo "Failed to setup environment for Secret ${secretArn}"
exit 1
fi
Golang executable
This uses Golang to invoke the AWS APIs since the Lambda execution environment does natively provide the AWS Command Line Interface. The Golang executable can be included in a layer so that the layer works with a number of Lambda runtimes.
The Golang executable captures and validates the command line arguments to ensure that required parameters are supplied. If Lambda does not have permissions to read and decrypt the secret, you can supply an ARN for a role to assume.
The following code example shows how the Golang executable retrieves the necessary information to assume a role using the AWS Security Token Service:
client := sts.NewFromConfig(cfg)
return client.AssumeRole(ctx,
&sts.AssumeRoleInput{
RoleArn: &roleArn,
RoleSessionName: &sessionName,
},
)
After obtaining the necessary permissions, the secret can be retrieved using the Secrets Manager API. The following code example uses the new credentials to create a client connection to Secrets Manager and the secret:
client := secretsmanager.NewFromConfig(cfg, func(o *secretsmanager.Options) {
o.Credentials = aws.NewCredentialsCache(credentials.NewStaticCredentialsProvider(*assumedRole.Credentials.AccessKeyId, *assumedRole.Credentials.SecretAccessKey, *assumedRole.Credentials.SessionToken))
})
return client.GetSecretValue(ctx, &secretsmanager.GetSecretValueInput{
SecretId: aws.String(secretArn),
})
After retrieving the secret, the contents must be converted into a format that the wrapper script can use. The following sample code covers the conversion from a secret string to JSON by storing the data in a map. Once the data is in a map, a loop is used to output the information as key-value pairs.
// Convert the secret into JSON
var dat map[string]interface{}
// Convert the secret to JSON
if err := json.Unmarshal([]byte(*result.SecretString), &dat); err != nil {
fmt.Println("Failed to convert Secret to JSON")
fmt.Println(err)
panic(err)
}
// Get the secret value and dump the output in a manner that a shell script can read the
// data from the output
for key, value := range dat {
fmt.Printf("%s|%s\n", key, value)
}
Conversion to environmental variables
After the secret information is retrieved by using Golang, the wrapper script can now loop over the output, populate a temporary file with export statements, and execute the temporary file. The following code covers these steps:
# Read the data line by line and export the data as key value pairs
# and environmental variables
echo "${values}" | while read -r line; do
# Split the line into a key and value
ARRY=(${line//|/ })
# Capture the kay value
key="${ARRY[0]}"
# Since the key had been captured, no need to keep it in the array
unset ARRY[0]
# Join the other parts of the array into a single value.  There is a chance that
# The split man have broken the data into multiple values.  This will force the
# data to be rejoined.
value="${ARRY[@]}"
# Save as an env var to the temp file for later processing
echo "export ${key}=\"${value}\"" >> ${tempFile}
done
# Source the temp file to read in the env vars
. ${tempFile}
At this point, the information stored in the secret is now available as environmental variables to layers and the Lambda function.
Deployment
To deploy this solution, you must build on an instance that is running an Amazon Linux 2 AMI. This ensures that the compiled Golang executable is compatible with the Lambda execution environment.
The easiest way to deploy this solution is from an AWS Cloud9 environment but you can also use an Amazon EC2 instance. To build and deploy the solution into your environment, you need the ARN of the secret that you want to use. A build script is provided to ease deployment and perform compilation, archival, and AWS CDK execution.
To deploy, run:
./build.sh <ARN of the secret to use>
Once the build is complete, the following resources are deployed into your AWS account:
A Lambda layer (called get-secrets-layer)
A second Lambda layer for testing (called second-example-layer)
A Lambda function (called example-get-secrets-lambda)
Testing
To test the deployment, create a test event to send to the new example-get-secrets-lambda Lambda function using the AWS Management Console. The test Lambda function uses both the get-secrets-layer and second-example-layer Lambda layers, and the secret specified from the build. This function logs the values of environmental variables that were created by the get-secrets-layer and second-example-layer layers:
The secret contains the following information:
{
"EXAMPLE_CONNECTION_TOKEN": "EXAMPLE AUTH TOKEN",
"EXAMPLE_CLUSTER_ID": "EXAMPLE CLUSTER ID",
"EXAMPLE_CONNECTION_URL": "EXAMPLE CONNECTION URL",
"EXAMPLE_TENANT": "EXAMPLE TENANT",
"AWS_LAMBDA_EXEC_WRAPPER": "/opt/second-example-layer"
}
This is the Python code for the example-get-secrets-lambda function:
import os
import json
import sys
def lambda_handler(event, context):
print(f"Got event in main lambda [{event}]",flush=True)
# Return all of the data
return {
'statusCode': 200,
'layer': {
'EXAMPLE_AUTH_TOKEN': os.environ.get('EXAMPLE_AUTH_TOKEN', 'Not Set'),
'EXAMPLE_CLUSTER_ID': os.environ.get('EXAMPLE_CLUSTER_ID', 'Not Set'),
'EXAMPLE_CONNECTION_URL': os.environ.get('EXAMPLE_CONNECTION_URL', 'Not Set'),
'EXAMPLE_TENANT': os.environ.get('EXAMPLE_TENANT', 'Not Set'),
'AWS_LAMBDA_EXEC_WRAPPER': os.environ.get('AWS_LAMBDA_EXEC_WRAPPER', 'Not Set')
},
'secondLayer': {
'SECOND_LAYER_EXECUTE': os.environ.get('SECOND_LAYER_EXECUTE', 'Not Set')
}
}
When running a test using the AWS Management Console, you see the following response returned from the Lambda in the AWS Management Console:
{
"statusCode": 200,
"layer": {
"EXAMPLE_AUTH_TOKEN": "EXAMPLE AUTH TOKEN",
"EXAMPLE_CLUSTER_ID": "EXAMPLE CLUSTER ID",
"EXAMPLE_CONNECTION_URL": "EXAMPLE CONNECTION URL",
"EXAMPLE_TENANT": "EXAMPLE TENANT",
"AWS_LAMBDA_EXEC_WRAPPER": "/opt/second-example-layer"
},
"secondLayer": {
"SECOND_LAYER_EXECUTE": "true"
}
}
When the secret changes, there is a delay before those changes are available to the Lambda layers and function. This is because the layer only executes in the init phase of the Lambda lifecycle. After the Lambda execution environment is recreated and initialized, the layer executes and creates environmental variables with the new secret information.
Conclusion
This solution provides a way to convert information from Secrets Manager into Lambda environment variables. By following this approach, you can centralize the management of information through Secrets Manager, instead of at the function level.
For more information about the Lambda lifecycle, see the Lambda execution environment lifecycle documentation.
The code for this post is available from this GitHub repo.
For more serverless learning resources, visit Serverless Land.
Identifying optimal locations for flexible workloads with Spot placement score
=======================
This post is written by Jessie Xie, Solutions Architect for EC2 Spot, and Peter Manastyrny, Senior Product Manager for EC2 Auto Scaling and EC2 Fleet.
Amazon EC2 Spot Instances let you run flexible, fault-tolerant, or stateless applications in the AWS Cloud at up to a 90% discount from On-Demand prices. Since we introduced Spot Instances back in 2009, we have been building new features and integrations with a single goal – to make Spot easy and efficient to use for your flexible compute needs.
Spot Instances are spare EC2 compute capacity in the AWS Cloud available for steep discounts. In exchange for the discount, Spot Instances are interruptible and must be returned when EC2 needs the capacity back. The location and amount of spare capacity available at any given moment is dynamic and changes in real time. This is why Spot workloads should be flexible, meaning they can utilize a variety of different EC2 instance types and can be shifted in real time to where the spare capacity currently is. You can use Spot Instances with tools such as EC2 Fleet and Amazon EC2 Auto Scaling which make it easy to run workloads on multiple instance types.
The AWS Cloud spans 81 Availability Zones across 25 Regions with plans to launch 21 more Availability Zones and 7 more Regions. However, until now there was no way to find an optimal location (either a Region or Availability Zone) to fulfill your Spot capacity needs without trying to launch Spot Instances there first. Today, we are excited to announce Spot placement score, a new feature that helps you identify an optimal location to run your workloads on Spot Instances. Spot placement score recommends an optimal Region or Availability Zone based on the amount of Spot capacity you need and your instance type requirements.
Spot placement score is useful for workloads that could potentially run in a different Region. Additionally, because the score takes into account your instance type selection, it can help you determine if your request is sufficiently instance type flexible for your chosen Region or Availability Zone.
How Spot placement score works
To use Spot placement score you need to specify the amount of Spot capacity you need, what your instance type requirements are, and whether you would like a recommendation for a Region or a single Availability Zone. For instance type requirements, you can either provide a list of instance types, or the instance attributes, like the number of vCPUs and amount of memory. If you choose to use the instance attributes option, you can then use the same attribute configuration to request your Spot Instances in the recommended Region or Availability Zone with the new attribute-based instance type selection feature in EC2 Fleet or EC2 Auto Scaling.
Spot placement score provides a list of Regions or Availability Zones, each scored from 1 to 10, based on factors such as the requested instance types, target capacity, historical and current Spot usage trends, and time of the request. The score reflects the likelihood of success when provisioning Spot capacity, with a 10 meaning that the request is highly likely to succeed. Provided scores change based on the current Spot capacity situation, and the same request can yield different scores when ran at different times. It is important to note that the score serves as a guideline, and no score guarantees that your Spot request will be fully or partially fulfilled.
You can also filter your score by Regions or Availability Zones, which is useful for cases where you can use only a subset of AWS Regions, for example any Region in the United States.
Let’s see how Spot placement score works in practice through an example.
Using Spot placement score with AWS Management Console
To try Spot placement score, log into your AWS account, select EC2, Spot Requests, and click on Spot placement score to open the Spot placement score window.
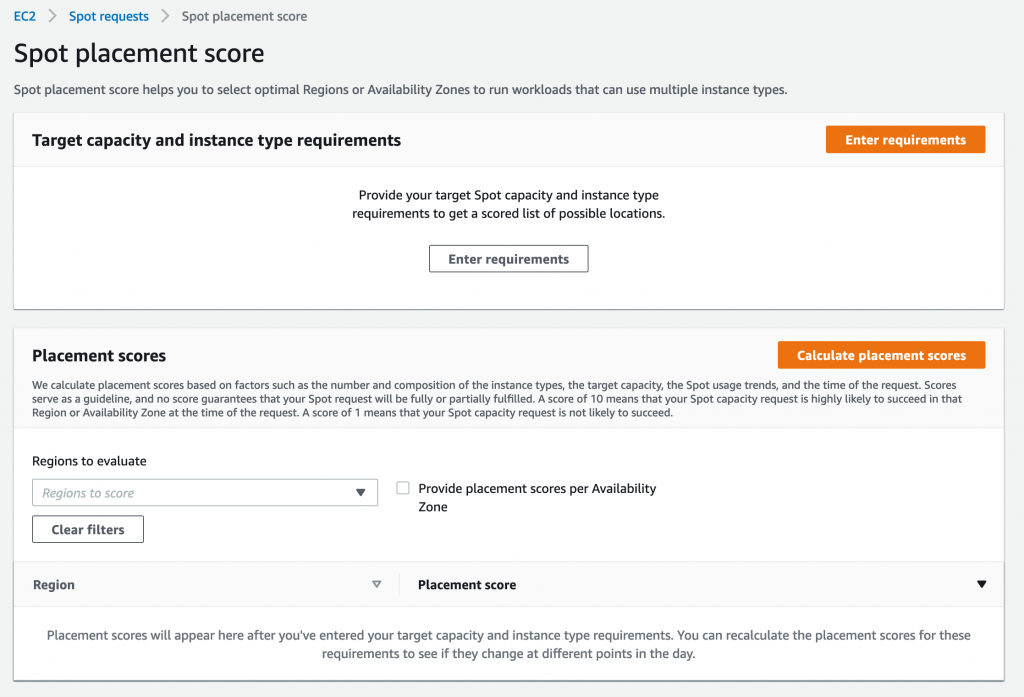
Here, you need provide your target capacity and instance type requirements by clicking on Enter requirements. You can enter target capacity as a number of instances, vCPUs, or memory. vCPUs and memory options are useful for vertically scalable workloads that are sized for a total amount of compute resources and can utilize a wide range of instance sizes. Target capacity is limited and based on your recent Spot usage with accounting for potential usage growth. For accounts that do not have recent Spot usage, there is a default limit aligned with the Spot Instances limit.
For instance type requirements, there are two options. First option is to select Specify instance attributes that match your compute requirements tab and enter your compute requirements as a number of vCPUs, amount of memory, CPU architecture, and other optional attributes. Second option is to select Manually select instance types tab and select instance types from the list.
Please note that you need to select at least three different instance types (that is, different families, generations, or sizes). If you specify a smaller number of instance types, Spot placement score will always yield a low score. Spot placement score is designed to help you find an optimal location to request Spot capacity tailored to your specific workload needs, but it is not intended to be used for getting high-level Spot capacity information across all Regions and instance types.
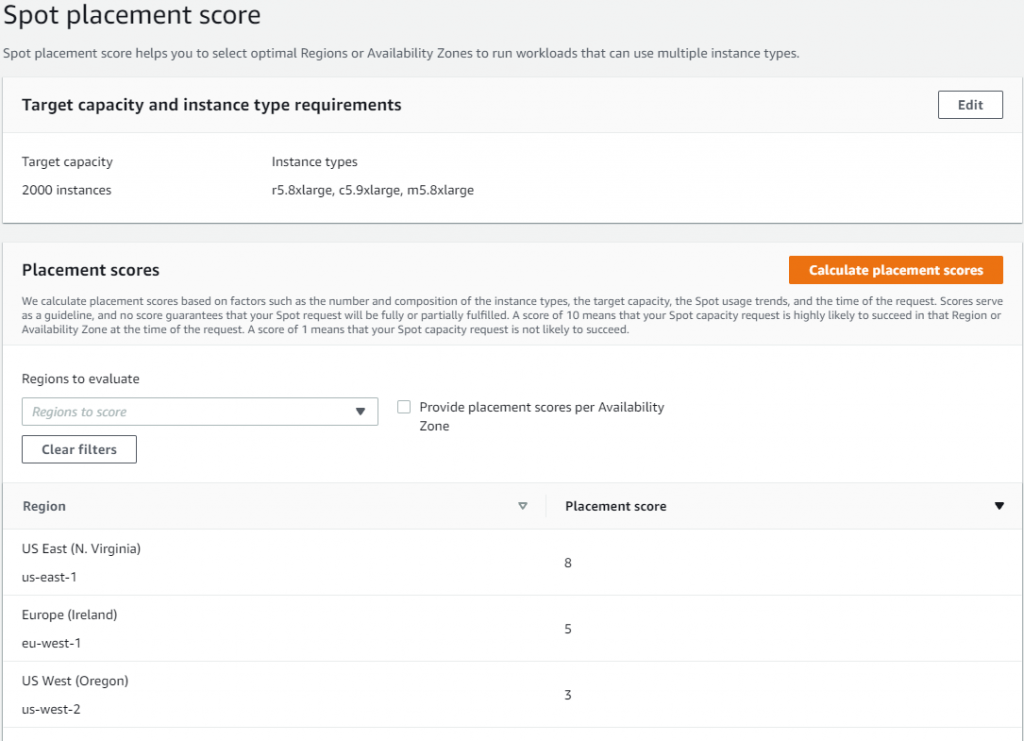
Let’s try to find an optimal location to run a workload that can utilize r5.8xlarge, c5.9xlarge, and m5.8xlarge instance types and is sized at 2000 instances.
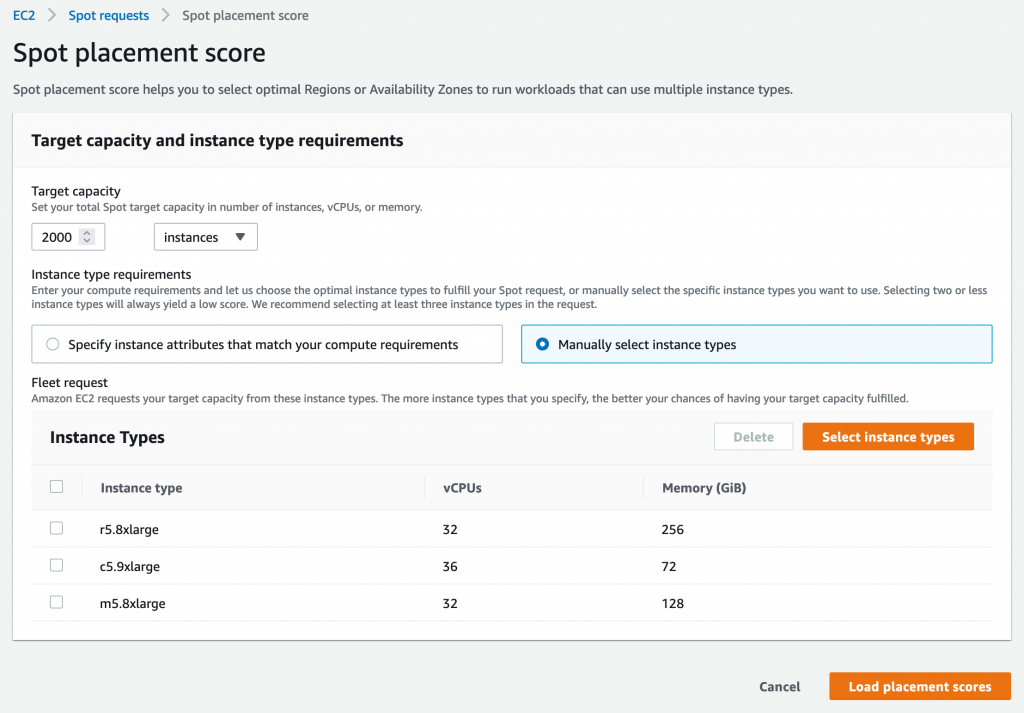
Once you select 2000 instances under Target capacity, select r5.8xlarge, c5.9xlarge, and m5.8xlarge instances under Select instance types, and click Load placement score button, you will get a list of Regions sorted by score in a descending order. There is also an option to filter by specific Regions if needed.
The highest rated Region for your requirements turns out to be US East (N. Virginia) with a score of 8. The second closest contender is Europe (Ireland) with a score of 5. That tells you that right now the optimal Region for your Spot requirements is US East (N. Virginia).
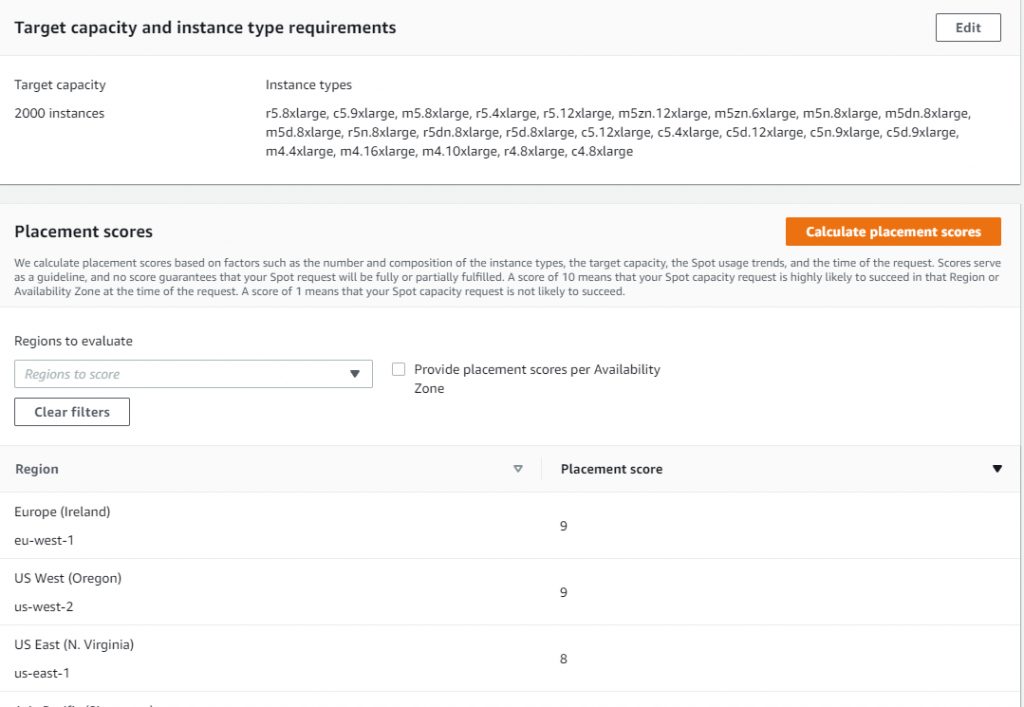
Let’s now see if it is possible to get a higher score. Remember, the key best practice for Spot is to be flexible and utilize as many instance types as possible. To do that, press the Edit button on the Target capacity and instance type requirements tab. For the new request, keep the same target capacity at 2000, but expand the selection of instance types by adding similarly sized instance types from a variety of instance families and generations, i.e., r5.4xlarge, r5.12xlarge, m5zn.12xlarge, m5zn.6xlarge, m5n.8xlarge, m5dn.8xlarge, m5d.8xlarge, r5n.8xlarge, r5dn.8xlarge, r5d.8xlarge, c5.12xlarge, c5.4xlarge, c5d.12xlarge, c5n.9xlarge. c5d.9xlarge, m4.4xlarge, m4.16xlarge, m4.10xlarge, r4.8xlarge, c4.8xlarge.
After requesting the scores with updated requirements, you can see that even though the score in US East (N. Virginia) stays unchanged at 8, the scores for Europe (Ireland) and US West (Oregon) improved dramatically, both raising to 9. Now, you have a choice of three high-scored Regions to request your Spot Instances, each with a high likelihood to succeed.
To request Spot Instances based on the score, you can use EC2 Fleet or EC2 Auto Scaling. Please note, that the score implies that you use capacity-optimized Spot allocation strategy when requesting the capacity. If you use other allocation strategies, such as lowest-price, the result in the recommended Region or Availability Zone will not align with the score provided.
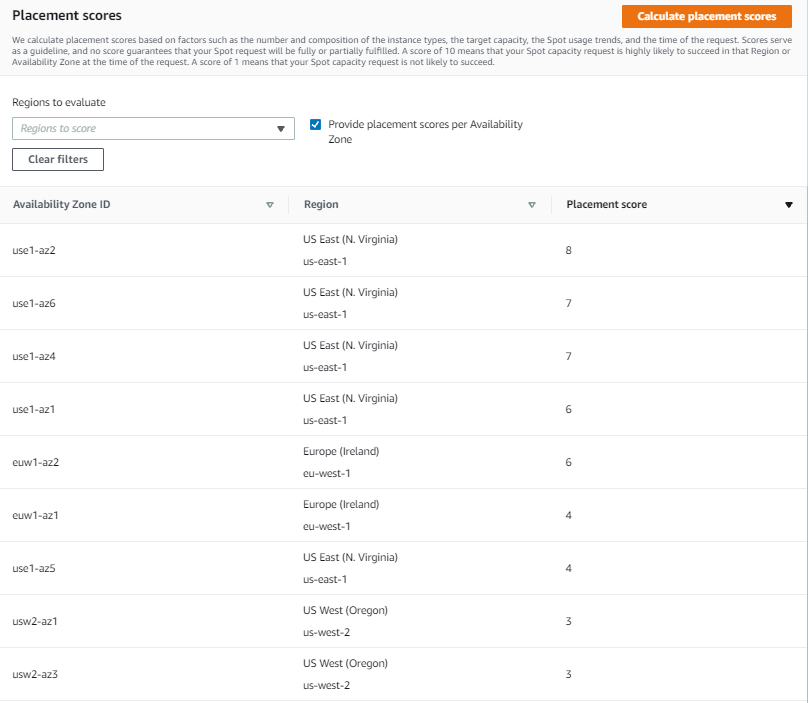
You can also request the scores at the Availability Zone level. This is useful for running workloads that need to have all instances in the same Availability Zone, potentially to minimize inter-Availability Zone data transfer costs. Workloads such as Apache Spark, which involve transferring a high volume of data between instances, would be a good use case for this. To get scores per Availability Zone you can check the box Provide placement scores per Availability Zone.
When requesting instances based on Availability Zone recommendation, you need to make sure to configure EC2 Fleet or EC2 Auto Scaling request to only use that specific Availability Zone.
With Spot placement score, you can test different instance type combinations at different points in time, and find the most optimal Region or Availability Zone to run your workloads on Spot Instances.
Availability and pricing
You can use Spot placement score today in all public and AWS GovCloud Regions with the exception of those based in China, where we plan to release later. You can access Spot placement score using the AWS Command Line Interface (CLI), AWS SDKs, and Management Console. There is no additional charge for using Spot placement score, you will only pay EC2 standard rates if provisioning instances based on recommendation.
To learn more about using Spot placement score, visit the Spot placement score documentation page. To learn more about best practices for using Spot Instances, see Spot documentation.
Accelerating serverless development with AWS SAM Accelerate
=======================
Building a serverless application changes the way developers think about testing their code. Previously, developers would emulate the complete infrastructure locally and only commit code ready for testing. However, with serverless, local emulation can be more complex.
In this post, I show you how to bypass most local emulation by testing serverless applications in the cloud against production services using AWS SAM Accelerate. AWS SAM Accelerate aims to increase infrastructure accuracy for testing with sam sync, incremental builds, and aggregated feedback for developers. AWS SAM Accelerate brings the developer to the cloud and not the cloud to the developer.
AWS SAM Accelerate
The AWS SAM team has listened to developers wanting a better way to emulate the cloud on their local machine and we believe that testing against the cloud is the best path forward. With that in mind, I am happy to announce the beta release of AWS SAM Accelerate!
Previously, the latency of deploying after each change has caused developers to seek other options. AWS SAM Accelerate is a set of features to reduce that latency and enable developers to test their code quickly against production AWS services in the cloud.
To demonstrate the different options, this post uses an example application called “Blog”. To follow along, create your version of the application by downloading the demo project. Note, you need the latest version of AWS SAM and Python 3.9 installed. AWS SAM Accelerate works with other runtimes, but this example uses Python 3.9.
After installing the pre-requisites, set up the demo project with the following commands:
- Create a folder for the project called blog
mkdir blog && cd blog
- Initialize a new AWS SAM project:
sam init
- Chose option 2 for Custom Template Location.
- Enter https://github.com/aws-samples/aws-sam-accelerate-demo as the location.
AWS SAM downloads the sample project into the current folder. With the blog application in place, you can now try out AWS SAM Accelerate.
AWS SAM sync
The first feature of AWS SAM Accelerate is a new command called sam sync. This command synchronizes your project declared in an AWS SAM template to the AWS Cloud. However, sam sync differentiates between code and configuration.
AWS SAM defines code as the following:
AWS Lambda function code.
AWS Lambda layer resources.
AWS Step Functions templates in Amazon States Language form.
Amazon API Gateway OpenAPI documents identified in the CodeUri parameter.
Anything else is considered configuration. The following description of the sam sync options explains how sam sync differentiates between configuration synchronization and code synchronization. The resulting patterns are the fastest way to test code in the cloud with AWS SAM.
Using sam sync (no options)
The sam sync command with no options deploys or updates all infrastructure and code like the sam deploy command. However, unlike sam deploy, sam sync bypasses the AWS CloudFormation changeset process. To see this, run:
sam sync --stack-name blog

AWS SAM sync with no options
First, sam sync builds the code using the sam build command and then the application is synchronized to the cloud.

Successful sync
Using SAM sync code, resource, resource-id flags
The sam sync command can also synchronize code changes to the cloud without updating the infrastructure. This code synchronization uses the service APIs and bypasses CloudFormation, allowing AWS SAM to update the code in seconds instead of minutes.
To synchronize code, use the --code flag, which instructs AWS SAM to sync all the code resources in the stack:
sam sync --stack-name blog --code
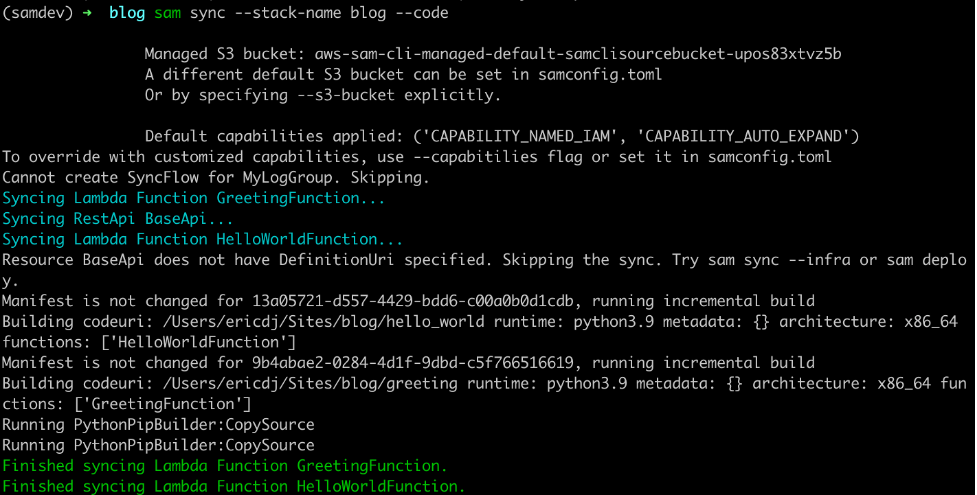
AWS SAM sync with the code flag
The sam sync command verifies each of the code types present and synchronizes the sources to the cloud. This example uses an API Gateway REST API and two Lambda functions. AWS SAM skips the REST API because there is no external OpenAPI file for this project. However, the Lambda functions and their dependencies are synchronized.
You can limit the synchronized resources by using the --resource flag with the --code flag:
sam sync --stack-name blog --code --resource AWS::Serverless::Function

SAM sync specific resource types
This command limits the synchronization to Lambda functions. Other available resources are AWS::Serverless::Api, AWS::Serverless::HttpApi, and AWS::Serverless::StateMachine.
You can target one specific resource with the --resource-id flag to get more granular:
sam sync --stack-name blog --code --resource-id HelloWorldFunction

SAM sync specific resource
This time sam sync ignores the GreetingFunction and only updates the HelloWorldFunction declared with the command’s --resource-id flag.
Using the SAM sync watch flag
The sam sync --watch option tells AWS SAM to monitor for file changes and automatically synchronize when changes are detected. If the changes include configuration changes, AWS SAM performs a standard synchronization equivalent to the sam sync command. If the changes are code only, then AWS SAM synchronizes the code with the equivalent of the sam sync --code command.
The first time you run the sam sync command with the --watch flag, AWS SAM ensures that the latest code and infrastructure are in the cloud. It then monitors for file changes until you quit the command:
sam sync --stack-name blog --watch

Initial sync
To see a change, modify the code in the HelloWorldFunction (hello_world/app.py) by updating the response to the following:
return {
"statusCode": 200,
"body": json.dumps({
"message": "hello world, how are you",
# "location": ip.text.replace("\n", "")
}),
}
Once you save the file, sam sync detects the change and syncs the code for the HelloWorldFunction to the cloud.

AWS SAM detects changes
Auto dependency layer nested stack
During the initial sync, there is a logical resource name called AwsSamAutoDependencyLayerNestedStack. This feature helps to synchronize code more efficiently.
When working with Lambda functions, developers manage the code for the Lambda function and any dependencies required for the Lambda function. Before AWS SAM Accelerate, if a developer does not create a Lambda layer for dependencies, then the dependencies are re-uploaded with the function code on every update. However, with sam sync, the dependencies are automatically moved to a temporary layer to reduce latency.

Auto dependency layer in change set
During the first synchronization, sam sync creates a single nested stack that maintains a Lambda layer for each Lambda function in the stack.
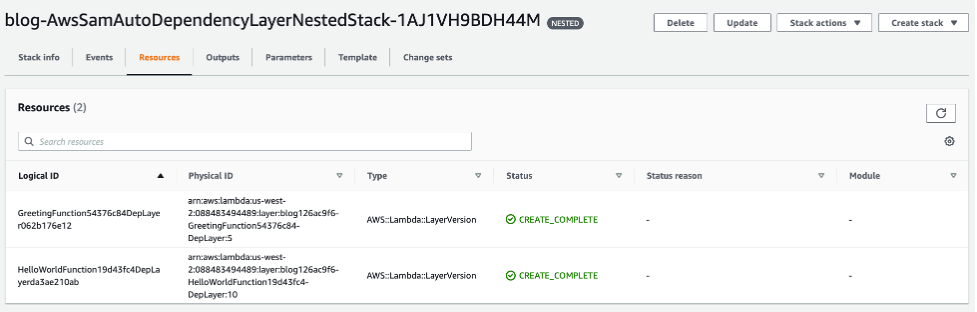
Auto dependency layer in console
These layers are only updated when the dependencies for one of the Lambda functions are updated. To demonstrate, change the requirements.txt (greeting/requirements.txt) file for the GreetingFunction to the following:
Requests
boto3
AWS SAM detects the change, and the GreetingFunction and its temporary layer are updated:

Auto dependency layer synchronized
The Lambda function changes because the Lambda layer version must be updated.
Incremental builds with sam build
The second feature of AWS SAM Accelerate is an update to the SAM build command. This change separates the cache for dependencies from the cache for the code. The build command now evaluates these separately and only builds artifacts that have changed.
To try this out, build the project with the cached flag:
sam build --cached
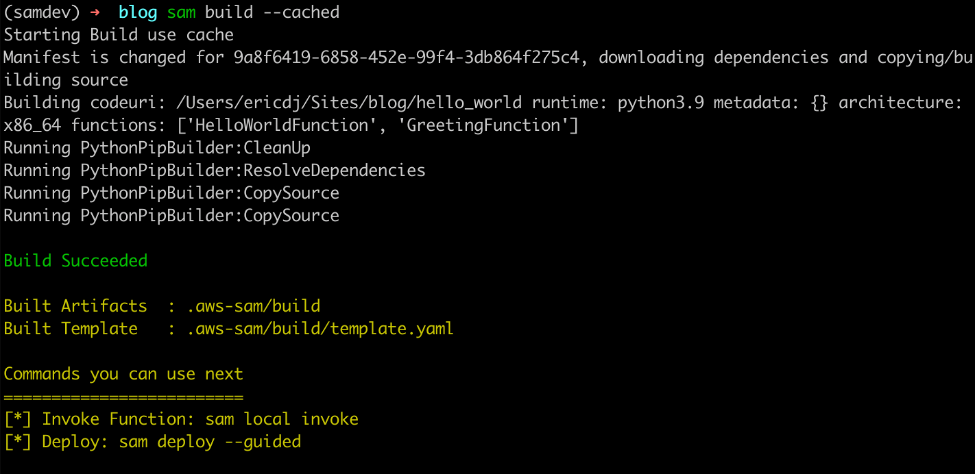
The first build establishes cache
The first build recognizes that there is no cache and downloads the dependencies and builds the code. However, when you rerun the command:

The second build uses existing cached artifacts
The sam build command verifies that the dependencies have not changed. There is no need to download them again so it builds only the application code.
Finally, update the requirements file for the HelloWorldFunction (hello_w0rld/requirements.txt) to:
Requests
boto3
Now rerun the build command:

AWS SAM build detects dependency changes
The sam build command detects a change in the dependency requirements and rebuilds the dependencies and the code.
Aggregated feedback for developers
The final part of AWS SAM Accelerate’s beta feature set is aggregating logs for developer feedback. This feature is an enhancement to the already existing sam logs command. In addition to pulling Amazon CloudWatch Logs or the Lambda function, it is now possible to retrieve logs for API Gateway and traces from AWS X-Ray.
To test this, start the sam logs:
sam logs --stack-name blog --include-traces --tail
Invoke the HelloWorldApi endpoint returned in the outputs on syncing:
curl https://112233445566.execute-api.us-west-2.amazonaws.com/Prod/hello
The sam logs command returns logs for the AWS Lambda function, Amazon API Gateway REST execution logs, and AWS X-Ray traces.

AWS Lambda logs from Amazon CloudWatch

Amazon API Gateway execution logs from Amazon CloudWatch
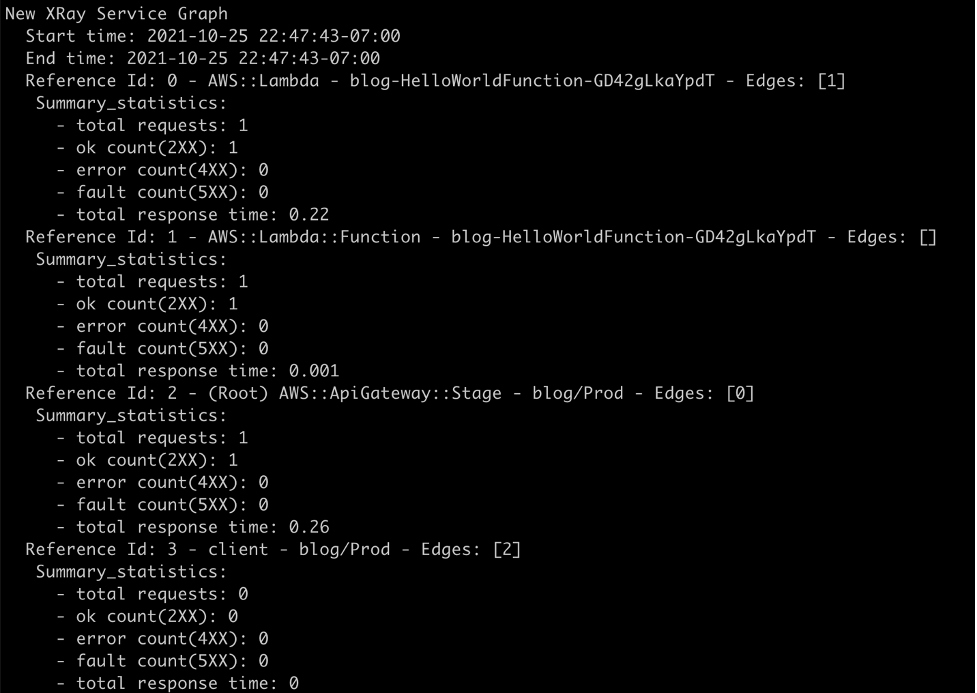
Traces from AWS X-Ray
The full picture

Development diagram for AWS SAM Accelerate
With AWS SAM Accelerate, creating and testing an application is easier and faster. To get started:
- Start a new project:
sam init
- Synchronize the initial project with a development environment:
sam sync --stack-name <project name> --watch
- Start monitoring for logs:
sam logs --stack-name <project name> --include-traces --tail
- Test using response data or logs.
- Iterate.
- Rinse and repeat!
Some caveats
AWS SAM Accelerate is in beta as of today. The team has worked hard to implement a solid minimum viable product (MVP) to get feedback from our community. However, there are a few caveats.
- Amazon State Language (ASL) code updates for Step Functions does not currently support DefinitionSubstitutions.
- API Gateway OpenAPI template must be defined in the DefiitionUri parameter and does not currently support pseudo parameters and intrinsic functions at this time
- The
sam logs command only supports execution logs on REST APIs and access logs on HTTP APIs.
- Function code cannot be inline and must be defined as a separate file in the CodeUri parameter.
Clean up
If you no longer need the AWS resources that you created by running this example, you can remove them by deleting the AWS CloudFormation stack that you deployed.
To delete the AWS CloudFormation stack, use the sam delete command:
sam delete --stack-name blog
Conclusion
When testing serverless applications, developers must get to the cloud as soon as possible. AWS SAM Accelerate helps developers escape from emulating the cloud locally and move to the fidelity of testing in the cloud.
In this post, I walk through the philosophy of why the AWS SAM team built AWS SAM Accelerate. I provide an example application and demonstrate the different features designed to remove barriers from testing in the cloud.
We invite the serverless community to help improve AWS SAM for building serverless applications. As with AWS SAM and the AWS SAM CLI (which includes AWS SAM Accelerate), this project is open source and you can contribute to the repository.
For more serverless content, visit Serverless Land.
Use Amazon EC2 for cost-efficient cloud gaming with pay-as-you-go pricing
=======================
This post is written by Markus Ziller, Solutions Architect
Since AWS launched in 2006, cloud computing disrupted traditional IT operations by providing a more cost-efficient, scalable, and secure alternative to owning hardware and data centers. Similarly, cloud gaming today enables gamers to play video games with pay-as-you go pricing. This removes the need of high upfront investments in gaming hardware. Cloud gaming platforms like Amazon Luna are an entryway, but customers are limited to the games available on the service. Furthermore, many customers also prefer to own their games, or they already have a sizable collection. For those use cases, vendor-neutral software like NICE DCV or Parsec are powerful solutions for streaming your games from anywhere.
This post shows a way to stream video games from the AWS Cloud to your local machine. I will demonstrate how you can provision a powerful gaming machine with pay-as-you-go pricing that allows you to play even the most demanding video games with zero upfront investment into gaming hardware.
The post comes with code examples on GitHub that let you follow along and replicate this post in your account.
In this example, I use the AWS Cloud Development Kit (AWS CDK), an open source software development framework, to model and provision cloud application resources. Using the CDK can reduce the complexity and amount of code needed to automate resource deployment.
Overview of the solution
The main services in this solution are Amazon Elastic Compute Cloud (Amazon EC2) and Amazon Elastic Block Store (Amazon EBS). The architecture is as follows:
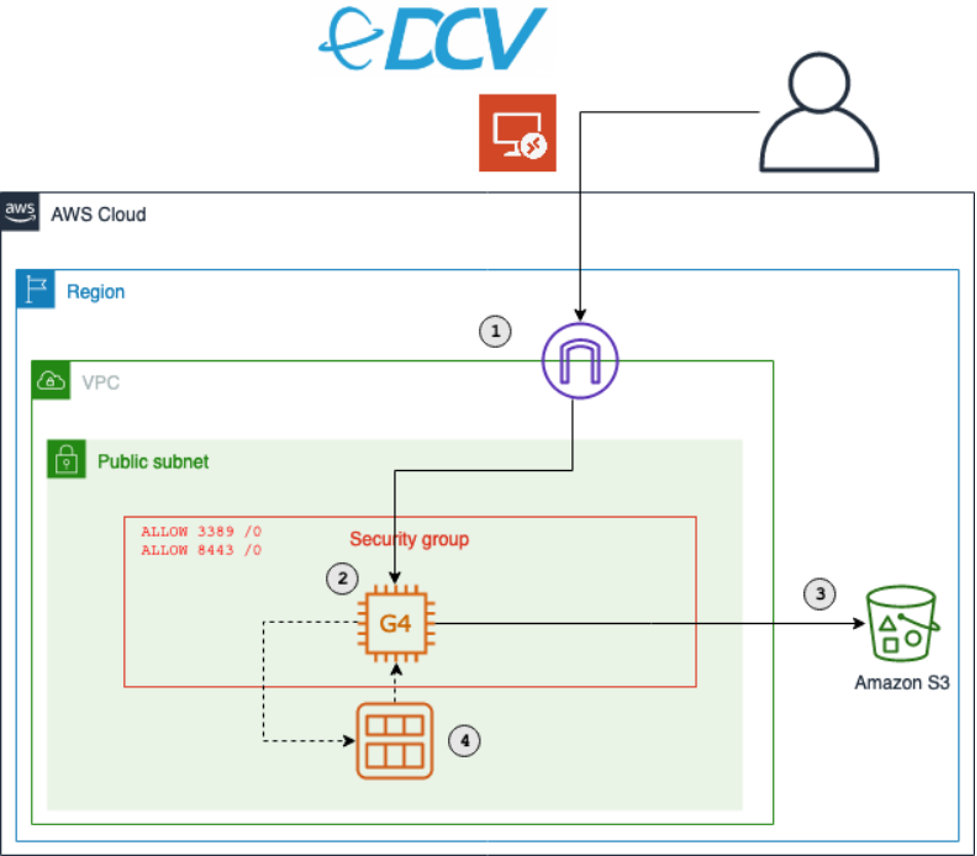
The key components of this solution are described in the following list. During this post, I will explain each component in detail. Deploy this architecture with the sample CDK project that comes with this blog post.
- An Amazon Virtual Private Cloud (Amazon VPC) that lets you launch AWS resources in a logically isolated virtual network. This includes a network configuration that lets you connect with instances in your VPC on ports 3389 and 8443.
- An Amazon EC2 instance of the G4 instance family. Amazon EC2 G4 instances are the most cost-effective and versatile GPU instances. Utilize G4 instances to run your games.
- Access to an Amazon Simple Storage Service (Amazon S3) bucket. S3 is an object storage that contains the graphics drivers required for GPU instances.
- A way to create a personal gaming Amazon Machine Images (AMI). AMIs mean that you only need to conduct the initial configuration of your gaming instance once. After that, create new gaming instances on demand from your AMI.
- In November 2021, AWS announced the launch of Amazon EC2 G5 instances that deliver up to 3x higher performance for graphics-intensive applications compared to Amazon EC2 G4dn instances. To use G5 instances with the associated CDK project, add the following code snippet to
gaming-on-g4-instances-stack.ts and replace the G4DNStack with G5Stack in the respective commands.export class G5Stack extends G4DNStack { protected getInstanceType() {
return new ec2.InstanceType(`g5.${this.props.instanceSize}`)
}
}
Walkthrough
The following sections walk through the steps required to set up your personal gaming AMI. You will only have to do this once.
For this walkthrough, you need:
An AWS account
Installed and authenticated AWS CLI
Installed Node.js, TypeScript
Installed git
Installed AWS CDK
You will also need an EC2 key pair for the initial instance setup. List your available key pairs with the following CLI command:
aws ec2 describe-key-pairs --query 'KeyPairs[*].KeyName' --output table
Alternatively, create a new key pair with the CLI. You will need the created .pem file later, so make sure to keep it.
KEY_NAME=Gaming
aws ec2 create-key-pair --key-name $KEY_NAME –query 'KeyMaterial' --output text > $KEY_NAME.pem
Checkout and deploy the sample stack
- After completing the prerequisites, clone the associated GitHub repository by running the following command in a local directory:
git clone git@github.com:aws-samples/cloud-gaming-on-ec2-instances
- Open the repository in your preferred local editor, and then review the contents of the
*.ts files in cdk/bin/ and cdk/lib/
- In
gaming-on-g4-instances.ts you will find two CDK stacks: G4DNStack and G4ADStack. A CDK stack is a unit of deployment. All AWS resources defined within the scope of a stack, either directly or indirectly, are provisioned as a single unit.
The architecture for both stacks is similar, and it only differs in the instance type that will be deployed.
G4DNStack and G4ADStack share parameters that determine the configuration of the EC2 instance, the VPC network and the preinstalled software. The stacks come with defaults for some parameters – I recommend keeping the default values.
EC2
instanceSize: Sets the EC2 size. Defaults to g4dn.xlarge and g4ad.4xlarge, respectively. Check the service page for a list of valid configurations.
sshKeyName: The name of the EC2 key pair you will use to connect to the instance. Ensure you have access to the respective .pem file.
volumeSizeGiB: The root EBS volume size. Around 20 GB will be used for the Windows installation, the rest will be available for your software.
VPC
openPorts: Access from these ports will be allowed. Per default, this will allow access for Remote Desktop Protocol (RDP) (3389) and NICE DCV (8443).
associateElasticIp: Controls if an Elastic IP address will be created and added to the EC2 instance. An Elastic IP address is a static public IPv4 address. Contrary to dynamic IPv4 addresses managed by AWS, it will not change after an instance restart. This is an optional convenience that comes at a small cost for reserving the IP address for you.
allowInboundCidr: Access from this CIDR range will be allowed. This limits the IP space from where your instance is routable. It can be used to add an additional security layer. Per default, traffic from any IP address will be allowed to reach your instance. Notwithstanding allowInboundCidr, an RDP or NICE DCV connection to your instance requires valid credentials and will be rejected otherwise.
Software
niceDCVDisplayDriverUrl: The download URL of the NICE DCV Virtual Display Driver for EC2.
niceDCVServerUrl: The download URL of the NICE DCV 2021.0 Server.
For g4dn instances, one more parameter is required (see process of installing NVIDIA drivers):
gridSwCertUrl: The NVIDIA driver requires a certificate file, which can be downloaded from Amazon S3.
Choose an instance type based on your performance and cost requirements, and then adapt the config accordingly. I recommend starting with the G4DNStack, as it comes at the lowest hourly instance cost. If you need more graphics performance, then choose the G4ADStack for up to 40% improvement in graphics performance.
After choosing an instance, follow the instructions in the README.md in order to deploy the stack.
The CDK will create a new Amazon VPC with a public subnet. It will also configure security groups to allow inbound traffic from the CIDR range and ports specific in the config. By default, this will allow inbound traffic from any IP address. I recommend restricting access to your current IP address by going to checkip.amazonaws.com and replacing 0.0.0.0/0 with <YOUR_IP>/32 for the allowInboundCidr config parameter.
Besides the security groups, the CDK also manages all required IAM permissions.
It creates the following resources in your VPC:
An EC2 GPU instance running Windows Server 2019. Depending on the stack you chose, the default instance type will be g4dn.xlarge or g4ad.4xlarge. You can override this in the template. When the EC2 instance is launched, the CDK runs an instance-specific PowerShell script. This PowerShell script downloads all drivers and NICE DCV. Check the code to see the full script or add your own commands.
An EBS gp3 volume with your defined size (default: 150 GB).
An EC2 launch template.
(Optionally) An Elastic IP address as a static public IP address for your gaming instances.
After the stack has been deployed, you will see the following output:

Click the first link, and download the remote desktop file in order to connect to your instance. Use the .pem file from the previous step to receive the instance password.
Install drivers on EC2
You will use the RDP to initially connect to your instance. RDP provides a user with a graphical interface to connect to another computer over a network connection. RDP clients are available for a large number of platforms. Use the public IP address provided by the CDK output, the username Administrator, and the password displayed by the EC2 dialogue.
Ensure that you note the password for later steps.
Most configuration process steps are automated by the CDK. However, a few actions (e.g., driver installation) cannot be properly automated. For those, the following manual steps are required once.
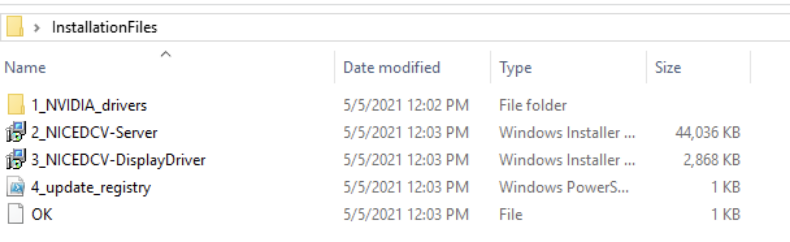
Navigate to $home\Desktop\InstallationFiles. If the folder contains an empty file named “OK”, then everything was downloaded correctly and you can proceed with the installation. If you connect while the setup process is still in progress, then wait until the OK file gets created before proceeding. This typically takes 2-3 minutes.
The next step differs slightly for g4ad and g4dn instances.
g4ad instances with AMD Radeon Pro V520
Follow the instructions in the EC2 documentation to install the AMD driver from the InstallationFiles folder. The installation may take a few minutes, and it will display the following output when successfully finished.
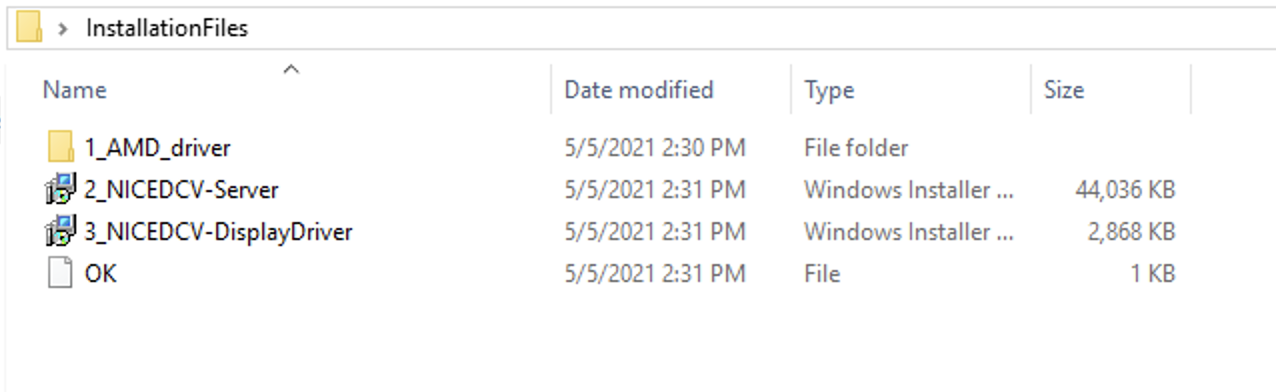
Next, install NICE DCV Server and Display driver by double-clicking the respective files. Finally, restart the instance by running the Restart-Computer PowerShell command.
g4dn instances with NVIDIA T4
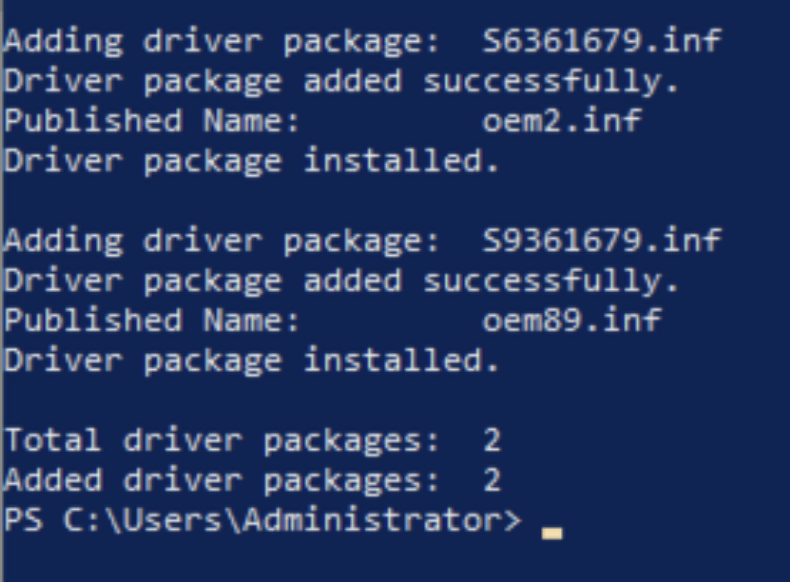
Navigate to 1_NVIDIA_drivers, run the NVIDIA driver installer for Windows Server 2019 and follow the instructions.
Next, double-click the respective files in the InstallationFiles folder in order to install NICE DCV Server and Display driver.
Finally, right-click on 4_update_registry.ps1, and select “Run with PowerShell” to activate the driver. In order to complete the setup, restart the instance.
Install your software
After the instance restart, you can connect from your local machine to your EC2 instance with NICE DCV. The NICE DCV bandwidth-adaptive streaming protocol allows near real-time responsiveness for your applications without compromising the image accuracy. This is the recommended way to stream latency sensitive applications.
Download the NICE DCV viewer client and connect to your EC2 instance with the same credentials that you used for the RDP connection earlier. After testing the NICE DCV connection, I recommend disabling RDP by removing the corresponding rule in your security group.
You are now all set to install your games and tools on the EC2 instance. Make sure to install it on the C: drive, as you will create an AMI with the contents of C: later.
Start and stop your instance on demand
At this point, you have fully set up the EC2 instance for cloud gaming on AWS. You can now start and stop the instance when needed. The following CLI commands are all you need to remember:
aws ec2 start-instances --instance-ids <INSTANCE_ID>
aws ec2 stop-instances --instance-ids <INSTANCE_ID>
This will use the regular On-Demand instance capacity of EC2, and you will be billed hourly charges for the time that your instance is running. If your instance is stopped, you will only be charged for the EBS volume and the Elastic IP address if you chose to use one.
Launch instances from AMI
Make sure you have installed all of the applications you require on your EC2, and then create your personal gaming AMI by running the following AWS CLI command.
aws ec2 create-image --instance-id <YOUR_INSTANCE_ID> --name <THE_NAME_OF_YOUR_AMI>
Use the following command to get details about your AMI creation. When the status changes from pending to available, then your AMI is ready.
aws ec2 describe-images --owners self --query 'Images[*].[Name, ImageId, BlockDeviceMappings[0].Ebs.SnapshotId, State]' --output table
The CDK created an EC2 launch template when it deployed the stack. Run the following CLI command to spin up an EC2 instance from this template.
aws ec2 run-instances --image-id <YOUR_AMI_ID> --launch-template LaunchTemplateName=<LAUNCH_TEMPLATE_NAME> --query "Instances[*].[InstanceId, PublicIpAddress]" --output table
This command will start a new EC2 instance with the exact same configuration as your initial EC2, but with all your software already installed.
Conclusion
This post walked you through creating your personal cloud gaming stack. You are now all set to lean back and enjoy the benefits of per second billing while playing your favorite video games in the AWS cloud.
Visit the Amazon EC2 G4 instances service page to learn more about how AWS continues to push the boundaries of cost-effectiveness for graphic-intensive applications.
Monitoring and tuning federated GraphQL performance on AWS Lambda
=======================
This post is written by Krzysztof Lis, Senior Software Development Engineer, IMDb.
Our federated GraphQL at IMDb distributes requests across 19 subgraphs (graphlets). To ensure reliability for customers, IMDb monitors availability and performance across the whole stack. This article focuses on this challenge and concludes a 3-part federated GraphQL series:
Part 1 presents the migration from a monolithic REST API to a federated GraphQL (GQL) endpoint running on AWS Lambda.
Part 2 describes schema management in federated GQL systems.
This presents an approach towards performance tuning. It compares graphlets with the same logic and different runtime (for example, Java and Node.js) and shows best practices for AWS Lambda tuning.
The post describes IMDb’s test strategy that emphasizes the areas of ownership for the Gateway and Graphlet teams. In contrast to the legacy monolithic system described in part 1, the federated GQL gateway does not own any business logic. Consequently, the gateway integration tests focus solely on platform features, leaving the resolver logic entirely up to the graphlets.
Monitoring and alarming
Efficient monitoring of a distributed system requires you to track requests across all components. To correlate service issues with issues in the gateway or other services, you must pass and log the common request ID.
Capture both error and latency metrics for every network call. In Lambda, you cannot send a response to the client until all work for that request is complete. As a result, this can add latency to a request.
The recommended way to capture metrics is Amazon CloudWatch embedded metric format (EMF). This scales with Lambda and helps avoid throttling by the Amazon CloudWatch PutMetrics API. You can also search and analyze your metrics and logs more easily using CloudWatch Logs Insights.
Lambda configured timeouts emit a Lambda invocation error metric, which can make it harder to separate timeouts from errors thrown during invocation. By specifying a timeout in-code, you can emit a custom metric to alarm on to treat timeouts differently from unexpected errors. With EMF, you can flush metrics before timing out in code, unlike the Lambda-configured timeout.
Running out of memory in a Lambda function also appears as a timeout. Use CloudWatch Insights to see if there are Lambda invocations that are exceeding the memory limits.
You can enable AWS X-Ray tracing for Lambda with a small configuration change to enable tracing. You can also trace components like SDK calls or custom sub segments.
Gateway integration tests
The Gateway team wants tests to be independent from the underlying data served by the graphlets. At the same time, they must test platform features provided by the Gateway – such as graphlet caching.
To simulate the real gateway-graphlet integration, IMDb uses a synthetic test graphlet that serves mock data. Given the graphlet’s simplicity, this reduces the risk of unreliable graphlet data. We can run tests asserting only platform features with the assumption of stable and functional, improving confidence that failing tests indicate issues with the platform itself.
This approach helps to reduce false positives in pipeline blockages and improves the continuous delivery rate. The gateway integration tests are run against the exposed endpoint (for example, a content delivery network) or by invoking the gateway Lambda function directly and passing the appropriate payload.
The former approach allows you to detect potential issues with the infrastructure setup. This is useful when you use infrastructure as code (IaC) tools like AWS CDK. The latter further narrows down the target of the tests to the gateway logic, which may be appropriate if you have extensive infrastructure monitoring and testing already in place.
Graphlet integration tests
The Graphlet team focuses only on graphlet-specific features. This usually means the resolver logic for the graph fields they own in the overall graph. All the platform features – including query federation and graphlet response caching – are already tested by the Gateway Team.
The best way to test the specific graphlet is to run the test suite by directly invoking the Lambda function. If there is any issue with the gateway itself, it does cause a false-positive failure for the graphlet team.
Load tests
It’s important to determine the maximum traffic volume your system can handle before releasing to production. Before the initial launch and before any high traffic events (for example, the Oscars or Golden Globes), IMDb conducts thorough load testing of our systems.
To perform meaningful load testing, the workload captures traffic logs to IMDb pages. We later replay the real customer traffic at the desired transaction-per-second (TPS) volume. This ensures that our tests approximate real-life usage. It reduces the risk of skewing test results due to over-caching and disproportionate graphlet usage. Vegeta is an example of a tool you can use to run the load test against your endpoint.
Canary tests
Canary testing can also help ensure high availability of an endpoint. The canary produces the traffic. This is a configurable script that runs on a schedule. You configure the canary script to follow the same routes and perform the same actions as a user, which allows you to continually verify the user experience even without live traffic.
Canaries should emit success and failure metrics that you can alarm on. For example, if a canary runs 100 times per minute and the success rate drops below 90% in three consecutive data points, you may choose to notify a technician about a potential issue.
Compared with integration tests, canary tests run continuously and do not require any code changes to trigger. They can be a useful tool to detect issues that are introduced outside the code change. For example, through manual resource modification in the AWS Management Console or an upstream service outage.
Performance tuning
There is a per-account limit on the number of concurrent Lambda invocations shared across all Lambda functions in a single account. You can help to manage concurrency by separating high-volume Lambda functions into different AWS accounts. If there is a traffic surge to any one of the Lambda functions, this isolates the concurrency used to a single AWS account.
Lambda compute power is controlled by the memory setting. With more memory comes more CPU. Even if a function does not require much memory, you can adjust this parameter to get more CPU power and improve processing time.
When serving real-time traffic, Provisioned Concurrency in Lambda functions can help to avoid cold start latency. (Note that you should use max, not average for your auto scaling metric to keep it more responsive for traffic increases.) For Java functions, code in static blocks is run before the function is invoked. Provisioned Concurrency is different to reserved concurrency, which sets a concurrency limit on the function and throttles invocations above the hard limit.
Use the maximum number of concurrent executions in a load test to determine the account concurrency limit for high-volume Lambda functions. Also, configure a CloudWatch alarm for when you are nearing the concurrency limit for the AWS account.
There are concurrency limits and burst limits for Lambda function scaling. Both are per-account limits. When there is a traffic surge, Lambda creates new instances to handle the traffic. “Burst limit = 3000” means that the first 3000 instances can be obtained at a much faster rate (invocations increase exponentially). The remaining instances are obtained at a linear rate of 500 per minute until reaching the concurrency limit.
An alternative way of thinking this is that the rate at which concurrency can increase is 500 per minute with a burst pool of 3000. The burst limit is fixed, but the concurrency limit can be increased by requesting a quota increase.
You can further reduce cold start latency by removing unused dependencies, selecting lightweight libraries for your project, and favoring compile-time over runtime dependency injection.
Impact of Lambda runtime on performance
Choice of runtime impacts the overall function performance. We migrated a graphlet from Java to Node.js with complete feature parity. The following graph shows the performance comparison between the two:
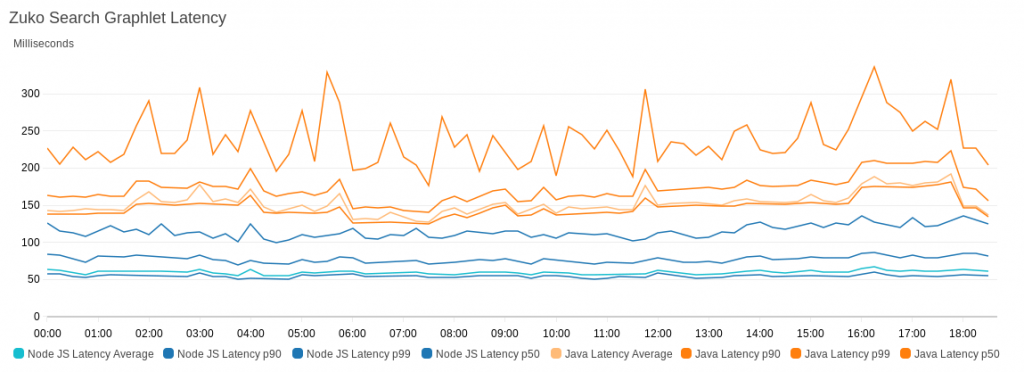
To illustrate the performance difference, the graph compares the slowest latencies for Node.js and Java – the P80 latency for Node.js was lower than the minimal latency we recorded for Java.
Conclusion
There are multiple factors to consider when tuning a federated GQL system. You must be aware of trade-offs when deciding on factors like the runtime environment of Lambda functions.
An extensive testing strategy can help you scale systems and narrow down issues quickly. Well-defined testing can also keep pipelines clean of false-positive blockages.
Using CloudWatch EMF helps to avoid PutMetrics API throttling and allows you to run CloudWatch Logs Insights queries against metric data.
For more serverless learning resources, visit Serverless Land.
Building a difference checker with Amazon S3 and AWS Lambda
=======================
When saving different versions of files or objects, it can be useful to detect and log the differences between the versions automatically. A difference checker tool can detect changes in JSON files for configuration changes, or log changes in documents made by users.
This blog post shows how to build and deploy a scalable difference checker service using Amazon S3 and AWS Lambda. The example application uses the AWS Serverless Application Model (AWS SAM), enabling you to deploy the application more easily in your own AWS account.
This walkthrough creates resources covered in the AWS Free Tier but usage beyond the Free Tier allowance may incur cost. To set up the example, visit the GitHub repo and follow the instructions in the README.md file.
Overview
By default in S3, when you upload an object with the same name as an existing object, the new object overwrites the existing one. However, when you enable versioning in a S3 bucket, the service stores every version of an object. Versioning provides an effective way to recover objects in the event of accidental deletion or overwriting. It also provides a way to detect changes in objects, since you can compare the latest version to previous versions.
In the example application, the S3 bucket triggers a Lambda function every time an object version is unloaded. The Lambda function compares the latest version with the last version and then writes the differences to Amazon CloudWatch Logs.
Additionally, the application uses a configurable environment variable to determine how many versions of the object to retain. By default, it keeps the latest three versions. The Lambda function deletes versions that are earlier than the configuration allows, providing an effective way to implement object life cycling.
This shows the application flow when multiple versions of an object are uploaded:
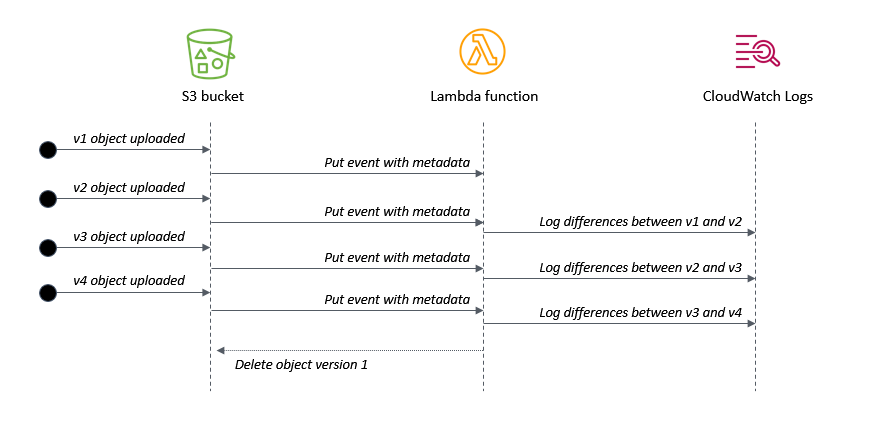
- When v1 is uploaded, there is no previous version to compare against.
- When v2 is uploaded, the Lambda function logs the differences compared with v1.
- When v3 is uploaded, the Lambda function logs the differences compared with v2.
- When v4 is uploaded, the Lambda function logs the differences compared with v3. It then deletes v1 of the object, since it is earlier than the configured setting.
Understanding the AWS SAM template
The application’s AWS SAM template configures the bucket with versioning enabled using the VersioningConfiguration attribute:
  SourceBucket:
Type: AWS::S3::Bucket
Properties:
BucketName: !Ref BucketName
VersioningConfiguration:
Status: Enabled
It defines the Lambda function with an environment variable KEEP_VERSIONS, which determines how many versions of an object to retain:
  S3ProcessorFunction:
Type: AWS::Serverless::Function
Properties:
CodeUri: src/
Handler: app.handler
Runtime: nodejs14.x
MemorySize: 128
Environment:
Variables:
KEEP_VERSIONS: 3
The template uses an AWS SAM policy template to provide the Lambda function with an S3ReadPolicy to the objects in the bucket. The version handling logic requires s3:ListBucketVersions permission on the bucket and s3:DeleteObjectVersion permission on the objects in the bucket. It’s important to note which permissions apply to the bucket and which apply to the objects within the bucket. The template defines these three permission types in the function’s policy:
      Policies:
- S3ReadPolicy:
BucketName: !Ref BucketName
- Statement:
- Sid: VersionsPermission
Effect: Allow
Action:
- s3:ListBucketVersions
Resource: !Sub "arn:${AWS::Partition}:s3:::${BucketName}"
- Statement:
- Sid: DeletePermission
Effect: Allow
Action:
- s3:DeleteObject
- s3:DeleteObjectVersion
Resource: !Sub "arn:${AWS::Partition}:s3:::${BucketName}/*"
The example application only works for text files but you can use the same logic to process other file types. The event definition ensures that only objects ending in ‘.txt’ invoke the Lambda function:
      Events:
FileUpload:
Type: S3
Properties:
Bucket: !Ref SourceBucket
Events: s3:ObjectCreated:*
Filter:
S3Key:
Rules:
- Name: suffix
Value: '.txt'
Processing events from the S3 bucket
S3 sends events to the Lambda function when objects are created. The event contains metadata about the objects but not the contents of the object. It’s good practice to separate the business logic of the function from the Lambda handler, so the generic handler in app.js iterates through the event’s records and calls the custom logic for each record:
const { processS3 } = require('./processS3')
exports.handler = async (event) => {
console.log (JSON.stringify(event, null, 2))
await Promise.all(
event.Records.map(async (record) => {
try {
await processS3(record)
} catch (err) {
console.error(err)
}
})
)
}
The processS3.js file contains a function that fetches the object versions in the bucket and sorts the event data received. The listObjectVersions method of the S3 API requires the s3:ListBucketVersions permission, as provided in the AWS SAM template:
    // Decode URL-encoded key
const Key = decodeURIComponent(record.s3.object.key.replace(/\+/g, " "))
// Get the list of object versions
const data = await s3.listObjectVersions({
Bucket: record.s3.bucket.name,
Prefix: Key
}).promise()
// Sort versions by date (ascending by LastModified)
const versions = data.Versions
const sortedVersions = versions.sort((a,b) => new Date(a.LastModified) - new Date(b.LastModified))
Finally, the compareS3.js file contains a function that loads the latest two versions of the S3 object and uses the Diff npm library to compare:
const compareS3 = async (oldVersion, newVersion) => {
try {
console.log ({oldVersion, newVersion})
// Get original text from objects
const oldObject = await s3.getObject({ Bucket: oldVersion.BucketName, Key: oldVersion.Key }).promise()
const newObject = await s3.getObject({ Bucket: newVersion.BucketName, Key: newVersion.Key }).promise()
// Convert buffers to strings
const oldFile = oldObject.Body.toString()
const newFile = newObject.Body.toString()
// Use diff library to compare files (https://www.npmjs.com/package/diff)
return Diff.diffWords(oldFile, newFile)
} catch (err) {
console.error('compareS3: ', err)
}
}
Life-cycling earlier versions of an S3 object
You can use an S3 Lifecycle configuration to apply rules automatically based on object transition actions. Using this approach, you can expire objects based upon age and the S3 service processes the deletion asynchronously. Lifecyling with rules is entirely managed by S3 and does not require any custom code. This implementation uses a different approach, using code to delete objects based on number of retained versions instead of age.
When versioning is enabled on a bucket, S3 adds a VersionId attribute to an object when it is created. This identifier is a random string instead of a sequential identifier. Listing the versions of an object also returns a LastModified attribute, which can be used to determine the order of the versions. The length of the response array also indicates the number of versions available for an object:
[
{
Key: 'test.txt',
VersionId: 'IX_tyuQrgKpMFfq5YmLOlrtaleRBQRE',
IsLatest: false,
LastModified: 2021-08-01T18:48:50.000Z,
},
{
Key: 'test.txt',
VersionId: 'XNpxNgUYhcZDcI9Q9gXCO9_VRLlx1i.',
IsLatest: false,
LastModified: 2021-08-01T18:52:58.000Z,
},
{
Key: 'test.txt',
VersionId: 'RBk2BUIKcYYt4hNA5hrTVdNit.MDNMZ',
IsLatest: true,
LastModified: 2021-08-01T18:53:26.000Z,
}
]
For convenience, this code adds a sequential version number attribute, determined by sorting the array by date. The deleteS3 function uses the deleteObjects method in the S3 API to delete multiple objects in one action. It builds a params object containing the list of keys for deletion, using the sequential version ID to flag versions for deletion:
const deleteS3 = async (versions) => {
const params = {
Bucket: versions[0].BucketName,
Delete: {
Objects: [ ]
}
}
try {
// Add keys/versions from objects that are process.env.KEEP_VERSIONS behind
versions.map((version) => {
if ((versions.length - version.VersionNumber) >= process.env.KEEP_VERSIONS ) {
console.log(`Delete version ${version.VersionNumber}: versionId = ${version.VersionId}`)
params.Delete.Objects.push({
Key: version.Key,
VersionId: version.VersionId
})
}
})
// Delete versions
const result = await s3.deleteObjects(params).promise()
console.log('Delete object result: ', result)
} catch (err) {
console.error('deleteS3: ', err)
}
}
Testing the application
To test this example, upload a sample text file to the S3 bucket by using the AWS Management Console or with the AWS CLI:
aws s3 cp sample.txt s3://myS3bucketname
Modify the test file and then upload again using the same command. This creates a second version in the bucket. Repeat this process multiple times to create more versions of the object. The Lambda function’s log file shows the differences between versions and any deletion activity for earlier versions:
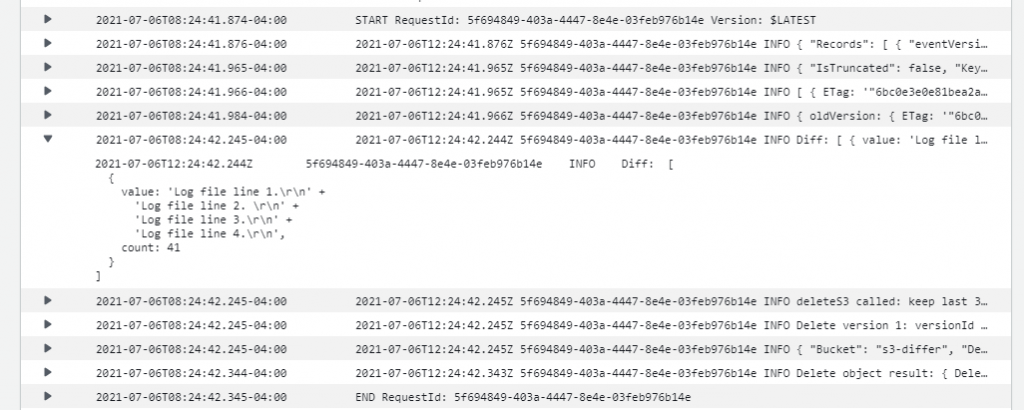
You can also test the object locally using the test.js function and supplying a test event. This can be useful for local debugging and testing.
Conclusion
This blog post shows how to create a scalable difference checking tool for objects stored in S3 buckets. The Lambda function is invoked when S3 writes new versions of an object to the bucket. This example also shows how to remove earlier versions of object and define a set number of versions to retain.
I walk through the AWS SAM template for deploying this example application and highlight important S3 API methods in the SDK used in the implementation. I explain how version IDs work in S3 and how to use this in combination with the LastModified date attribute to implement sequential versioning.
To learn more about best practices when using S3 to Lambda, see the Lambda Operator Guide. For more serverless learning resources, visit Serverless Land.
Creating AWS Serverless batch processing architectures
=======================
This post is written by Reagan Rosario, AWS Solutions Architect and Mark Curtis, Solutions Architect, WWPS.
Batch processes are foundational to many organizations and can help process large amounts of information in an efficient and automated way. Use cases include file intake processes, queue-based processing, and transactional jobs, in addition to heavy data processing jobs.
This post explains a serverless solution for batch processing to implement a file intake process. This example uses AWS Step Functions for orchestration, AWS Lambda functions for on-demand instance compute, Amazon S3 for storing the data, and Amazon SES for sending emails.
Overview
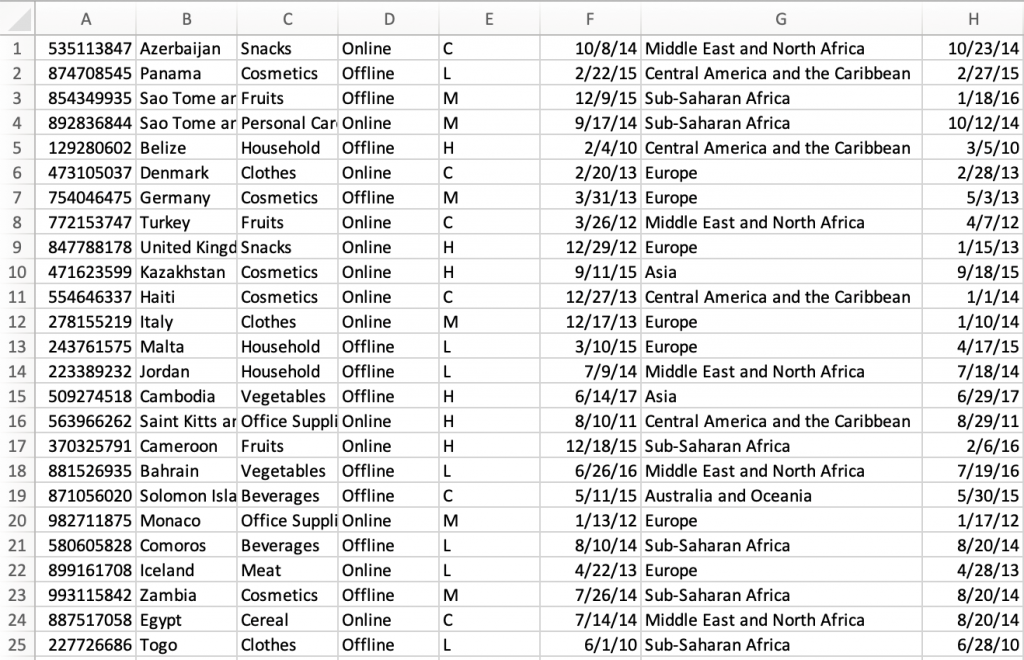
This post’s example takes a common use-case of a business’s need to process data uploaded as a file. The test file has various data fields such as item ID, order date, order location. The data must be validated, processed, and enriched with related information such as unit price. Lastly, this enriched data may need to be sent to a third-party system.
Step Functions allows you to coordinate multiple AWS services in fully managed workflows to build and update applications quickly. You can also create larger workflows out of smaller workflows by using nesting. This post’s architecture creates a smaller and modular Chunk processor workflow, which is better for processing smaller files.
As the file size increases, the size of the payload passed between states increases. Executions that pass large payloads of data between states can be stopped if they exceed the maximum payload size of 262,144 bytes.
To process large files and to make the workflow modular, I split the processing between two workflows. One workflow is responsible for splitting up a larger file into chunks. A second nested workflow is responsible for processing records in individual chunk files. This separation of high-level workflow steps from low-level workflow steps also allows for easier monitoring and debugging.
Splitting the files in multiple chunks can also improve performance by processing each chunk in parallel. You can further improve the performance by using dynamic parallelism via the map state for each chunk.

- The file upload to an S3 bucket triggers the S3 event notification. It invokes the Lambda function asynchronously with an event that contains details about the object.
- Lambda function calls the Main batch orchestrator workflow to start the processing of the file.
- Main batch orchestrator workflow reads the input file and splits it into multiple chunks and stores them in an S3 bucket.
- Main batch orchestrator then invokes the Chunk Processor workflow for each split file chunk.
- Each Chunk processor workflow execution reads and processes a single split chunk file.
- Chunk processor workflow writes the processed chunk file back to the S3 bucket.
- Chunk processor workflow writes the details about any validation errors in an Amazon DynamoDB table.
- Main batch orchestrator workflow then merges all the processed chunk files and saves it to an S3 bucket.
- Main batch orchestrator workflow then emails the consolidated files to the intended recipients using Amazon Simple Email Service.
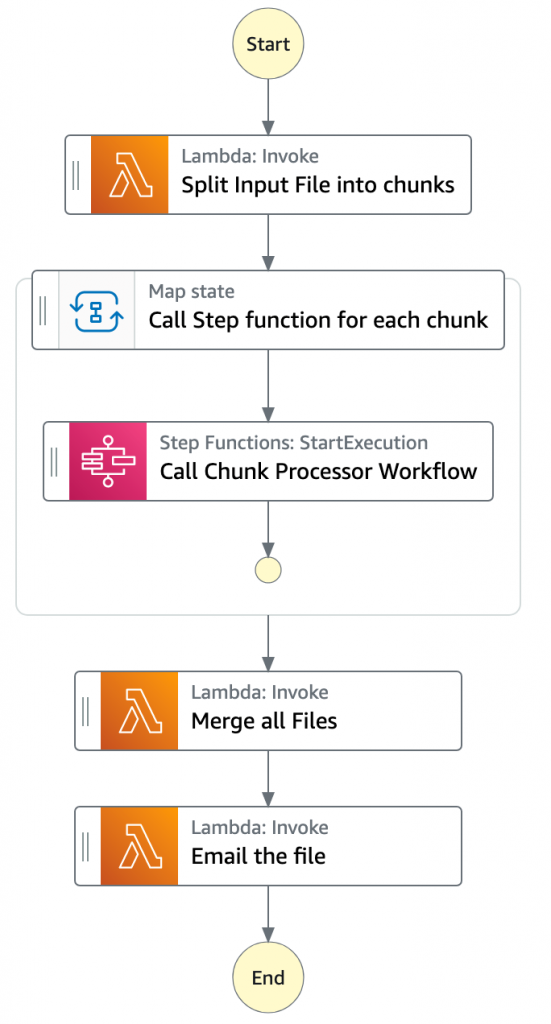
- The Main batch orchestrator workflow orchestrates the processing of the file.
- The first task state Split Input File into chunks calls a Lambda function. It splits the main file into multiple chunks based on the number of records and stores each chunk into an S3 bucket.
- The next state is a map state called Call Step Functions for each chunk. It uses the Step Functions service integration to trigger the Chunk Processor workflow for each chunk of the file. It also passes the S3 bucket path of the split file chunk as a parameter to the Chunk Processor workflow.
- Then the Main batch orchestrator waits for all the child workflow executions to complete.
- Once all the child workflows are processed successfully, the next task state is Merge all Files. This combines all the processed chunks into a single file and then stores the file back to the S3 bucket.
- The next task state Email the file takes the output file. It generates an S3 presigned URL for the file and sends an email with the S3 presigned URL.
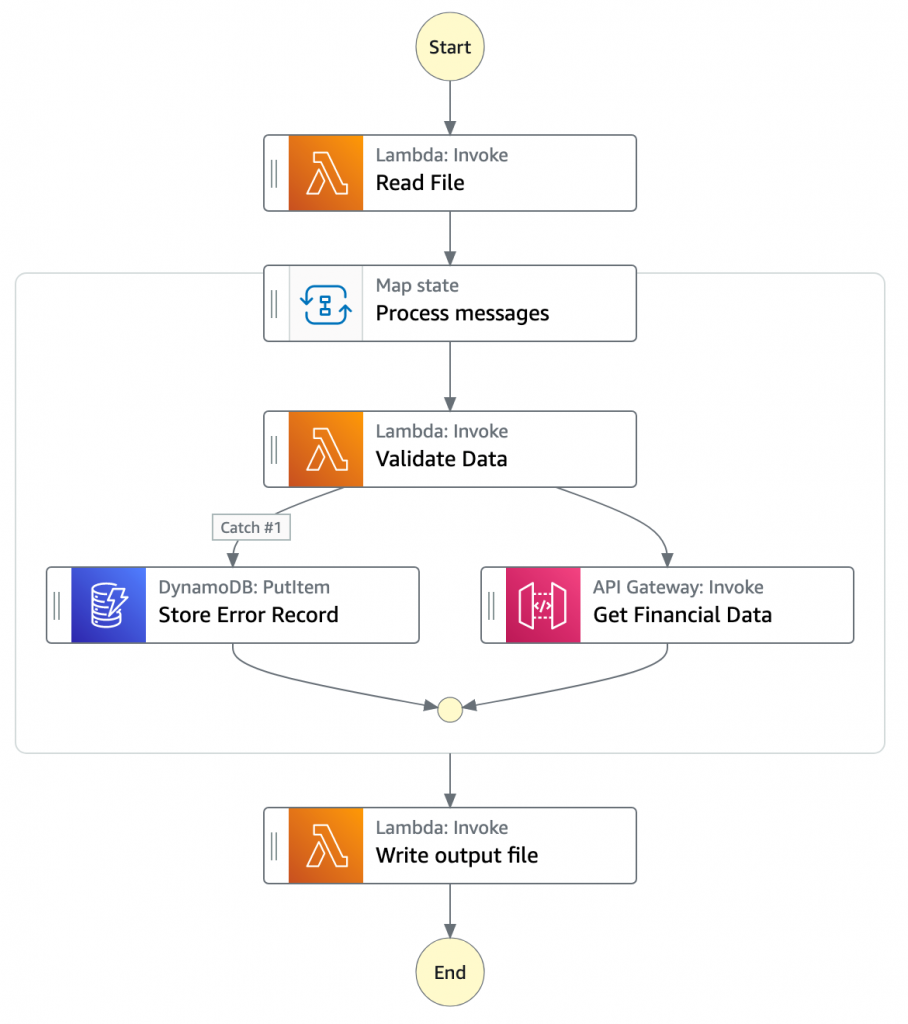
- The Chunk processor workflow is responsible for processing each row from the chunk file that was passed.
- The first task state Read reads the chunked file from S3 and converts it to an array of JSON objects. Each JSON object represents a row in the chunk file.
- The next state is a map state called Process messages. It runs a set of steps for each element of an input array. The input to the map state is an array of JSON objects passed by the previous task.
- Within the map state, Validate Data is the first state. It invokes a Lambda function that validates each JSON object using the rules that you have created. Records that fail validation are stored in an Amazon DynamoDB table.
- The next state Get Financial Data invokes Amazon API Gateway endpoints to enrich the data in the file with data from a DynamoDB table.
- When the map state iterations are complete, the Write output file state triggers a task. It calls a Lambda function, which converts the JSON data back to CSV and writes the output object to S3.
Prerequisites
AWS account.
AWS SAM CLI.
Python 3.
An AWS Identity and Access Management (IAM) role with appropriate access.
Deploying the application
- Clone the repository.
- Change to the directory and build the application source:
sam build
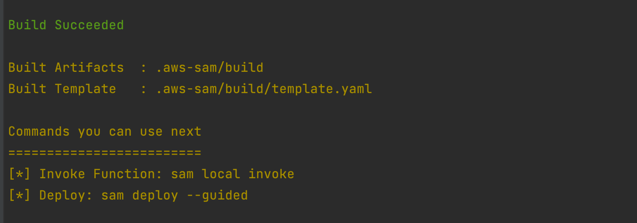
- Package and deploy the application to AWS. When prompted, input the corresponding parameters as shown below:
sam deploy --guided
 Note the template parameters:
- SESSender: The sender email address for the output file email.
- SESRecipient: The recipient email address for the output file email.
- SESIdentityName: An email address or domain that Amazon SES users use to send email.
- InputArchiveFolder: Amazon S3 folder where the input file will be archived after processing.
- FileChunkSize: Size of each of the chunks, which is split from the input file.
- FileDelimiter: Delimiter of the CSV file (for example, a comma).
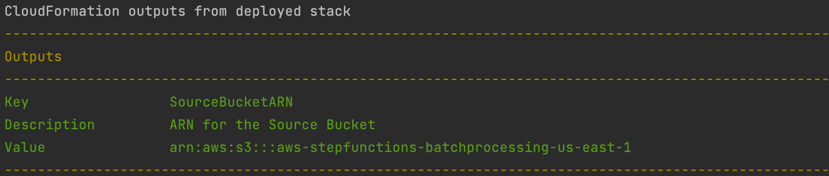
- After the stack creation is complete, you see the source bucket created in Outputs.
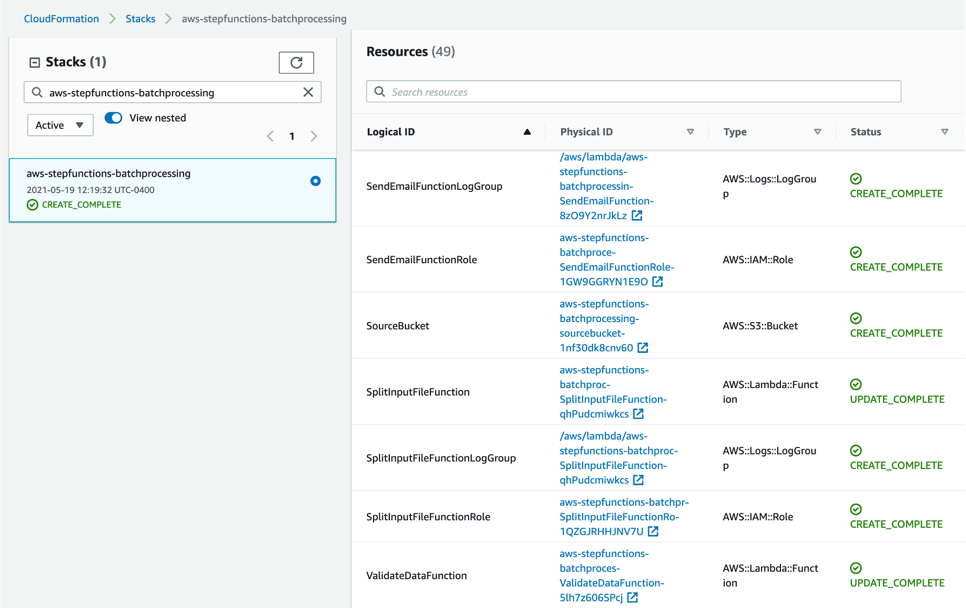
- Review the deployed components in the AWS CloudFormation Console.
Testing the solution
- Before you can send an email using Amazon SES, you must verify each identity that you’re going to use as a “From”, “Source”, “Sender”, or “Return-Path” address to prove that you own it. Refer Verifying identities in Amazon SES for more information.
- Locate the S3 bucket (SourceBucket) in the Resources section of the CloudFormation stack. Choose the physical ID.

- In the S3 console for the SourceBucket, choose Create folder. Name the folder input and choose Create folder.

- The S3 event notification on the SourceBucket uses “input” as the prefix and “csv” as the suffix. This triggers the notification Lambda function. This is created as a part of the custom resource in the AWS SAM template.

- In the S3 console for the SourceBucket, choose the Upload button. Choose Add files and browse to the input file (testfile.csv). Choose Upload.
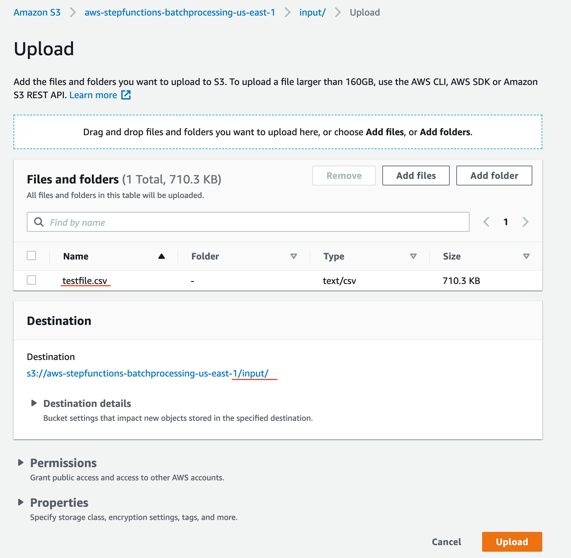
- Review the data in the input file testfile.csv.
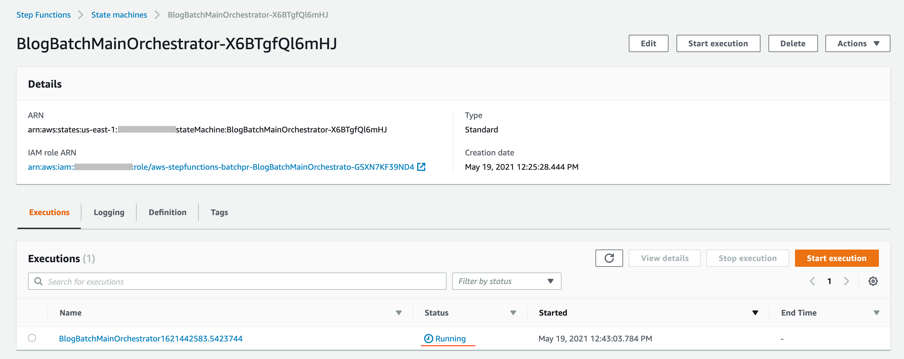
- After the object is uploaded, the event notification triggers the Lambda Function. This starts the main orchestrator workflow. In the Step Functions console, you see the workflow is in a running state.

- Choose an individual state machine to see additional information.
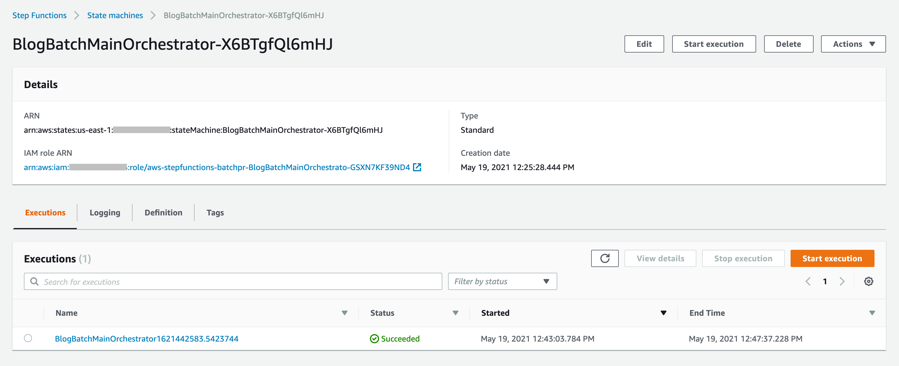
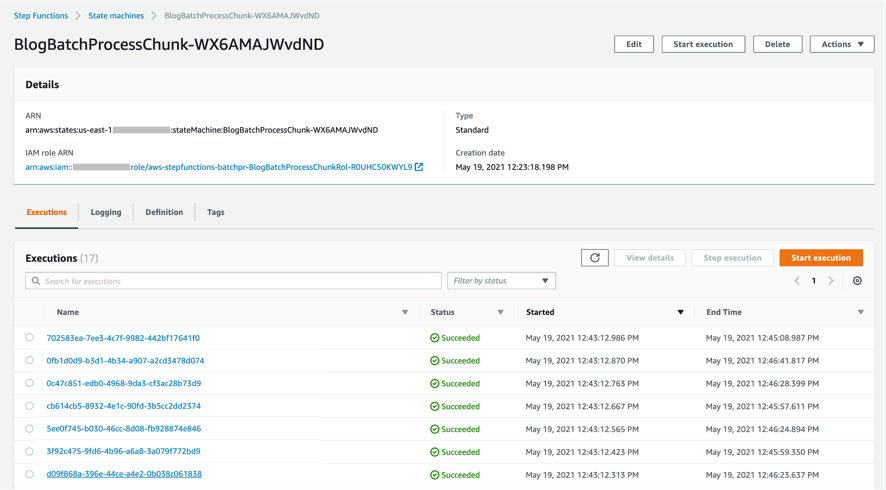
- After a few minutes, both BlogBatchMainOrchestrator and BlogBatchProcessChunk workflows have completed all executions. There is one execution for the BlogBatchMainOrchestrator workflow and multiple invocations of the BlogBatchProcessChunk workflow. This is because the BlogBatchMainOrchestrator invokes the BlogBatchProcessChunk for each of the chunked files.
Checking the output
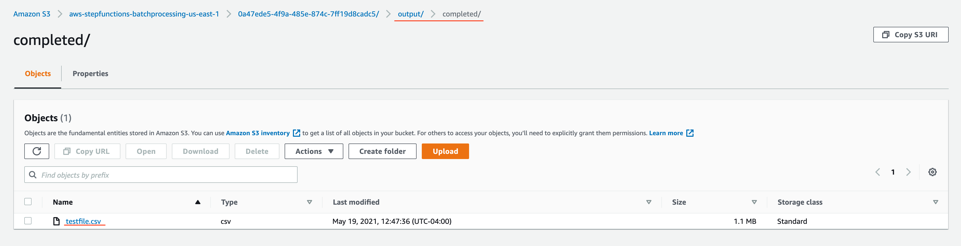
- Open the S3 console and verify the folders created after the process has completed.
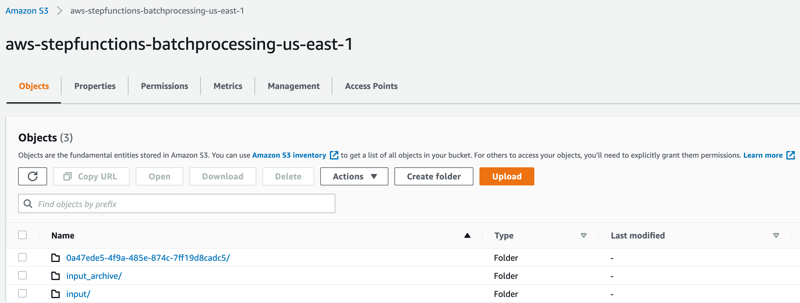
The following subfolders are created after the processing is complete:
– input_archive – Folder for archival of the input object.
– 0a47ede5-4f9a-485e-874c-7ff19d8cadc5 – Subfolder with a unique UUID in the name. This is created for storing the objects generated during batch execution.
- Select the folder 0a47ede5-4f9a-485e-874c-7ff19d8cadc5.
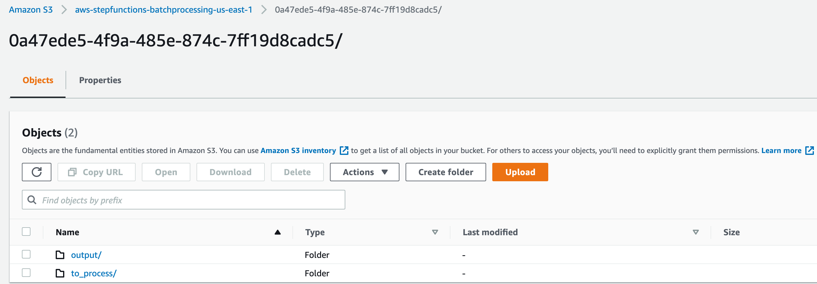
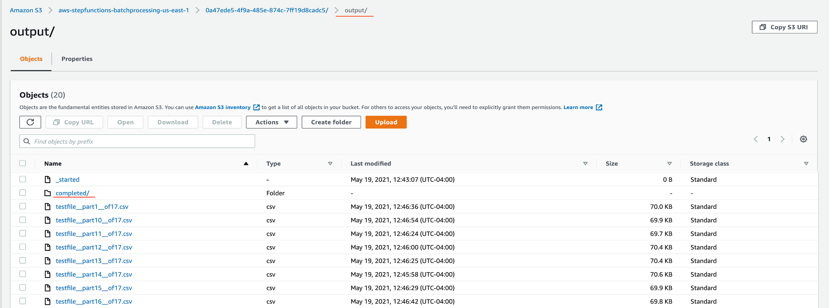
output – This folder contains the completed output objects, some housekeeping files, and processed chunk objects.
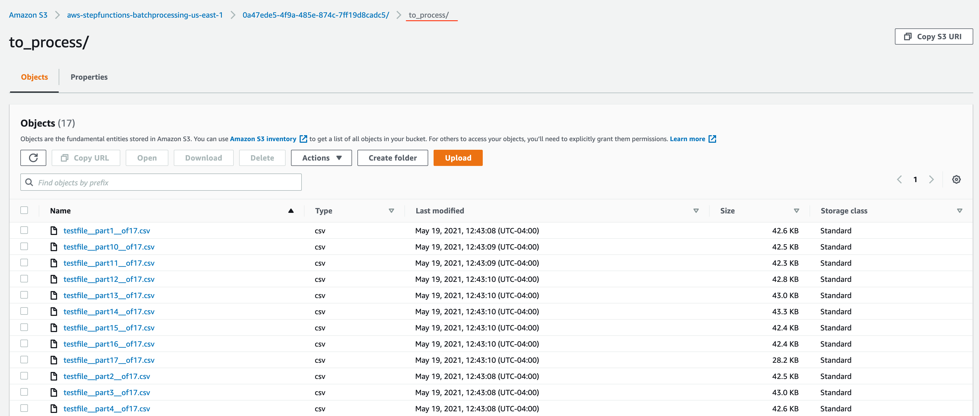
to_process – This folder contains all the split objects from the original input file.
- Open the processed object from the output/completed folder.
Inspect the output object testfile.csv. It is enriched with additional data (columns I through N) from the DynamoDB table fetched through an API call.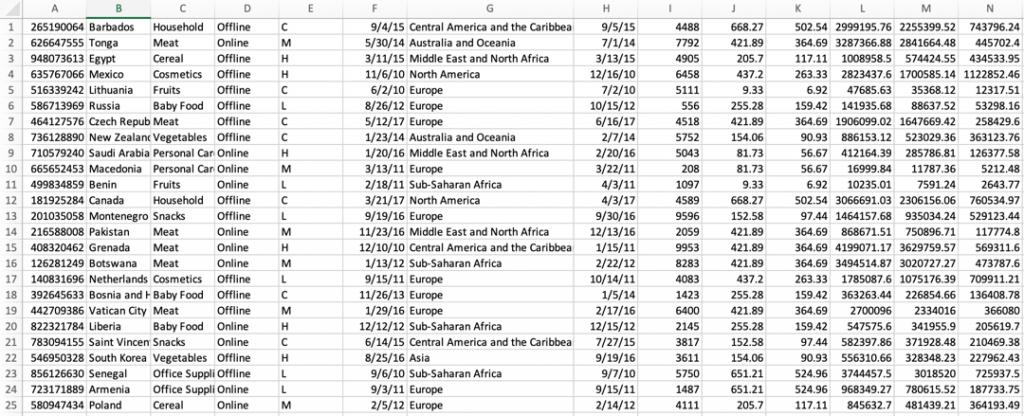
Viewing a completed workflow
Open the Step Functions console and browse to the BlogBatchMainOrchestrator and BlogBatchProcessChunk state machines. Choose one of the executions of each to locate the Graph Inspector. This shows the execution results for each state.
BlogBatchMainOrchestrator:
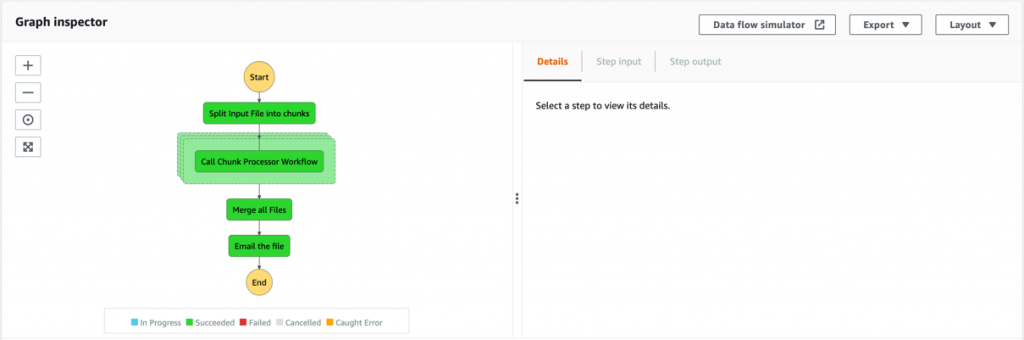
BlogBatchProcessChunk:

Batch performance
For this use case, this is the time taken for the batch to complete, based on the number of input records:
| No. of records |
Time for batch completion |
| 10 k |
5 minutes |
| 100 k |
7 minutes |
The performance of the batch depends on other factors such as the Lambda memory settings and data in the file. Read more about Profiling functions with AWS Lambda Power Tuning.
Conclusion
This blog post shows how to use Step Functions’ features and integrations to orchestrate a batch processing solution. You use two Steps Functions workflows to implement batch processing, with one workflow splitting the original file and a second workflow processing each chunk file.
The overall performance of our batch processing application is improved by splitting the input file into multiple chunks. Each chunk is processed by a separate state machine. Map states further improve the performance and efficiency of workflows by processing individual rows in parallel.
Download the code from this repository to start building a serverless batch processing system.
Additional Resources:
Orchestration examples with Step Functions
Create a Serverless Workflow
Building Business Workflows with AWS Step Functions
Using a Map State to Call Lambda Multiple Times
For more serverless learning resources, visit Serverless Land.
Amazon EC2 Auto Scaling will no longer add support for new EC2 features to Launch Configurations
=======================
This post is written by Scott Horsfield, Principal Solutions Architect, EC2 Scalability and Surabhi Agarwal, Sr. Product Manager, EC2.
In 2010, AWS released launch configurations as a way to define the parameters of instances launched by EC2 Auto Scaling groups. In 2017, AWS released launch templates, the successor of launch configurations, as a way to streamline and simplify the launch process for Auto Scaling, Spot Fleet, Amazon EC2 Spot Instances, and On-Demand Instances. Launch templates define the steps required to create an instance, by capturing instance parameters in a resource that can be used across multiple services. Launch configurations have continued to live alongside launch templates but haven’t benefitted from all of the features we’ve added to launch templates.
Today, AWS is recommending that customers using launch configurations migrate to launch templates. We will continue to support and maintain launch configurations, but we will not be adding any new features to them. We will focus on adding new EC2 features to launch templates only. You can continue using launch configurations, and AWS is committed to supporting applications you have already built using them, but in order for you to take advantage of our most recent and upcoming releases, a migration to launch templates is recommended. Additionally, we plan to no longer support new instance types with launch configurations by the end of 2022. Our goal is to have all customers moved over to launch templates by then.
Moving to launch templates is simple to accomplish and can be done easily today. In this blog, we provide more details on how you can transition from launch configurations to launch templates. If you are unable to transition to launch templates due to lack of tooling or specific functions, or have any concerns, please contact AWS Support.
Launch templates vs. launch configurations
Launch configurations have been a part of Amazon EC2 Auto Scaling Groups since 2010. Customers use launch configurations to define Auto Scaling group configurations that include AMI and instance type definition. In 2017, AWS released launch templates, which reduce the number of steps required to create an instance by capturing all launch parameters within one resource that can be used across multiple services. Since then, AWS has released many new features such as Mixed Instance Policies with Auto Scaling groups, Targeted Capacity Reservations, and unlimited mode for burstable performance instances that only work with launch templates.
Launch templates provide several key benefits to customers, when compared to launch configurations, that can improve the availability and optimization of the workloads you host in Auto Scaling groups and allow you to access the full set of EC2 features when launching instances in an Auto Scaling group.
Some of the key benefits of launch templates when used with Auto Scaling groups include:
Support for multiple instance types and purchase options in a single Auto Scaling group.
Launching Spot Instances with the capacity-optimized allocation strategy.
Support for launching instances into existing Capacity Reservations through an Auto Scaling group.
Support for unlimited mode for burstable performance instances.
Support for Dedicated Hosts.
Combining CPU architectures such as Intel, AMD, and ARM (Graviton2)
Improved governance through IAM controls and versioning.
Automating instance deployment with Instance Refresh.
How to determine where you are using launch configurations
Use the Launch Configuration Inventory Script to find all of the launch configurations in your account. You can use this script to generate an inventory of launch configurations across all regions in a single account or all accounts in your AWS Organization.
The script can be run with a variety of options for different levels of account access. You can learn more about these options in this GitHub post. In its simplest form it will use the default credentials profile to inventory launch configurations across all regions in a single account.

Once the script has completed, you can view the generated inventory.csv file to get a sense of how many launch configurations may need to be converted to launch templates or deleted.

How to transition to launch templates today
If you’re ready to move to launch templates now, making the transition is simple and mostly automated through the AWS Management Console. For customers who do not use the AWS Management Console, most popular Infrastructure as Code (IaC), such as CloudFormation and Terraform, already support launch templates, as do the AWS CLI and SDKs.
To perform this transition, you will need to ensure that your user has the required permissions.
Here are some examples to get you started.
AWS Management Console
- Open the EC2 Launch Configuration console. You must sign in if you are not already authenticated.
- From the Launch Configuration console, click on the Copy to launch template button and select Copy all.
- Alternatively, you can select individual launch configurations, and use the Copy selected option to selectively copy certain launch configurations.

- Review the list of templates and click on the Copy button when you’re ready to proceed.
- Once the copy process has completed, you can close the wizard.
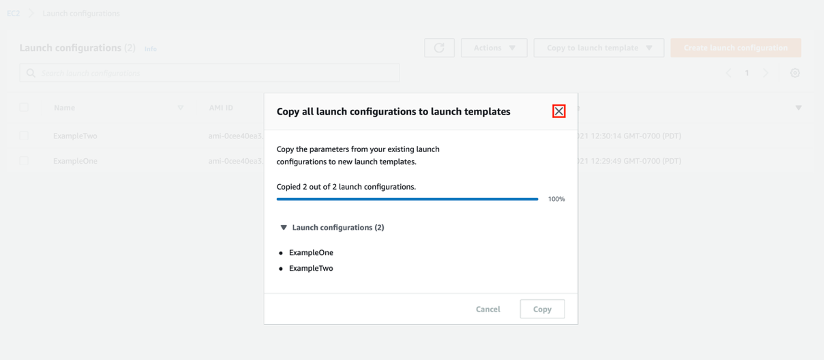
- Navigate to the EC2 Launch Template console to view your newly created launch templates.
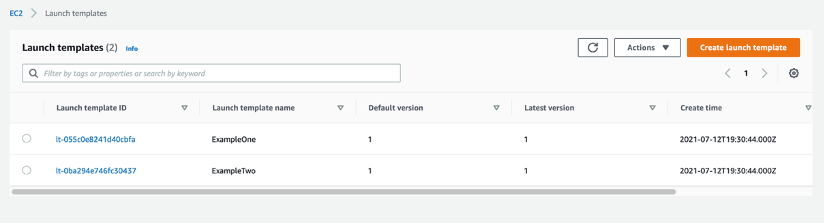
- Your launch templates are now ready to replace launch configurations in your Auto Scaling group configuration. Navigate to the Auto Scaling group console, select your Auto Scaling group, and click on the Edit.
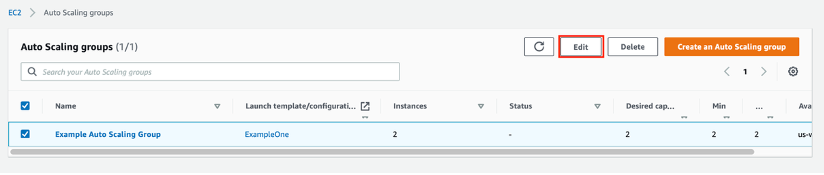
- Next, scroll down to the Launch configuration section, and click Switch to launch template.
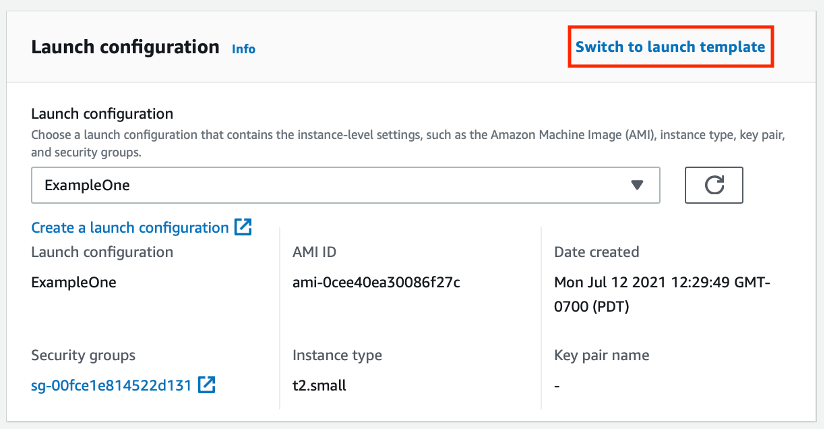
- Select your newly created Launch template, review and confirm your configuration, and when ready scroll down to the bottom of the page and click the Update button.
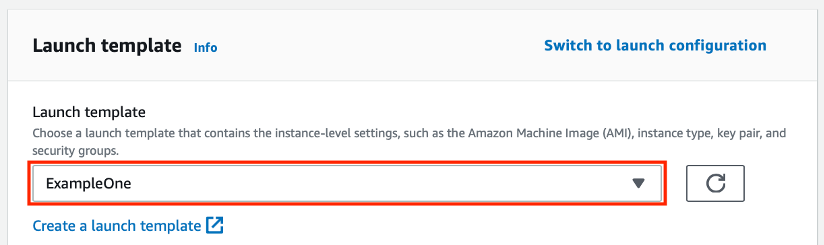
- Now that you’ve migrated your launch configurations to launch templates you can prevent users from creating new launch configurations by updating their IAM permissions to deny the autoscaling:CreateLaunchConfiguration action.
Instances launched by this Auto Scaling group continue to run and are not automatically be replaced by making this change. Any instance launched after making this change uses the launch template for its configuration. As your Auto Scaling group scales up and down, the older instances are replaced. If you’d like to force an update, you can use Instance Refresh to ensure that all instances are running the same launch template and version.
CloudFormation and Terraform
If you use CloudFormation to create and manage your infrastructure, you should use the AWS::EC2::LaunchTemplate resource to create launch templates. After adding a launch template resource to your CloudFormation stack template file update your Auto Scaling group resource definition by adding a LaunchTemplate property and removing the existing LaunchConfigurationName property. We have several examples available to help you get started.
Using launch templates with Terraform is a similar process. Update your template file to include a aws_launch_template resource and then update your aws_autoscaling_group resources to reference the launch template.
In addition to making these changes, you may also want to consider adding a MixedInstancesPolicy to your Auto Scaling group. A MixedInstancesPolicy allows you to configure your Auto Scaling group with multiple instance types and purchase options. This helps improve the availability and optimization of your applications. Some examples of these benefits include using Spot Instances and On-Demand Instances within the same Auto Scaling group, combining CPU architectures such as Intel, AMD, and ARM (Graviton2), and having multiple instance types configured in case of a temporary capacity issue.
You can generate and configure example templates for CloudFormation and Terraform in the AWS Management Console.
AWS CLI
If you’re using the AWS CLI to create and manage your Auto Scaling groups, these examples will show you how to accomplish common tasks when using launch templates.
SDKs
AWS SDKs already include APIs for creating launch templates. If you’re using one of our SDKs to create and configure your Auto Scaling groups, you can find more information in the SDK documentation for your language of choice.
Next steps
We’re excited to help you take advantage of the latest EC2 features by making the transition to launch templates as seamless as possible. As we make this transition together, we’re here to help and will continue to communicate our plans and timelines for this transition. If you are unable to transition to launch templates due to lack of tooling or functionalities or have any concerns, please contact AWS Support. Also, stay tuned for more information on tools to help make this transition easier for you.
Operating serverless at scale: Keeping control of resources – Part 3
=======================
This post is written by Jerome Van Der Linden, Solutions Architect.
In the previous part of this series, I provide application archetypes for developers to follow company best practices and include libraries needed for compliance. But using these archetypes is optional and teams can still deploy resources without them. Even if they use them, the templates can be modified. Developers can remove a layer, over-permission functions, or allow access to APIs without appropriate authorization.
To avoid this, you must define guardrails. Templates are good for providing guidance, best practices and to improve productivity. But they do not prevent actions like guardrails do. There are two kinds of guardrails:
Proactive: you define rules and permissions that avoid some specific actions.
Reactive: you define controls that detect if something happens and trigger notifications to alert someone or remediate actions.
This third part on serverless governance describes different guardrails and ways to implement them.
Implementing proactive guardrails
Proactive guardrails are often the most efficient but also the most restrictive. Be sure to apply them with caution as you could reduce developers’ agility and productivity. For example, test in a sandbox account before applying more broadly.
In this category, you typically find IAM policies and service control policies. This section explores some examples applied to serverless applications.
Controlling access through policies
Part 2 discusses Lambda layers, to include standard components and ensure compliance of Lambda functions. You can enforce the use of a Lambda layer when creating or updating a function, using the following policy. The condition checks if a layer is configured with the appropriate layer ARN:
{
"Version": "2012-10-17",
"Statement": [
{
"Sid": "ConfigureFunctions",
"Effect": "Allow",
"Action": [
"lambda:CreateFunction",
"lambda:UpdateFunctionConfiguration"
],
"Resource": "*",
"Condition": {
"ForAllValues:StringLike": {
"lambda:Layer": [
"arn:aws:lambda:*:123456789012:layer:my-company-layer:*"
]
}
}
}
]
}
When deploying Lambda functions, some companies also want to control the source code integrity and verify it has not been altered. Using code signing for AWS Lambda, you can sign the package and verify its signature at deployment time. If the signature is not valid, you can be warned or even block the deployment.
An administrator must first create a signing profile (you can see it as a trusted publisher) using AWS Signer. Then, a developer can reference this profile in its AWS SAM template to sign the Lambda function code:
Resources:
MyFunction:
Type: AWS::Serverless::Function
Properties:
CodeUri: src/
Handler: app.lambda_handler
Runtime: python3.9
CodeSigningConfigArn: !Ref MySignedFunctionCodeSigningConfig
MySignedFunctionCodeSigningConfig:
Type: AWS::Lambda::CodeSigningConfig
Properties:
AllowedPublishers:
SigningProfileVersionArns:
- arn:aws:signer:eu-central-1:123456789012:/signing-profiles/MySigningProfile
CodeSigningPolicies:
UntrustedArtifactOnDeployment: "Enforce"
Using the AWS SAM CLI and the --signing-profile option, you can package and deploy the Lambda function using the appropriate configuration. Read the documentation for more details.
You can also enforce the use of code signing by using a policy so that every function must be signed before deployment. Use the following policy and a condition requiring a CodeSigningConfigArn:
{
"Version": "2012-10-17",
"Statement": [
{
"Sid": "ConfigureFunctions",
"Effect": "Allow",
"Action": [
"lambda:CreateFunction"
],
"Resource": "*",
"Condition": {
"StringEquals": {
"lambda:CodeSigningConfigArn": "arn:aws:lambda:eu-central-1:123456789012:code-signing-config:csc-0c44689353457652"
}
}
}
]
}
When using Amazon API Gateway, you may want to use a standard authorization mechanism. For example, a Lambda authorizer to validate a JSON Web Token (JWT) issued by your company identity provider. You can do that using a policy like this:
{
"Version": "2012-10-17",
"Statement": [
{
"Sid": "DenyWithoutJWTLambdaAuthorizer",
"Effect": "Deny",
"Action": [
"apigateway:PUT",
"apigateway:POST",
"apigateway:PATCH"
],
"Resource": [
"arn:aws:apigateway:eu-central-1::/apis",
"arn:aws:apigateway:eu-central-1::/apis/??????????",
"arn:aws:apigateway:eu-central-1::/apis/*/authorizers",
"arn:aws:apigateway:eu-central-1::/apis/*/authorizers/*"
],
"Condition": {
"ForAllValues:StringNotEquals": {
"apigateway:Request/AuthorizerUri":
"arn:aws:apigateway:eu-central-1:lambda:path/2015-03-31/functions/arn:aws:lambda:eu-central-1:123456789012:function:MyCompanyJWTAuthorizer/invocations"
}
}
}
]
}
To enforce the use of mutual authentication (mTLS) and TLS version 1.2 for APIs, use the following policy:
{
"Version": "2012-10-17",
"Statement": [
{
"Sid": "EnforceTLS12",
"Effect": "Allow",
"Action": [
"apigateway:POST"
],
"Resource": [
"arn:aws:apigateway:eu-central-1::/domainnames",
"arn:aws:apigateway:eu-central-1::/domainnames/*"
],
"Condition": {
"ForAllValues:StringEquals": {
"apigateway:Request/SecurityPolicy": "TLS_1_2"
}
}
}
]
}
You can apply other guardrails for Lambda, API Gateway, or another service. Read the available policies and conditions for your service here.
Securing self-service with permissions boundaries
When creating a Lambda function, developers must create a role that the function will assume when running. But by giving the ability to create roles to developers, one could elevate their permission level. In the following diagram, you can see that an admin gives this ability to create roles to developers:
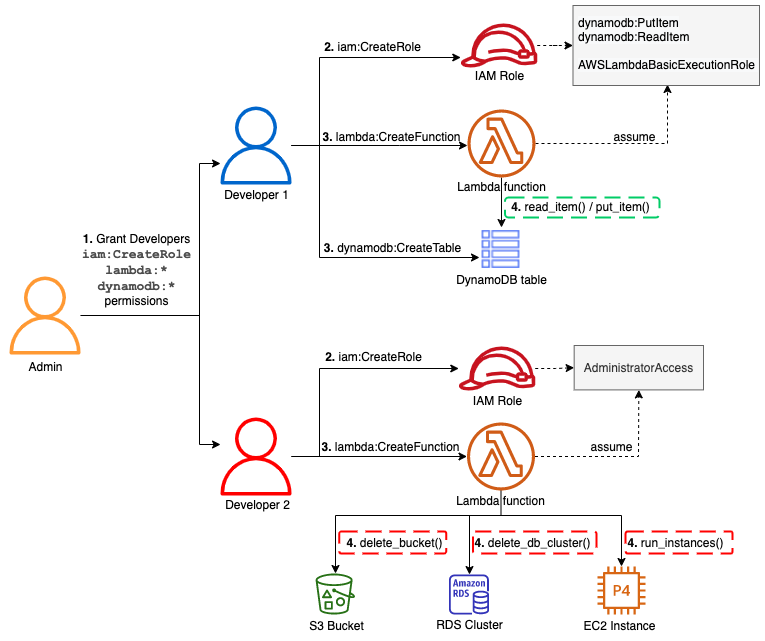
Developer 1 creates a role for a function. This only allows Amazon DynamoDB read/write access and a basic execution role for Lambda (for Amazon CloudWatch Logs). But developer 2 is creating a role with administrator permission. Developer 2 cannot assume this role but can pass it to the Lambda function. This role could be used to create resources on Amazon EC2, delete an Amazon RDS database or an Amazon S3 bucket, for example.
To avoid users elevating their permissions, define permissions boundaries. With these, you can limit the scope of a Lambda function’s permissions. In this example, an admin still gives the same ability to developers to create roles but this time with a permissions boundary attached. Now the function cannot perform actions that exceed this boundary:

The admin must first define the permissions boundaries within an IAM policy:
{
"Version": "2012-10-17",
"Statement": [
{
"Sid": "LambdaDeveloperBoundary",
"Effect": "Allow",
"Action": [
"s3:List*",
"s3:Get*",
"logs:*",
"dynamodb:*",
"lambda:*"
],
"Resource": "*"
}
]
}
Note that this boundary is still too permissive and you should reduce and adopt a least privilege approach. For example, you may not want to grant the dynamodb:DeleteTable permission or restrict it to a specific table.
The admin can then provide the CreateRole permission with this boundary using a condition:
{
"Version": "2012-10-17",
"Statement": [
{
"Sid": "CreateRole",
"Effect": "Allow",
"Action": [
"iam:CreateRole"
],
"Resource": "arn:aws:iam::123456789012:role/lambdaDev*",
"Condition": {
"StringEquals": {
"iam:PermissionsBoundary": "arn:aws:iam::123456789012:policy/lambda-dev-boundary"
}
}
}
]
}
Developers assuming a role lambdaDev* can create a role for their Lambda functions but these functions cannot have more permissions than defined in the boundary.
Deploying reactive guardrails
The principle of least privilege is not always easy to accomplish. To achieve it without this permission management burden, you can use reactive guardrails. Actions are allowed but they are detected and trigger a notification or a remediation action.
To accomplish this on AWS, use AWS Config. It continuously monitors your resources and their configurations. It assesses them against compliance rules that you define and can notify you or automatically remediate to non-compliant resources.
AWS Config has more than 190 built-in rules and some are related to serverless services. For example, you can verify that an API Gateway REST API is configured with SSL or protected by a web application firewall (AWS WAF). You can ensure that a DynamoDB table has back up configured in AWS Backup or that data is encrypted.
Lambda also has a set of rules. For example, you can ensure that functions have a concurrency limit configured, which you should. Most of these rules are part of the “Operational Best Practices for Serverless” conformance pack to ease their deployment as a single entity. Otherwise, setting rules and remediation can be done in the AWS Management Console or AWS CLI.
If you cannot find a rule for your use case in the AWS Managed Rules, you can find additional ones on GitHub or write your own using the Rule Development Kit (RDK). For example, enforcing the use of a Lambda layer for functions. This is possible using a service control policy but it denies the creation or modification of the function if the layer is not provided. You can use this policy in production but you may only want to notify the developers in their sandbox accounts or test environments.
By using the RDK CLI, you can bootstrap a new rule:
rdk create LAMBDA_LAYER_CHECK --runtime python3.9 \
--resource-types AWS::Lambda::Function \
--input-parameters '{"LayerArn":"arn:aws:lambda:region:account:layer:layer_name", "MinLayerVersion":"1"}'
It generates a Lambda function, some tests, and a parameters.json file that contains the configuration for the rule. You can then edit the Lambda function code and the evaluate_compliance method. To check for a layer:
LAYER_REGEXP = 'arn:aws:lambda:[a-z]{2}((-gov)|(-iso(b?)))?-[a-z]+-\d{1}:\d{12}:layer:[a-zA-Z0-9-_]+'
def evaluate_compliance(event, configuration_item, valid_rule_parameters):
pkg = configuration_item['configuration']['packageType']
if not pkg or pkg != "Zip":
return build_evaluation_from_config_item(configuration_item, 'NOT_APPLICABLE',
annotation='Layers can only be used with functions using Zip package type')
layers = configuration_item['configuration']['layers']
if not layers:
return build_evaluation_from_config_item(configuration_item, 'NON_COMPLIANT',
annotation='No layer is configured for this Lambda function')
regex = re.compile(LAYER_REGEXP + ':(.*)')
annotation = 'Layer ' + valid_rule_parameters['LayerArn'] + ' not used for this Lambda function'
for layer in layers:
arn = layer['arn']
version = regex.search(arn).group(5)
arn = re.sub('\:' + version + '$', '', arn)
if arn == valid_rule_parameters['LayerArn']:
if version >= valid_rule_parameters['MinLayerVersion']:
return build_evaluation_from_config_item(configuration_item, 'COMPLIANT')
else:
annotation = 'Wrong layer version (was ' + version + ', expected ' + valid_rule_parameters['MinLayerVersion'] + '+)'
return build_evaluation_from_config_item(configuration_item, 'NON_COMPLIANT',
annotation=annotation)
You can find the complete source of this AWS Config rule and its tests on GitHub.
Once the rule is ready, use the command rdk deploy to deploy it on your account. To deploy it across multiple accounts, see the documentation. You can then define remediation actions. For example, automatically add the missing layer to the function or send a notification to the developers using Amazon Simple Notification Service (SNS).
Conclusion
This post describes guardrails that you can set up in your accounts or across the organization to keep control over deployed resources. These guardrails can be more or less restrictive according to your requirements.
Use proactive guardrails with service control policies to define coarse-grained permissions and block everything that must not be used. Define reactive guardrails for everything else to aid agility and productivity but still be informed of the activity and potentially remediate.
This concludes this series on serverless governance:
Standardization is an important aspect of the governance to speed up teams and ensure that deployed applications are operable and compliant with your internal rules. Use templates, layers, and other mechanisms to create shareable archetypes to apply these standards and rules at the enterprise level.
It’s important to keep visibility and control on your resources, to understand how your environment evolves and to be able to operate and act if needed. Tags and guardrails are helpful to achieve this and they should evolve as your maturity with the cloud evolves.
Find more SCP examples and all the AWS managed AWS Config rules in the documentation.
For more serverless learning resources, visit Serverless Land.
Building dynamic Amazon SNS subscriptions for auto scaling container workloads
=======================
This post is written by Mithun Mallick, Senior Specialist Solutions Architect, App Integration.
Amazon Simple Notification Service (SNS) is a serverless publish subscribe messaging service. It supports a push-based subscriptions model where subscribers must register an endpoint to receive messages. Amazon Simple Queue Service (SQS) is one such endpoint, which is used by applications to receive messages published on an SNS topic.
With containerized applications, the container instances poll the queue and receive the messages. However, containerized applications can scale out for a variety of reasons. The creation of an SQS queue for each new container instance creates maintenance overhead for customers. You must also clean up the SNS-SQS subscription once the instance scales in. The messages are used to update state in all instances and are not pieces of work that need to be done by one of the instances.
This blog walks through a dynamic subscription solution, which automates the creation, subscription, and deletion of SQS queues for an Auto Scaling group of containers running in Amazon Elastic Container Service (ECS).
Overview
The solution is based on the use of events to achieve the dynamic subscription pattern. ECS uses the concept of tasks to create an instance of a container. You can find more details on ECS tasks in the ECS documentation.
This solution uses the events generated by ECS to manage the complete lifecycle of an SNS-SQS subscription. It uses the task ID as the name of the queue that is used by the ECS instance for pulling messages. More details on the ECS task ID can be found in the task documentation.
This also uses Amazon EventBridge to apply rules on ECS events and trigger an AWS Lambda function. The first rule detects the running state of an ECS task and triggers a Lambda function, which creates the SQS queue with the task ID as queue name. It also grants permission to the queue and creates the SNS subscription on the topic.
As the container instance starts up, it can send a request to its metadata URL and retrieve the task ID. The task ID is used by the container instance to poll for messages. If the container instance terminates, ECS generates a task stopped event. This event matches a rule in Amazon EventBridge and triggers a Lambda function. The Lambda function retrieves the task ID, deletes the queue, and deletes the subscription from the SNS topic. The solution decouples the container instance from any overhead in maintaining queues, applying permissions, or managing subscriptions. The security permissions for all SNS-SQS management are handled by the Lambda functions.
This diagram shows the solution architecture:

Events from ECS are sent to the default event bus. There are various events that are generated as part of the lifecycle of an ECS task. You can find more on the various ECS task states in ECS task documentation. This solution uses ECS as the container orchestration service but you can also use Amazon Elastic Kubernetes Service.(EKS). For EKS, you must apply the rules for EKS task state events.
Walkthrough of the implementation
The code snippets are shortened for brevity. The full source code of the solution is in the GitHub repository. The solution uses AWS Serverless Application Model (AWS SAM) for deployment.
SNS topic
The SNS topic is used to send notifications to the ECS tasks. The following snippet from the AWS SAM template shows the definition of the SNS topic:
  SNSDynamicSubsTopic:
Type: AWS::SNS::Topic
Properties:
TopicName: !Ref DynamicSubTopicName
Container instance
The container instance subscribes to the SNS topic using an SQS queue. The container image is a Java class that reads messages from an SQS queue and prints them in the logs. The following code shows some of the message processor implementation:
AmazonSQS sqs = AmazonSQSClientBuilder.defaultClient();
AmazonSQSResponder responder = AmazonSQSResponderClientBuilder.standard()
.withAmazonSQS(sqs)
.build();
SQSMessageConsumer consumer = SQSMessageConsumerBuilder.standard()
.withAmazonSQS(responder.getAmazonSQS())
.withQueueUrl(queue_url)
.withConsumer(message -> {
System.out.println("The message is " + message.getBody());
sqs.deleteMessage(queue_url,message.getReceiptHandle());
}).build();
consumer.start();
The queue_url highlighted is the task ID of the ECS task. It is retrieved in the constructor of the class:
String metaDataURL = map.get("ECS_CONTAINER_METADATA_URI_V4");
HttpGet request = new HttpGet(metaDataURL);
CloseableHttpResponse response = httpClient.execute(request);
HttpEntity entity = response.getEntity();
if (entity != null) {
String result = EntityUtils.toString(entity);
String taskARN = JsonPath.read(result, "$['Labels']['com.amazonaws.ecs.task-arn']").toString();
String[] arnTokens = taskARN.split("/");
taskId = arnTokens[arnTokens.length-1];
System.out.println("The task arn : "+taskId);
}
queue_url = sqs.getQueueUrl(taskId).getQueueUrl();
The queue URL is constructed from the task ID of the container. Each queue is dedicated to each of the tasks or the instances of the container running in ECS.
EventBridge rules
The following event pattern on the default event bus captures events that match the start of the container instance. The rule triggers a Lambda function:
      EventPattern:
source:
- aws.ecs
detail-type:
- "ECS Task State Change"
detail:
desiredStatus:
- "RUNNING"
lastStatus:
- "RUNNING"
The start rule routes events to a Lambda function that creates a queue with the name as the task ID. It creates the subscription to the SNS topic and grants permission on the queue to receive messages from the topic.
This event pattern matches STOPPED events of the container task. It also triggers a Lambda function to delete the queue and the associated subscription:
      EventPattern:
source:
- aws.ecs
detail-type:
- "ECS Task State Change"
detail:
desiredStatus:
- "STOPPED"
lastStatus:
- "STOPPED"
Lambda functions
There are two Lambda functions that perform the queue creation, subscription, authorization, and deletion.
The SNS-SQS-Subscription-Service
The following code creates the queue based on the task id, applies policies, and subscribes it to the topic. It also stores the subscription ARN in a Amazon DynamoDB table:
# get the task id from the event
taskArn = event['detail']['taskArn']
taskArnTokens = taskArn.split('/')
taskId = taskArnTokens[len(taskArnTokens)-1]
create_queue_resp = sqs_client.create_queue(QueueName=queue_name)
response = sns.subscribe(TopicArn=topic_arn, Protocol="sqs", Endpoint=queue_arn)
ddbresponse = dynamodb.update_item(
TableName=SQS_CONTAINER_MAPPING_TABLE,
Key={
'id': {
'S' : taskId.strip()
}
},
AttributeUpdates={
'SubscriptionArn':{
'Value': {
'S': subscription_arn
}
}
},
ReturnValues="UPDATED_NEW"
)
The cleanup service
The cleanup function is triggered when the container instance is stopped. It fetches the subscription ARN from the DynamoDB table based on the taskId. It deletes the subscription from the topic and deletes the queue. You can modify this code to include any other cleanup actions or trigger a workflow. The main part of the function code is:
taskId = taskArnTokens[len(taskArnTokens)-1]
ddbresponse = dynamodb.get_item(TableName=SQS_CONTAINER_MAPPING_TABLE,Key={'id': { 'S' : taskId}})
snsresp = sns.unsubscribe(SubscriptionArn=subscription_arn)
queuedelresp = sqs_client.delete_queue(QueueUrl=queue_url)
Conclusion
This blog shows an event driven approach to handling dynamic SNS subscription requirements. It relies on the ECS service events to trigger appropriate Lambda functions. These create the subscription queue, subscribe it to a topic, and delete it once the container instance is terminated.
The approach also allows the container application logic to focus only on consuming and processing the messages from the queue. It does not need any additional permissions to subscribe or unsubscribe from the topic or apply any additional permissions on the queue. Although the solution has been presented using ECS as the container orchestration service, it can be applied for EKS by using its service events.
For more serverless learning resources, visit Serverless Land.
Page 1|Page 2|Page 3|Page 4