Contents of this page is copied directly from AWS blog sites to make it Kindle friendly. Some styles & sections from these pages are removed to render this properly in 'Article Mode' of Kindle e-Reader browser. All the contents of this page is property of AWS.
Page 1|Page 2|Page 3|Page 4
AWS Control Tower Account vending through Amazon Lex ChatBot
=======================
In this blog post you will learn about a multi-environment solution that uses a cloud native CICD pipeline to build, test, and deploy a Serverless ChatOps bot that integrates with AWS Control Tower Account Factory for AWS account vending. This solution can be used and integrated with any of your favourite request portal or channel that allows to call a RESTFUL API endpoint, for you to offer AWS Account vending at scale for your enterprise.
Introduction
Most of the AWS Control Tower customers use the AWS Control Tower Account Factory (an AWS Service Catalog product built on AWS CloudFormation), and the AWS Service Catalog service to vend standardized services and products into AWS Accounts. ChatOps is a collaboration model that interconnects a process with people, tools, and automation. It combines a Bot that can fulfill service requests (the work needed) and be augmented by Ops and Engineering staff in order to allow approval processes or corrections in the case of exception request. Major tasks in the public Cloud go toward building a proper foundation (the so called LandingZone). The main goals of this foundation are providing not only an AWS Account access (with the right permissions), but also the correct Cloud Center of Excellence (CCoE) approved products and services. This post demonstrates how to utilize the existing AWS Control Tower Account Factory, extending the Service Catalog portfolio in Control Tower with additional products, and executing Account vending and Product vending through an easy ChatBot interface. You will also learn how to utilize this Solution with Slack. But it can also be easily utilized with Chime/MS Teams or a normal Web-frontend, as the integration is channel-agnostig through an API Gateway integration layer. Then, you will combine all of this, integrating a ChatBot frontend where users can issue requests against the CCoE and Ops team to fulfill AWS services easily and transparently. As a result, you experience a more efficient process for vending AWS Accounts and Products and taking away the burden on your Cloud Operations team.
Background
An AWS Account Factory Account is an AWS account provisioned using the account vending capability in AWS Control Tower.
AWS Service Catalog lets you to centrally manage commonly deployed IT services. For this blog, the Control Tower Account Factory utilizes AWS Service Catalog to provision new AWS accounts.
A Control Tower provisioned product is an instance of the Control Tower Account Factory product that is provisioned by AWS Service Catalog. In this post, any new AWS account created through the ChatOps solution will be a provisioned product and visible in Service Catalog.
Amazon Lex: is a service for building conversational interfaces into any application using voice and text
Architecture Overview
The following architecture shows the overview of the solution which will be built with the code provided through Github.
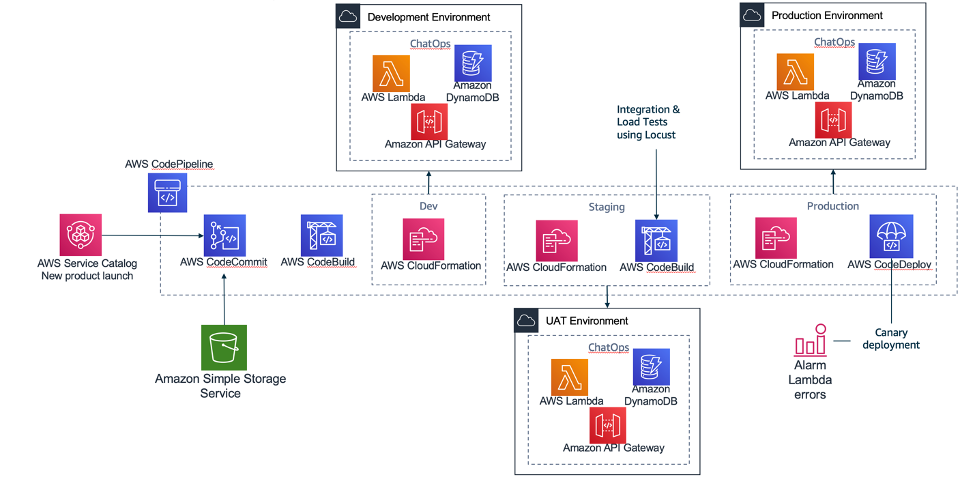
The multi-environment pipeline is building three environments (Dev, Staging, Production) with different quality gates to push changes on this solution from a “Development Environment” up to a “Production environment”. This will make sure that your AWS ChatBot and the account vending is scalable and fully functional before you release it to production and make it available to your end-users.
AWS Code Commit: There are two repositories used, one repository where Amazon Lex bot is created through a Java-Lambda function and installed in STEP 1. And one for the Amazon Lex bot APIs that are running and capturing the Account vending requests behind API Gateway and then communicating with the Amazon Lex Bot.
AWS Code Pipeline: It integrates Amazon CodeCommit, Amazon CodeBuild and Amazon CodeDeploy, to be manage your release pipelines moving from Dev to Production.
AWS Code Build: Each different activity executed inside the pipeline is a CodeBuild activity. Inside the source code repository there are different files with the prefix buildspec. Each of these files contains the exact commands that the code build must execute on each of the stages: build/test.
AWS Code Deploy: This is an AWS service that manages the deployment of the serverless application stack. In this solution it implements a canary deployment where in the first minute we switch 10% of the requests to the new version of it which will allow to test the scaling of the solution.
AWS ControlTower Account Vending integration and ChatOps bot architecture
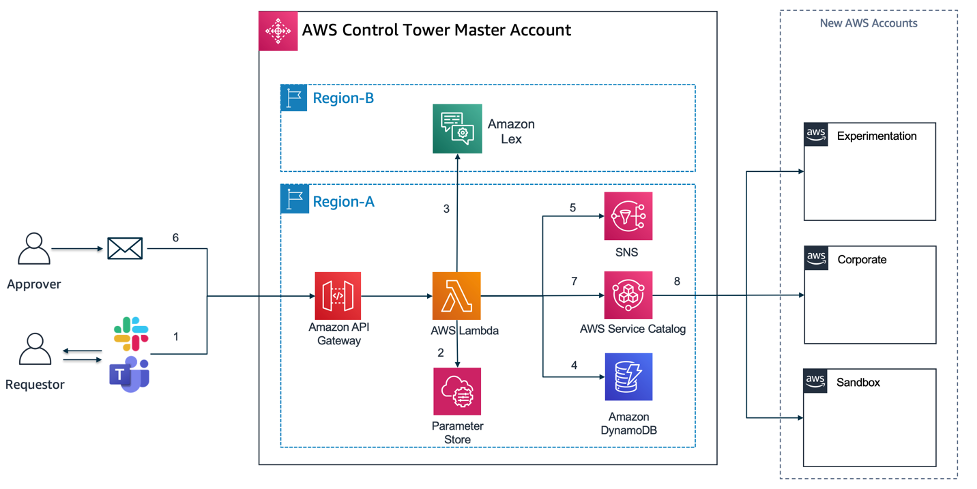
The actual Serverless Application architecture built with Amazon Lex and the Application code in Lambda accessible through Amazon API Gateway, which will allow you to integrate this solution with almost any front-end (Slack, MS Teams, Website).
Amazon Lex: With Amazon Lex, the same deep learning technologies that power Amazon Alexa are now available to any developer, enabling you to quickly and easily build sophisticated, natural language, conversational bots (“chatbots”). As Amazon lex is not available yet in all AWS regions that currently AWS Control Tower is supported, it may be that you want to deploy Amazon Lex in another region than you have AWS Control Tower deployed.
Amazon API Gateway / AWS Lambda: The API Gateway is used as a central entry point for the Lambda functions (AccountVendor) that are capturing the Account vending requests from a frontend (e.g. Slack or Website). As Lambda functions can not be exposed directly as a REST service, they need a trigger which in this case API Gateway does.
Amazon SNS: Amazon Simple Notification Service (Amazon SNS) is a fully managed messaging service. SNS is used to send notifications via e-mail channel to an approver mailbox.
Amazon DynamoDB: Amazon DynamoDB is a key-value and document database that delivers single-digit millisecond performance at any scale. It’s a fully managed, multi-region, multi-active, durable database. Amazon DynamoDB will store the Account vending requests from the Lambda code that get triggered by the Lex-bot interaction.
Solution Overview and Prerequisites
Solution Overview
Start with building these 2 main components of the Architecture through an automated script. This will be split into “STEP 1”, and “STEP 2” in this walkthrough. “STEP 3” and “STEP 4” will be testing the solution and then integrating the solution with a frontend, in this case we use Slack as an example and also provide you with the Slack App manifest file to build the solution quickly.
STEP 1) “Install Amazon Lex Bot”: The key part of the left side of the Architecture, the Amazon Lex Bot called (“ChatOps” bot) will be built in a first step, then
STEP 2) “Build of the multi-environment CI/CD pipeline”: Build and deploy a full load testing DevOps pipeline that will stresstest the Lex bot and its capabilities to answer to requests. This will build the supporting components that are needed to integrate with Amazon Lex and are described below (Amazon API Gateway, AWS Lambda, Amazon DynamoDB, Amazon SNS).
STEP 3) “Testing the ChatOps Bot”: We will execute some test scripts through Postman, that will trigger Amazon API Gateway and trigger a sample Account request that will require a feedback from the ChatOps Lex Bot.
STEP 4) “Integration with Slack”: The final step is an end-to-end integration with an communication platform solution such as Slack.
The DevOps pipeline (using CodePipeline, CodeCommit, CodeBuild and CodeDeploy) is automatically triggered when the stack is deployed and the AWS CodeCommit repository is created inside the account. The pipeline builds the Amazon Lex ChatOps bot from the source code. The Step 2 integrates the surrounding components with the ChatOps Lex bot in 3 different environments: Dev/Staging/Prod. In addition to that, we use canary deployment to promote updates in the Lambda code from the AWS CodeCommit repository. During the canary deployment we implemented the rollback procedure using a log metric filter that scans the word Exception inside the log file in CloudWatch. When the word is found, an alarm is triggered and deployment is automatically rolled back. Usually, the rollback will occur automatically during the load test phase. This would prevent faulty code from being promoted into the production environment.
Prerequisites
For this walkthrough, you should have the following prerequisites ready. What you’ll need:
An AWS account
A ready AWS ControlTower deployment (needs 3 AWS Accounts/e-mail addresses)
AWS Cloud9 IDE or a development environment with access to download/run the scripts provided through Github
You need to log into the AWS Control Tower management account with AWSAdministratorAccess role if using AWS SSO or equivalent permissions if you are using other federations.
Walkthrough
To get started, you can use Cloud9 IDE or log into your AWS SSO environment within AWS Control Tower.
- Prepare: Set up the sample solution
Log in to your AWS account and open Cloud9.
1.1. Clone the GitHub repository to your Cloud9 environment.
The complete solution can be found at the GitHub repository here. The actual deployment and build are scripted in shell, but the Serverless code is in Java and uses Amazon Serverless services to build this solution (Amazon API Gateway, Amazon DynamoDB, Amazon SNS and Amazon Lex).
git clone https://github.com/aws-samples/multi-environment-chatops-bot-for-controltower
- STEP 1: Install Amazon Lex Bot
Amazon Lex is currently not deployable natively with Amazon CloudFormation. Therefore the solution is using a custom Lambda resource in Amazon CloudFormation to create the Amazon Lex bot. We will create the Lex bot, along some sample utterances, three custom slots (Account Type, Account E-Mail and Organizational OU) and one main intent (“Control Tower Account Vending Intent”) to capture the request to trigger an AWS Account vending process.
2.1. Start the script, “deploy.sh” and provide the below inputs. Select a project name. You can override it if you wan’t to choose a custom name and select the bucket name accordingly (we recommend to use the default names)
./deploy.sh
Choose a project name [chatops-lex-bot-xyz]:
Choose a bucket name for source code upload [chatops-lex-bot-xyz]:
2.2. To confirm, double check the AWS region you have specificed.
Attention: Make sure you have configured your AWS CLI region! (use either 'aws configure' or set your 'AWS_DEFAULT_REGION' variable).
Using region from $AWS_DEFAULT_REGION: eu-west-1
2.3. Then, make sure you choose the region where you want to install Amazon Lex (make sure you use an available AWS region where Lex is available), or use the default and leave empty. The Amazon Lex AWS region can be different as where you have AWS ControlTower deployed.
Choose a region where you want to install the chatops-lex-bot [eu-west-1]:
Using region eu-west-1
2.4. The script will create a new S3 bucket in the specified region in order to upload the code to create the Amazon Lex bot.
Creating a new S3 bucket on eu-west-1 for your convenience...
make_bucket: chatops-lex-bot-xyz
Bucket chatops-lex-bot-xyz successfully created!
2.5. We show a summary of the bucket name and the project being used.
Using project name................chatops-lex-bot-xyz
Using bucket name.................chatops-lex-bot-xyz
2.6 Make sure that if any of these names or outputs are wrong, you can still stop here by pressing Ctrl+c.
If these parameters are wrong press ctrl+c to stop now...
2.7 The script will upload the source code to the S3 bucket specified, you should see a successful upload.
Waiting 9 seconds before continuing
upload: ./chatops-lex-bot-xyz.zip to s3://chatops-lex-bot-xyz/chatops-lex-bot-xyz.zip
2.8 Then, the script will trigger an aws cloudformation package command, that will use the uploaded zip file, reference it and generate a ready CloudFormation yml file for deployment. The output of the generated package-file (devops-packaged.yml) will be stored locally and used to executed the aws cloudformation deploy command.
Successfully packaged artifacts and wrote output template to file devops-packaged.yml.
Note: You can ignore this part below as the shell script will execute the “aws cloudformation deploy” command for you.
Execute the following command to deploy the packaged template
aws cloudformation deploy --template-file devops-packaged.yml --stack-name <YOUR STACK NAME>
2.9 The AWS CloudFormation scripts should be running in the background
Waiting for changeset to be created..
Waiting for stack create/update to complete
Successfully created/updated stack - chatops-lex-bot-xyz-cicd
2.10 Once you see the successful output of the CloudFormation script “chatops-lex-bot-xyz-cicd”, everything is ready to continue.
------------------------------------------
ChatOps Lex Bot Pipeline is installed
Will install the ChatOps API as an Add-On to the Vending Machine
------------------------------------------
2.11 Before we continue, confirm the output of the AWS CloudFormation called “chatops-lex-bot-xyz-cicd”. You should find three outputs from the CloudFormation template.
A CodePipeline, CodeCommit Repository with the same naming convention (chatops-lex-bot-xyz), and a CodeBuild execution with one stage (Prod). The execution of this pipeline should show as “Succeeded” within CodePipeline.
As a successful result of the execution of the Pipeline, you should find another CloudFormation that was triggered, which you should find in the output of CodeBuild or the CloudFormation Console (chatops-lex-bot-xyz-Prod).
The created resource of this CloudFormation will be the Lambda function (chatops-lex-bot-xyz-Prod-AppFunction-abcdefgh) that will create the Amazon Lex Bot. You can find the details in Amazon Lambda in the Mgmt console. For more information on CloudFormation and custom resources, see the CloudFormation documentation.
You can find the successful execution in the CloudWatch Logs:
Adding Slot Type:: AccountTypeValues
Adding Slot Type:: AccountOUValues
Adding Intent:: AWSAccountVending
Adding LexBot:: ChatOps
Adding LexBot Alias:: AWSAccountVending
Check if the Amazon Lex bot has been created in the Amazon Lex console, you should see an Amazon Lex bot called “ChatOps” with the status “READY”.
2.12. This means you have successfully installed the ChatOps Lex Bot. You can now continue with STEP 2.
- STEP 2. Build of the multi-environment CI/CD pipeline
In this section, we will finalize the set up by creating a full CI/CD Pipeline, the API Gateway and Lambda functions that can capture requests for Account creation (AccountVendor) and interact with Amazon Lex, and a full testing cycle to do a Dev-Staging-Production build pipeline that does a stress test on the whole set of Infrastructure created.
3.1 You should see the same name of the bucket and project as used previously. If not, please override the input here. Otherwise, leave empty (we recommend to use the default names).
Choose a bucket name for source code upload [chatops-lex-xyz]:
3.2. This means that the Amazon Lex Bot was successfully deployed, and we just confirm the deployed AWS region.
ChatOps-Lex-Bot is already deployed in region eu-west-1
3.3 Please specify a mailbox that you have access in order to approve new ChatOps (e.g. Account vending) vending requests as a manual approver step.
Choose a mailbox to receive approval e-mails for new accounts: mail+chatops-lex-bot-xyz@yourdomain.com
3.4 Make sure you have the right AWS region where AWS Control Tower has deployed its Account Factory Portfolio product in Service Catalog (to double check you can log into AWS Service Catalog and confirm that you see the AWS Control Tower Account Factory)
Choose the AWS region where your vending machine is installed [eu-west-1]:
Using region eu-west-1
Creating a new S3 bucket on eu-west-1 for your convenience...
{
"Location": "http://chatops-lex-xyz.s3.amazonaws.com/"
}
Bucket chatops-lex-xyz successfully created!
3.5 Now the script will identify if you have Control Tower deployed and if it can identify the Control Tower Account Factory Product.
Trying to find the AWS Control Tower Account Factory Portfolio
Using project name....................chatops-lex-xyz
Using bucket name.....................chatops-lex-xyz
Using mailbox for approvals...........approvermail+chatops-lex-bot-xyz@yourdomain.com
Using lexbot region...................eu-west-1
Using service catalog portfolio-id....port-abcdefghijklm
If these parameters are wrong press ctrl+c to stop now…
3.6 If something is wrong or has not been set and you see an empty line for any of the, stop here and press ctr+c. Check the Q&A section if you might have missed some errors previously. These values need to be filled to proceed.
Waiting 1 seconds before continuing
[INFO] Scanning for projects...
[INFO] Building Serverless Jersey API 1.0-SNAPSHOT
3.7 You should see a “BUILD SUCCESS” message.
[INFO] BUILD SUCCESS
[INFO] Total time: 0.190 s
3.8 Then the package built locally will be uploaded to the S3 bucket, and then again prepared for Amazon CloudFormation to package- and deploy.
upload: ./chatops-lex-xyz.zip to s3://chatops-lex-xyz/chatops-lex-xyz.zip
Successfully packaged artifacts and wrote output template to file devops-packaged.yml.
Execute the following command to deploy the packaged template
aws cloudformation deploy --template-file devops-packaged.yml --stack-name <YOUR STACK NAME>
3.9 You can neglect the above message, as the shell script will execute the Cloudformation API for you. The AWS CloudFormation scripts should be running in the background, and you can double check in the AWS Mgmt Console.
Waiting for changeset to be created..
Waiting for stack create/update to complete
Successfully created/updated stack - chatops-lex-xyz-cicd
------------------------------------------
ChatOps Lex Pipeline and Chatops Lex Bot Pipelines successfully installed
------------------------------------------
3.10 This means that the Cloud Formation scripts have executed successfully. Lets confirm in the Amazon CloudFormation console, and in Code Pipeline if we have a successful outcome and full test-run of the CICD pipeline. To remember, have a look at the AWS Architecture overview and the resources / components created.
You should find the successful Cloud Formation artefacts named:
chatops-lex-xyz-cicd: This is the core CloudFormation that we created and uploaded that built a full CI/CD pipeline with three phases (DEV/STAGING/PROD). All three stages will create a similar set of AWS resources (e.g. Amazon API Gateway, AWS Lambda, Amazon DynamoDB), but only the Staging phase will run an additional Load-Test prior to doing the production release.
chatops-lex-xyz-DEV: A successful build, creation and deployment of the DEV environment.
chatops-lex-xyz-STAGING: The staging phase will run a set of load tests, for a full testing and through io (an open-source load testing framework)
chatops-lex-xyz-PROD: A successful build, creation and deployment of the Production environment.
3.11 For further confirmation, you can check the Lambda-Functions (chatops-lex-xyz-pipeline-1-Prod-ChatOpsLexFunction-), Amazon DynamoDB (chatops-lex-xyz-pipeline-1_account_vending_) and Amazon SNS (chatops-lex-xyz-pipeline-1_aws_account_vending_topic_Prod) if all the resources as shown in the Architecture picture have been created.
Within Lambda and/or Amazon API Gateway, you will find the API Gateway execution endpoints, same as in the Output section from CloudFormation:
ApiUrl: https://apiId.execute-api.eu-west-1.amazonaws.com/Prod/account
ApiApproval https://apiId.execute-api.eu-west-1.amazonaws.com/Prod/account/confirm
3.11 This means you have successfully installed the Amazon Lex ChatOps bot, and the surrounding test CI/CD pipeline. Make sure you have accepted the SNS subscription confirmation.
AWS Notification - Subscription Confirmation
You have chosen to subscribe to the topic:
arn:aws:sns:eu-west-1:12345678901:chatops-lex-xyz-pipeline_aws_account_vending_topic_Prod
To confirm this subscription, click or visit the link below (If this was in error no action is necessary)
- STEP 3: Testing the ChatOps Bot
In this section, we provided a test script to test if the Amazon Lex Bot is up and if Amazon API Gateway/Lambda are correctly configured to handle the requests.
4.1 Use the Postman script under the /test folder postman-test.json, before you start integrating this solution with a Chat or Web- frontend such as Slack or a custom website in Production.
4.2. You can import the JSON file into Postman and execute a RESTful test call to the API Gateway endpoint.
4.3 Once the script is imported in Postman, you should execute the two commands below and replace the HTTP URL of the two requests (Vending API and Confirmation API) by the value of APIs recently created in the Production environment. Alternatively, you can also access these values directly from the Output tab in the CloudFormation stack with a name similar to chatops-lex-xyz-Prod:
aws cloudformation describe-stacks --query "Stacks[0].Outputs[?OutputKey=='ApiUrl'].OutputValue" --output text
aws cloudformation describe-stacks --query "Stacks[0].Outputs[?OutputKey=='ApiApproval'].OutputValue" --output text
4.4 Execute an API call against the PROD API
Use the Amazon API Gateaway endpoint to trigger a REST call against the endpoint, an example would be https://apiId.execute-api.eu-west-1.amazonaws.com/Prod/account/. Make sure you change the “apiId” with your Amazon Gateway API ID endpoint found in the above sections (CloudFormation Output or within the Lambda), see here the start of the parameters that you have to change in the postman-test.json file:
"url": {
"raw": "https://apiId.execute-api.us-east-1.amazonaws.com/Prod/account",
"protocol": "https",
Request Input, fill out and update the values on each of the JSON sections:
{ “UserEmail”: “user@yourdomain.com”, “UserName”:“TestUser-Name”, “UserLastname”: “TestUser-LastName”, “UserInput”: “Hi, I would like a new account please!”}
If the test response is SUCCESSFUL, you should see the following JSON as a return:
{"response": "Hi TestUser-Name, what account type do you want? Production or Sandbox?","initial-params": "{\"UserEmail\": \"user@yourdomain.com\",\"UserName\":\"TestUser-Name\",\"UserLastname\": \"TestUser-LastName\",\"UserInput\": \"Hi, I would like a new account please!\"}"}
4.5 Test the “confirm” action. To confirm the Account vending request, you can easily execute the /confirm API, which is similar to if you would confirm the action through the e-mail confirmation that you receive via Amazon SNS.
Make sure you change the following sections in Postman (Production-Confirm-API) and use the ApiApproval-apiID that has the /confirm path.
https://apiId.execute-api.eu-west-1.amazonaws.com/Prod/account/confirm
- STEP 4: Slack Integration Example
We will demonstrate you how to integrate with a Slack channel but any other request portal (Jira), Website or App that allows REST API integrations (e.g. Amazon Chime) could be used for this.
5.1 Use the attached YAML slack App manifest file to create a new Slack Application within your Organization. Go to “https://api.slack.com/apps?new_app=1” and choose “Create New App”.
5.2 Choose the “From an app manifest” to create a new Slack App and paste the sample code from the /test folder slack-app-manifest.yml .
Note: Make sure you first overwrite the request_url parameter for your Slack App that will point to the Production API Gateway endpoint.
request_url: https://apiId.execute-api.us-east-1.amazonaws.com/Prod/account"
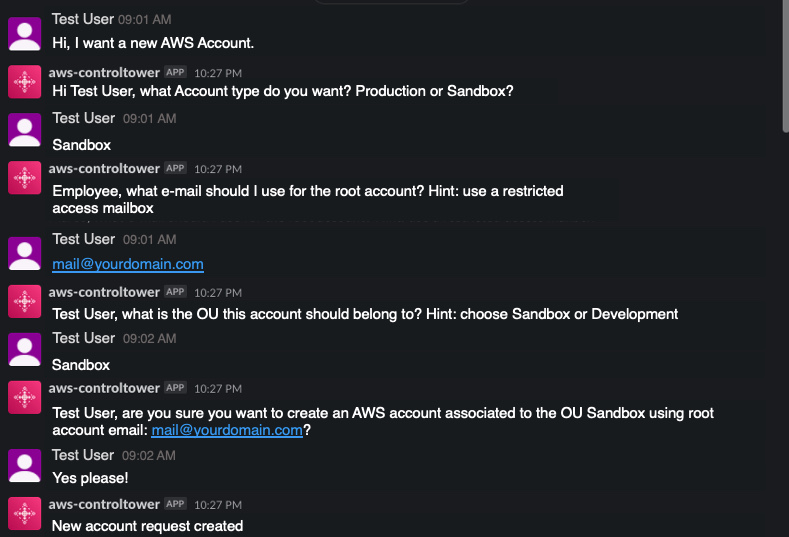
5.3 Choose to deploy and re-install the Slack App to your workspace and then access the ChatBot Application within your Slack workspace. If everything is successful, you can see a working Serverless ChatBot as shown below.
Conclusion and Cleanup
Conclusion
In this blog post, you have learned how to create a multi-environment CICD pipeline that builds a fully Serverless AWS account vending solution using an AI powered Amazon Lex bot integrated with AWS Control Tower Account Factory. This solution will help you enable standardized account vending on AWS through an easy way by exposing a ChatBot to your AWS consumers coming from various channels. This solution can be extended with AWS ServiceCatalog to allow to launch not just AWS accounts, but almost any AWS Service by using IaC (CloudFormation) templates provided through the CCoE Ops and Architecture teams.
Cleanup
For a proper cleanup, you can just go into AWS CloudFormation and choose the deployed Stacks and choose to “delete Stack”. If you incur issues while deleting, see below troubleshooting solutions for a fix. Also make sure you delete your integration Apps (e.g. Slack) for a full cleanup.
Troubleshooting
- An error occurred (BucketAlreadyOwnedByYou) when calling the CreateBucket operation: Your previous request to create the named bucket succeeded and you already own it.
Solution: Make sure you use a distinct name for the S3 bucket used in this project, for the Amazon Lex Bot and the CICD pipeline
- When you delete and rollback of the CloudFormation stacks and you get an error (Code: 409; Error Code: BucketNotEmpty).
Solution: Delete the S3 build bucket and its content “delete permanently” and then delete the associated CloudFormation stack that has created the CICD pipeline.
Automated security and compliance remediation at HDI
=======================
with Dr. Malte Polley (HDI Systeme AG – Cloud Solutions Architect)
At HDI, one of the biggest European insurance group companies, we use AWS to build new services and capabilities and delight our customers. Working in the financial services industry, the company has to comply with numerous regulatory requirements in the areas of data protection and FSI regulations such as GDPR, German Supervisory Requirements for IT (VAIT) and Supervision of Insurance Undertakings (VAG). The same security and compliance assessment process in the cloud supports development productivity and organizational agility, and helps our teams innovate at a high pace and meet the growing demands of our internal and external customers.
In this post, we explore how HDI adopted AWS security and compliance best practices. We describe implementation of automated security and compliance monitoring of AWS resources using a combination of AWS and open-source solutions. We also go through the steps to implement automated security findings remediation and address continuous deployment of new security controls.
Background
Data analytics is the key capability for understanding our customers’ needs, driving business operations improvement, and developing new services, products, and capabilities for our customers. We needed a cloud-native data platform of virtually unlimited scale that offers descriptive and prescriptive analytics capabilities to internal teams with a high innovation pace and short experimentation cycles. One of the success metrics in our mission is time to market, therefore it’s important to provide flexibility to internal teams to quickly experiment with new use cases. At the same time, we’re vigilant about data privacy. Having a secure and compliant cloud environment is a prerequisite for every new experiment and use case on our data platform.
Cloud security and compliance implementation in the cloud is a shared effort between the Cloud Center of Competence team (C3), the Network Operation Center (NoC), and the product and platform teams. The C3 team is responsible for new AWS account provisioning, account security, and compliance baseline setup. Cross-account networking configuration is established and managed by the NoC team. Product teams are responsible for AWS services configuration to meet their requirements in the most efficient way. Typically, they deploy and configure infrastructure and application stacks, including the following:
Network configuration – Amazon Virtual Private Cloud (Amazon VPC) subnets and routing
Object storage setup – Amazon Simple Storage Service (Amazon S3) buckets and bucket policies
Data encryption at rest configuration – Management of AWS Key Management Service (AWS KMS) customer master keys (CMKs) and key policies
Managed services configuration – AWS Glue jobs, AWS Cloud9 environments, and others
We were looking for security controls model that would allow us to continuously monitor infrastructure and application components set up by all the teams. The model also needed to support guardrails that allowed product teams to focus on new use case implementation, but also inherited the security and compliance best practices promoted and ensured within our company.
Security and compliance baseline definition
We started with the AWS Well-Architected Framework Security Pillar whitepaper, which provides implementation guidance on the essential areas of security and compliance in the cloud, including identity and access management, infrastructure security, data protection, detection, and incident response. Although all five elements are equally important for implementing enterprise-grade security and compliance in the cloud, we saw an opportunity to improve controls of on-premises environments by automating detection and incident response elements. The continuous monitoring of AWS infrastructure and application changes complemented by the automated incident response of the security baseline helps us foster security best practices and allows for a high innovation pace. Manual security reviews are no longer required to asses security posture.
Our security and compliance controls framework is based on GDPR and several standards and programs, including ISO 27001, C5. Translation of the controls framework into the security and compliance baseline definition in the cloud isn’t always straightforward, so we use a number of guidelines. As a starting point, we use CIS Amazon Web Services benchmarks, because it’s a prescriptive recommendation and its controls cover multiple AWS security areas, including identity and access management, logging and monitoring configuration, and network configuration. CIS benchmarks are industry-recognized cyber security best practices and recommendations that cover a wide range of technology families, and are used by enterprise organizations around the world. We also apply GDPR compliance on AWS recommendations and AWS Foundational Security Best Practices, extending controls recommended by CIS AWS Foundations Benchmarks in multiple control areas: inventory, logging, data protection, access management, and more.
Security controls implementation
AWS provides multiple services that help implement security and compliance controls:
AWS CloudTrail provides a history of events in an AWS account, including those originating from command line tools, AWS SDKs, AWS APIs, or the AWS Management Console. In addition, it allows exporting event history for further analysis and subscribing to specific events to implement automated remediation.
AWS Config allows you to monitor AWS resource configuration, and automatically evaluate and remediate incidents related to unexpected resources configuration. AWS Config comes with pre-built conformance pack sample templates designed to help you meet operational best practices and compliance standards.
Amazon GuardDuty provides threat detection capabilities that continuously monitor network activity, data access patterns, and account behavior.
With multiple AWS services to use as building blocks for continuous monitoring and automation, there is a strong need for a consolidated findings overview and unified remediation framework. This is where AWS Security Hub comes into play. Security Hub provides built-in security standards and controls that make it easy to enable foundational security controls. Then, Security Hub integrates with CloudTrail, AWS Config, GuardDuty, and other AWS services out of the box, which eliminates the need to develop and maintain integration code. Security Hub also accepts findings from third-party partner products and provides APIs for custom product integration. Security Hub significantly reduces the effort to consolidate audit information coming from multiple AWS-native and third-party channels. Its API and supported partner products ecosystem gave us confidence that we can adhere to changes in security and compliance standards with low effort.
While AWS provides a rich set of services to manage risk at the Three Lines Model, we were looking for wider community support in maintaining and extending security controls beyond those defined by CIS benchmarks and compliance and best practices recommendations on AWS. We came across Prowler, an open-source tool focusing on AWS security assessment and auditing and infrastructure hardening. Prowler implements CIS AWS benchmark controls and has over 100 additional checks. We appreciated Prowler providing checks that helped us meet GDPR and ISO 27001 requirements, specifically. Prowler delivers assessment reports in multiple formats, which makes it easy to implement reporting archival for future auditing needs. In addition, Prowler integrates well with Security Hub, which allows us to use a single service for consolidating security and compliance incidents across a number of channels.
We came up with the solution architecture depicted in the following diagram.

Automated remediation solution architecture HDI
Let’s look closely into the most critical components of this solution.
Prowler is a command line tool that uses the AWS Command Line Interface (AWS CLI) and a bash script. Individual Prowler checks are bash scripts organized into groups by compliance standard or AWS service. By supplying corresponding command line arguments, we can run Prowler against a specific AWS Region or multiple Regions at the same time. We can run Prowler in multiple ways; we chose to run it as an AWS Fargate task for Amazon Elastic Container Service (Amazon ECS). Fargate is a serverless compute engine that runs Docker-compatible containers. ECS Fargate tasks are scheduled tasks that make it easy to perform periodic assessments of an AWS account and export findings. We configured Prowler to run every 7 days in every account and Region it’s deployed into.
Security Hub acts as a single place for consolidating security findings from multiple sources. When Security Hub is enabled in a given Region, CIS AWS Foundations Benchmark and Foundational Security Best Practices standards are enabled as well. Enabling these standards also configures integration with AWS Config and Guard Duty. Integration with Prowler requires enabling product integration on the Security Hub side by calling the EnableImportFindingsForProduct API action for a given product. Because Prowler supports integration with Security Hub out of the box, posting security findings is a matter of passing the right command line arguments: -M json-asff to format reports as AWS Security Findings Format and -S to ship findings to Security Hub.
Automated security findings remediation is implemented using AWS Lambda functions and the AWS SDK for Python (Boto3). The remediation function can be triggered in two ways: automatically in response to a new security finding, or by a security engineer from the Security Hub findings page. In both cases, the same Lambda function is used. Remediation functions implement security standards in accordance with recommendations, whether they’re CIS AWS Foundations Benchmark and Foundational Security Best Practices standards, or others.
The exact activities performed depend on the security findings type and its severity. Examples of activities performed include deleting non-rotated AWS Identity and Access Management (IAM) access keys, enabling server-side encryption for S3 buckets, and deleting unencrypted Amazon Elastic Block Store (Amazon EBS) volumes.
To trigger the Lambda function, we use Amazon EventBridge, which makes it easy to build an event-driven remediation engine and allows us to define Lambda functions as targets for Security Hub findings and custom actions. EventBridge allows us to define filters for security findings and therefore map finding types to specific remediation functions. Upon successfully performing security remediation, each function updates one or more Security Hub findings by calling the BatchUpdateFindings API and passing the corresponding finding ID.
The following example code shows a function enforcing an IAM password policy:
import boto3
import os
import logging
from botocore.exceptions import ClientError
iam = boto3.client("iam")
securityhub = boto3.client("securityhub")
log_level = os.environ.get("LOG_LEVEL", "INFO")
logging.root.setLevel(logging.getLevelName(log_level))
logger = logging.getLogger(__name__)
def lambda_handler(event, context, iam=iam, securityhub=securityhub):
"""Remediate findings related to cis15 and cis11.
Params:
event: Lambda event object
context: Lambda context object
iam: iam boto3 client
securityhub: securityhub boto3 client
Returns:
No returns
"""
finding_id = event["detail"]["findings"][0]["Id"]
product_arn = event["detail"]["findings"][0]["ProductArn"]
lambda_name = os.environ["AWS_LAMBDA_FUNCTION_NAME"]
try:
iam.update_account_password_policy(
MinimumPasswordLength=14,
RequireSymbols=True,
RequireNumbers=True,
RequireUppercaseCharacters=True,
RequireLowercaseCharacters=True,
AllowUsersToChangePassword=True,
MaxPasswordAge=90,
PasswordReusePrevention=24,
HardExpiry=True,
)
logger.info("IAM Password Policy Updated")
except ClientError as e:
logger.exception(e)
raise e
try:
securityhub.batch_update_findings(
FindingIdentifiers=[{"Id": finding_id, "ProductArn": product_arn},],
Note={
"Text": "Changed non compliant password policy",
"UpdatedBy": lambda_name,
},
Workflow={"Status": "RESOLVED"},
)
except ClientError as e:
logger.exception(e)
raise e
A key aspect in developing remediation Lambda functions is testability. To quickly iterate through testing cycles, we cover each remediation function with unit tests, in which necessary dependencies are mocked and replaced with stub objects. Because no Lambda deployment is required to check remediation logic, we can test newly developed functions and ensure reliability of existing ones in seconds.
Each Lambda function developed is accompanied with an event.json document containing an example of an EventBridge event for a given security finding. A security finding event allows us to verify remediation logic precisely, including deletion or suspension of non-compliant resources or a finding status update in Security Hub and the response returned. Unit tests cover both successful and erroneous remediation logic. We use pytest to develop unit tests, and botocore.stub and moto to replace runtime dependencies with mocks and stubs.
Automated security findings remediation
The following diagram illustrates our security assessment and automated remediation process.

The workflow includes the following steps:
- An existing Security Hub integration performs periodic resource audits. The integration posts new security findings to Security Hub.
- Security Hub reports the security incident to the company’s centralized Service Now instance by using the Service Now ITSM Security Hub integration.
- Security Hub triggers automated remediation:
- Security Hub triggers the remediation function by sending an event to EventBridge. The event has a source field equal to
aws.securityhub, with the filter ID corresponding to the specific finding type and compliance status as FAILED. The combination of these fields allows us to map the event to a particular remediation function.
- The remediation function starts processing the security finding event.
- The function calls the
UpdateFindings Security Hub API to update the security finding status upon completing remediation.
- Security Hub updates the corresponding security incident status in Service Now (Step 2)
- Alternatively, the security operations engineer resolves the security incident in Service Now:
- The engineer reviews the current security incident in Service Now.
- The engineer manually resolves the security incident in Service Now.
- Service Now updates the finding status by calling the
UpdateFindings Security Hub API. Service Now uses the AWS Service Management Connector.
- Alternatively, the platform security engineer triggers remediation:
- The engineer reviews the currently active security findings on the Security Hub findings page.
- The engineer triggers remediation from the security findings page by selecting the appropriate action.
- Security Hub triggers the remediation function by sending an event with the source
aws.securityhub to EventBridge. The automated remediation flow continues as described in the Step 3.
Deployment automation
Due to legal requirements, HDI uses the infrastructure as code (IaC) principle while defining and deploying AWS infrastructure. We started with AWS CloudFormation templates defined as YAML or JSON format. The templates are static by nature and define resources in a declarative way. We figured out that as our solution complexity grows, the CloudFormation templates also grow in size and complexity, because all the resources deployed have to be explicitly defined. We wanted a solution to increase our development productivity and simplify infrastructure definition.
The AWS Cloud Development Kit (AWS CDK) helped us in two ways:
The AWS CDK provides ready-to-use building blocks called constructs. These constructs include pre-configured AWS services following best practices. For example, a Lambda function always gets an IAM role with an IAM policy to be able to write logs to CloudWatch Logs.
The AWS CDK allows us to use high-level programming languages to define configuration of all AWS services. Imperative definition allows us to build our own abstractions and reuse them to achieve concise resource definition.
We found that implementing IaC with the AWS CDK is faster and less error-prone. At HDI, we use Python to build application logic and define AWS infrastructure. The imperative nature of the AWS CDK is truly a turning point in fulfilling legal requirements and achieving high developer productivity at the same time.
One of the AWS CDK constructs we use is AWS CDK pipeline. This construct creates a customizable continuous integration and continuous delivery (CI/CD) pipeline implemented with AWS CodePipeline. The source action is based on AWS CodeCommit. The synth action is responsible for creating a CloudFormation template from the AWS CDK project. The synth action also runs unit tests on remediations functions. The pipeline actions are connected via artifacts. Lastly, the AWS CDK pipeline constructs offer a self-mutating feature, which allows us to maintain the AWS CDK project as well as the pipeline in a single code repository. Changes of the pipeline definition as well as automated remediation solutions are deployed seamlessly. The actual solution deployment is also implemented as a CI/CD stage. Stages can be eventually deployed in cross-Region and cross-account patterns. To use cross-account deployments, the AWS CDK provides a bootstrap functionality to create a trust relationship between AWS accounts.
The AWS CDK project is broken down to multiple stacks. To deploy the CI/CD pipeline, we run the cdk deploy cicd-4-securityhub command. To add a new Lambda remediation function, we must add remediation code, optional unit tests, and finally the Lambda remediation configuration object. This configuration object defines the Lambda function’s environment variables, necessary IAM policies, and external dependencies. See the following example code of this configuration:
prowler_729_lambda = {
"name": "Prowler 7.29",
"id": "prowler729",
"description": "Remediates Prowler 7.29 by deleting/terminating unencrypted EC2 instances/EBS volumes",
"policies": [
_iam.PolicyStatement(
effect=_iam.Effect.ALLOW,
actions=["ec2:TerminateInstances", "ec2:DeleteVolume"],
resources=["*"])
],
"path": "delete_unencrypted_ebs_volumes",
"environment_variables": [
{"key": "ACCOUNT_ID", "value": core.Aws.ACCOUNT_ID}
],
"filter_id": ["prowler-extra729"],
}
Remediation functions are organized in accordance with the security and compliance frameworks they belong to. The AWS CDK code iterates over remediation definition lists and synthesizes corresponding policies and Lambda functions to be deployed later. Committing Git changes and pushing them triggers the CI/CD pipeline, which deploys the newly defined remediation function and adjusts the configuration of Prowler.
We are working on publishing the source code discussed in this blog post.
Looking forward
As we keep introducing new use cases in the cloud, we plan to improve our solution in the following ways:
Continuously add new controls based on our own experience and improving industry standards
Introduce cross-account security and compliance assessment by consolidating findings in a central security account
Improve automated remediation resiliency by introducing remediation failure notifications and retry queues
Run a Well-Architected review to identify and address possible areas of improvement
Conclusion
Working on the solution described in this post helped us improve our security posture and meet compliancy requirements in the cloud. Specifically, we were able to achieve the following:
Gain a shared understanding of security and compliance controls implementation as well as shared responsibilities in the cloud between multiple teams
Speed up security reviews of cloud environments by implementing continuous assessment and minimizing manual reviews
Provide product and platform teams with secure and compliant environments
Lay a foundation for future requirements and improvement of security posture in the cloud
The content and opinions in this post are those of the third-party author and AWS is not responsible for the content or accuracy of this post.
Align with best practices while creating infrastructure using CDK Aspects
=======================
Organizations implement compliance rules for cloud infrastructure to ensure that they run the applications according to their best practices. They utilize AWS Config to determine overall compliance against the configurations specified in their internal guidelines. This is determined after the creation of cloud resources in their AWS account. This post will demonstrate how to use AWS CDK Aspects to check and align with best practices before the creation of cloud resources in your AWS account.
The AWS Cloud Development Kit (AWS CDK) is an open-source software development framework that lets you define your cloud application resources using familiar programming languages, such as TypeScript, Python, Java, and .NET. The expressive power of programming languages to define infrastructure accelerates the development process and improves the developer experience.
AWS Config is a service that enables you to assess, audit, and evaluate your AWS resource configurations. Config continuously monitors and records your AWS resource configurations, as well as lets you automate the evaluation of recorded configurations against desired configurations. React to non-compliant resources and change their state either automatically or manually.
AWS Config helps customers run their workloads on AWS in a compliant manner. Some customers want to detect it up front, and then only provision compliant resources. Some configurations are important for the customers, so they might not provision resources without having them compliant from the beginning. The following are examples of such configurations:
Amazon S3 bucket must not be created with public access
Amazon S3 bucket encryption must be enabled
Database deletion protection must be enabled
CDK Aspects
CDK Aspects are a way to apply an operation to every construct in a given scope. The aspect could verify something about the state of the constructs, such as ensuring that all buckets are encrypted, or it could modify the constructs, such as by adding tags.
An aspect is a class that implements the IAspect interface shown below. Aspects employ visitor pattern, which allows them to add a new operation to existing object structures without modifying the structures. In object-oriented programming and software engineering, the visitor design pattern is a method for separating an algorithm from an object structure on which it operates.
interface IAspect {
visit(node: IConstruct): void;
}
An AWS CDK app goes through the following lifecycle phases when you call cdk deploy. These phases are also shown in the diagram below. Learn more about the CDK application lifecycle at this page.
- Construction
- Preparation
- Validation
- Synthesis
- Deployment
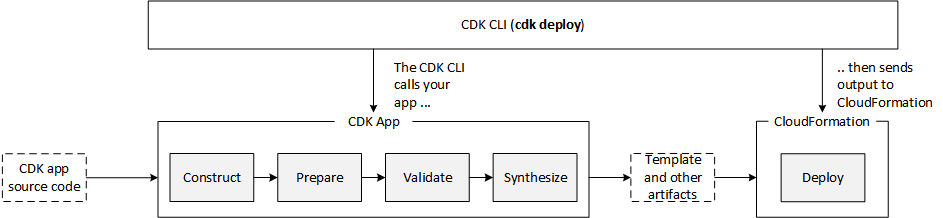
CDK Aspects become relevant during the Prepare phase, where it makes the final modifications round in the constructs to setup their final state. This Prepare phase happens automatically. All constructs have their internal list of Aspects which are called and applied during the Prepare phase. Add your custom aspects in a scope by calling the following method:
Aspects.of(myConstruct).add(new SomeAspect(...));
When you call the method above, constructs add the custom aspects to the list of internal aspects. When CDK application goes through the Prepare phase, then AWS CDK calls the visit method of the object for the constructs and all of its children in top-down order. The visit method is free to change anything in the construct.
How to align with or check configuration compliance using CDK Aspects
In the following sections, you will see how to implement CDK Aspects for some common use cases when provisioning the cloud resources. CDK Aspects are extensible, and you can extend it for any suitable use cases in order to implement additional rules.
The code below creates the cloud resources to be verified against the best practices using Aspects in the following section.
export class AwsCdkAspectsStack extends cdk.Stack {
  constructor(scope: cdk.Construct, id: string, props?: cdk.StackProps) {
    super(scope, id, props);
    //Create a VPC with 3 availability zones
    const vpc = new ec2.Vpc(this, 'MyVpc', {
      maxAzs: 3,
    });
    //Create a security group
    const sg = new ec2.SecurityGroup(this, 'mySG', {
      vpc: vpc,
      allowAllOutbound: true
    })
    //Add ingress rule for SSH from the public internet
    sg.addIngressRule(ec2.Peer.anyIpv4(), ec2.Port.tcp(22), 'SSH access from anywhere')
    //Launch an EC2 instance in private subnet
    const instance = new ec2.Instance(this, 'MyInstance', {
      vpc: vpc,
      machineImage: ec2.MachineImage.latestAmazonLinux(),
      instanceType: new ec2.InstanceType('t3.small'),
      vpcSubnets: {subnetType: ec2.SubnetType.PRIVATE},
      securityGroup: sg
    })
    //Launch MySQL rds database instance in private subnet
    const database = new rds.DatabaseInstance(this, 'MyDatabase', {
      engine: rds.DatabaseInstanceEngine.mysql({
        version: rds.MysqlEngineVersion.VER_5_7
      }),
      vpc: vpc,
      vpcSubnets: {subnetType: ec2.SubnetType.PRIVATE},
      deletionProtection: false
    })
    //Create an s3 bucket
    const bucket = new s3.Bucket(this, 'MyBucket')
  }
}
In this section, you will see the use cases and code where Aspects are used to verify the resources against the following best practices.
- VPC CIDR range must start with specific CIDR IP
- Security Group must not have public ingress rule
- EC2 instance must use approved AMI
- S3 bucket encryption must be enabled
- S3 bucket versioning must be enabled
- RDS instance must have deletion protection enabled
//Verify VPC CIDR range
export class VPCCIDRAspect implements IAspect {
    public visit(node: IConstruct): void {
        if (node instanceof ec2.CfnVPC) {
            if (!node.cidrBlock.startsWith('192.168.')) {
                Annotations.of(node).addError('VPC does not use standard CIDR range starting with "192.168."');
            }
        }
    }
}
//Verify public ingress rule of security group
export class SecurityGroupNoPublicIngressAspect implements IAspect {
    public visit(node: IConstruct) {
        if (node instanceof ec2.CfnSecurityGroup) {
            checkRules(Stack.of(node).resolve(node.securityGroupIngress));
        }
        function checkRules (rules :Array<IngressProperty>) {
            if(rules) {
                for (const rule of rules.values()) {
                    if (!Tokenization.isResolvable(rule) && (rule.cidrIp == '0.0.0.0/0' || rule.cidrIp == '::/0')) {
                        Annotations.of(node).addError('Security Group allows ingress from public internet.');
                    }
                }
            }
        }
    }
}
//Verify AMI of EC2 instance
export class EC2ApprovedAMIAspect implements IAspect {
    public visit(node: IConstruct) {
        if (node instanceof ec2.CfnInstance) {
            if (node.imageId != 'approved-image-id') {
                Annotations.of(node).addError('EC2 Instance is not using approved AMI.');
            }
        }
    }
}
//Verify that bucket versioning is enabled
export class BucketVersioningAspect implements IAspect {
    public visit(node: IConstruct): void {
        if (node instanceof s3.CfnBucket) {
            if (!node.versioningConfiguration
                || (!Tokenization.isResolvable(node.versioningConfiguration)
                    && node.versioningConfiguration.status !== 'Enabled')) {
                Annotations.of(node).addError('S3 bucket versioning is not enabled.');
            }
        }
    }
}
//Verify that bucket has server-side encryption enabled
export class BucketEncryptionAspect implements IAspect {
    public visit(node: IConstruct): void {
        if (node instanceof s3.CfnBucket) {
            if (!node.bucketEncryption) {
                Annotations.of(node).addError('S3 bucket encryption is not enabled.');
            }
        }
    }
}
//Verify that DB instance deletion protection is enabled
export class RDSDeletionProtectionAspect implements IAspect {
    public visit(node: IConstruct) {
        if (node instanceof rds.CfnDBInstance) {
            if (! node.deletionProtection) {
                Annotations.of(node).addError('RDS DB instance deletion protection is not enabled.');
            }
        }
    }
}
Once you create the aspects, add them in a particular scope. That scope can be App, Stack, or Construct. In the example below, all aspects are added in the scope of Stack.
const app = new cdk.App();
const stack = new AwsCdkAspectsStack(app, 'MyApplicationStack');
Aspects.of(stack).add(new VPCCIDRAspect());
Aspects.of(stack).add(new SecurityGroupNoPublicIngressAspect());
Aspects.of(stack).add(new EC2ApprovedAMIAspect());
Aspects.of(stack).add(new RDSDeletionProtectionAspect());
Aspects.of(stack).add(new BucketEncryptionAspect());
Aspects.of(stack).add(new BucketVersioningAspect());
app.synth();
Once you call cdk deploy for the above code with aspects added, you will see the output below. The deployment will not continue until you resolve the errors to make the resources compliant.

You can also use Aspects to make general modifications to the resources regardless of any compliance checks. For example, use it to apply mandatory tags to every taggable resource. Tags is an example of implementing CDK Aspects in order to achieve this functionality. Utilizing the code below, you can add or remove a tag from all taggable resources and their children in the scope of a Construct.
Tags.of(myConstruct).add('key', 'value');
Tags.of(myConstruct).remove('key');
Below is an example of adding the Department tag to every resource created in the scope of Stack.
Tags.of(stack).add('Department', 'Finance');
We recommend developers to avoid using Aspects to dynamically modify the infrastructure resources. This can change the stack when CDK code is synthesized which makes IaC less deterministic and CDK code isn’t single source of truth.
Additional recommendations
CDK Aspects are ways for developers to align with and check best practices in their infrastructure configurations using the programming language of choice. AWS CloudFormation Guard (cfn-guard) provides compliance administrators with a simple, policy-as-code language to author policies and apply them to enforce best practices. Aspects are applied before generation of the CloudFormation template in Prepare phase, but cfn-guard is applied after generation of the CloudFormation template and before the Deploy phase. Developers can use Aspects or cfn-guard or both as part of a CI/CD pipeline to stop deployment of non-compliant resources, but CloudFormation Guard is the way to go when you want to enforce compliances and prevent deployment of non-compliant resources.
cdk-nag is an open-source project which implements many rules in evaluation packs such as AWS Solutions, HIPPA and NIST 800-53 using AWS CDK Aspects. This project helps you to check your CDK applications for best practices using already available rules in these packs. You also have option to suppress some rules from evaluation packs which you don’t want to evaluate.
Conclusion
If you are utilizing AWS CDK to provision your infrastructure, then you can start using Aspects to align with best practices before resources are created. If you are utilizing CloudFormation template to manage your infrastructure, then you can read this blog to learn how to migrate the CloudFormation template to AWS CDK. After the migration, utilize CDK Aspects to evaluate compliance of your resources against the best practices before they are created.
Target cross-platform Go builds with AWS CodeBuild Batch builds
=======================
Many different operating systems and architectures could end up as the destination for our applications. By using a AWS CodeBuild batch build, we can run builds for a Go application targeted at multiple platforms concurrently.
Cross-compiling Go binaries for different platforms is as simple as setting two environment variables $GOOS and $GOARCH, regardless of the build’s host platform. For this post we will build all of the binaries on Linux/x86 containers. You can run the command go tool dist list to see the Go list of supported platforms. We will build binaries for six platforms: Windows+ARM, Windows+AMD64, Linux+ARM64, Linux+AMD64, MacOS+ARM64, and Mac+AMD64. Note that AMD64 is a 64-bit architecture based on the Intel x86 instruction set utilized on both AMD and Intel hardware.
This post demonstrates how to create a single AWS CodeBuild project by using a batch build and a single build spec to create concurrent builds for the six targeted platforms. Learn more about batch builds in AWS CodeBuild in the documentation: Batch builds in AWS CodeBuild
Solution Overview
AWS CodeBuild is a fully managed continuous integration service that compiles source code, runs tests, and produces ready-to-deploy software packages. A batch build is utilized to run concurrent and coordinated builds. Let’s summarize the 3 different batch builds:
Build graph: defines dependencies between builds. CodeBuild utilizes the dependencies graph to run builds in an order that satisfies the dependencies.
Build list: utilizes a list of settings for concurrently run builds.
Build matrix: utilizes a matrix of settings to create a build for every combination.
The requirements for this project are simple – run multiple builds with a platform pair of $GOOS and $GOARCH environment variables. For this, a build list can be utilized. The buildspec for the project contains a batch/build-list setting containing every environment variable for the six builds.
batch:
build-list:
- identifier: build1
env:
variables:
GOOS: darwin
GOARCH: amd64
- identifier: build2
env:
variables:
GOOS: darwin
GOARCH: arm64
- ...
The batch build project will launch seven builds. See the build sequence in the diagram below.
Step 1 – A build downloads the source.
Step 2 – Six concurrent builds configured with six sets of environment variables from the batch/build-list setting.
Step 3 – Concurrent builds package a zip file and deliver to the artifacts Amazon Simple Storage Service (Amazon S3) bucket.

The supplied buildspec file includes commands for the install and build phases. The install phase utilizes the phases/install/runtime-versions phase to set the version of Go is used in the build container.
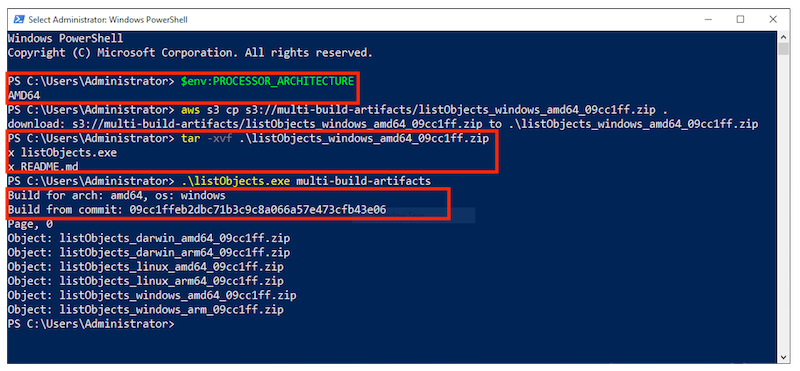
The build phase contains commands to replace source code placeholders with environment variables set by CodeBuild. The entire list of environment variables is documented at Environment variables in build environments. This is followed by a simple go build to build the binaries. The application getting built is an AWS SDK for Go sample that will list the contents of an S3 bucket.
  build:
commands:
- mv listObjects.go listObjects.go.tmp
- cat listObjects.go.tmp | envsubst | tee listObjects.go
- go build listObjects.go
The artifacts sequence specifies the build outputs that we want packaged and delivered to the artifacts S3 bucket. The name setting creates a name for ZIP artifact. And the name combines the operating system, architecture environment variables, as well as the git commit hash. We use Shell command language to expand the environment variables, as well as command substitution to take the first seven characters of the git hash.
artifacts:
files:
- 'listObjects'
- 'listObjects.exe'
- 'README.md'
name: listObjects_${GOOS}_${GOARCH}_$(echo $CODEBUILD_RESOLVED_SOURCE_VERSION | cut -c 1-7).zip
Let’s walk through the CodeBuild project setup process. When the builds complete, we’ll see zip files containing the builds for each platform in an artifacts bucket.
Here is what we will create:
Create an S3 bucket to host the built artifacts.
Create the CodeBuild project, which needs to know:
Where the source is
The environment – a docker image and a service role
The location of the build spec
Batch configuration, a service role used to launch batch build groups
The artifact S3 bucket location
The code that is built is available on github here: https://github.com/aws-samples/cross-platform-go-builds-with-aws-codebuild. For an alternative to the manual walkthrough steps, a CloudFormation template that will build all of the resources is available in the git repository.
Prerequisites
For this walkthrough, you must have the following prerequisites:
An AWS account
Access to an AWS account with administrator or PowerUser (or equivalent) AWS Identity and Access Management (IAM) role policies attached
Create the Artifacts S3 Bucket
An S3 bucket will be the destination of the build artifacts.
In the Amazon S3 console, create a bucket with a unique name. This will be the destination of your build artifacts.

Create the AWS CodeBuild Project
In the AWS CodeBuild console, create a project named multi-arch-build.
 For Source Provider, choose GitHub. Choose the Connect to GitHub button and follow the authorization screens. For repository, enter
 https://github.com/aws-samples/cross-platform-go-builds-with-aws-codebuild
 For Environment image, choose Managed Image. Choose the most recent Ubuntu image. This image contains every tool needed for the build. If you are interested in the contents of the image, then you can see the Dockerfile used to build the image in the GitHub repository here: https://github.com/aws/aws-codebuild-docker-images/tree/master/ubuntu
 For Service Role, keep the suggested role name.
 For Build specifications, leave Buildspec name empty. This will use the default location
 buildspec.yml in the source root.
Under Batch configuration, enable Define batch configuration. For the Role Name, enter a name for the role: batch-multi-arch-build-service-role. There is an option here to combine artifacts. CodeBuild can combine the artifacts from batch builds into a single location. This isn’t needed for this build, as we want a zip to be created for each platform.
 Under Artifacts, for Type, choose Amazon S3. For Bucket name, select the S3 bucket created earlier. This is where we want the build artifacts delivered. Choose the checkbox for Enable semantic versioning. This will tell CodeBuild to use the artifact name that was specified in the buildspec file.
 For Artifacts Packaging, choose Zip for CodeBuild to create a compressed zip from the build artifacts.
 Create the build project, and start a build. You will see the
 DOWNLOAD_SOURCE build complete, followed by the six concurrent builds for each combination of OS and architecture.

Run the Artifacts
The builds have completed, and each packaged artifact has been delivered to the S3 bucket. Remember the name of the ZIP archive that was built using the buildspec file setting. This incorporated a combination of the operating system, architecture, and git commit hash.

Below, I have tested the artifact by downloading the zip for the operating system and architecture combination on three different platforms: MacOS/AMD64, an AWS Graviton2 instance, and a Microsoft Windows instance. Note the system information, unzipping the platform artifact, and the build specific information substituted into the Go source code.


Cleaning up
To avoid incurring future charges, delete the resources:
On the Amazon S3 console, choose the artifacts bucket created, and choose Empty. Confirm the deletion by typing ‘permanently delete’. Choose Empty.
Choose the artifacts bucket created, and Delete.
On the IAM console, choose Roles.
Search for batch-multi-arch-build-service-role and Delete. Search for codebuild-multi-arch-build-service-role and Delete.
Go to the CodeBuild console. From Build projects, choose multi-arch-build, and choose Delete build project.
Conclusion
This post utilized CodeBuild batch builds to build and package binaries for multiple platforms concurrently. The build phase used a small amount of scripting to replace placeholders in the code with build information CodeBuild makes available in environment variables. By overriding the artifact name using the buildspec setting, we created zip files built from information about the build. The zip artifacts were downloaded and tested on three platforms: Intel MacOS, a Graviton ARM based EC2 instance, and Microsoft Windows.
Features like this let you build on CodeBuild, a fully managed build service – and not have to worry about maintaining your own build servers.
Simulated location data with Amazon Location Service
=======================
Modern location-based applications require the processing and storage of real-world assets in real-time. The recent release of Amazon Location Service and its Tracker feature makes it possible to quickly and easily build these applications on the AWS platform. Tracking real-world assets is important, but at some point when working with Location Services you will need to demo or test location-based applications without real-world assets.
Applications that track real-world assets are difficult to test and demo in a realistic setting, and it can be hard to get your hands on large amounts of real-world location data. Furthermore, not every company or individual in the early stages of developing a tracking application has access to a large fleet of test vehicles from which to derive this data.
Location data can also be considered highly sensitive, because it can be easily de-anonymized to identify individuals and movement patterns. Therefore, only a few openly accessible datasets exist and are unlikely to exhibit the characteristics required for your particular use-case.
To overcome this problem, the location-based services community has developed multiple openly available location data simulators. This blog will demonstrate how to connect one of those simulators to Amazon Location Service Tracker to test and demo your location-based services on AWS.
Walk-through
Part 1: Create a tracker in Amazon Location Service
This walkthrough will demonstrate how to get started setting up simulated data into your tracker.
Step 1: Navigate to Amazon Location Service in the AWS Console and select “Trackers“.
Step 2: On the “Trackers” screen click the orange “Create tracker“ button.


Step 3: On the “Create tracker” screen, name your tracker and make sure to reply “Yes” to the question asking you if you will only use simulated or sample data. This allows you to use the free-tier of the service.
Next, click “Create tracker” to create you tracker.

Done. You’ve created a tracker. Note the “Name” of your tracker.
Generate trips with the SharedStreets Trip-simulator
A common option for simulating trip data is the shared-steets/trip-simulator project.
SharedStreets maintains an open-source project on GitHub – it is a probabilistic, multi-agent GPS trajectory simulator. It even creates realistic noise, and thus can be used for testing algorithms that must work under real-world conditions. Of course, the generated data is fake, so privacy is not a concern.
The trip-simulator generates files with a single GPS measurement per line. To playback those files to the Amazon Location Service Tracker, you must use a tool to parse the file; extract the GPS measurements, time measurements, and device IDs of the simulated vehicles; and send them to the tracker at the right time.
Before you start working with the playback program, the trip-simulator requires a map to simulate realistic trips. Therefore, you must download a part of OpenStreetMap (OSM). Using GeoFabrik you can download extracts at the size of states or selected cities based on the area within which you want to simulate your data.
This blog will demonstrate how to simulate a small fleet of cars in the greater Munich area. The example will be written for OS-X, but it generalizes to Linux operating systems. If you have a Windows operating system, I recommend using Windows Subsystem for Linux (WSL). Alternatively, you can run this from a Cloud9 IDE in your AWS account.
Step 1: Download the Oberbayern region from download.geofabrik.de
Prerequisites:
curl
curl https://download.geofabrik.de/europe/germany/bayern/oberbayern-latest.osm.pbf -o oberbayern-latest.osm.pbf
Step 2: Install osmium-tool
Prerequisites:
Homebrew
brew install osmium-tool
Step 3: Extract Munich from the Oberbayern map
osmium extract -b "11.5137,48.1830,11.6489,48.0891" oberbayern-latest.osm.pbf -o ./munich.osm.pbf -s "complete_ways" --overwrite
Step 4: Pre-process the OSM map for the vehicle routing
Prerequisites:
Docker
docker run -t -v $(pwd):/data osrm/osrm-backend:v5.25.0 osrm-extract -p /opt/car.lua /data/munich.osm.pbf
docker run -t -v $(pwd):/data osrm/osrm-backend:v5.25.0 osrm-contract /data/munich.osrm
Step 5: Install the trip-simulator
Prerequisites:
Node.js
npm install -g trip-simulator
Step 6: Run a 10 car, 30 minute car simulation
trip-simulator \
--config car \
--pbf munich.osm.pbf \
--graph munich.osrm \
--agents 10 \
--start 1563122921000 \
--seconds 1800 \
--traces ./traces.json \
--probes ./probes.json \
--changes ./changes.json \
--trips ./trips.json
The probes.json file is the file containing the GPS probes we will playback to Amazon Location Service.
Part 2: Playback trips to Amazon Location Service
Now that you have simulated trips in the probes.json file, you can play them back in the tracker created earlier. For this, you must write only a few lines of Python code. The following steps have been neatly separated into a series of functions that yield an iterator.
Prerequisites:
Python 3.7
boto3
Step 1: Load the probes.json file and yield each line
import json
import time
import datetime
import boto3
def iter_probes_file(probes_file_name="probes.json"):
"""Iterates a file line by line and yields each individual line."""
with open(probes_file_name) as probes_file:
while True:
line = probes_file.readline()
if not line:
break
yield line
Step 2: Parse the probe on each line
To process the probes, you parse the JSON on each line and extract the data relevant for the playback. Note that the coordinates order is longitude, latitude in the probes.json file. This is the same order that the Location Service expects.
def parse_probes_trip_simulator(probes_iter):
"""Parses a file witch contains JSON document, one per line.
Each line contains exactly one GPS probe. Example:
{"properties":{"id":"RQQ-7869","time":1563123002000,"status":"idling"},"geometry":{"type":"Point","coordinates":[-86.73903753135207,36.20418779626351]}}
The function returns the tuple (id,time,status,coordinates=(lon,lat))
"""
for line in probes_iter:
probe = json.loads(line)
props = probe["properties"]
geometry = probe["geometry"]
yield props["id"], props["time"], props["status"], geometry["coordinates"]
Step 3: Update probe record time
The probes represent historical data. Therefore, when you playback you will need to normalize the probes recorded time to sync with the time you send the request in order to achieve the effect of vehicles moving in real-time.
This example is a single threaded playback. If the simulated playback lags behind the probe data timing, then you will be provided a warning through the code detecting the lag and outputting a warning.
The SharedStreets trip-simulator generates one probe per second. This frequency is too high for most applications, and in real-world applications you will often see frequencies of 15 to 60 seconds or even less. You must decide if you want to add another iterator for sub-sampling the data.
def update_probe_record_time(probes_iter):
"""
Modify all timestamps to be relative to the time this function was called.
I.e. all timestamps will be equally spaced from each other but in the future.
"""
new_simulation_start_time_utc_ms = datetime.datetime.now().timestamp() * 1000
simulation_start_time_ms = None
time_delta_recording_ms = None
for i, (_id, time_ms, status, coordinates) in enumerate(probes_iter):
if time_delta_recording_ms is None:
time_delta_recording_ms = new_simulation_start_time_utc_ms - time_ms
simulation_start_time_ms = time_ms
simulation_lag_sec = (
(
datetime.datetime.now().timestamp() * 1000
- new_simulation_start_time_utc_ms
)
- (simulation_start_time_ms - time_ms)
) / 1000
if simulation_lag_sec > 2.0 and i % 10 == 0:
print(f"Playback lags behind by {simulation_lag_sec} seconds.")
time_ms += time_delta_recording_ms
yield _id, time_ms, status, coordinates
Step 4: Playback probes
In this step, pack the probes into small batches and introduce the timing element into the simulation playback. The reason for placing them in batches is explained below in step 6.
def sleep(time_elapsed_in_batch_sec, last_sleep_time_sec):
sleep_time = max(
0.0,
time_elapsed_in_batch_sec
- (datetime.datetime.now().timestamp() - last_sleep_time_sec),
)
time.sleep(sleep_time)
if sleep_time > 0.0:
last_sleep_time_sec = datetime.datetime.now().timestamp()
return last_sleep_time_sec
def playback_probes(
probes_iter,
batch_size=10,
batch_window_size_sec=2.0,
):
"""
Replays the probes in live mode.
The function assumes, that the probes returned by probes_iter are sorted
in ascending order with respect to the probe timestamp.
It will either yield batches of size 10 or smaller batches if the timeout is reached.
"""
last_probe_record_time_sec = None
time_elapsed_in_batch_sec = 0
last_sleep_time_sec = datetime.datetime.now().timestamp()
batch = []
# Creates two second windows and puts all the probes falling into
# those windows into a batch. If the max. batch size is reached it will yield early.
for _id, time_ms, status, coordinates in probes_iter:
probe_record_time_sec = time_ms / 1000
if last_probe_record_time_sec is None:
last_probe_record_time_sec = probe_record_time_sec
time_to_next_probe_sec = probe_record_time_sec - last_probe_record_time_sec
if (time_elapsed_in_batch_sec + time_to_next_probe_sec) > batch_window_size_sec:
last_sleep_time_sec = sleep(time_elapsed_in_batch_sec, last_sleep_time_sec)
yield batch
batch = []
time_elapsed_in_batch_sec = 0
time_elapsed_in_batch_sec += time_to_next_probe_sec
batch.append((_id, time_ms, status, coordinates))
if len(batch) == batch_size:
last_sleep_time_sec = sleep(time_elapsed_in_batch_sec, last_sleep_time_sec)
yield batch
batch = []
time_elapsed_in_batch_sec = 0
last_probe_record_time_sec = probe_record_time_sec
if len(batch) > 0:
last_sleep_time_sec = sleep(time_elapsed_in_batch_sec, last_sleep_time_sec)
yield batch
Step 5: Create the updates for the tracker
LOCAL_TIMEZONE = (
datetime.datetime.now(datetime.timezone(datetime.timedelta(0))).astimezone().tzinfo
)
def convert_to_tracker_updates(probes_batch_iter):
"""
Converts batches of probes in the format (id,time_ms,state,coordinates=(lon,lat))
into batches ready for upload to the tracker.
"""
for batch in probes_batch_iter:
updates = []
for _id, time_ms, _, coordinates in batch:
# The boto3 location service client expects a datetime object for sample time
dt = datetime.datetime.fromtimestamp(time_ms / 1000, LOCAL_TIMEZONE)
updates.append({"DeviceId": _id, "Position": coordinates, "SampleTime": dt})
yield updates
Step 6: Send the updates to the tracker
In the update_tracker function, you use the batch_update_device_position function of the Amazon Location Service Tracker API. This lets you send batches of up to 10 location updates to the tracker in one request. Batching updates is much more cost-effective than sending one-by-one. You pay for each call to batch_update_device_position. Therefore, batching can lead to a 10x cost reduction.
def update_tracker(batch_iter, location_client, tracker_name):
"""
Reads tracker updates from an iterator and uploads them to the tracker.
"""
for update in batch_iter:
response = location_client.batch_update_device_position(
TrackerName=tracker_name, Updates=update
)
if "Errors" in response and response["Errors"]:
for error in response["Errors"]:
print(error["Error"]["Message"])
Step 7: Putting it all together
The follow code is the main section that glues every part together. When using this, make sure to replace the variables probes_file_name and tracker_name with the actual probes file location and the name of the tracker created earlier.
if __name__ == "__main__":
location_client = boto3.client("location")
probes_file_name = "probes.json"
tracker_name = "my-tracker"
iterator = iter_probes_file(probes_file_name)
iterator = parse_probes_trip_simulator(iterator)
iterator = update_probe_record_time(iterator)
iterator = playback_probes(iterator)
iterator = convert_to_tracker_updates(iterator)
update_tracker(
iterator, location_client=location_client, tracker_name=tracker_name
)
Paste all of the code listed in steps 1 to 7 into a file called trip_playback.py, then execute
python3 trip_playback.py
This will start the playback process.
Step 8: (Optional) Tracking a device’s position updates
Once the playback is running, verify that the updates are actually written to the tracker repeatedly querying the tracker for updates for a single device. Here, you will use the get_device_position function of the Amazon Location Service Tracker API to receive the last known device position.
import boto3
import time
def get_last_vehicle_position_from_tracker(
device_id, tracker_name="your-tracker", client=boto3.client("location")
):
response = client.get_device_position(DeviceId=device_id, TrackerName=tracker_name)
if response["ResponseMetadata"]["HTTPStatusCode"] != 200:
print(str(response))
else:
lon = response["Position"][0]
lat = response["Position"][1]
return lon, lat, response["SampleTime"]
if __name__ == "__main__":
device_id = "my-device"
tracker_name = "my-tracker"
while True:
lon, lat, sample_time = get_last_vehicle_position_from_tracker(
device_id=device_id, tracker_name=tracker_name
)
print(f"{lon}, {lat}, {sample_time}")
time.sleep(10)
In the example above, you must replace the tracker_name with the name of the tracker created earlier and the device_id with the ID of one of the simulation vehicles. You can find the vehicle IDs in the probes.json file created by the SharedStreets trip-simulator. If you run the above code, then you should see the following output.

AWS IoT Device Simulator
As an alternative, if you are familiar with AWS IoT, AWS has its own vehicle simulator that is part of the IoT Device Simulator solution. It lets you simulate a vehicle fleet moving on a road network. This has been described here. The simulator sends the location data to an Amazon IoT endpoint. The Amazon Location Service Developer Guide shows how to write and set-up a Lambda function to connect the IoT topic to the tracker.
The AWS IoT Device Simulator has a GUI and is a good choice for simulating a small number of vehicles. The drawback is that only a few trips are pre-packaged with the simulator and changing them is somewhat complicated. The SharedStreets Trip-simulator has much more flexibility, allowing simulations of fleets made up of a larger number of vehicles, but it has no GUI for controlling the playback or simulation.
Cleanup
You’ve created a Location Service Tracker resource. It does not incur any charges if it isn’t used. If you want to delete it, you can do so on the Amazon Location Service Tracker console.
Conclusion
This blog showed you how to use an open-source project and open-source data to generate simulated trips, as well as how to play those trips back to the Amazon Location Service Tracker. Furthermore, you have access to the AWS IoT Device Simulator, which can also be used for simulating vehicles.
Give it a try and tell us how you test your location-based applications in the comments.
Building an InnerSource ecosystem using AWS DevOps tools
=======================
InnerSource is the term for the emerging practice of organizations adopting the open source methodology, albeit to develop proprietary software. This blog discusses the building of a model InnerSource ecosystem that leverages multiple AWS services, such as CodeBuild, CodeCommit, CodePipeline, CodeArtifact, and CodeGuru, along with other AWS services and open source tools.
What is InnerSource and why is it gaining traction?
Most software companies leverage open source software (OSS) in their products, as it is a great mechanism for standardizing software and bringing in cost effectiveness via the re-use of high quality, time-tested code. Some organizations may allow its use as-is, while others may utilize a vetting mechanism to ensure that the OSS adheres to the organization standards of security, quality, etc. This confidence in OSS stems from how these community projects are managed and sustained, as well as the culture of openness, collaboration, and creativity that they nurture.
Many organizations building closed source software are now trying to imitate these development principles and practices. This approach, which has been perhaps more discussed than adopted, is popularly called “InnerSource”. InnerSource serves as a great tool for collaborative software development within the organization perimeter, while keeping its concerns for IP & Legality in check. It provides collaboration and innovation avenues beyond the confines of organizational silos through knowledge and talent sharing. Organizations reap the benefits of better code quality and faster time-to-market, yet at only a fraction of the cost.
What constitutes an InnerSource ecosystem?
Infrastructure and processes that harbor collaboration stand at the heart of InnerSource ecology. These systems (refer Figure 1) would typically include tools supporting features such as code hosting, peer reviews, Pull Request (PR) approval flow, issue tracking, documentation, communication & collaboration, continuous integration, and automated testing, among others. Another major component of this system is an entry portal that enables the employees to discover the InnerSource projects and join the community, beginning as ordinary users of the reusable code and later graduating to contributors and committers.
Figure 1: A typical InnerSource ecosystem
More to InnerSource than meets the eye
This blog focuses on detailing a technical solution for establishing the required tools for an InnerSource system primarily to enable a development workflow and infrastructure. But the secret sauce of an InnerSource initiative in an enterprise necessitates many other ingredients.

Figure 2: InnerSource Roles & Use Cases
InnerSource thrives on community collaboration and a low entry barrier to enable adoptability. In turn, that demands a cultural makeover. While strategically deciding on the projects that can be inner sourced as well as the appropriate licensing model, enterprises should bootstrap the initiative with a seed product that draws the community, with maintainers and the first set of contributors. Many of these users would eventually be promoted, through a meritocracy-based system, to become the trusted committers.
Over a set period, the organization should plan to move from an infra specific model to a project specific model. In a Project-specific InnerSource model, the responsibility for a particular software asset is owned by a dedicated team funded by other business units. Whereas in the Infrastructure-based InnerSource model, the organization provides the necessary infrastructure to create the ecosystem with code & document repositories, communication tools, etc. This enables anybody in the organization to create a new InnerSource project, although each project initiator maintains their own projects. They could begin by establishing a community of practice, and designating a core team that would provide continuing support to the InnerSource projects’ internal customers. Having a team of dedicated resources would clearly indicate the organization’s long-term commitment to sustaining the initiative. The organization should promote this culture through regular boot camps, trainings, and a recognition program.
Lastly, the significance of having a modular architecture in the InnerSource projects cannot be understated. This architecture helps developers understand the code better, as well as aids code reuse and parallel development, where multiple contributors could work on different code modules while avoiding conflicts during code merges.
A model InnerSource solution using AWS services
This blog discusses a solution that weaves various services together to create the necessary infrastructure for an InnerSource system. While it is not a full-blown solution, and it may lack some other components that an organization may desire in its own system, it can provide you with a good head start.
The ultimate goal of the model solution is to enable a developer workflow as depicted in Figure 3.
Figure 3: Typical developer workflow at InnerSource
At the core of the InnerSource-verse is the distributed version control (AWS CodeCommit in our case). To maintain system transparency, openness, and participation, we must have a discovery mechanism where users could search for the projects and receive encouragement to contribute to the one they prefer (Step 1 in Figure 4).

Figure 4: Architecture diagram for the model InnerSource system
For this purpose, the model solution utilizes an open source reference implementation of InnerSource Portal. The portal indexes data from AWS CodeCommit by using a crawler, and it lists available projects with associated metadata, such as the skills required, number of active branches, and average number of commits. For CodeCommit, you can use the crawler implementation that we created in the open source code repo at https://github.com/aws-samples/codecommit-crawler-innersource.
The major portal feature is providing an option to contribute to a project by using a “Contribute” link. This can present a pop-up form to “apply as a contributor” (Step 2 in Figure 4), which when submitted sends an email (or creates a ticket) to the project maintainer/committer who can create an IAM (Step 3 in Figure 4) user with access to the particular repository. Note that the pop-up form functionality is built into the open source version of the portal. However, it would be trivial to add one with an associated action (send an email, cut a ticket, etc.).

Figure 5: InnerSource portal indexes CodeCommit repos and provides a bird’s eye view
The contributor, upon receiving access, logs in to CodeCommit, clones the mainline branch of the InnerSource project (Step 4 in Figure 4) into a fix or feature branch, and starts altering/adding the code. Once completed, the contributor commits the code to the branch and raises a PR (Step 5 in Figure 4). A Pull Request is a mechanism to offer code to an existing repository, which is then peer-reviewed and tested before acceptance for inclusion.
The PR triggers a CodeGuru review (Step 6 in Figure 4) that adds the recommendations as comments on the PR. Furthermore, it triggers a CodeBuild process (Steps 7 to 10 in Figure 4) and logs the build result in the PR. At this point, the code can be peer reviewed by Trusted Committers or Owners of the project repository. The number of approvals would depend on the approval template rule configured in CodeCommit. The Committer(s) can approve the PR (Step 12 in Figure 4) and merge the code to the mainline branch – that is once they verify that the code serves its purpose, has passed the required tests, and doesn’t break the build. They could also rely on the approval vote from a sanity test conducted by a CodeBuild process. Optionally, a build process could deploy the latest mainline code (Step 14 in Figure 4) on the PR merge commit.
To maintain transparency in all communications related to progress, bugs, and feature requests to downstream users and contributors, a communication tool may be needed. This solution does not show integration with any Issue/Bug tracking tool out of the box. However, multiple of these tools are available at the AWS marketplace, with some offering forum and Wiki add-ons in order to elicit discussions. Standard project documentation can be kept within the repository by using the constructs of the README.md file to provide project mission details and the CONTRIBUTING.md file to guide the potential code contributors.
An overview of the AWS services used in the model solution
The model solution employs the following AWS services:
Amazon CodeCommit: a fully managed source control service to host secure and highly scalable private Git repositories.
Amazon CodeBuild: a fully managed build service that compiles source code, runs tests, and produces software packages that are ready to deploy.
Amazon CodeDeploy: a service that automates code deployments to any instance, including EC2 instances and instances running on-premises.
Amazon CodeGuru: a developer tool providing intelligent recommendations to improve code quality and identify an application’s most expensive lines of code.
Amazon CodePipeline: a fully managed continuous delivery service that helps automate release pipelines for fast and reliable application and infrastructure updates.
Amazon CodeArtifact: a fully managed artifact repository service that makes it easy to securely store, publish, and share software packages utilized in their software development process.
Amazon S3: an object storage service that offers industry-leading scalability, data availability, security, and performance.
Amazon EC2: a web service providing secure, resizable compute capacity in the cloud. It is designed to ease web-scale computing for developers.
Amazon EventBridge: a serverless event bus that eases the building of event-driven applications at scale by using events generated from applications and AWS services.
Amazon Lambda: a serverless compute service that lets you run code without provisioning or managing servers.
The journey of a thousand miles begins with a single step
InnerSource might not be the right fit for every organization, but is a great step for those wanting to encourage a culture of quality and innovation, as well as purge silos through enhanced collaboration. It requires backing from leadership to sponsor the engineering initiatives, as well as champion the establishment of an open and transparent culture granting autonomy to the developers across the organization to contribute to projects outside of their teams. The organizations best-suited for InnerSource have already participated in open source initiatives, have engineering teams that are adept with CI/CD tools, and are willing to adopt OSS practices. They should start small with a pilot and build upon their successes.
Conclusion
Ever more enterprises are adopting the open source culture to develop proprietary software by establishing an InnerSource. This instills innovation, transparency, and collaboration that result in cost effective and quality software development. This blog discussed a model solution to build the developer workflow inside an InnerSource ecosystem, from project discovery to PR approval and deployment. Additional features, like an integrated Issue Tracker, Real time chat, and Wiki/Forum, can further enrich this solution.
If you need helping hands, AWS Professional Services can help adapt and implement this model InnerSource solution in your enterprise. Moreover, our Advisory services can help establish the governance model to accelerate OSS culture adoption through Experience Based Acceleration (EBA) parties.
References
An introduction to InnerSource
The InnerSource Commons is a forum for sharing experiences and best practices to advance the InnerSource movement. Some proven approaches have been provided as patterns. In addition, several free books are also available on the topic.
How Amazon CodeGuru Reviewer helps Gridium maintain a high quality codebase
=======================
Gridium creates software that lets people run commercial buildings at a lower cost and with less energy. Currently, half of the world lives in cities. Soon, nearly 70% will, while buildings utilize 40% of the world’s electricity. In the U.S. alone, commercial real estate value tops one trillion dollars. Furthermore, much of this asset class is still run with spreadsheets, clipboards, and outdated software. Gridium’s software platform collects large amounts of operational data from commercial buildings like offices, medical providers, and corporate campuses. Then, our analytics identifies energy savings opportunities that we work with customers to actualize.
Gridium’s Challenge
Data streams from utility companies across the U.S. are an essential input for Gridium’s analytics. This data is processed and visualized so that our customers can garner new insights and drive smarter decisions. In order to integrate a new data source into our platform, we often utilize third-party contractors to write tools that ingest data feeds and prepare them for analysis.
Our team firmly emphasizes our codebase quality. We strive for our code to be stylistically consistent, easily testable, swiftly understood, and well-documented. We write code internally by using agreed-upon standards. This makes it easy for us to review and edit internal code using standard collaboration tools.
We work to ensure that code arriving from contractors meets similar standards, but enforcing external code quality can be difficult. Contractor-developed code will be written in the style of each contractor. Furthermore, reviewing and editing code written by contractors introduces new challenges beyond those of working with internal code. We have used tools like PyLint to help stylistically align code, but we wanted a method for uncovering more complex issues without burdening the team and undermining the benefits of outside contractors.
Adopting Amazon CodeGuru Reviewer
We began evaluating Amazon CodeGuru Reviewer in order to provide an additional review layer for code developed by contractors, and to find complex corrections within code that traditional tools might not catch.
Initially, we enabled the service only on external repositories and generated reviews on pull requests. CodeGuru immediately provided us with actionable recommendations for maintaining Gridium’s codebase quality.

The example above demonstrates a useful recurring recommendation related to exception-handling. Strictly speaking, there is nothing wrong with utilizing a general Exception class whenever needed. However, utilizing general Exception classes in production can complicate error-handling functions and generate ambiguity when trying to debug or understand code.
After a few weeks of utilizing CodeGuru Reviewer and witnessing its benefits, we determined that we wanted to use it for our entire codebase. Moreover, CodeGuru provided us with meaningful recommendations on our internal repositories.

This example once again showcases CodeGuru’s ability to highlight subtle issues that aren’t necessarily bugs. Without diving through related libraries and functions, it would be difficult to find any optimizable areas, but CodeGuru found that this function could become problematic due to its dependency on twenty other functions. If any of the dependencies is updated, then it could break the entire function, thereby making debugging the root cause difficult.
The explanations following each code recommendation were essential in our quick adoption of CodeGuru. Simply showing what code to change would make it tough to follow through with a code correction. CodeGuru provided ample context, reasoning, and even metrics in some cases to explain and justify a correction.
Conclusion
Our development team thoroughly appreciates the extra review layer that CodeGuru provides. CodeGuru indicates areas that internal review might otherwise miss, especially in code written by external contractors.
In some cases, CodeGuru highlighted issues never before considered by the team. Examples of these issues include highly coupled functions, ambiguous exceptions, and outdated API calls. Each suggestion is accompanied with its context and reasoning so that our developers can independently judge if an edit should be made. Furthermore, CodeGuru was easily set up with our GitHub repositories. We enabled it within minutes through the console.
After familiarizing ourselves with the CodeGuru workflow, Gridium treats CodeGuru recommendations like suggestions that an internal reviewer would make. Both internal developers and third parties act on recommendations in order to improve code health and quality. Any CodeGuru suggestions not accepted by contractors are verified and implemented by an internal reviewer if necessary.
Over the twelve weeks that we have been utilizing Amazon CodeGuru, we have had 281 automated pull request reviews. These provided 104 recommendations resulting in fifty code corrections that we may not have made otherwise. Our monthly bill for CodeGuru usage is about $10.00. If we make only a single correction to our code over a whole month that we would have missed otherwise, then we can safely say that it was well worth the price!
Orchestrate Jenkins Workloads using Dynamic Pod Autoscaling with Amazon EKS
=======================
This blog post will demonstrate how to leverage Jenkins with Amazon Elastic Kubernetes Service (EKS) by running a Jenkins Manager within an EKS pod. In doing so, we can run Jenkins workloads by allowing Amazon EKS to spawn dynamic Jenkins Agent(s) in order to perform application and infrastructure deployment. Traditionally, customers will setup a Jenkins Manager-Agent architecture that contains a set of manually added nodes with no autoscaling capabilities. Implementing this strategy will ensure that a robust approach optimizes the performance with the right-sized compute capacity and work needed to successfully perform the build tasks.
In setting up our Amazon EKS cluster with Jenkins, we’ll utilize the eksctl simple CLI tool for creating clusters on EKS. Then, we’ll build both the Jenkins Manager and Jenkins Agent image. Afterward, we’ll run a container deployment on our cluster to access the Jenkins application and utilize the dynamic Jenkins Agent pods to run pipelines and jobs.
Solution Overview
The architecture below illustrates the execution steps.

Figure 1. Solution overview diagram
Disclaimer(s): (Note: This Jenkins application is not configured with a persistent volume storage. Therefore, you must establish and configure this template to fit that requirement).
To accomplish this deployment workflow, we will do the following:
Centralized Shared Services account
- Deploy the Amazon EKS Cluster into a Centralized Shared Services Account.
- Create the Amazon ECR Repository for the Jenkins Manager and Jenkins Agent to store docker images.
- Deploy the kubernetes manifest file for the Jenkins Manager.
Target Account(s)
- Establish a set of AWS Identity and Access Management (IAM) roles with permissions for cross-across access from the Share Services account into the Target account(s).
Jenkins Application UI
- Jenkins Plugins – Install and configure the Kubernetes Plugin and CloudBees AWS Credentials Plugin from Manage Plugins (you will not have to manually install this since it will be packaged and installed as part of the Jenkins image build).
- Jenkins Pipeline Example—Fetch the Jenkinsfile to deploy an S3 Bucket with CloudFormation in the Target account using a Jenkins parameterized pipeline.
Prerequisites
The following is the minimum requirements for ensuring this solution will work.
Account Prerequisites
Shared Services Account: The location of the Amazon EKS Cluster.
Target Account: The destination of the CI/CD pipeline deployments.
Build Requirements
AWS CLI
Docker CLI — Note: The docker engine must be running in order to build images.
aws-iam-authenticator
kubectl
eksctl
Configure your AWS credentials with the associated region.
Verify if the build requirements were correctly installed by checking the version.
Create an EKS Cluster using eksctl.
Verify that EKS nodes are running and available.
Create an AWS ECR Repository for the Jenkins Manager and Jenkins Agent.
Clone the Git Repository
git clone https://github.com/aws-samples/jenkins-cloudformation-deployment-example.git
Security Considerations
This blog provides a high-level overview of the best practices for cross-account deployment and isolation maintenance between the applications. We evaluated the cross-account application deployment permissions and will describe the current state as well as what to avoid. As part of the security best practices, we will maintain isolation among multiple apps deployed in these environments, e.g., Pipeline 1 does not deploy to the Pipeline 2 infrastructure.
Requirement
A Jenkins manager is running as a container in an EC2 compute instance that resides within a Shared AWS account. This Jenkins application represents individual pipelines deploying unique microservices that build and deploy to multiple environments in separate AWS accounts. The cross-account deployment utilizes the target AWS account admin credentials in order to do the deployment.
This methodology means that it is not good practice to share the account credentials externally. Additionally, the deployment errors risk should be eliminated and application isolation should be maintained within the same account.
Note that the deployment steps are being run using AWS CLIs, thus our solution will be focused on AWS CLI usage.
The risk is much lower when utilizing CloudFormation / CDK to conduct deployments because the AWS CLIs executed from the build jobs will specify stack names as parametrized inputs and the very low probability of stack-name error. However, it remains inadvisable to utilize admin credentials of the target account.
Best Practice — Current Approach
We utilized cross-account roles that can restrict unauthorized access across build jobs. Behind this approach, we will utilize the assume-role concept that will enable the requesting role to obtain temporary credentials (from the STS service) of the target role and execute actions permitted by the target role. This is safer than utilizing hard-coded credentials. The requesting role could be either the inherited EC2 instance role OR specific user credentials. However, in our case, we are utilizing the inherited EC2 instance role.
For ease of understanding, we will refer the target-role as execution-role below.

Figure 2. Current approach
As per the security best practice of assigning minimum privileges, we must first create execution role in IAM in the target account that has deployment permissions (either via CloudFormation OR via CLI’s), e.g., app-dev-role in Dev account and app-prod-role in Prod account.
For each of those roles, we configure a trust relationship with the parent account ID (Shared Services account). This enables any roles in the Shared Services account (with assume-role permission) to assume the execution-role and deploy it on respective hosting infrastructure, e.g., the app-dev-role in Dev account will be a common execution role that will deploy various apps across infrastructure.
Then, we create a local role in the Shared Services account and configure credentials within Jenkins to be utilized by the Build Jobs. Provide the job with the assume-role permissions and specify the list of ARNs across every account. Alternatively, the inherited EC2 instance role can also be utilized to assume the execution-role.
Create Cross-Account IAM Roles
Cross-account IAM roles allow users to securely access AWS resources in a target account while maintaining the observability of that AWS account. The cross-account IAM role includes a trust policy allowing AWS identities in another AWS account to assume the given role. This allows us to create a role in one AWS account that delegates specific permissions to another AWS account.
Create an IAM role with a common name in each target account. The role name we’ve created is AWSCloudFormationStackExecutionRole. The role must have permissions to perform CloudFormation actions and any actions regarding the resources that will be created. In our case, we will be creating an S3 Bucket utilizing CloudFormation.
This IAM role must also have an established trust relationship to the Shared Services account. In this case, the Jenkins Agent will be granted the ability to assume the role of the particular target account from the Shared Services account.
In our case, the IAM entity that will assume the AWSCloudFormationStackExecutionRole is the EKS Node Instance Role that associated with the EKS Cluster Nodes.
{
"Version": "2012-10-17",
"Statement": [
{
"Effect": "Allow",
"Action": [
"cloudformation:CreateUploadBucket",
"cloudformation:ListStacks",
"cloudformation:CancelUpdateStack",
"cloudformation:ExecuteChangeSet",
"cloudformation:ListChangeSets",
"cloudformation:ListStackResources",
"cloudformation:DescribeStackResources",
"cloudformation:DescribeStackResource",
"cloudformation:CreateChangeSet",
"cloudformation:DeleteChangeSet",
"cloudformation:DescribeStacks",
"cloudformation:ContinueUpdateRollback",
"cloudformation:DescribeStackEvents",
"cloudformation:CreateStack",
"cloudformation:DeleteStack",
"cloudformation:UpdateStack",
"cloudformation:DescribeChangeSet",
"s3:PutBucketPublicAccessBlock",
"s3:CreateBucket",
"s3:DeleteBucketPolicy",
"s3:PutEncryptionConfiguration",
"s3:PutBucketPolicy",
"s3:DeleteBucket"
],
"Resource": "*"
}
]
}
Build Docker Images
Build the custom docker images for the Jenkins Manager and the Jenkins Agent, and then push the images to AWS ECR Repository. Navigate to the docker/ directory, then execute the command according to the required parameters with the AWS account ID, repository name, region, and the build folder name jenkins-manager/ or jenkins-agent/ that resides in the current docker directory. The custom docker images will contain a set of starter package installations.
Build and push the Jenkins Manager and Jenkins Agent docker images to the AWS ECR Repository
Deploy Jenkins Application
After building both images, navigate to the k8s/ directory, modify the manifest file for the Jenkins image, and then execute the Jenkins manifest.yaml template to setup the Jenkins application. (Note: This Jenkins application is not configured with a persistent volume storage. Therefore, you will need to establish and configure this template to fit that requirement).
Deploy the Jenkins Application to the EKS Cluster
# Fetch the Application URL or navigate to the AWS Console for the Load Balancer
kubectl get svc -n jenkins
# Verify that jenkins deployment/pods are up running
kubectl get pods -n jenkins
# Replace with jenkins manager pod name and fetch Jenkins login password
kubectl exec -it pod/<JENKINS-MANAGER-POD-NAME> -n jenkins -- cat /var/jenkins_home/secrets/initialAdminPassword
The Kubernetes Plugin and CloudBees AWS Credentials Plugin should be installed as part of the Jenkins image build from the Managed Plugins.
Navigate: Manage Jenkins → Configure Global Security
Set the Crumb Issuer to remove the error pages in order to prevent Cross Site Request Forgery exploits.

Figure 3. Configure Global Security
Configure Jenkins Kubernetes Cloud
Navigate: Manage Jenkins → Manage Nodes and Clouds → Configure Clouds
Click: Add a new cloud → select Kubernetes from the drop menus

Figure 4a. Jenkins Configure Nodes and Clouds
Note: Before proceeding, please ensure that you can access your Amazon EKS cluster information, whether it is through Console or CLI.
Enter a Name in the Kubernetes Cloud configuration field.
Enter the Kubernetes URL which can be found via AWS Console by navigating to the Amazon EKS service and locating the API server endpoint of the cluster, or run the command kubectl cluster-info.
Enter the namespace that will be utilized in the Kubernetes Namespace field. This will determine where the dynamic kubernetes pods will spawn. In our case, the name of the namespace is jenkins.
During the initial setup of Jenkins Manager on kubernetes, there is an environment variable JENKINS_URL that automatically utilizes the Load Balancer URL to resolve requests. However, we will resolve our requests locally to the cluster IP address.
The format is as follows: https://<service-name>.<namespace>.svc.cluster.local

Figure 4b. Configure Kubernetes Cloud
Set AWS Credentials
Security concerns are a key reason why we’re utilizing an IAM role instead of access keys. For any given approach involving IAM, it is the best practice to utilize temporary credentials.
You must have the AWS Credentials Binding Plugin installed before this step. Enter the unique ID name as shown in the example below.
Enter the IAM Role ARN you created earlier for both the ID and IAM Role to use in the field as shown below.

Figure 5. AWS Credentials Binding

Figure 6. Managed Credentials
Create a pipeline
Navigate to the Jenkins main menu and select new item
Create a Pipeline

Figure 7. Create a pipeline
Configure Jenkins Agent
Setup a Kubernetes YAML template after you’ve built the agent image. In this example, we will be using the k8sPodTemplate.yaml file stored in the k8s/ folder.
Configure Jenkins Agent k8s Pod Template
CloudFormation Execution Scripts
This deploy-stack.sh file can accept four different parameters and conduct several types of CloudFormation stack executions such as deploy, create-changeset, and execute-changeset. This is also reflected in the stages of this Jenkinsfile pipeline. As for the delete-stack.sh file, two parameters are accepted, and, when executed, it will delete a CloudFormation stack based on the given stack name and region.
Understanding Pipeline Execution Scripts for CloudFormation
Jenkinsfile
In this Jenkinsfile, the individual pipeline build jobs will deploy individual microservices. The k8sPodTemplate.yaml is utilized to specify the kubernetes pod details and the inbound-agent that will be utilized to run the pipeline.
Jenkinsfile Parameterized Pipeline Configurations
Jenkins Pipeline: Execute a pipeline
Click Build with Parameters and then select a build action.

Figure 8a. Build with Parameters
Examine the pipeline stages even further for the choice you selected. Also, view more details of the stages below and verify in your AWS account that the CloudFormation stack was executed.

Figure 8b. Pipeline Stage View
The Final Step is to execute your pipeline and watch the pods spin up dynamically in your terminal. As is shown below, the Jenkins agent pod spawned and then terminated after the work completed. Watch this task on your own by executing the following command:
# Watch the pods spawn in the "jenkins" namespace
kubectl get pods -n jenkins -w

Figure 9. Watch Jenkins Agent Pods Spawn
Code Repository
Amazon EKS Jenkins Integration
References
Jenkins Kubernetes Plugin
CloudBees AWS Credentials Plugin
Cleanup
In order to avoid incurring future charges, delete the resources utilized in the walkthrough.
Delete the EKS cluster. You can utilize the eksctl to delete the cluster.
Delete any remaining AWS resources created by EKS such as AWS LoadBalancer, Target Groups, etc.
Delete any related IAM entities.
Conclusion
This post walked you through the process of building out Amazon EKS based infrastructure and integrating Jenkins to orchestrate workloads. We demonstrated how you can utilize this to deploy securely across multiple accounts with dynamic Jenkins agents and create alignment to your business with similar use cases. To learn more about Amazon EKS, see our documentation pages or explore our console.
Finding code inconsistencies using Amazon CodeGuru Reviewer
=======================
Here we are introducing the inconsistency detector for Java in Amazon CodeGuru Reviewer. CodeGuru Reviewer automatically analyzes pull requests (created in supported repositories such as AWS CodeCommit, GitHub, GitHub Enterprise, and Bitbucket) and generates recommendations for improving code quality. For more information, see Automating code reviews and application profiling with Amazon CodeGuru.
The Inconsistency Principle
Software is repetitive, so it’s possible to mine usage specifications from the mining of large code bases. While the mined specifications are often correct, specification violations are not often bugs. This is because the code uses are contextual, therefore contextual analysis is required to detect genuine violations. Moreover, naive enforcement of learned specifications leads to many false positives. The inconsistency principle is based on the following observation: While deviations from frequent behavior (or specifications) are often permissible across repositories or packages, deviations from frequent behavior inside of a given repository are worthy of investigation by developers, and these are often bugs or code smells.
Consider the following example. Assume that within a repository or package, we observe 10 occurrences of this statement:
private static final String stage = AppConfig.getDomain().toLowerCase();
And assume that there is one occurrence of the following statement in the same package:
private static final String newStage = AppConfig.getDomain();
The inconsistency can be described as: in this package, typically there is an API call of toLowerCase() follows AppConfig.getDomain() that converts the string generated by AppConfig.getDomain() to its lower-case correspondence. However, in one occurrence, the call is missing. This should be examined.
In summary, the inconsistency detector can learn from a single package (read: your own codebase) and can identify common code usage patterns in the code, such as common patterns of logging, throwing and handling exceptions, performing null checks, etc. Next, usage patterns inconsistent with frequent usage patterns are flagged. While the flagged violations are most often bugs or code smells, it is possible that in some cases the majority usage patterns are the anti-patterns and the flagged violations are actually correct. Mining and detection are conducted on-the-fly during code analysis, and neither the code nor the patterns are persisted. This ensures that the customer code privacy requirements are preserved.
Diverse Recommendations
Perhaps the most distinguishing feature of the inconsistency detector family is how it is based on learning from the customer’s own code while conducting analysis on-the-fly without persisting the code. This is rather different than the pre-defined rules or dedicated ML algorithms targeting specific code defects like concurrency. These approaches also persist learned patterns or models. Therefore, the inconsistency principle-based detectors are much more diversified and spread out to a wide range of code problems.
Our approach aims to automatically detect inconsistent code pieces that are abnormal and deviant from common code patterns in the same package—assuming that the common behaviors are correct. This anomaly detection approach doesn’t require prior knowledge and minimizes the human effort to predefine rule sets, as it can automatically and implicitly “infer” rules, i.e., common code patterns, from the source code. While inconsistencies can be detected in the specific aspects of programs (such as synchronization, exceptions, logging, etc.), CodeGuru Reviewer can detect inconsistencies in multiple program aspects. The detections aren’t restricted to specific code defect types, but instead cover diverse code issue categories. These code defects may not necessarily be bugs, but they could also be code smells that should be avoided for better code maintenance and readability. CodeGuru Reviewer can detect 12 types of code inconsistencies in Java code. These detectors identify issues like typos, inconsistent messaging, inconsistent logging, inconsistent declarations, general missing API calls, missing null checks, missing preconditions, missing exceptions, etc. Now let’s look at several real code examples (they may not cover all types of findings).
Typo
Typos frequently appear in code messages, logs, paths, variable names, and other strings. Even simple typos can be difficult to find and can cause severe issues in your code. In a real code example below, the developer is setting a configuration file location.
context.setConfigLocation("com.amazom.daas.customerinfosearch.config");
The inconsistency detector identifies a typo in the path amazom → amazon. Failure to identify and fix this typo will make the configuration location not found. Accordingly, the developer fixed the typo. In some other cases, certain typos are customized to the customer code and may be difficult to find via pre-defined rules or vocabularies. In the example below, the developer sets a bean name as a string.
public static final String COOKIE_SELECTOR_BEAN_NAME = "com.amazon.um.webapp.config.CookiesSelectorService";
The inconsistency detector learns from the entire codebase and identifies that um should instead be uam, as uam appears in multiple similar cases in the code, thereby making the use of um abnormal. The developer responded “Cool!” to this finding and accordingly made the fix.
Inconsistent Logging
In the example below, the developer is logging an exception related to a missing field, ID_FIELD.
log.info ("Missing {} from data {}", ID_FIELD, data);
The inconsistency detector learns the patterns in the developer’s code and identifies that, in 47 other similar cases of the same codebase, the developer’s code uses a log level of error instead of info, as shown below.
log.error ("Missing {} from data {}", ID_FIELD, data);
Utilizing the appropriate log level can improve the application debugging process and ensure that developers are aware of all potential issues within their applications. The message from the CodeGuru Reviewer was “The detector found 47 occurrences of code with logging similar to the selected lines. However, the logging level in the selected lines is not consistent with the other occurrences. We recommend you check if this is intentional. The following are some examples in your code of the expected level of logging in similar occurrences: log.error (“Missing {} from data {}”, ID_FIELD, data); …”
The developer acknowledges the recommendation to make the log level consistent, and they made the corresponding change to upgrade the level from info to error.
Apart from log levels, the inconsistency detector also identifies potentially missing log statements in your code, and it ensures that the log messages are consistent across the entire codebase.
Inconsistent Declaration
The inconsistency detector also identifies inconsistencies in variable or method declarations. For instance, a typical example is missing a final keyword for certain variables or functions. While a variable doesn’t always need to be declared final, the inconsistency determines certain variables as final by inferring from other appearances of the variables. In the example below, the developer declares a method with the variable request.
protected ExecutionContext setUpExecutionContext(ActionRequest request) {
Without prior knowledge, the inconsistency learns from 9 other similar occurrences of the same codebase, and it determines that the request should be with final keyword. The developer responded by saying “Good catch!”, and then made the change.
Missing API
Missing API calls is a typical code bug, and their identification is highly valued by customers. The inconsistency detector can find these issues via the inconsistency principle. In the example below, the developer deletes stale entities in the document object.
private void deleteEntities(Document document) {
...
for (Entity returnEntity : oldReturnCollection) {
document.deleteEntity(returnEntity);
}
}
The inconsistency detector learns from 4 other similar methods in the developer’s codebase, and then determines that the API document.deleteEntity() is strongly associated with another API document.acceptChanges(), which is usually called after document.deleteEntity() in order to ensure that the document can accept other changes, while it is missing in this case. Therefore, the inconsistency detector recommends adding the document.acceptChanges() call. Another human reviewer agrees with CodeGuru’s suggestion, and they also refer to the coding guidelines of their platform that echo with CodeGuru’s recommendation. The developer made the corresponding fix as shown below.
private void deleteEntities(Document document) {
...
for (Entity returnEntity : oldReturnCollection) {
document.deleteEntity(returnEntity);
}
document.acceptChanges();
}
Null Check
Consider the following code snippet:
String ClientOverride = System.getProperty(MB_CLIENT_OVERRIDE_PROPERTY);
if (ClientOverride != null) {
log.info("Found Client override {}", ClientOverride);
config.setUnitTestOverride(ConfigKeys.Client, ClientOverride);
}
String ServerOverride = System.getProperty(MB_SERVER_OVERRIDE_PROPERTY);
if (ClientOverride != null) {
log.info("Found Server override {}", ServerOverride);
config.setUnitTestOverride(ConfigKeys.ServerMode, ServerOverride);
}
CodeGuru Reviewer indicates that the output generated by the System.getProperty(MB_SERVER_OVERRIDE_PROPERTY) misses a null-check. A null-check appears to be available in the next line. However, if we look carefully, that null check is not applied to the correct output. It is a copy-paste error, and instead of checking on ServerOverride it checks ClientOverride. The developer fixed the code as the recommendation suggested.
Exception Handling
The following example shows an inconsistency finding regarding exception handling.
Detection:
try {
if (null != PriceString) {
final Double Price = Double.parseDouble(PriceString);
if (Price.isNaN() || Price <= 0 || Price.isInfinite()) {
throw new InvalidParameterException(
ExceptionUtil.getExceptionMessageInvalidParam(PRICE_PARAM));
}
}
} catch (NumberFormatException ex) {
throw new InvalidParameterException(ExceptionUtil.getExceptionMessageInvalidParam(PRICE_PARAM));
}
Supporting Code Block:
try {
final Double spotPrice = Double.parseDouble(launchTemplateOverrides.getSpotPrice());
if (spotPrice.isNaN() || spotPrice <= 0 || spotPrice.isInfinite()) {
throw new InvalidSpotFleetRequestConfigException(
ExceptionUtil.getExceptionMessageInvalidParam(LAUNCH_TEMPLATE_OVERRIDE_SPOT_PRICE_PARAM));
}
} catch (NumberFormatException ex) {
throw new InvalidSpotFleetRequestConfigException(
ExceptionUtil.getExceptionMessageInvalidParam(LAUNCH_TEMPLATE_OVERRIDE_SPOT_PRICE_PARAM));
}
There are 4 occurrences of handling an exception thrown by Double.parseDouble using catch with InvalidSpotFleetRequestConfigException(). The detected code snippet with an incredibly similar context simply uses InvalidParameterException(), which does not provide as much detail as the customized exception. The developer responded with “yup the detection sounds right”, and then made the revision.
Responses to the Inconsistency Detector Findings
Large repos are typically developed by more than one developer over a period of time. Therefore, maintaining consistency for the code snippets that serve the same or similar purpose, code style, etc., can easily be overlooked, especially for repos with months or years of development history. As a result, the inconsistency detector in CodeGuru Reviewer has flagged numerous findings and alerted developers within Amazon regarding hundreds of inconsistency issues before they hit production.
The inconsistency detections have witnessed a high developer acceptance rate, and developer feedback of the inconsistency detector has been very positive. Some feedback from the developers includes “will fix. Didn’t realize as this was just copied from somewhere else.”, “Oops!, I’ll correct it and use consistent message format.”, “Interesting. Now it’s learning from our own code. AI is trying to take our jobs haha”, and “lol yeah, this was pretty surprising”. Developers have also concurred that the findings are essential and must be fixed.
Conclusion
Inconsistency bugs are difficult to detect or replicate during testing. They can impact production services availability. As a result, it’s important to automatically detect these bugs early in the software development lifecycle, such as during pull requests or code scans. The CodeGuru Reviewer inconsistency detector combines static code analysis algorithms with ML and data mining in order to surface only the high confidence deviations. It has a high developer acceptance rate and has alerted developers within Amazon to hundreds of inconsistencies before they reach production.
CDK Corner – August 2021
=======================
We’re now well into the dog days of summer but that hasn’t slowed down the community one bit. In the past few months the team has delivered 3 big features that I think the community will love. The biggest new feature is the Construct Hub Developer Preview. Alex Pulver describes it as “a one-stop destination for finding, reusing, and sharing constructs”. The Construct Hub features constructs created by AWS, AWS Partner Network (APN) Partners, and the community. While the Construct Hub only includes TypeScript and Python constructs today, we will be adding support for the remaining jsii-supported languages in the coming months.
The next big release is the General Availability of CDK Pipelines. Instead of writing a new blog post for the General Availability launch, Rico updated the original announcement post to reflect updates made for GA. CDK Pipelines is a high-level construct library that makes it easy to set up a continuous deployment pipeline for your CDK-based applications. CDK Pipelines was announced last year and has seen several improvements, such as support for Docker registry credentials, cached builds, and getting started templates. To get started with your own CDK Pipelines, refer to the original launch blog post, that Rico has kindly updated for the GA announcement.
Since the launch of AWS CDK, customers have asked for a way to test their CDK constructs. The CDK assert library was previously only available for constructs written in TypeScript. With this new release, in which we have re-written the assert library to support jsii and renamed it the assertions library, customers can now test CDK constructs written in any supported language. The assertions library enables customers to test the generated AWS CloudFormation templates that a construct produces to ensure that the construct is designed and implemented properly. In June, Niranjan delivered an initial version of the assert library available in all supported languages. The RFC for “polyglot assert” describes the motivation fot this feature and some examples for using it.
Some key new constructs for AWS services include: – New L1 Constructs for AWS Location Services – New L2 Constructs for AWS CodeStar Connections – New L2 Constructs for Amazon CloudFront Functions – New L2 Constructs for AWS Service Catalog App Registry
This edition’s featured contribution comes from AWS Community Hero Philipp Garbe. Philipp added the ability to load Docker images from an existing tarball instead of rebuilding it from a Dockerfile.
Page 1|Page 2|Page 3|Page 4