Contents of this page is copied directly from AWS blog sites to make it Kindle friendly. Some styles & sections from these pages are removed to render this properly in 'Article Mode' of Kindle e-Reader browser. All the contents of this page is property of AWS.
Use Amazon ECS Fargate Spot with CircleCI to deploy and manage applications in a cost-effective way
=======================
This post is written by Pritam Pal, Sr EC2 Spot Specialist SA & Dan Kelly, Sr EC2 Spot GTM Specialist
Customers are using Amazon Web Services (AWS) to build CI/CD pipelines and follow DevOps best practices in order to deliver products rapidly and reliably. AWS services simplify infrastructure provisioning and management, application code deployment, software release processes automation, and application and infrastructure performance monitoring. Builders are taking advantage of low-cost, scalable compute with Amazon EC2 Spot Instances, as well as AWS Fargate Spot to build, deploy, and manage microservices or container-based workloads at a discounted price.
Amazon EC2 Spot Instances let you take advantage of unused Amazon Elastic Compute Cloud (Amazon EC2) capacity at steep discounts as compared to on-demand pricing. Fargate Spot is an AWS Fargate capability that can run interruption-tolerant Amazon Elastic Container Service (Amazon ECS) tasks at up to a 70% discount off the Fargate price. Since tasks can still be interrupted, only fault tolerant applications are suitable for Fargate Spot. However, for flexible workloads that can be interrupted, this feature enables significant cost savings over on-demand pricing.
CircleCI provides continuous integration and delivery for any platform, as well as your own infrastructure. CircleCI can automatically trigger low-cost, serverless tasks with AWS Fargate Spot in Amazon ECS. Moreover, CircleCI Orbs are reusable packages of CircleCI configuration that help automate repeated processes, accelerate project setup, and ease third-party tool integration. Currently, over 1,100 organizations are utilizing the CircleCI Amazon ECS Orb to power/run 250,000+ jobs per month.
Customers are utilizing Fargate Spot for a wide variety of workloads, such as Monte Carlo simulations and genomic processing. In this blog, I utilize a python code with the Tensorflow library that can run as a container image in order to train a simple linear model. It runs the training steps in a loop on a data batch and periodically writes checkpoints to S3. If there is a Fargate Spot interruption, then it restores the checkpoint from S3 (when a new Fargate Instance occurs) and continues training. We will deploy this on AWS ECS Fargate Spot for low-cost, serverless task deployment utilizing CircleCI.
Concepts
Before looking at the solution, let’s revisit some of the concepts we’ll be using.
Capacity Providers: Capacity providers let you manage computing capacity for Amazon ECS containers. This allows the application to define its requirements for how it utilizes the capacity. With capacity providers, you can define flexible rules for how containerized workloads run on different compute capacity types and manage the capacity scaling. Furthermore, capacity providers improve the availability, scalability, and cost of running tasks and services on Amazon ECS. In order to run tasks, the default capacity provider strategy will be utilized, or an alternative strategy can be specified if required.
AWS Fargate and AWS Fargate Spot capacity providers don’t need to be created. They are available to all accounts and only need to be associated with a cluster for utilization. When a new cluster is created via the Amazon ECS console, along with the Networking-only cluster template, the FARGATE and FARGATE_SPOT capacity providers are automatically associated with the new cluster.
CircleCI Orbs: Orbs are reusable CircleCI configuration packages that help automate repeated processes, accelerate project setup, and ease third-party tool integration. Orbs can be found in the developer hub on the CircleCI orb registry. Each orb listing has usage examples that can be referenced. Moreover, each orb includes a library of documented components that can be utilized within your config for more advanced purposes. Since the 2.0.0 release, the AWS ECS Orb supports the capacity provider strategy parameter for running tasks allowing you to efficiently run any ECS task against your new or existing clusters via Fargate Spot capacity providers.
Solution overview
Fargate Spot helps cost-optimize services that can handle interruptions like Containerized workloads, CI/CD, or Web services behind a load balancer. When Fargate Spot needs to interrupt a running task, it sends a SIGTERM signal. It is best practice to build applications capable of responding to the signal and shut down gracefully.
This walkthrough will utilize a capacity provider strategy leveraging Fargate and Fargate Spot, which mitigates risk if multiple Fargate Spot tasks get terminated simultaneously. If you’re unfamiliar with Fargate Spot, capacity providers, or capacity provider strategies, read our previous blog about Fargate Spot best practices here.
Prerequisites
Our walkthrough will utilize the following services:
CircleCI for demonstrating a CI/CD pipeline. We will utilize CircleCI Cloud Free version, which allows 2,500 free credits/week and can run 1 job at a time.
We will run a Job with CircleCI ECS Orb in order to deploy 4 ECS Tasks on Fargate and Fargate Spot. You should have the following prerequisites:
An AWS account
A GitHub account
Walkthrough
Step 1: Create AWS Keys for Circle CI to utilize.
Head to AWS IAM console, create a new user, i.e., circleci, and select only the Programmatic access checkbox. On the set permission page, select Attach existing policies directly. For the sake of simplicity, we added a managed policy AmazonECS_FullAccess to this user. However, for production workloads, employ a further least-privilege access model. Download the access key file, which will be utilized to connect to CircleCI in the next steps.
Step 2: Create an ECS Cluster, Task definition, and ECS Service
2.2 From the navigation bar, select the Region to use
2.3 In the navigation pane, choose Clusters
2.4 On the Clusters page, choose Create Cluster
2.5 Create a Networking only Cluster ( Powered by AWS Fargate)
This option lets you launch a cluster in your existing VPC to utilize for Fargate tasks. The FARGATE and FARGATE_SPOT capacity providers are automatically associated with the cluster.
2.6 Click on Update Cluster to define a default capacity provider strategy for the cluster, then add FARGATE and FARGATE_SPOT capacity providers each with a weight of 1. This ensures Tasks are divided equally among Capacity providers. Define other ratios for splitting your tasks between Fargate and Fargate Spot tasks, i.e., 1:1, 1:2, or 3:1.
2.7 Here we will create a Task Definition by using the Fargate launch type, give it a name, and specify the task Memory and CPU needed to run the task. Feel free to utilize any Fargate task definition. You can use your own code, add the code in a container, or host the container in Docker hub or Amazon ECR. Provide a name and image URI that we copied in the previous step and specify the port mappings. Click Add and then click Create.
We are also showing an example of a python code using the Tensorflow library that can run as a container image in order to train a simple linear model. It runs the training steps in a loop on a batch of data, and it periodically writes checkpoints to S3. Please find the complete code here. Utilize a Dockerfile to create a container from the code.
Sample Docker file to create a container image from the code mentioned above.
FROM ubuntu:18.04
WORKDIR /app
COPY . /app
RUN pip install -r requirements.txt EXPOSE 5000 CMD python tensorflow_checkpoint.py
Below is the Code Snippet we are using for Tensorflow to Train and Checkpoint a Training Job.
def train_and_checkpoint(net, manager):
ckpt.restore(manager.latest_checkpoint).expect_partial()
if manager.latest_checkpoint:
print("Restored from {}".format(manager.latest_checkpoint))
else:
print("Initializing from scratch.")
for _ in range(5000):
example = next(iterator)
loss = train_step(net, example, opt)
ckpt.step.assign_add(1)
if int(ckpt.step) % 10 == 0:
save_path = manager.save()
list_of_files = glob.glob('tf_ckpts/*.index')
latest_file = max(list_of_files, key=os.path.getctime)
upload_file(latest_file, 'pythontfckpt', object_name=None)
list_of_files = glob.glob('tf_ckpts/*.data*')
latest_file = max(list_of_files, key=os.path.getctime)
upload_file(latest_file, 'pythontfckpt', object_name=None)
upload_file('tf_ckpts/checkpoint', 'pythontfckpt', object_name=None)
2.8 Next, we will create an ECS Service, which will be used to fetch Cluster information while running the job from CircleCI. In the ECS console, navigate to your Cluster, From Services tab, then click create. Create an ECS service by choosing Cluster default strategy from the Capacity provider strategy dropdown. For the Task Definition field, choose webapp-fargate-task, which is the one we created earlier, enter a service name, set the number of tasks to zero at this point, and then leave everything else as default. Click Next step, select an existing VPC and two or more Subnets, keep everything else default, and create the service.
Step 3: GitHub and CircleCI Configuration
Create a GitHub repository, i.e., circleci-fargate-spot, and then create a .circleci folder and a config file config.yml. If you’re unfamiliar with GitHub or adding a repository, check the user guide here.
For this project, the config.yml file contains the following lines of code that configure and run your deployments.
Now, Create a CircleCI account. Choose Login with GitHub. Once you’re logged in from the CircleCI dashboard, click Add Project and add the project circleci-fargate-spot from the list shown.
When working with CircleCI Orbs, you will need the config.yml file and environment variables under Project Settings.
The config file utilizes CircleCI version 2.1 and various Orbs, i.e., AWS-ECS, AWS-CLI, and JQ. We will use a job test-fargatespot, which uses a Docker image, and we will setup the environment. In config.yml we are using the jq tool to parse JSON and fetch the ECS cluster information like VPC config, Subnets, and Security Groups needed to run an ECS task. As we are utilizing the capacity-provider-strategy, we will set the launch type parameter to an empty string.
In order to run a task, we will demonstrate how to override the default Capacity Provider strategy with Fargate & Fargate Spot, both with a weight of 1, and to divide tasks equally among Fargate & Fargate Spot. In our example, we are running 4 tasks, so 2 should run on Fargate and 2 on Fargate Spot.
Parameters like ECS_SERVICE_NAME, ECS_CLUSTER_NAME and other AWS access specific details are added securely under Project Settings and can be utilized by other jobs running within the project.
Add the following environment variables under Project Settings
AWS_ACCESS_KEY_ID – From Step 1
AWS_SECRET_ACCESS_KEY – From Step 1
AWS_DEFAULT_REGION – i.e. : – us-west-2
ECS_CLUSTER_NAME – From Step 2
ECS_SERVICE_NAME – From Step 2
SECURITY_GROUP_IDS – Security Group that will be used to run the task
Step 4: Run Job
Now in the CircleCI console, navigate to your project, choose the branch, and click Edit Config to verify that config.xml is correctly populated. Check for the ribbon at the bottom. A green ribbon means that the config file is valid and ready to run. Click Commit & Run from the top-right menu.
Click build Status to check its progress as it runs.
A successful build should look like the one below. Expand each section to see the output.
Return to the ECS console, go to the Tasks Tab, and check that 4 new tasks are running. Click each task for the Capacity provider details. Two tasks should have run with FARGATE_SPOT as a Capacity provider, and two should have run with FARGATE.
Congratulations!
You have successfully deployed ECS tasks utilizing CircleCI on AWS Fargate and Fargate Spot. If you have used any sample web applications, then please use the public IP address to see the page. If you have used the sample code that we provided, then you should see Tensorflow training jobs running on Fargate instances. If there is a Fargate Spot interruption, then it restores the checkpoint from S3 when a new Fargate Instance comes up and continues training.
Cleaning up
In order to avoid incurring future charges, delete the resources utilized in the walkthrough. Go to the ECS console and Task tab.
Delete any running Tasks.
Delete ECS cluster.
Delete the circleci user from IAM console.
Cost analysis in Cost Explorer
In order to demonstrate a cost breakdown between the tasks running on Fargate and Fargate Spot, we left the tasks running for a day. Then, we utilized Cost Explorer with the following filters and groups in order discover the savings by running Fargate Spot.
Apply a filter on Service for ECS on the right-side filter, set Group by to Usage Type, and change the time period to the specific day.
The cost breakdown demonstrates how Fargate Spot usage (indicated by “SpotUsage”) was significantly less expensive than non-Spot Fargate usage. Current Fargate Spot Pricing can be found here.
Conclusion
In this blog post, we have demonstrated how to utilize CircleCI to deploy and manage ECS tasks and run applications in a cost-effective serverless approach by using Fargate Spot.
Author bio
Improve the performance of Lambda applications with Amazon CodeGuru Profiler
=======================
As businesses expand applications to reach more users and devices, they risk higher latencies that could degrade the customer experience. Slow applications can frustrate or even turn away customers. Developers therefore increasingly face the challenge of ensuring that their code runs as efficiently as possible, since application performance can make or break businesses.
Amazon CodeGuru Profiler helps developers improve their application speed by analyzing its runtime. CodeGuru Profiler analyzes single and multi-threaded applications and then generates visualizations to help developers understand the latency sources. Afterwards, CodeGuru Profiler provides recommendations to help resolve the root cause.
This post highlights these new features by explaining how to set up and utilize CodeGuru Profiler on an AWS Lambda function written in Python.
Prerequisites
This post focuses on improving the performance of an application written with AWS Lambda, so it’s important to understand the Lambda functions that work best with CodeGuru Profiler. You will get the most out of CodeGuru Profiler on long-duration Lambda functions (>10 seconds) or frequently invoked shorter generation Lambda functions (~100 milliseconds). Because CodeGuru Profiler requires five minutes of runtime data before the Lambda container is recycled, very short duration Lambda functions with an execution time of 1-10 milliseconds may not provide sufficient data for CodeGuru Profiler to generate meaningful results.
The automated CodeGuru Profiler onboarding process, which automatically creates the profiling group for you, supports Lambda functions running on Java 8 (Amazon Corretto), Java 11, and Python 3.8 runtimes. Additional runtimes, without the automated onboarding process, are supported and can be found in the Java documentation and the Python documentation.
Getting Started
Let’s quickly demonstrate the new Lambda onboarding process and the new Python recommendations. This example assumes you have already created a Lambda function, so we will just walk through the process of turning on CodeGuru Profiler and viewing results. If you don’t already have a Lambda function created, you can create one by following these set up instructions. If you would like to replicate this example, the code we used can be found on GitHub here.
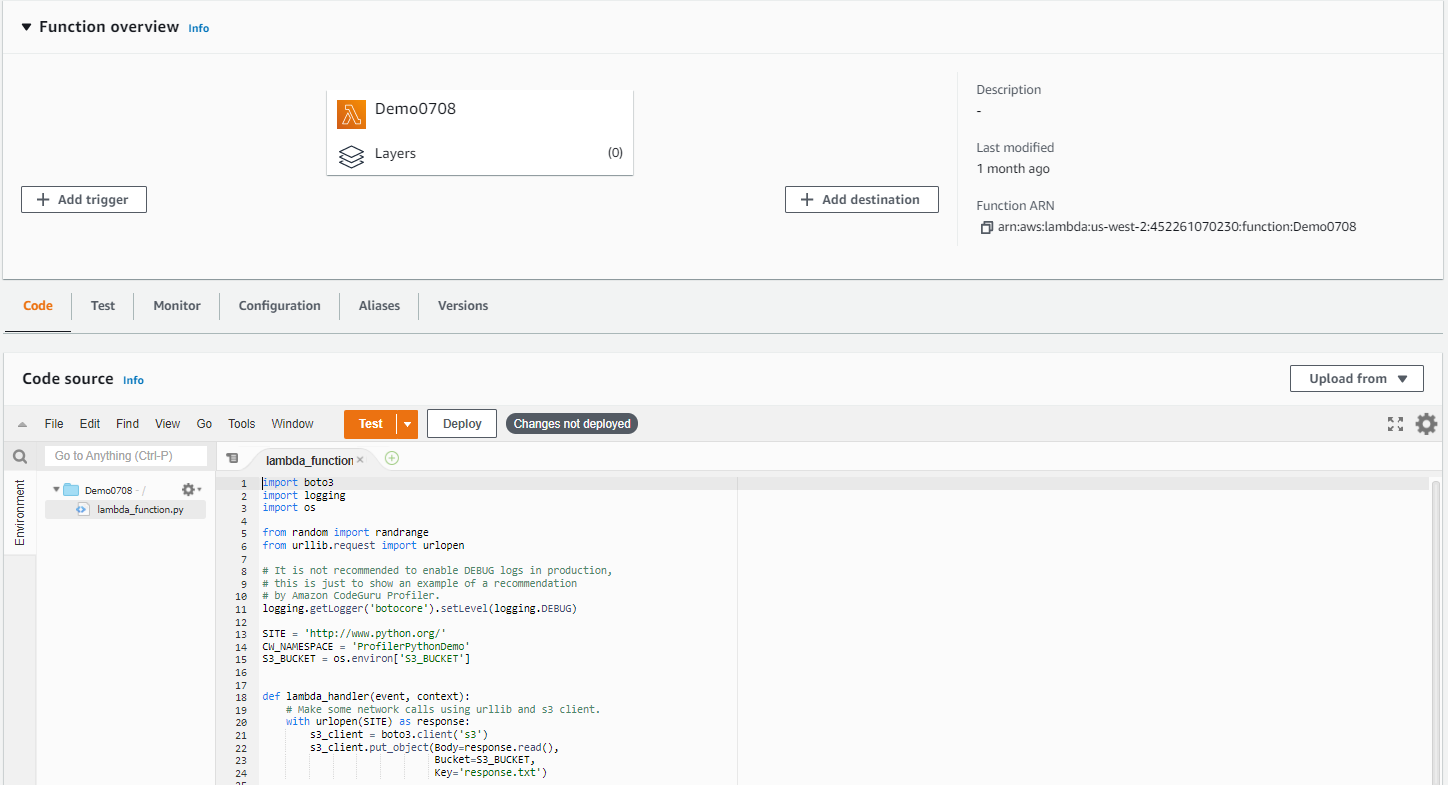
On the AWS Lambda Console page, open your Lambda function. For this example, we’re using a function with a Python 3.8 runtime.
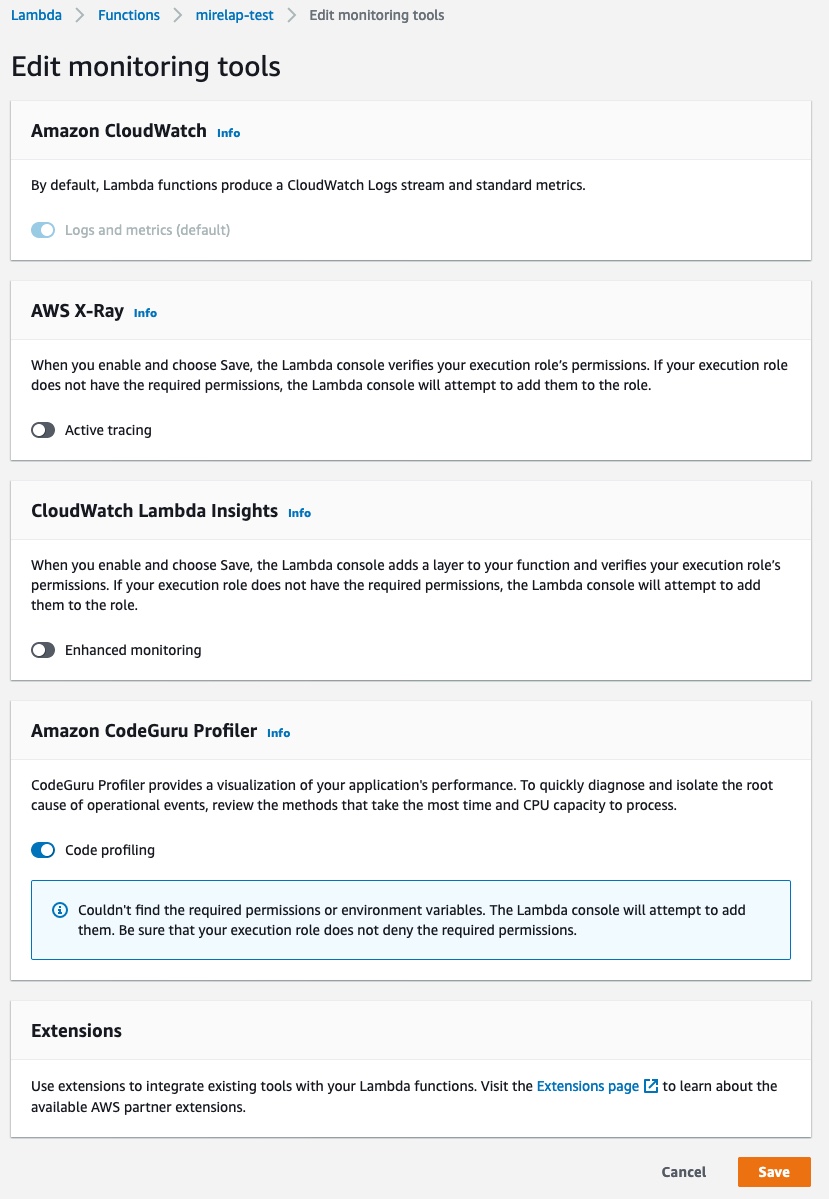
2. Navigate to the Configuration tab, go to the Monitoring and operations tools page, and click Edit on the right side of the page.
3. Scroll down to “Amazon CodeGuru Profiler” and click the button next to “Code profiling” to turn it on. After enabling Code profiling, click Save.
4. Verify that CodeGuru Profiler has been turned on within the Monitoring and operations tools page
That’s it! You can now navigate to CodeGuru Profiler within the AWS console and begin viewing results.
Viewing your results
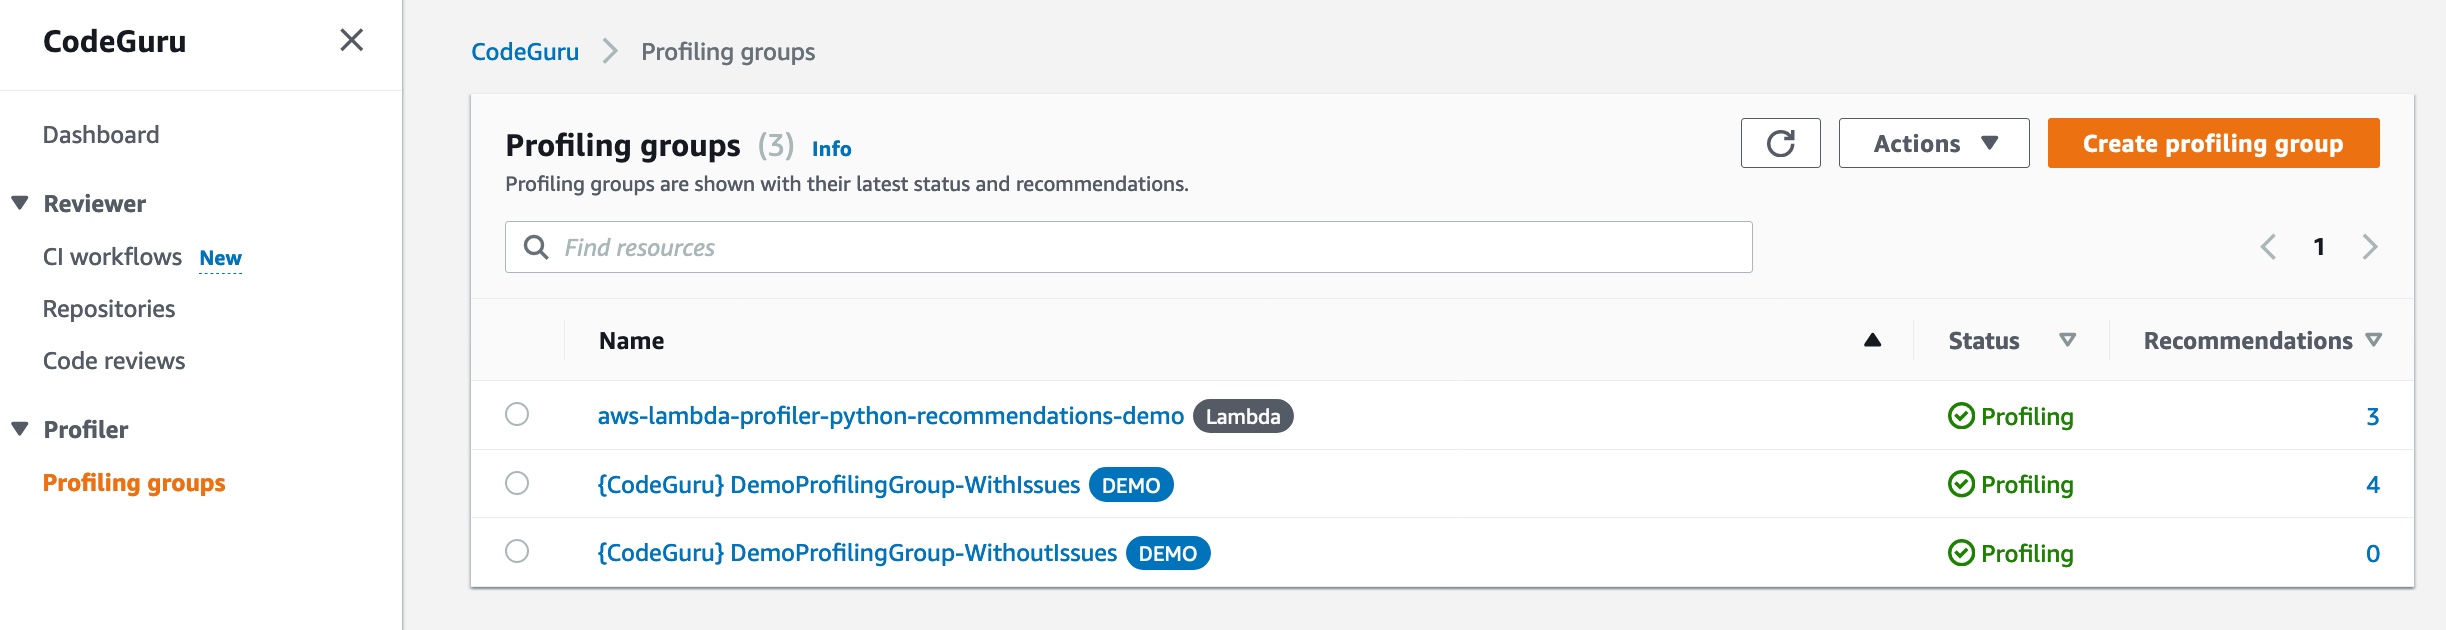
CodeGuru Profiler requires 5 minutes of Lambda runtime data to generate results. After your Lambda function provides this runtime data, which may need multiple runs if your lambda has a short runtime, it will display within the “Profiling group” page in the CodeGuru Profiler console. The profiling group will be given a default name (i.e., aws-lambda-<lambda-function-name>), and it will take approximately 15 minutes after CodeGuru Profiler receives the runtime data before it appears on this page.
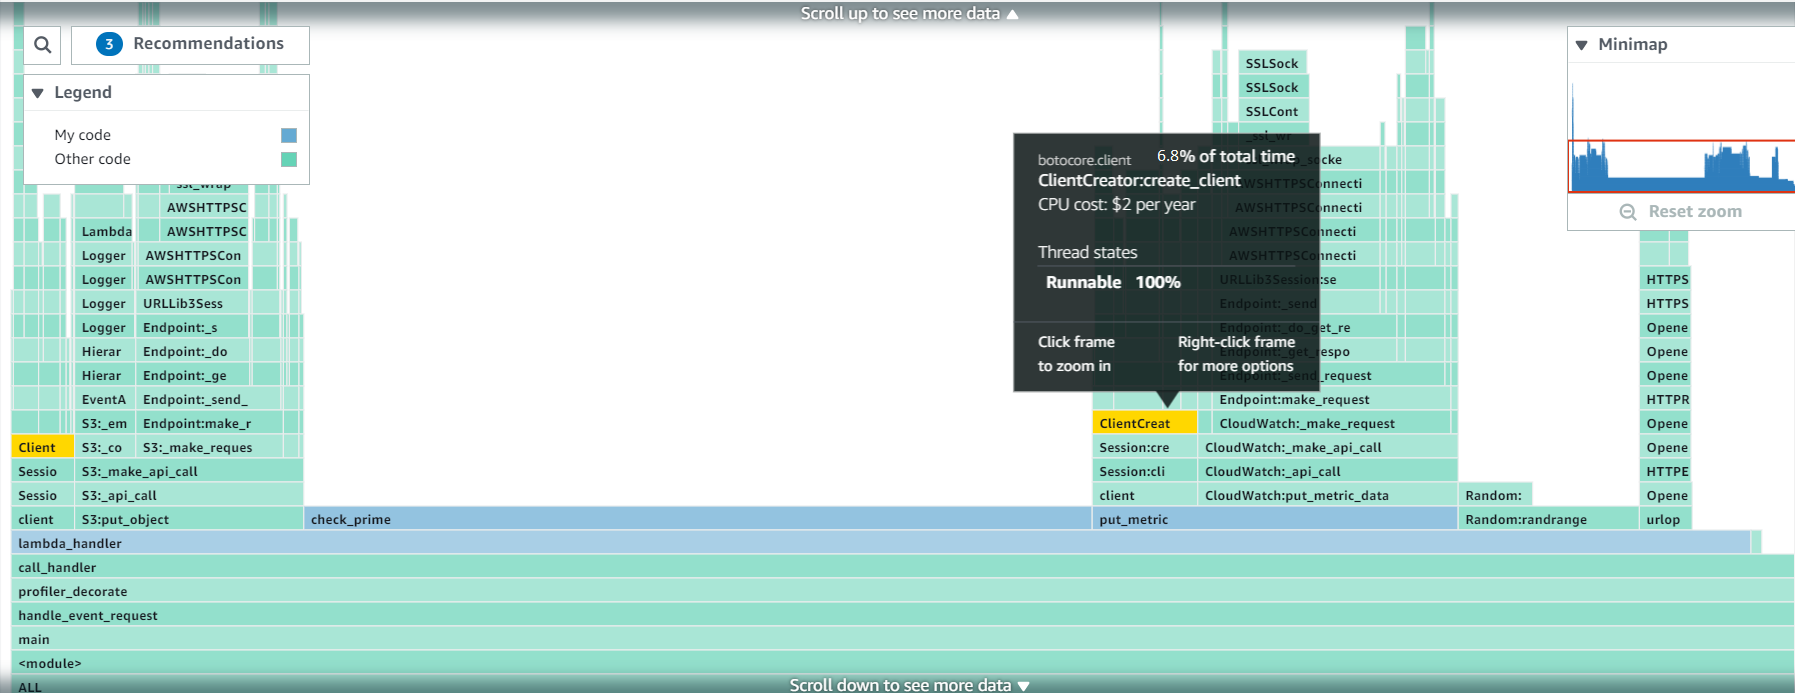
After the profile appears, customers can view their profiling results by analyzing the flame graphs. Additionally, after approximately 1 hour, customers will receive their first recommendation set (if applicable). For more information on how to reading the CodeGuru Profiler results, see Investigating performance issues with Amazon CodeGuru Profiler.
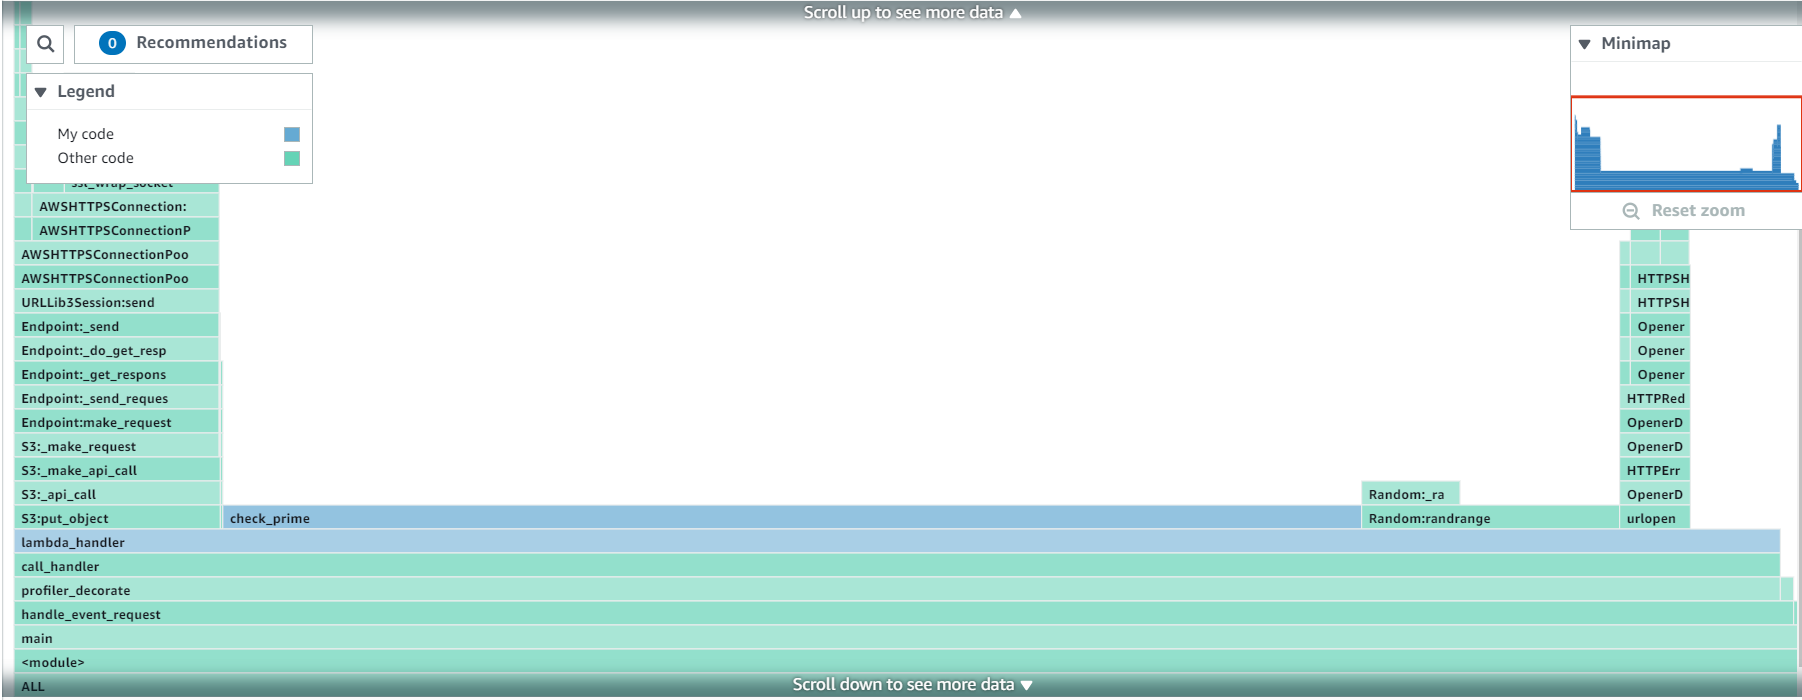
The below images show the two flame graphs (CPU Utilization and Latency) generated from profiling the Lambda function. Note that the highlighted horizontal bar (also referred to as a frame) in both images corresponds with one of the three frames that generates a recommendation. We’ll dive into more details on the recommendation in the following sections.
CPU Utilization Flame Graph:
Latency Flame Graph:
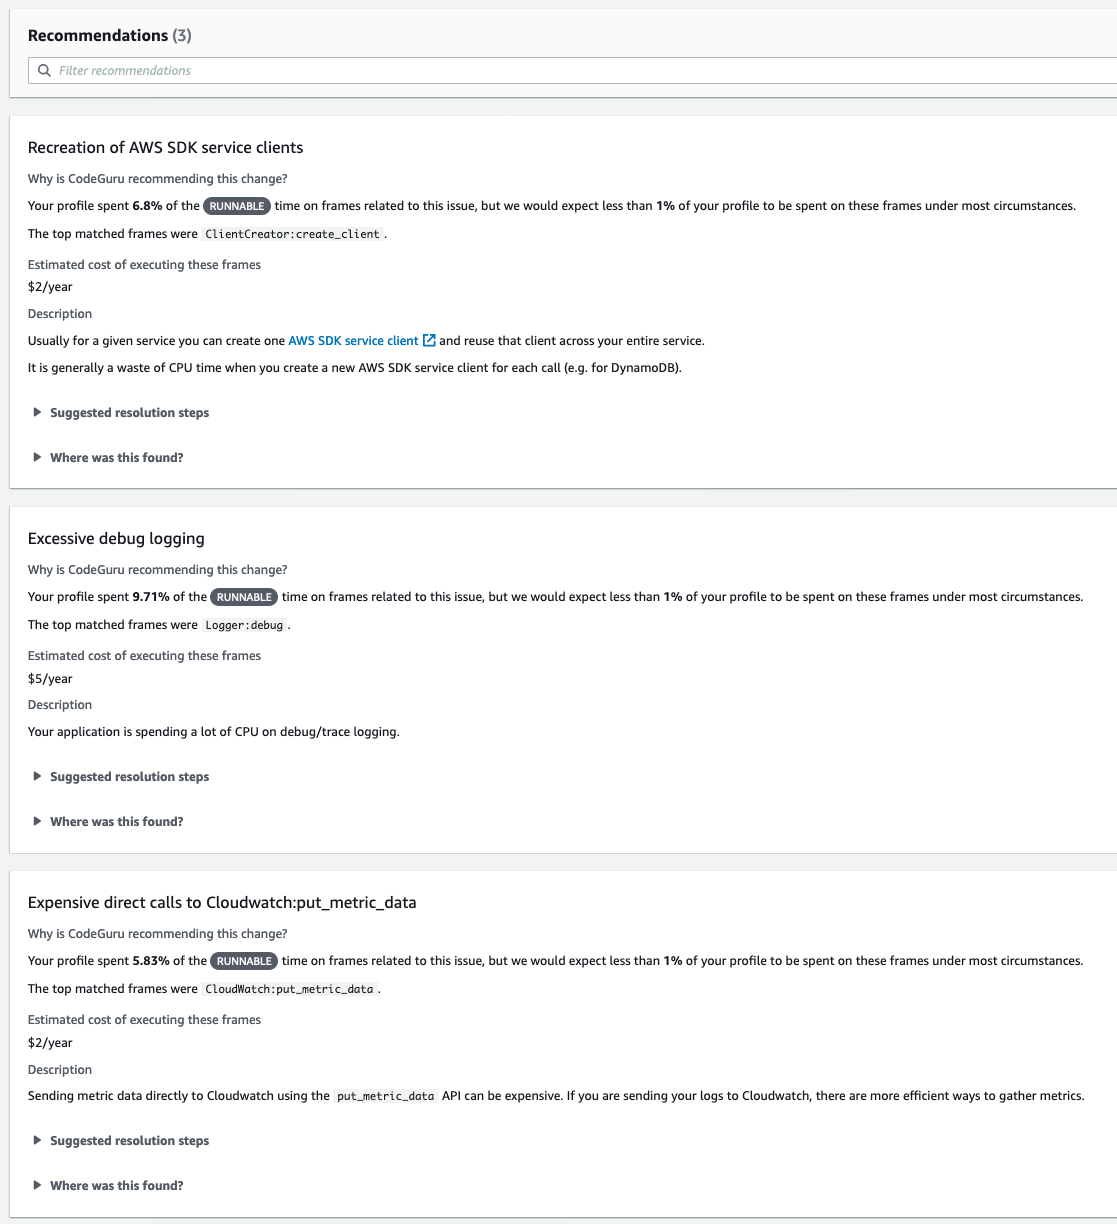
Here are the three recommendations generated from the above Lambda function:
Addressing a recommendation
Let’s dive even further into it an example recommendation. The first recommendation above notices that the Lambda function is spending more than the normal amount of runnable time (6.8% vs <1%) creating AWS SDK service clients. It recommends ensuring that the function doesn’t unnecessarily create AWS SDK service clients, which wastes CPU time.
Based on the suggested resolution step, we made a quick and easy code change, moving the client creation outside of the lambda-handler function. This ensures that we don’t create unnecessary AWS SDK clients. The code change below shows how we would resolve the issue.
After making each of the three changes recommended above by CodeGuru Profiler, look at the new flame graphs to see how the changes impacted the applications profile. You’ll notice below that we no longer see the previously wide frames for boto3 clients, put_metric_data, or the logger in the S3 API call.
CPU Utilization Flame Graph:
Latency Flame Graph:
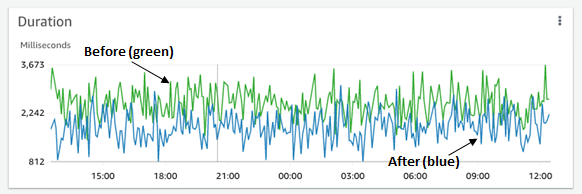
Moreover, we can run the Lambda function for one day (1439 invocations) and see the results in Lambda Insights in order to understand our total savings. After every recommendation was addressed, this Lambda function, with a 128 MB memory and 10 second timeout, decreased in CPU time by 10% and dropped in maximum memory usage and network IO leading to a 30% drop in GB-s. Decreasing GB-s leads to 30% lower cost for the Lambda’s duration bill as explained in the AWS Lambda Pricing.
Latency (before and after CodeGuru Profiler):
The graph below displays the duration change while running the Lambda function for 1 day.
Cost (before and after CodeGuru Profiler):
The graph below displays the function cost change while running the lambda function for 1 day.
Conclusion
This post showed how developers can easily onboard onto CodeGuru Profiler in order to improve the performance of their serverless applications built on AWS Lambda. Get started with CodeGuru Profiler by visiting the CodeGuru console.
All across Amazon, numerous teams have utilized CodeGuru Profiler’s technology to generate performance optimizations for customers. It has also reduced infrastructure costs, saving millions of dollars annually.
Onboard your Python applications onto CodeGuru Profiler by following the instructions on the documentation. If you’re interested in the Python agent, note that it is open-sourced on GitHub. Also for more demo applications using the Python agent, check out the GitHub repository for additional samples.
Build Next-Generation Microservices with .NET 5 and gRPC on AWS
Microservices commonly communicate with JSON over HTTP/1.1. These technologies are ubiquitous and human-readable, but they aren’t optimized for communication between dozens or hundreds of microservices.
Next-generation Web technologies, including gRPC and HTTP/2, significantly improve communication speed and efficiency between microservices. AWS offers the most compelling experience for builders implementing microservices. Moreover, the addition of HTTP/2 and gRPC support in Application Load Balancer (ALB) provides an end-to-end solution for next-generation microservices. ALBs can inspect and route gRPC calls, enabling features like health checks, access logs, and gRPC-specific metrics.
This post demonstrates .NET microservices communicating with gRPC via Application Load Balancers. The microservices run on AWS Graviton2 instances, utilizing a custom-built 64-bit Arm processor to deliver up to 40% better price/performance than x86.
Architecture Overview
Modern Tacos is a new restaurant offering delivery. Customers place orders via mobile app, then they receive real-time status updates as their order is prepared and delivered.
The tutorial includes two microservices: “Submit Order” and “Track Order”. The Submit Order service receives orders from the app, then it calls the Track Order service to initiate order tracking. The Track Order service provides streaming updates to the app as the order is prepared and delivered.
Each microservice is deployed in an Amazon EC2 Auto Scaling group. Each group is behind an ALB that routes gRPC traffic to instances in the group.
This architecture is simplified to focus on ALB and gRPC functionality. Microservices are often deployed in
containers for elastic scaling, improved reliability, and efficient resource utilization. ALB, gRPC, and .NET all work equally effectively in these architectures.
Comparing gRPC and JSON for microservices
Microservices typically communicate by sending JSON data over HTTP. As a text-based format, JSON is readable, flexible, and widely compatible. However, JSON also has significant weaknesses as a data interchange format. JSON’s flexibility makes enforcing a strict API specification difficult — clients can send arbitrary or invalid data, so developers must write rigorous data validation code. Additionally, performance can suffer at scale due to JSON’s relatively high bandwidth and parsing requirements. These factors also impact performance in constrained environments, such as smartphones and IoT devices. gRPC addresses all of these issues.
gRPC is an open-source framework designed to efficiently connect services. Instead of JSON, gRPC sends messages via a compact binary format called Protocol Buffers, or protobuf. Although protobuf messages are not human-readable, they utilize less network bandwidth and are faster to encode and decode. Operating at scale, these small differences multiply to a significant performance gain.
gRPC APIs define a strict contract that is automatically enforced for all messages. Based on this contract, gRPC implementations generate client and server code libraries in multiple programming languages. This allows developers to use higher-level constructs to call services, rather than programming against “raw” HTTP requests.
gRPC also benefits from being built on HTTP/2, a major revision of the HTTP protocol. In addition to the foundational performance and efficiency improvements from HTTP/2, gRPC utilizes the new protocol to support bi-directional streaming data. Implementing real-time streaming prior to gRPC typically required a completely separate protocol (such as WebSockets) that might not be supported by every client.
Instead of working with JSON, dynamic objects, or strings, C# developers calling a gRPC service use a strongly-typed client, automatically generated from the protobuf specification. This obviates much of the boilerplate validation required by JSON APIs, and it enables developers to use rich data structures. Additionally, the generated code enables full IntelliSense support in Visual Studio.
For example, the “Submit Order” microservice executes this code in order to call the “Track Order” microservice:
using var channel = GrpcChannel.ForAddress("https://track-order.example.com");
var trackOrderClient = new TrackOrder.Protos.TrackOrder.TrackOrderClient(channel);
var reply = await trackOrderClient.StartTrackingOrderAsync(new TrackOrder.Protos.Order
{
DeliverTo = "Address",
LastUpdated = Timestamp.FromDateTime(DateTime.UtcNow),
OrderId = order.OrderId,
PlacedOn = order.PlacedOn,
Status = TrackOrder.Protos.OrderStatus.Placed
});
This code calls the StartTrackingOrderAsync method on the Track Order client, which looks just like a local method call. The method intakes a data structure that supports rich data types like DateTime and enumerations, instead of the loosely-typed JSON. The methods and data structures are defined by the Track Order service’s protobuf specification, and the .NET gRPC tools automatically generate the client and data structure classes without requiring any developer effort.
Configuring ALB for gRPC
To make gRPC calls to targets behind an ALB, create a load balancer target group and select gRPC as the protocol version. You can do this through the AWS Management Console, AWS Command Line Interface (CLI), AWS CloudFormation, or AWS Cloud Development Kit (CDK).
This CDK code creates a gRPC target group:
var targetGroup = new ApplicationTargetGroup(this, "TargetGroup", new ApplicationTargetGroupProps
{
Protocol = ApplicationProtocol.HTTPS,
ProtocolVersion = ApplicationProtocolVersion.GRPC,
Vpc = vpc,
Targets = new IApplicationLoadBalancerTarget {...}
});
gRPC requests work with target groups utilizing HTTP/2, but the gRPC protocol enables additional features including health checks, request count metrics, access logs that differentiate gRPC requests, and gRPC-specific response headers. gRPC also works with native ALB features like stickiness, multiple load balancing algorithms, and TLS termination.
Deploy the Tutorial
The sample provisions AWS resources via the AWS Cloud Development Kit (CDK). The CDK code is provided in C# so that .NET developers can use a familiar language.
Open a terminal (such as Bash) or a PowerShell prompt.
Configure the environment variables needed by the CDK. In the sample commands below, replace AWS_ACCOUNT_ID with your numeric AWS account ID. Replace AWS_REGION with the name of the region where you will deploy the sample, such as us-east-1 or us-west-2.
If you’re using a *nix shell such as Bash, run these commands:
Throughout this tutorial, replace RED TEXT with the appropriate value.
Save the directory path where you cloned the GitHub repository. In the sample commands below, replace EXAMPLE_DIRECTORY with this path.
In your terminal or PowerShell, run these commands:
cd EXAMPLE_DIRECTORY/src/ModernTacoShop/Common/cdk
cdk bootstrap --context domain-name=PARENT_DOMAIN_NAME
cdk deploy --context domain-name=PARENT_DOMAIN_NAME
The CDK output includes the name of the S3 bucket that will store deployment packages. Save the name of this bucket. In the sample commands below, replace SHARED_BUCKET_NAME with this name.
Deploy the Track Order microservice
Compile the Track Order microservice for the Arm microarchitecture utilized by AWS Graviton2 processors. The TrackOrder.csproj file includes a target that automatically packages the compiled microservice into a ZIP file. You will upload this ZIP file to S3 for use by CodeDeploy. Next, you will utilize the CDK to deploy the microservice’s AWS infrastructure, and then install the microservice on the EC2 instance via CodeDeploy.
The CDK stack deploys these resources:
An Amazon EC2 Auto Scaling group.
An Application Load Balancer (ALB) using gRPC, targeting the Auto Scaling group and configured with microservice health checks.
A subdomain for the microservice, targeting the ALB.
A DynamoDB table used by the microservice.
CodeDeploy infrastructure to deploy the microservice to the Auto Scaling group.
The Submit Order ALB routes the gRPC call to an instance.
The Submit Order instance stores order data.
The Submit Order instance calls the Track Order service via gRPC.
The Track Order ALB routes the gRPC call to an instance.
The Track Order instance stores tracking data.
The app calls the Track Order service, which streams the order’s location during delivery.
Test the microservices
Once the CodeDeploy deployments have completed, test both microservices.
First, check the load balancers’ status. Go to Target Groups in the AWS Management Console, which will list one target group for each microservice. Click each target group, then click “Targets” in the lower details pane. Every EC2 instance in the target group should have a “healthy” status.
If a service is healthy, it will return an empty JSON object.
Run the mobile app
You will run a pre-compiled version of the app on AWS Device Farm, which lets you test on a real device without managing any infrastructure. Alternatively, compile your own version via the AndroidApp.FrontEnd project within the solution located at EXAMPLE_DIRECTORY/src/ModernTacoShop/AndroidApp/AndroidApp.sln.
Go to Device Farm in the AWS Management Console. Under “Mobile device testing projects”, click “Create a new project”. Enter “ModernTacoShop” as the project name, and click “Create Project”. In the ModernTacoShop project, click the “Remote access” tab, then click “Start a new session”. Under “Choose a device”, select the Google Pixel 3a running OS version 10, and click “Confirm and start session”.
Once the session begins, click “Upload” in the “Install applications” section. Unzip and upload the APK file located at EXAMPLE_DIRECTORY/src/ModernTacoShop/AndroidApp/com.example.modern_tacos.grpc_tacos.apk.zip, or upload an APK that you created.
Once the app has uploaded, drag up from the bottom of the device screen in order to reach the “All apps” screen. Click the ModernTacos app to launch it.
Once the app launches, enter the parent domain name in the “Domain Name” field. Click the “+” and “-“ buttons next to each type of taco in order to create your order, then click “Submit Order”. The order status will initially display as “Preparing”, and will switch to “InTransit” after about 30 seconds. The Track Order service will stream a random route to the app, updating with new position data every 5 seconds. After approximately 2 minutes, the order status will change to “Delivered” and the streaming updates will stop.
Once you’ve run a successful test, click “Stop session” in the console.
Cleaning up
To avoid incurring charges, use the cdk destroy command to delete the stacks in the reverse order that you deployed them.
In addition to deleting the stacks, you must delete the Route 53 hosted zone and the Device Farm project.
Conclusion
This post demonstrated multiple next-generation technologies for microservices, including end-to-end HTTP/2 and gRPC communication over Application Load Balancer, AWS Graviton2 processors, and .NET 5. These technologies enable builders to create microservices applications with new levels of performance and efficiency.
Matt Cline
Matt Cline is a Solutions Architect at Amazon Web Services, supporting customers in his home city of Pittsburgh PA. With a background as a full-stack developer and architect, Matt is passionate about helping customers deliver top-quality applications on AWS. Outside of work, Matt builds (and occasionally finishes) scale models and enjoys running a tabletop role-playing game for his friends.
Ulili Nhaga
Ulili Nhaga is a Cloud Application Architect at Amazon Web Services in San Diego, California. He helps customers modernize, architect, and build highly scalable cloud-native applications on AWS. Outside of work, Ulili loves playing soccer, cycling, Brazilian BBQ, and enjoying time on the beach.
Deploying custom AWS Config rules developed for Terraform using AWS Config RDK
=======================
To help customers using Terraform for multi-cloud infrastructure deployment, we have introduced a new feature in the AWS Config Rule Development Kit (RDK) that allows you to export custom AWS Config rules to Terraform files so that you can deploy the RDK rules with Terraform.
This blog post is a complement to the previous post – How to develop custom AWS Config rules using the Rule Development Kit. Here I will show you how to prototype, develop, and deploy custom AWS Config rules. The steps for prototyping and developing the custom AWS Config rules remain identical, while a variation exists in the deployment step, which I’ll walk you through in detail.
In this post, you will learn how to export the custom AWS Config rule to Terraform files and deploy to AWS using Terraform.
Background
RDK doesn’t support Terraform for rules deployment, which is impacting customers using Terraform (“Infrastructure As Code”) to provision AWS infrastructure. Therefore, we have provided one more option to deploy the rules by using Terraform.
Getting Started
The first step is making sure that you installed the latest RDK version. After you have defined an AWS Config rule and prototyped using the AWS Config RDK as described in the previous blog post, follow the steps below to deploy the various AWS Config components across the compliance and satellite accounts.
Prerequisites
Validate that you downloaded the RDK that supports “export”, using the command “rdk export -h”, and you should see the below output. If the installed RDK doesn’t support the export feature, then update it by using the command “pip install rdk”
(venv) 8c85902e4110:7RDK test$ rdk export -h
usage: rdk export [-h] [-s RULESETS] [--all] [--lambda-layers LAMBDA_LAYERS]
[--lambda-subnets LAMBDA_SUBNETS]
[--lambda-security-groups LAMBDA_SECURITY_GROUPS]
[--lambda-role-arn LAMBDA_ROLE_ARN]
[--rdklib-layer-arn RDKLIB_LAYER_ARN] -v {0.11,0.12} -f
{terraform}
[<rulename> [<rulename> ...]]
Used to export the Config Rule to terraform file.
positional arguments:
<rulename>            Rule name(s) to export to a file.
optional arguments:
-h, --help            show this help message and exit
-s RULESETS, --rulesets RULESETS
comma-delimited list of RuleSet names
--all, -a             All rules in the working directory will be deployed.
--lambda-layers LAMBDA_LAYERS
[optional] Comma-separated list of Lambda Layer ARNs
to deploy with your Lambda function(s).
--lambda-subnets LAMBDA_SUBNETS
[optional] Comma-separated list of Subnets to deploy
your Lambda function(s).
--lambda-security-groups LAMBDA_SECURITY_GROUPS
[optional] Comma-separated list of Security Groups to
deploy with your Lambda function(s).
--lambda-role-arn LAMBDA_ROLE_ARN
[optional] Assign existing iam role to lambda
functions. If omitted, new lambda role will be
created.
--rdklib-layer-arn RDKLIB_LAYER_ARN
[optional] Lambda Layer ARN that contains the desired
rdklib. Note that Lambda Layers are region-specific.
-v {0.11,0.12}, --version {0.11,0.12}
Terraform version
-f {terraform}, --format {terraform}
Export Format
Create your rule
Create your rule by using the command below which creates the MY_FIRST_RULE rule.
This creates the three files below. Edit the “MY_FIRST_RULE.py” as per your business requirement, as described in the “Edit” section of this blog.
7RDK test$ cd MY_FIRST_RULE/
(venv) 8c85902e4110:MY_FIRST_RULE test$ls
MY_FIRST_RULE.py        MY_FIRST_RULE_test.py   parameters.json
Export your rule to Terraform
Use the command below to export your rule to Terraform files, which supports the two versions of Terraform (0.11 and 0.12). Use the “-v” argument to specify the version.
test$ cd ..
7RDK test$ rdk export MY_FIRST_RULE -f terraform -v 0.12
Running export
Found Custom Rule.
Zipping MY_FIRST_RULE
Zipping complete.
terraform version: 0.12
Export completed.This will generate three .tf files.
7RDK test$
This creates the four files.
<< rule-name >>_rule.tf :
This script uploads the rule to the Amazon S3 bucket, deploys the lambda, and creates the AWS config rule and the required IAM roles/policies.
7RDK test$ cd MY_FIRST_RULE/
(venv) 8c85902e4110:MY_FIRST_RULE test$ ls -1
MY_FIRST_RULE.py
MY_FIRST_RULE.zip
MY_FIRST_RULE_test.py
my_first_rule.tfvars.json
my_first_rule_rule.tf
my_first_rule_variables.tf
parameters.json
Deploy your rule using Terraform
Initialize Terraform by using “terraform init” to download the AWS provider Plug-In.
MY_FIRST_RULE test$ terraform init
Initializing the backend...
Initializing provider plugins...
- Checking for available provider plugins...
- Downloading plugin for provider "aws" (hashicorp/aws) 2.70.0...
The following providers do not have any version constraints in configuration,
so the latest version was installed.
To prevent automatic upgrades to new major versions that may contain breaking
changes, it is recommended to add version = "..." constraints to the
corresponding provider blocks in configuration, with the constraint strings
suggested below.
* provider.aws: version = "~> 2.70"
Terraform has been successfully initialized!
To deploy the config rules, your role should have the permissions and should mention the role ARN in my_rule.tfvars.json
To apply Terraform, it requires two arguments:
var-file: Terraform script variable file name, created while exporting the rule using RDK.
source_bucket: Your Amazon S3 bucket name, to upload the config rule lambda code.
Make sure that AWS provider is configured for your Terraform environment as mentioned in the docs.
MY_FIRST_RULE test$ terraform apply -var-file=my_first_rule.tfvars.json --var source_bucket=config-bucket-xxxxx
aws_iam_policy.awsconfig_policy[0]: Creating...
aws_iam_role.awsconfig[0]: Creating...
aws_s3_bucket_object.rule_code: Creating...
aws_iam_role.awsconfig[0]: Creation complete after 3s [id=my_first_rule-awsconfig-role]
aws_iam_role_policy_attachment.readonly-role-policy-attach[0]: Creating...
aws_iam_policy.awsconfig_policy[0]: Creation complete after 4s [id=arn:aws:iam::xxxxxxxxxxxx:policy/my_first_rule-awsconfig-policy]
aws_iam_role_policy_attachment.awsconfig_policy_attach[0]: Creating...
aws_s3_bucket_object.rule_code: Creation complete after 5s [id=MY_FIRST_RULE.zip]
aws_lambda_function.rdk_rule: Creating...
aws_iam_role_policy_attachment.readonly-role-policy-attach[0]: Creation complete after 2s [id=my_first_rule-awsconfig-role-20200726023315892200000001]
aws_iam_role_policy_attachment.awsconfig_policy_attach[0]: Creation complete after 3s [id=my_first_rule-awsconfig-role-20200726023317242000000002]
aws_lambda_function.rdk_rule: Still creating... [10s elapsed]
aws_lambda_function.rdk_rule: Creation complete after 18s [id=RDK-Rule-Function-MY_FIRST_RULE]
aws_lambda_permission.lambda_invoke: Creating...
aws_config_config_rule.event_triggered[0]: Creating...
aws_lambda_permission.lambda_invoke: Creation complete after 2s [id=AllowExecutionFromConfig]
aws_config_config_rule.event_triggered[0]: Creation complete after 4s [id=MY_FIRST_RULE]
Apply complete! Resources: 8 added, 0 changed, 0 destroyed.
Login to your AWS console to validate the deployed config rule.
Clean up
Once all your tests are completed, enter the following command to remove all the resources.
MY_FIRST_RULE test$ terraform destroy
Conclusion
With this new feature, you can export the AWS config rules developed by RDK to Terraform, and integrate these files into your Terraform CI/CD pipeline to provision the config rules in AWS without using the RDK.
Create CIS hardened Windows images using EC2 Image Builder
=======================
Many organizations today require their systems to be compliant with the CIS (Center for Internet Security) Benchmarks. Enterprises have adopted the guidelines or benchmarks drawn by CIS to maintain secure systems. Creating secure Linux or Windows Server images on the cloud and on-premises can involve manual update processes or require teams to build automation scripts to maintain images. This blog post details the process of automating the creation of CIS compliant Windows images using EC2 Image Builder.
EC2 Image Builder simplifies the building, testing, and deployment of Virtual Machine and container images for use on AWS or on-premises. Keeping Virtual Machine and container images up-to-date can be time consuming, resource intensive, and error-prone. Currently, customers either manually update and snapshot VMs or have teams that build automation scripts to maintain images. EC2 Image Builder significantly reduces the effort of keeping images up-to-date and secure by providing a simple graphical interface, built-in automation, and AWS-provided security settings. With Image Builder, there are no manual steps for updating an image nor do you have to build your own automation pipeline. EC2 Image Builder is offered at no cost, other than the cost of the underlying AWS resources used to create, store, and share the images.
Hardening is the process of applying security policies to a system and thereby, an Amazon Machine Image (AMI) with the CIS security policies in place would be a CIS hardened AMI. CIS benchmarks are a published set of recommendations that describe the security policies required to be CIS-compliant. They cover a wide range of platforms including Windows Server and Linux. For example, a few recommendations in a Windows Server environment are to:
Have a password requirement and rotation policy.
Set an idle timer to lock the instance if there is no activity.
Prevent guest users from using Remote Desktop Protocol (RDP) to access the instance.
While Deploying CIS L1 hardened AMIs with EC2 Image Builder discusses about Linux AMIs, this blog post demonstrates how EC2 Image Builder can be used to publish hardened Windows 2019 AMIs. This solutions uses the following AWS services:
EC2 Image Builder provides all the necessary resources needed for publishing AMIs and that involves –
Creating a pipeline by providing details such as a name, description, tags, and a schedule to run automated builds.
Creating a recipe by providing a name and version, select a source operating system image, and choose components to add for building and testing. Components are the building blocks that are consumed by an image recipe or a container recipe. For example, packages for installation, security hardening steps, and tests. The selected source operating system image and components make up an image recipe.
Defining infrastructure configuration – Image Builder launches Amazon EC2 instances in your account to customize images and run validation tests. The Infrastructure configuration settings specify infrastructure details for the instances that will run in your AWS account during the build process.
After the build is complete and has passed all its tests, the pipeline automatically distributes the developed AMIs to the select AWS accounts and regions as defined in the distribution configuration. More details on creating an Image Builder pipeline using the AWS console wizard can be found here.
Solution Overview and prerequisites
The objective of this pipeline is to publish CIS L1 compliant Windows 2019 AMIs and this is achieved by applying a Windows Group Policy Object(GPO) stored in an Amazon S3 bucket for creating the hardened AMIs. The workflow includes the following steps:
Download and modify the CIS Microsoft Windows Server 2019 Benchmark Build Kit available on the Center for Internet Security website. Note: Access to the benchmarks on the CIS site requires a paid subscription.
Upload the modified GPO file to an S3 bucket in an AWS account.
Create a custom Image Builder component by referencing the GPO file uploaded to the S3 bucket.
Create an IAM Instance Profile that the
Launch the EC2 Image Builder pipeline for publishing CIS L1 hardened Windows 2019 AMIs.
Make sure to have these prerequisites checked before getting started:
An AWS account for hosting the S3 bucket and the EC2 Image Builder Pipeline. We use the S3 bucket named image-builder-assets for demonstration purposes in this blog post. Refer to the create an S3 bucket page for more details on creating an S3 buckets.
Now that you have the prerequisites met, let’s begin with modifying the downloaded GPO file.
Creating the GPO File
This step involves modifying two files, registry.pol and GptTmpl.inf
On your workstation, create a folder of your choice, lets say C:\Utils
Move both the CIS Benchmark build kit and the LGPO utility to C:\Utils
Unzip the benchmark file to C:\Utils\Server2019v1.1.0. You should find the following folder structure in the benchmark build kit.
To make the GPO file work with AWS EC2 instances, you need to change the GPO file to prevent it from applying the following CIS recommendations mentioned in the below table and execute the commands mentioned below the table for getting there:
Benchmark rule #
Recommendation
Value to be configured
Reason
2.2.21 (L1)
Configure ‘Deny Access to this computer from the network’
Guests
Does not include ‘Local account and member of Administrators group’ to allow for remote login.
2.2.26 (L1)
Ensure ‘Deny log on through Remote Desktop Services’ is set to include ‘Guests, Local account’
Guests
Does not include ‘Local account’ to allow for RDP login.
2.3.1.1 (L1)
Ensure ‘Accounts: Administrator account status’ is set to ‘Disabled’
Not Configured
Administrator account remains enabled in support of allowing login to the instance after launch.
2.3.1.5 (L1)
Ensure ‘Accounts: Rename administrator account’ is configured
Not Configured
We have retained “Administrator” as the default administrative account for the sake of provisioning scripts that may not have knowledge of “CISAdmin” as defined in the CIS remediation kit.
2.3.1.6 (L1)
Configure ‘Accounts: Rename guest account’
Not Configured
Sysprep process renames this account to default of ‘Guest’.
2.3.7.4
Interactive logon: Message text for users attempting to log on
Not Configured
This recommendation is not configured as it causes issues with AWS Scanner.
2.3.7.5
Interactive logon: Message title for users attempting to log on
Not Configured
This recommendation is not configured as it causes issues with AWS Scanner.
9.3.5 (L1)
Ensure ‘Windows Firewall: Public: Settings: Apply local firewall rules’ is set to ‘No’
Not Configured
This recommendation is not configured as it causes issues with RDP.
9.3.6 (L1)
Ensure ‘Windows Firewall: Public: Settings: Apply local connection security rules’
Not Configured
This recommendation is not configured as it causes issues with RDP.
18.2.1 (L1)
Ensure LAPS AdmPwd GPO Extension / CSE is installed (MS only)
Not Configured
LAPS is not configured by default in the AWS environment.
18.9.58.3.9.1 (L1)
Ensure ‘Always prompt for password upon connection’ is set to ‘Enabled’
Not Configured
This recommendation is not configured as it causes issues with RDP.
Parse the policy file located inside MS-L1\{6B8FB17A-45D6-456D-9099-EB04F0100DE2}\DomainSysvol\GPO\Machine\registry.pol into a text file using the command:
Copy the newly generated registry.pol file from C:\Utils\ to C:\Utils\Server2019v1.1.0\MS-L1\DomainSysvol\GPO\Machine\. Note:This will replace the existing registry.pol file.
Next, open C:\Utils\Server2019v1.1.0\MS-L1\DomainSysvol\GPO\Machine\microsoft\windows nt\SecEdit\GptTmpl.inf using Notepad.
Under the [System Access] section, delete the following lines:
Under the section [Registry Values], remove the following two lines:
MACHINE\Software\Microsoft\Windows\CurrentVersion\Policies\System\LegalNoticeCaption=1,"ADD TEXT HERE" MACHINE\Software\Microsoft\Windows\CurrentVersion\Policies\System\LegalNoticeText=7,ADD TEXT HERE
Save the C:\Utils\Server2019v1.1.0\MS-L1\DomainSysvol\GPO\Machine\microsoft\windows nt\SecEdit\GptTmpl.inf file.
Rename the root folder C:\Utils\Server2019v1.1.0 to a simpler name like C:\Utilis\gpos
Compress both the C:\Utilis\gpos folder along with the C:\Utils\LGPO.exe file and name it as C:\Utilis\cisbuild.zip and upload it to the image-builder-assets S3 bucket.
Create Build Component
Next step for us is to develop the build component file that details what gets to be installed on the AMI that will be created at the end of the process. For example, you can use the component definition for installing external tools like Python. To build a component, you must provide a YAML-based document, which represents the phases and steps to create the component. Create the CISL1Component following the below steps:
Login to the AWS Console and open the EC2 Image Builder dashboard.
Click on Components in the left pane.
Click on Create Component.
Choose Windows for Image Operating System (OS).
Type a name for the Component, in this case, we will name it as CIS-Windows-2019-Build-Component.
Type in a component version. Since it is the first version, we will choose 1.0.0
Optionally, under KMS keys, if you have a custom KMS key to encrypt the image, you can choose that or leave as default.
Type in a meaningful description.
Under Definition Document, choose “Define document content” and paste the following YAML code:
name: CISLevel1Build description: Build Component to build a CIS Level 1 Image along with additional libraries schemaVersion: 1.0
The above template has a build phase with the following steps:
DownloadUtilities – Executes a command to create a directory (C:\Utils) and another command to download Python from the internet and save it in the created directory as python.exe. Both are executed in PowerShell.
BuildKitDownload – Downloads the GPO archive created in the previous section from the bucket we stored it in.
InstallPython – Installs Python in the system using the executable downloaded in the first step.
InstallGPO – Installs the GPO files we prepared from the previous section to apply the CIS security policies. In this example, we are creating a Level 1 CIS hardened AMI.
Note: In order to create a Level 2 CIS hardened AMIs, you need to apply User-L1, User-L2, MS-L1, MS-L2 GPOs.
To apply the policy, we use the LGPO.exe tool and run the following command: LGPO.exe /g "Path\of\GPO\directory"
As an example, to apply the MS-L1 GPO, the command would be as follows: LGPO.exe /g "C:\Utils\gpos\MS-L1\DomainSysvol"
The last command opens the 5985 port in the firewall to allow AWS Scanner inbound connection. This is a CIS recommendation.
RebootStep – Reboots the instance after applying the security policies. A reboot is necessary to apply the policies.
Note: If you need to run any tests/validation you need to include another phase to run the test scripts. Guidelines on that can be found here.
Create an instance profile role for the Image Pipeline
Image Builder launches Amazon EC2 instances in your account to customize images and run validation tests. The Infrastructure configuration settings specify infrastructure details for the instances that will run in your AWS account during the build process. In this step, you will create an IAM Role to attach to the instance that the Image Pipeline will use to create an image. Create the IAM Instance Profile following the below steps:
Open the AWS Identity and Access Management (AWS IAM) console and click on Roles on the left pane.
Click on Create Role.
Choose AWS service for trusted entity and choose EC2 and click Next.
Attach the following policies: AmazonEC2RoleforSSM, AmazonS3ReadOnlyAccess, EC2InstanceProfileForImageBuilder and click Next.
Optionally, add tags and click Next
Give the role a name and description and review if all the required policies are attached. In this case, we will name the IAM Instance Profile as CIS-Windows-2019-Instance-Profile
Click Create role.
Create Image Builder Pipeline
In this step, you create the image pipeline which will produce the desired AMI as an output. Image Builder image pipelines provide an automation framework for creating and maintaining custom AMIs and container images. Pipelines deliver the following functionality:
Assemble the source image, components for building and testing, infrastructure configuration, and distribution settings.
Facilitate scheduling for automated maintenance processes using the Schedule builder in the console wizard, or entering cron expressions for recurring updates to your images.
Enable change detection for the source image and components, to automatically skip scheduled builds when there are no changes.
To create an Image Builder pipeline, perform the following steps:
Open the EC2 Image Builder console and choose create Image Pipeline.
Select Windows for the Image Operating System.
Under Select Image, choose Select Managed Images and browse for the latest Windows Server 2019 English Full Base x86 image.
Under Build components, choose the Build component CIS-Windows-2019-Build-Component created in the previous section.
Optionally, under Tests, if you have a test component created, you can select that.
Click Next.
Under Pipeline details, give the pipeline a name and a description. For IAM role, select the role CIS-Windows-2019-Instance-Profile that was created in the previous section.
Under Build Schedule, you can choose how frequently you want to create an image through this pipeline based on an update schedule. You can select Manual for now.
(Optional) Under Infrastructure Settings, select an instance type to customize your image for that type, an Amazon SNS topic to get alerts from as well as Amazon VPC settings. If you would like to troubleshoot in case the pipeline faces any errors, you can uncheck “Terminate Instance on failure” and choose an EC2 Key Pair to access the instance via Remote Desktop Protocol (RDP). You may wish to store the Logs in an S3 bucket as well. Note: Make sure the chosen VPC has outbound access to the internet in case you are downloading anything from the web as part of the custom component definition.
Click Next.
Under Configure additional settings, you can optionally choose to attach any licenses that you own through AWS License Manager to the AMI.
Under Output AMI, give a name and optional tags.
Under AMI distribution settings, choose the regions or AWS accounts you want to distribute the image to. By default, your current region is included. Click on Review.
Review the details and click Create Pipeline.
Since we have chosen Manual under the Build Schedule, manually trigger the Image Builder pipeline for kicking off the AMI creation process. On successful run, Image Builder pipeline will create the image and the output image can be found under Images on the left pane of the EC2 Image Builder console.
To troubleshoot any issues, the reasons for failure can be found by clicking on the Image Pipeline you created and view the corresponding output image with the Status as Failed.
Cleanup
Following the above detailed step-by-step process creates EC2 Image Builder Pipeline, Custom Component and an IAM Instance Profile. While none of these resources have any costs associated with them, you are charged for the runtime of the EC2 instance used during the AMI built process and the EBS volume costs associated with the size of the AMI. Make sure to clear the AMIs when not needed for avoiding any unwanted costs.
Conclusion
This blog post demonstrated how you can use EC2 Image Builder to create a CIS L1 hardened Windows 2019 Image in an automated fashion. Additionally, this post also demonstrated on how you can use build components to install any dependencies or executables from different sources like the internet or from an Amazon S3 bucket. Feel free to test this solution in your AWS accounts and provide feedback.
Deploying Alexa Skills with the AWS CDK
=======================
So you’re expanding your reach by leveraging voice interfaces for your applications through the Alexa ecosystem. You’ve experimented with a new Alexa Skill via the Alexa Developer Console, and now you’re ready to productionalize it for your customers. How exciting!
You are also a proponent of Infrastructure as Code (IaC). You appreciate the speed, consistency, and change management capabilities enabled by IaC. Perhaps you have other applications that you provision and maintain via DevOps practices, and you want to deploy and maintain your Alexa Skill in the same way. Great idea!
That’s where AWS CloudFormation and the AWS Cloud Development Kit (AWS CDK) come in. AWS CloudFormation lets you treat infrastructure as code, so that you can easily model a collection of related AWS and third-party resources, provision them quickly and consistently, and manage them throughout their lifecycles. The AWS CDK is an open-source software development framework for modeling and provisioning your cloud application resources via familiar programming languages, like TypeScript, Python, Java, and .NET. AWS CDK utilizes AWS CloudFormation in the background in order to provision resources in a safe and repeatable manner.
In this post, we show you how to achieve Infrastructure as Code for your Alexa Skills by leveraging powerful AWS CDK features.
Concepts
Alexa Skills Kit (ASK)
In addition to the Alexa Developer Console, skill developers can utilize the Alexa Skills Kit (ASK) to build interactive voice interfaces for Alexa. ASK provides a suite of self-service APIs and tools for building and interacting with Alexa Skills, including the ASK CLI, the Skill Management API (SMAPI), and SDKs for Node.js, Java, and Python. These tools provide a programmatic interface for your Alexa Skills in order to update them with code rather than through a user interface.
AWS CloudFormation
AWS CloudFormation lets you create templates written in either YAML or JSON format to model your infrastructure in code form. CloudFormation templates are declarative and idempotent, allowing you to check them into a versioned code repository, deploy them automatically, and track changes over time.
The ASK CloudFormation resource allows you to incorporate Alexa Skills in your CloudFormation templates alongside your other infrastructure. However, this has limitations that we’ll discuss in further detail in the Problem section below.
AWS Cloud Development Kit (AWS CDK)
Think of the AWS CDK as a developer-centric toolkit that leverages the power of modern programming languages to define your AWS infrastructure as code. When AWS CDK applications are run, they compile down to fully formed CloudFormation JSON/YAML templates that are then submitted to the CloudFormation service for provisioning. Because the AWS CDK leverages CloudFormation, you still enjoy every benefit provided by CloudFormation, such as safe deployment, automatic rollback, and drift detection. AWS CDK currently supports TypeScript, JavaScript, Python, Java, C#, and Go (currently in Developer Preview).
Perhaps the most compelling part of AWS CDK is the concept of constructs—the basic building blocks of AWS CDK apps. The three levels of constructs reflect the level of abstraction from CloudFormation. A construct can represent a single resource, like an AWS Lambda Function, or it can represent a higher-level component consisting of multiple AWS resources.
The three different levels of constructs begin with low-level constructs, called L1 (short for “level 1”) or Cfn (short for CloudFormation) resources. These constructs directly represent all of the resources available in AWS CloudFormation. The next level of constructs, called L2, also represents AWS resources, but it has a higher-level and intent-based API. They provide not only similar functionality, but also the defaults, boilerplate, and glue logic you’d be writing yourself with a CFN Resource construct. Finally, the AWS Construct Library includes even higher-level constructs, called L3 constructs, or patterns. These are designed to help you complete common tasks in AWS, often involving multiple resource types. Learn more about constructs in the AWS CDK developer guide.
One L2 construct example is the Custom Resources module. This lets you execute custom logic via a Lambda Function as part of your deployment in order to cover scenarios that the AWS CDK doesn’t support yet. While the Custom Resources module leverages CloudFormation’s native Custom Resource functionality, it also greatly reduces the boilerplate code in your CDK project and simplifies the necessary code in the Lambda Function. The open-source construct library referenced in the Solution section of this post utilizes Custom Resources to avoid some limitations of what CloudFormation and CDK natively support for Alexa Skills.
Problem
The primary issue with utilizing the Alexa::ASK::Skill CloudFormation resource, and its corresponding CDK CfnSkill construct, arises when you define the Skill’s backend Lambda Function in the same CloudFormation template or CDK project. When the Skill’s endpoint is set to a Lambda Function, the ASK service validates that the Skill has the appropriate permissions to invoke that Lambda Function. The best practice is to enable Skill ID verification in your Lambda Function. This effectively restricts the Lambda Function to be invokable only by the configured Skill ID. The problem is that in order to configure Skill ID verification, the Lambda Permission must reference the Skill ID, so it cannot be added to the Lambda Function until the Alexa Skill has been created. If we try creating the Alexa Skill without the Lambda Permission in place, insufficient permissions will cause the validation to fail. The endpoint validation causes a circular dependency preventing us from defining our desired end state with just the native CloudFormation resource.
Unfortunately, the AWS CDK also does not yet support any L2 constructs for Alexa skills. While the ASK Skill Management API is another option, managing imperative API calls within a CI/CD pipeline would not be ideal.
Solution
Overview
AWS CDK is extensible in that if there isn’t a native construct that does what you want, you can simply create your own! You can also publish your custom constructs publicly or privately for others to leverage via package registries like npm, PyPI, NuGet, Maven, etc.
We could write our own code to solve the problem, but luckily this use case allows us to leverage an open-source construct library that addresses our needs. This library is currently available for TypeScript (npm) and Python (PyPI).
The complete solution can be found at the GitHub repository, here. The code is in TypeScript, but you can easily port it to another language if necessary. See the AWS CDK Developer Guide for more guidance on translating between languages.
Prerequisites
You will need the following in order to build and deploy the solution presented below. Please be mindful of any prerequisites for these tools.
Alexa Developer Account
AWS Account
Docker
Used by CDK for bundling assets locally during synthesis and deployment.
See Docker website for installation instructions based on your operating system.
AWS CLI
Used by CDK to deploy resources to your AWS account.
See AWS CLI user guide for installation instructions based on your operating system.
Node.js
The CDK Toolset and backend runs on Node.js regardless of the project language. See the detailed requirements in the AWS CDK Getting Started Guide.
See the Node.js website to download the specific installer for your operating system.
Clone Code Repository and Install Dependencies
The code for the solution in this post is located in this repository on GitHub. First, clone this repository and install its local dependencies by executing the following commands in your local Terminal:
# clone repository
git clone https://github.com/aws-samples/aws-devops-blog-alexa-cdk-walkthrough
# navigate to project directory
cd aws-devops-blog-alexa-cdk-walkthrough
# install dependencies
npm install
Note that CLI commands in the sections below (ask, cdk) use npx. This executes the command from local project binaries if they exist, or, if not, it installs the binaries required to run the command. In our case, the local binaries are installed as part of the npm install command above. Therefore, npx will utilize the local version of the binaries even if you already have those tools installed globally. We use this method to simplify setup and alleviate any issues arising from version discrepancies.
Get Alexa Developer Credentials
To create and manage Alexa Skills via CDK, we will need to provide Alexa Developer account credentials, which are separate from our AWS credentials. The following values must be supplied in order to authenticate:
Vendor ID: Represents the Alexa Developer account.
Client ID: Represents the developer, tool, or organization requiring permission to perform a list of operations on the skill. In this case, our AWS CDK project.
Client Secret: The secret value associated with the Client ID.
Refresh Token: A token for reauthentication. The ASK service uses access tokens for authentication that expire one hour after creation. Refresh tokens do not expire and can retrieve a new access token when needed.
Follow the steps below to retrieve each of these values.
Get Alexa Developer Vendor ID
Easily retrieve your Alexa Developer Vendor ID from the Alexa Developer Console.
After logging in, on the main screen click on the “Settings” tab.
Your Vendor ID is listed in the “My IDs” section. Note this value.
Create Login with Amazon (LWA) Security Profile
The Skill Management API utilizes Login with Amazon (LWA) for authentication, so first we must create a security profile for LWA under the same Amazon account that we will use to create the Alexa Skill.
Navigate to the LWA console and login with your Amazon account.
Click the “Create a New Security Profile” button.
Fill out the form with a Name, Description, and Consent Privacy Notice URL, and then click “Save”.
The new Security Profile should now be listed. Hover over the gear icon, located to the right of the new profile name, and click “Web Settings”.
Click the “Edit” button and add the following under “Allowed Return URLs”:
Click the “Show Secret” button to reveal your Client Secret. Note your Client ID and Client Secret.
Get Refresh Token from ASK CLI
Your Client ID and Client Secret let you generate a refresh token for authenticating with the ASK service.
Navigate to your local Terminal and enter the following command, replacing <your Client ID> and <your Client Secret> with your Client ID and Client Secret, respectively:
# ensure you are in the root directory of the repository
npx ask util generate-lwa-tokens --client-id "<your Client ID>" --client-confirmation "<your Client Secret>" --scopes "alexa::ask:skills:readwrite alexa::ask:models:readwrite"
A browser window should open with a login screen. Supply credentials for the same Amazon account with which you created the LWA Security Profile previously.
Click the “Allow” button to grant the refresh token appropriate access to your Amazon Developer account.
Return to your Terminal. The credentials, including your new refresh token, should be printed. Note the value in the refresh_token field.
NOTE: If your Terminal shows an error like CliFileNotFoundError: File ~/.ask/cli_config not exists., you need to first initialize the ASK CLI with the command npx ask configure. This command will open a browser with a login screen, and you should enter the credentials for the Amazon account with which you created the LWA Security Profile previously. After signing in, return to your Terminal and enter n to decline linking your AWS account. After completing this process, try the generate-lwa-tokens command above again.
NOTE: If your Terminal shows an error like CliError: invalid_client, make sure that you have included the quotation marks (") around the --client_id and --client-confirmation arguments.
Add Alexa Developer Credentials to AWS SSM Parameter Store / AWS Secrets Manager
Our AWS CDK project requires access to the Alexa Developer credentials we just generated (Client ID, Client Secret, Refresh Token) in order to create and manage our Skill. To avoid hard-coding these values into our code, we can store the values in AWS Systems Manager (SSM) Parameter Store and AWS Secrets Manager, and then retrieve them programmatically when deploying our CDK project. In our case, we are using SSM Parameter Store to store the non-sensitive values in plaintext, and Secrets Manager to store the secret values in encrypted form.
The repository contains a shell script at scripts/upload-credentials.sh that can create the appropriate parameters and secrets via AWS CLI. You’ll just need to supply the credential values from the previous steps. Alternatively, instructions for creating parameters and secrets via the AWS Console or AWS CLI can each be found in the AWS Systems Manager User Guide and AWS Secrets Manager User Guide.
You will need the following resources created in your AWS account before proceeding:
Name
Service
Type
/alexa-cdk-blog/alexa-developer-vendor-id
SSM Parameter Store
String
/alexa-cdk-blog/lwa-client-id
SSM Parameter Store
String
/alexa-cdk-blog/lwa-client-secret
Secrets Manager
Plaintext / secret-string
/alexa-cdk-blog/lwa-refresh-token
Secrets Manager
Plaintext / secret-string
Code Walkthrough
Skill Package
When you programmatically create an Alexa Skill, you supply a Skill Package, which is a zip file consisting of a set of files defining your Skill. A skill package includes a manifest JSON file, and optionally a set of interaction model files, in-skill product files, and/or image assets for your skill. See the Skill Management API documentation for details regarding skill packages.
The repository contains a skill package that defines a simple Time Teller Skill at src/skill-package. If you want to use an existing Skill instead, replace the contents of src/skill-package with your skill package.
If you want to export the skill package of an existing Skill, use the ASK CLI:
Find the Skill you want to export and click the link under the name “Copy Skill ID”. Either make sure this stays on your clipboard or note the Skill ID for the next step.
Navigate to your local Terminal and enter the following command, replacing <your Skill ID> with your Skill ID:
# ensure you are in the root directory of the repository
cd src
npx ask smapi export-package --stage development --skill-id <your Skill ID>
NOTE: To export the skill package for a live skill, replace --stage development with --stage live.
NOTE: The CDK code in this solution will dynamically populate the manifest.apis section in skill.json. If that section is populated in your skill package, either clear it out or know that it will be replaced when the project is deployed.
Skill Backend Lambda Function
The Lambda Function code for the Time Teller Alexa Skill’s backend also resides within the CDK project at src/lambda/skill-backend. If you want to use an existing Skill instead, replace the contents of src/lambda/skill-backend with your Lambda code. Also note the following if you want to use your own Lambda code:
The CDK code in the repository assumes that the Lambda Function runtime is Python. However, you can modify for another runtime if necessary by using either the aws-lambda or aws-lambda-nodejs CDK module instead of aws-lambda-python.
If you’re using your own Python Lambda Function code, please note the following to ensure the Lambda Function definition compatibility in the sample CDK project. If your Lambda Function varies from what is below, then you may need to modify the CDK code. See the Python Lambda code in the repository for an example.
The skill-backend/ directory should contain all of the necessary resources for your Lambda Function. For Python functions, this should include at least a file named index.py that contains your Lambda entrypoint, and a requirements.txt file containing your pip dependencies.
For Python functions, your Lambda handler function should be called handler(). This generally looks like handler = SkillBuilder().lambda_handler() when using the Python ASK SDK.
Open-Source Alexa Skill Construct Library
As mentioned above, this solution utilizes an open-source construct library to create and manage the Alexa Skill. This construct library utilizes the L1 CfnSkill construct along with other L1 and L2 constructs to create a complete Alexa Skill with a functioning backend Lambda Function. Utilizing this construct library means that we are no longer limited by the shortcomings of only using the Alexa::ASK::Skill CloudFormation resource or L1 CfnSkill construct.
Look into the construct library code if you’re curious. There’s only one construct—Skill—and you can follow the code to see how it dodges the Lambda Permission issue.
CDK Stack
The CDK stack code is located in lib/alexa-cdk-stack.ts. Let’s dive in to understand what’s happening. We’ll look at one section at a time:
...
const PARAM_PREFIX = '/alexa-cdk-blog/'
export class AlexaCdkStack extends cdk.Stack {
constructor(scope: cdk.Construct, id: string, props?: cdk.StackProps) {
super(scope, id, props);
// Get Alexa Developer credentials from SSM Parameter Store/Secrets Manager.
// NOTE: Parameters and secrets must have been created in the appropriate account before running `cdk deploy` on this stack.
//       See sample script at scripts/upload-credentials.sh for how to create appropriate resources via AWS CLI.
const alexaVendorId = ssm.StringParameter.valueForStringParameter(this, `${PARAM_PREFIX}alexa-developer-vendor-id`);
const lwaClientId = ssm.StringParameter.valueForStringParameter(this, `${PARAM_PREFIX}lwa-client-id`);
const lwaClientSecret = cdk.SecretValue.secretsManager(`${PARAM_PREFIX}lwa-client-secret`);
const lwaRefreshToken = cdk.SecretValue.secretsManager(`${PARAM_PREFIX}lwa-refresh-token`);
...
}
}
First, within the stack’s constructor, after calling the constructor of the base class, we retrieve the credentials we uploaded earlier to SSM and Secrets Manager. This lets us to store our account credentials in a safe place—encrypted in the case of our lwaClientSecret and lwaRefreshToken secrets—and we avoid storing sensitive data in plaintext or source control.
...
export class AlexaCdkStack extends cdk.Stack {
constructor(scope: cdk.Construct, id: string, props?: cdk.StackProps) {
...
// Create the Lambda Function for the Skill Backend
const skillBackend = new lambdaPython.PythonFunction(this, 'SkillBackend', {
entry: 'src/lambda/skill-backend',
timeout: cdk.Duration.seconds(7)
});
...
}
}
Next, we create the Lambda Function containing the skill’s backend logic. In this case, we are using the aws-lambda-python module. This transparently handles every aspect of the dependency installation and packaging for us. Rather than leave the default 3-second timeout, specify a 7-second timeout to correspond with the Alexa service timeout of 8 seconds.
Finally, we create our Skill! All we need to do is pass the Lambda Function with the Skill’s backend code into where the skill package is located, as well as the credentials for authenticating into our Alexa Developer account. All of the wiring for deploying the skill package and connecting the Lambda Function to the Skill is handled transparently within the construct code.
Deploy CDK project
Now that all of our code is in place, we can deploy our project and test it out!
Make sure that you have bootstrapped your AWS account for CDK. If not, you can bootstrap with the following command:
# ensure you are in the root directory of the repository
npx cdk bootstrap
Make sure that the Docker daemon is running locally. This is generally done by starting the Docker Desktop application.
You can also use the following Terminal command to determine whether the Docker daemon is running. The command will return an error if the daemon is not running.
docker ps -q
See more details regarding starting the Docker daemon based on your operating system via the Docker website.
Synthesize your CDK project in order to confirm that your project is building properly.
# ensure you are in the root directory of the repository
npx cdk synth
NOTE: In addition to generating the CloudFormation template for this project, this command also bundles the Lambda Function code via Docker, so it may take a few minutes to complete.
Deploy!
# ensure you are in the root directory of the repository
npx cdk deploy
Feel free to review the IAM policies that will be created, and enter y to continue when prompted.
If you would like to skip the security approval requirement and deploy in one step, use cdk deploy --require-approval never instead.
Check it out!
Once your project finishes deploying, take a look at your new Skill!
After logging in, on the main screen you should now see your new Skill listed. Click on the name to go to the “Build” screen.
Investigate the console to confirm that your Skill was created as expected.
On the left-hand navigation menu, click “Endpoint” and confirm that the ARN for your backend Lambda Function is showing in the “Default Region” field. This ARN was added dynamically by our CDK project.
Test the Skill to confirm that it functions properly.
Click on the “Test” tab and enable testing for the “Development” stage of your skill.
Type your Skill’s invocation name in the Alexa Simulator in order to launch the skill and invoke a response.
If you deployed the sample skill package and Lambda Function, the invocation name is “time teller”. If Alexa responds with the current time in UTC, it is working properly!
Bonus Points
Now that you can deploy your Alexa Skill via the AWS CDK, can you incorporate your new project into a CI/CD pipeline for automated deployments? Extra kudos if the pipeline is defined with the CDK :) Follow these links for some inspiration:
After you are finished, delete the resources you created to avoid incurring future charges. This can be easily done by deleting the CloudFormation stack from the CloudFormation console, or by executing the following command in your Terminal, which has the same effect:
# ensure you are in the root directory of the repository
npx cdk destroy
Conclusion
You can, and should, strive for IaC and CI/CD in every project, and the powerful AWS CDK features make that easier with a set of simple yet flexible constructs. Leverage the simplicity of declarative infrastructure definitions with convenient default configurations and helper methods via the AWS CDK. This example also reveals that if there are any gaps in the built-in functionality, you can easily fill them with a custom resource construct, or one of the thousands of open-source construct libraries shared by fellow CDK developers around the world. Happy coding!
Jeff Gardner
Jeff Gardner is a Solutions Architect with Amazon Web Services (AWS). In his role, Jeff helps enterprise customers through their cloud journey, leveraging his experience with application architecture and DevOps practices. Outside of work, Jeff enjoys watching and playing sports and chasing around his three young children.
Deploy a Docker application on AWS Elastic Beanstalk with GitLab
=======================
Many customers rely on AWS Elastic Beanstalk to manage the infrastructure provisioning, monitoring, and deployment of their web applications. Although Elastic Beanstalk supports several development platforms and languages, its support for Docker applications provides the most flexibility for developers to define their own stacks and achieve faster delivery cycles.
At the same time, organizations want to automate their build, test, and deployment processes and use continuous methodologies with modern DevOps platforms like GitLab. In this post, we walk you through a process to build a simple Node.js application as a Docker container, host that container image in GitLab Container Registry, and use GitLab CI/CD and GitLab Runner to create a deployment pipeline to build the Docker image and push it to the Elastic Beanstalk environment.
Solution overview
The solution deployed in this post completes the following steps in your AWS account:
1. Set up the initial GitLab environment on Amazon Elastic Compute Cloud (Amazon EC2) in a new Amazon Virtual Private Cloud (Amazon VPC) and populate a GitLab code repository with a simple Node.js application. This step also configures a deployment pipeline involving GitLab CI/CD, GitLab Runner, and GitLab Container Registry. 2. Log in and set up SSH access to your GitLab environment and configure GitLab CI/CD deployment tokens. 3. Provision a sample Elastic Beanstalk application and environment. 4. Update the application code in the GitLab repository and automatically initiate the build and deployment to Elastic Beanstalk with GitLab CI/CD.
The following diagram illustrates the deployed solution.
Prerequisites and assumptions
To follow the steps outlined in this post, you need the following:
● An AWS account that provides access to AWS services. ● Node.js and npm installed on your local machine. If installing Node.js and npm on Mac, you can run the brew update and brew install node commands on your terminal. You can also download Node.js for Windows. The Node.js installer for Windows also includes the npm package manager. ● The TypeScript compiler (tsc) installed on your local machine. Our sample application is developed using TypeScript, which is a superset of JavaScript. To install the TypeScript compiler, run npm install -g typescript in your terminal.
Additionally, be aware of the following:
● The templates and code are intended to work in the us-east-1 region only and are only for demonstration purposes. This is not for production use. ● We configure all services in the same VPC to simplify networking considerations. ● The AWS CloudFormation templates and the sample code that we provide use hard-coded user names and passwords and open security groups.
Set up the initial GitLab environment
In this step, we set up the GitLab environment. To do so, we provision a VPC with an internet gateway, a public subnet, a route table, and a security group. The security group has one inbound rule to allow access to any TCP port from any VPC host configured to use the same security group. We use an Amazon Route 53 private hosted zone and an Amazon Simple Storage Service (Amazon S3) bucket to store input data and processed data. The template also downloads a sample application, pushes the code into the GitLab repository, and creates a deployment pipeline with GitLab CI/CD.
You can use this downloadable CloudFormation template to set up these components. To launch directly through the console, choose Launch Stack.
Provide a stack name and EC2 key pair. After you specify the template parameters, choose Next and create the CloudFormation stack. When the stack launch is complete, it should return outputs similar to the following.
Key
Value
StackName
Name
VPCID
vpc-xxxxxxxx
SubnetIDA
subnet-xxxxxxxx
SubnetIDB
subnet-xxxxxxxx
SubnetIDC
subnet-xxxxxxxx
VPCSubnets
VPCSubnetsList
AWSBLOGBEANAccessSecurityGroup
Security group
GitEc2PublicDNS
ec2-xx-xx-xx-xx.compute-1.amazonaws.com
GitEc2PublicIp
xx-xx-xx-xx
ExpS3Bucket
<bucket-that-was-created>
Installing and configuring GitLab takes approximately 20 minutes. Wait until GitLab is completely configured and running.
Make a note of the output; you use this information in the next step. You can view the stack outputs on the AWS CloudFormation console or by using the following AWS Command Line Interface (AWS CLI) command:
Log in to Gitlab and set up the SSH key and CI/CD token
Next, log in to your newly provisioned GitLab environment. Use the public DNS name that was shown in the CloudFormation stack output to open your browser and enter the PublicDNS in the address bar. Provide the username root and password changeme to log in to the GitLab environment. These credentials are set in the gitlab-setup.sh script.
Figure-2
Update the SSH key in GitLab
After successful login, we need to add your local host’s SSH key to establish a secure connection between your local computer and GitLab. We need SSH access in order to clone the populated GitLab repository and push code changes in a later step.
1. On the drop-down menu, choose Preferences.
Figure-3
2. In the navigation pane, choose SSH Keys. 3. Get your public SSH key from your local computer and enter it in the Key section.
Figure-4
If using Mac, get your public key with the following code:
cat ~/.ssh/id_rsa.pub
On Windows, use the following code (make sure you replace [your user name] with your user name):
C:\Users\[your user name]\.ssh.
4. Choose Add key.
Add deploy tokens on the Gitlab console
For Elastic Beanstalk to pull the Docker image containing our sample Node.js app from the GitLab Container Registry, we need to create GitLab deploy tokens. Deploy tokens allow access to packages, your repository, and registry images.
1. Sign in to your GitLab account. 2. Choose sample-nodejs-app. 3. Under Settings, choose Repository. 4. In the Deploy tokens section, for Name, enter a name for your token. 5. For Scopes, select all the options. 6. Choose Create deploy token.
This creates the username as gitlab+deploy-token-1 and a token with random alphanumeric characters.
7. Save these values before navigating to some other screen because the token can’t be recovered.
Upon creation, you should see the deploy token creation message.
Add CI/CD variables on the GitLab console
The .gitlab-ci.yml file provides customized instructions for GitLab CI/CD. In our case, this file is configured to use GitLab CI/CD environment variables for the username, password, and S3 bucket values needed during the pipeline run. To set up these environment variables, complete the following steps:
1. On the Your Projects page, choose sample-nodejs-app. 2. On the Settings menu, choose CI/CD. 3. In the Variables section, add three variables to the pipeline (make sure you deselect Protect variable for each variable):
a. GIT_DEPLOYMENT_USER – Your username should be the same. b. GIT_DEPLOYMENT_TOKEN – The value of the password that was generated as part of creating the deployment token. c. S3_BUCKET_NAME – Created during the CloudFormation stack deployment. You can find the S3_BUCKET_NAME value on the Outputs tab for that stack on the AWS CloudFormation console.
After the three variables are created, you should see them listed.
Verify the sample Node.js application
The CloudFormation stack you deployed also downloads a sample application and pushes the code into your GitLab repository. To verify this, go to the Projects menu on the GitLab console and choose Your Projects. You should see sample-nodejs-app.
Provision a sample Elastic Beanstalk application and environment
Now we create a sample Elastic Beanstalk application and environment. This step only creates an initial Elastic Beanstalk environment that we deploy to in the next step. You can use our downloadable CloudFormation template. To launch directly through the console, complete the following steps:
This CloudFormation template takes around 10 minutes to complete.
When the template is complete, you can see the newly created application and environment on the Elastic Beanstalk console.
Figure-9
The stack also creates a load balancer; we can use the hostname of that load balancer to connect to the application.
5. On the Elastic Load Balancing (ELB) console, choose the newly created load balancer and copy the DNS name. 6. Enter the DNS name in the browser address bar.
A default page should appear.
Figure-10
Update and deploy application changes Lastly, we clone sample-nodejs-app to your local machine, make a small change, and commit that change to initiate our CI/CD pipeline.
1. Sign in to GitLab and go to Your Projects. 2. Choose sample-nodejs-app. 3. On your local machine, create a directory where you want to download your repository and then clone your repository. The following commands are for a Mac:
mkdir -p ~/test/
cd ~/test/
git clone git@ec2-XX-XX-XX-XX.compute-1.amazonaws.com:root/sample-nodejs-app.git
Don’t forget to check your instance’s security group and make sure port 22 is open to this instance from your network. Update the hostname in the preceding command with the public DNS name of your GitLab EC2 instance.
4. Run the following command to install the TypeScript module dependencies:
cd ~/test/sample-nodejs-app/
npm install @types/node @types/express @types/body-parser --save-dev
Compile the application using the tsc command: The tsc command invokes the typescript compiler. It uses the tsconfig.json file to compile the application.
1. Enter the following code:
cd ~/test/sample-nodejs-app/
tsc
When the compilation is complete, it generates the dist directory.
2. Log in to your local machine and navigate to the directory where you copied the sample application. 3. Enter the following commands:
4. When the code push is complete, sign in to the GitLab console and choose sample-nodejs-app. 5. Under CI/CD, choose Pipelines.
You can see the pipeline being run. GitLab deploys the new version to the Elastic Beanstalk environment. Wait for the pipeline execution to be completed.
6. On the Elastic Beanstalk console, choose Environments. 7. Choose SampleBeanstalkGitLabEnvironment.
Your Elastic Beanstalk console should look similar to the following screenshot.
8. In the navigation pane, choose Go to environment.
You should see the sample webpage.
Modify the sample Node.js application (optional)
Because our application is now deployed and running, let’s make some changes to the sample application and push the code back to GitLab.
1. Go to your terminal and run the following commands to update the code and push your changes:
cd ~/test/sample-nodejs-app
cd src/routes
vi MyOffice.ts
The content of MyOffice.ts should look like the following screenshot.
Figure-13
2. Add an extra line in the <body> section.
This demonstrates making a simple change to the application. For this post, I added the line <h3>Thanks for checking this blog<h3>.
Figure-14
3. Save the file and push the code using the following commands:
4. On the GitLab console, choose sample-nodejs-app. 5. Under CI/CD, choose Pipelines.
Once again, you can see the pipeline automatically gets runs to deploy the new version to your Elastic Beanstalk environment.
6. Now that the pipeline run is complete, we can go to the Elastic Beanstalk console, choose SampleBeanstalkGitLabEnvironment, and choose Go to environment.
Your results should look similar to the following screenshot.
Figure-15
Cleanup
Please remove all the deployed resources by un-provisioning Elastic Beanstalk application as well as the GitLab service to make sure there are no additional charges incurred after the tests are completed.
Conclusion
In this post, we showed how to deploy a Docker-based Node.js application on Elastic Beanstalk with GitLab’s DevOps platform. The associated resources in this post provide automation for setting up GitLab on Amazon EC2 and configuring a GitLab CI/CD pipeline that integrates with the GitLab Container Registry and Elastic Beanstalk. For additional information about the setup scripts, templates, and configuration files used, refer to the GitHub repository. Thank you for reading!
Using AWS CodePipeline for deploying container images to AWS Lambda Functions
=======================
AWS Lambda launched support for packaging and deploying functions as container images at re:Invent 2020. In the post working with Lambda layers and extensions in container images, we demonstrated packaging Lambda Functions with layers while using container images. This post will teach you to use AWS CodePipeline to deploy docker images for microservices architecture involving multiple Lambda Functions and a common layer utilized as a separate container image. Lambda functions packaged as container images do not support adding Lambda layers to the function configuration. Alternatively, we can use a container image as a common layer while building other container images along with Lambda Functions shown in this post. Packaging Lambda functions as container images enables familiar tooling and larger deployment limits.
Here are some advantages of using container images for Lambda:
Easier dependency management and application building with container
Install native operating system packages
Install language-compatible dependencies
Consistent tool set for containers and Lambda-based applications
Utilize the same container registry to store application artifacts (Amazon ECR, Docker Hub)
Utilize the same build and pipeline tools to deploy
Tools that can inspect Dockerfile work the same
Deploy large applications with AWS-provided or third-party images up to 10 GB
Include larger application dependencies that previously were impossible
When using container images with Lambda, CodePipeline automatically detects code changes in the source repository in AWS CodeCommit, then passes the artifact to the build server like AWS CodeBuild and pushes the container images to ECR, which is then deployed to Lambda functions.
Architecture Diagram
DevOps Architecture
Application Architecture
In the above architecture diagram, two architectures are combined, namely 1, DevOps Architecture and 2, Microservices Application Architecture. DevOps architecture demonstrates the use of AWS Developer services such as AWS CodeCommit, AWS CodePipeline, AWS CodeBuild along with Amazon Elastic Container Repository (ECR) and AWS CloudFormation. These are used to support Continuous Integration and Continuous Deployment/Delivery (CI/CD) for both infrastructure and application code. Microservices Application architecture demonstrates how various AWS Lambda Functions that are part of microservices utilize container images for application code. This post will focus on performing CI/CD for Lambda functions utilizing container containers. The application code used in here is a simpler version taken from Serverless DataLake Framework (SDLF). For more information, refer to the AWS Samples GitHub repository for SDLF here.
DevOps workflow
There are two CodePipelines: one for building and pushing the common layer docker image to Amazon ECR, and another for building and pushing the docker images for all the Lambda Functions within the microservices architecture to Amazon ECR, as well as deploying the microservices architecture involving Lambda Functions via CloudFormation. Common layer container image functions as a common layer in all other Lambda Function container images, therefore its code is maintained in a separate CodeCommit repository used as a source stage for a CodePipeline. Common layer CodePipeline takes the code from the CodeCommit repository and passes the artifact to a CodeBuild project that builds the container image and pushes it to an Amazon ECR repository. This common layer ECR repository functions as a source in addition to the CodeCommit repository holding the code for all other Lambda Functions and resources involved in the microservices architecture CodePipeline.
Due to all or the majority of the Lambda Functions in the microservices architecture requiring the common layer container image as a layer, any change made to it should invoke the microservices architecture CodePipeline that builds the container images for all Lambda Functions. Moreover, a CodeCommit repository holding the code for every resource in the microservices architecture is another source to that CodePipeline to get invoked. This has two sources, because the container images in the microservices architecture should be built for changes in the common layer container image as well as for the code changes made and pushed to the CodeCommit repository.
Below is the sample dockerfile that uses the common layer container image as a layer:
ARG ECR_COMMON_DATALAKE_REPO_URL
FROM ${ECR_COMMON_DATALAKE_REPO_URL}:latest AS layer
FROM public.ecr.aws/lambda/python:3.8
# Layer Code
WORKDIR /opt
COPY --from=layer /opt/ .
# Function Code
WORKDIR /var/task
COPY src/lambda_function.py .
CMD ["lambda_function.lambda_handler"]
where the argument ECR_COMMON_DATALAKE_REPO_URL should resolve to the ECR url for common layer container image, which is provided to the --build-args along with docker build command. For example:
Step 2: Change the directory to the cloned directory or extracted directory. The local code repository structure should appear as follows:
cd codepipeline-lambda-docker-images
Step 3: Deploy the CloudFormation stack used in the template file CodePipelineTemplate/codepipeline.yaml to your AWS account. This deploys the resources required for DevOps architecture involving AWS CodePipelines for common layer code and microservices architecture code. Deploy CloudFormation stacks using the AWS console by following the documentation here, providing the name for the stack (for example datalake-infra-resources) and passing the parameters while navigating the console. Furthermore, use the AWS CLI to deploy a CloudFormation stack by following the documentation here.
Step 4: When the CloudFormation Stack deployment completes, navigate to the AWS CloudFormation console and to the Outputs section of the deployed stack, then note the CodeCommit repository urls. Three CodeCommit repo urls are available in the CloudFormation stack outputs section for each CodeCommit repository. Choose one of them based on the way you want to access it. Refer to the following documentation Setting up for AWS CodeCommit. I will be using the git-remote-codecommit (grc) method throughout this post for CodeCommit access.
Step 5: Clone the CodeCommit repositories and add code:
Common Layer CodeCommit repository: Take the value of the Output for the key oCommonLayerCodeCommitHttpsGrcRepoUrl from datalake-infra-resourcesCloudFormation Stack Outputs section which looks like below:
Add contents to the cloned repository from the source code downloaded in Step 1. Copy the code from the CommonLayerCode directory and the repo contents should appear as follows:
Create the main branch and push to the remote repository git checkout -b main
git add ./
git commit -m "Initial Commit"
git push -u origin main
Application CodeCommit repository: Take the value of the Output for the key oAppCodeCommitHttpsGrcRepoUrl from datalake-infra-resources CloudFormation Stack Outputs section which looks like below:
Clone the repository:
git clone codecommit::us-east-2://dev-AppCode
Change the directory to dev-CommonLayerCode
cd dev-AppCode
Add contents to the cloned repository from the source code downloaded in Step 1. Copy the code from the ApplicationCode directory and the repo contents should appear as follows from the root:
Create the main branch and push to the remote repository git checkout -b main
git add ./
git commit -m "Initial Commit"
git push -u origin main
What happens now?
Now the Common Layer CodePipeline goes to the InProgress state and invokes the Common Layer CodeBuild project that builds the docker image and pushes it to the Common Layer Amazon ECR repository. The image tag utilized for the container image is the value resolved for the environment variable available in the AWS CodeBuild project CODEBUILD_RESOLVED_SOURCE_VERSION. This is the CodeCommit git Commit Id in this case. For example, if the CommitId in CodeCommit is f1769c87, then the pushed docker image will have this tag along with latest
buildspec.yaml files appears as follows: version: 0.2
phases:
install:
runtime-versions:
docker: 19
pre_build:
commands:
- echo Logging in to Amazon ECR...
- aws --version
- $(aws ecr get-login --region $AWS_DEFAULT_REGION --no-include-email)
- REPOSITORY_URI=$ECR_COMMON_DATALAKE_REPO_URL
- COMMIT_HASH=$(echo $CODEBUILD_RESOLVED_SOURCE_VERSION | cut -c 1-7)
- IMAGE_TAG=${COMMIT_HASH:=latest}
build:
commands:
- echo Build started on `date`
- echo Building the Docker image...
- docker build -t $REPOSITORY_URI:latest .
- docker tag $REPOSITORY_URI:latest $REPOSITORY_URI:$IMAGE_TAG
post_build:
commands:
- echo Build completed on `date`
- echo Pushing the Docker images...
- docker push $REPOSITORY_URI:latest
- docker push $REPOSITORY_URI:$IMAGE_TAG
Now the microservices architecture CodePipeline goes to the InProgress state and invokes all of the application image builder CodeBuild project that builds the docker images and pushes them to the Amazon ECR repository.
To improve the performance, every docker image is built in parallel within the codebuild project. The buildspec.yaml executes the build.sh script. This has the logic to build docker images required for each Lambda Function part of the microservices architecture. The docker images used for this sample architecture took approximately 4 to 5 minutes when the docker images were built serially. After switching to parallel building, it took approximately 40 to 50 seconds.
build.sh file appears as follows: #!/bin/bash
set -eu
set -o pipefail
RESOURCE_PREFIX="${RESOURCE_PREFIX:=stg}"
AWS_DEFAULT_REGION="${AWS_DEFAULT_REGION:=us-east-1}"
ACCOUNT_ID=$(aws sts get-caller-identity --query Account --output text 2>&1)
ECR_COMMON_DATALAKE_REPO_URL="${ECR_COMMON_DATALAKE_REPO_URL:=$ACCOUNT_ID.dkr.ecr.$AWS_DEFAULT_REGION.amazonaws.com\/$RESOURCE_PREFIX-common-datalake-library}"
pids=()
pids1=()
PROFILE='new-profile'
aws configure --profile $PROFILE set credential_source EcsContainer
aws --version
$(aws ecr get-login --region $AWS_DEFAULT_REGION --no-include-email)
COMMIT_HASH=$(echo $CODEBUILD_RESOLVED_SOURCE_VERSION | cut -c 1-7)
BUILD_TAG=build-$(echo $CODEBUILD_BUILD_ID | awk -F":" '{print $2}')
IMAGE_TAG=${BUILD_TAG:=COMMIT_HASH:=latest}
cd dockerfiles;
mkdir ../logs
function pwait() {
while [ $(jobs -p | wc -l) -ge $1 ]; do
sleep 1
done
}
function build_dockerfiles() {
if [ -d $1 ]; then
directory=$1
cd $directory
echo $directory
echo "---------------------------------------------------------------------------------"
echo "Start creating docker image for $directory..."
echo "---------------------------------------------------------------------------------"
REPOSITORY_URI=$ACCOUNT_ID.dkr.ecr.$AWS_DEFAULT_REGION.amazonaws.com/$RESOURCE_PREFIX-$directory
docker build --build-arg ECR_COMMON_DATALAKE_REPO_URL=$ECR_COMMON_DATALAKE_REPO_URL . -t $REPOSITORY_URI:latest -t $REPOSITORY_URI:$IMAGE_TAG -t $REPOSITORY_URI:$COMMIT_HASH
echo Build completed on `date`
echo Pushing the Docker images...
docker push $REPOSITORY_URI
cd ../
echo "---------------------------------------------------------------------------------"
echo "End creating docker image for $directory..."
echo "---------------------------------------------------------------------------------"
fi
}
for directory in *; do
echo "------Started processing code in $directory directory-----"
build_dockerfiles $directory 2>&1 1>../logs/$directory-logs.log | tee -a ../logs/$directory-logs.log &
pids+=($!)
pwait 20
done
for pid in "${pids[@]}"; do
wait "$pid"
done
cd ../cfn/
function build_cfnpackages() {
if [ -d ${directory} ]; then
directory=$1
cd $directory
echo $directory
echo "---------------------------------------------------------------------------------"
echo "Start packaging cloudformation package for $directory..."
echo "---------------------------------------------------------------------------------"
aws cloudformation package --profile $PROFILE --template-file template.yaml --s3-bucket $S3_BUCKET --output-template-file packaged-template.yaml
echo "Replace the parameter 'pEcrImageTag' value with the latest built tag"
echo $(jq --arg Image_Tag "$IMAGE_TAG" '.Parameters |= . + {"pEcrImageTag":$Image_Tag}' parameters.json) > parameters.json
cat parameters.json
ls -al
cd ../
echo "---------------------------------------------------------------------------------"
echo "End packaging cloudformation package for $directory..."
echo "---------------------------------------------------------------------------------"
fi
}
for directory in *; do
echo "------Started processing code in $directory directory-----"
build_cfnpackages $directory 2>&1 1>../logs/$directory-logs.log | tee -a ../logs/$directory-logs.log &
pids1+=($!)
pwait 20
done
for pid in "${pids1[@]}"; do
wait "$pid"
done
cd ../logs/
ls -al
for f in *; do
printf '%s\n' "$f"
paste /dev/null - < "$f"
done
cd ../
The function build_dockerfiles() loops through each directory within the dockerfiles directory and runs the docker build command in order to build the docker image. The name for the docker image and then the ECR repository is determined by the directory name in which the DockerFile is used from. For example, if the DockerFile directory is routing-lambda and the environment variables take the below values,
Then REPOSITORY_URI becomes 0123456789.dkr.ecr.us-east-2.amazonaws.com/dev-routing-lambda And the docker image is pushed to this resolved REPOSITORY_URI. Similarly, docker images for all other directories are built and pushed to Amazon ECR.
Important Note: The ECR repository names match the directory names where the DockerFiles exist and was already created as part of the CloudFormation template codepipeline.yaml that was deployed in step 3. In order to add more Lambda Functions to the microservices architecture, make sure that the ECR repository name added to the new repository in the codepipeline.yaml template matches the directory name within the AppCode repository dockerfiles directory.
Every docker image is built in parallel in order to save time. Each runs as a separate operating system process and is pushed to the Amazon ECR repository. This also controls the number of processes that could run in parallel by setting a value for the variable pwait within the loop. For example, if pwait 20, then the maximum number of parallel processes is 20 at a given time. The image tag for all docker images used for Lambda Functions is constructed via the CodeBuild BuildId, which is available via environment variable $CODEBUILD_BUILD_ID, in order to ensure that a new image gets a new tag. This is required for CloudFormation to detect changes and update Lambda Functions with the new container image tag.
Once every docker image is built and pushed to Amazon ECR in the CodeBuild project, it builds every CloudFormation package by uploading all local artifacts to Amazon S3 via AWS Cloudformation package CLI command for the templates available in its own directory within the cfn directory. Moreover, it updates every parameters.json file for each directory with the ECR image tag to the parameter value pEcrImageTag. This is required for CloudFormation to detect changes and update the Lambda Function with the new image tag.
After this, the CodeBuild project will output the packaged CloudFormation templates and parameters files as an artifact to AWS CodePipeline so that it can be deployed via AWS CloudFormation in further stages. This is done by first creating a ChangeSet and then deploying it at the next stage.
Testing the microservices architecture
As stated above, the sample application utilized for microservices architecture involving multiple Lambda Functions is a modified version of the Serverless Data Lake Framework. The microservices architecture CodePipeline deployed every AWS resource required to run the SDLF application via AWS CloudFormation stages. As part of SDLF, it also deployed a set of DynamoDB tables required for the applications to run. I utilized the meteorites sample for this, thereby the DynamoDb tables should be added with the necessary data for the application to run for this sample.
Utilize the AWS console to write data to the AWS DynamoDb Table. For more information, refer to this documentation. The sample json files are in the utils/DynamoDbConfig/ directory.
1. Add the record below to the octagon-Pipelines-dev DynamoDB table:
Now upload the sample json files to the raw s3 bucket. The raw S3 bucket name can be obtained in the output of the common-cloudformation stack deployed as part of the microservices architecture CodePipeline. Navigate to the CloudFormation console in the region where the CodePipeline was deployed and locate the stack with the name common-cloudformation, navigate to the Outputs section, and then note the output bucket name with the key oCentralBucket. Navigate to the Amazon S3 Bucket console and locate the bucket for oCentralBucket, create two path directories named engineering/meteorites, and upload every sample json file to this directory. Meteorites sample json files are available in the utils/meteorites-test-json-files directory of the previously cloned repository. Wait a few minutes and then navigate to the stage bucket noted from the common-cloudformation stack output name oStageBucket. You can see json files converted into csv in pre-stage/engineering/meteorites folder in S3. Wait a few more minutes and then navigate to the post-stage/engineering/meteorites folder in the oStageBucket to see the csv files converted to parquet format.
Cleanup
Navigate to the AWS CloudFormation console, note the S3 bucket names from the common-cloudformation stack outputs, and empty the S3 buckets. Refer to Emptying the Bucket for more information.
Delete the CloudFormation stacks in the following order: 1. Common-Cloudformation 2. stagea 3. stageb 4. sdlf-engineering-meteorites Then delete the infrastructure CloudFormation stack datalake-infra-resources deployed using the codepipeline.yaml template. Refer to the following documentation to delete CloudFormation Stacks: Deleting a stack on the AWS CloudFormation console or Deleting a stack using AWS CLI.
Conclusion
This method lets us use CI/CD via CodePipeline, CodeCommit, and CodeBuild, along with other AWS services, to automatically deploy container images to Lambda Functions that are part of the microservices architecture. Furthermore, we can build a common layer that is equivalent to the Lambda layer that could be built independently via its own CodePipeline, and then build the container image and push to Amazon ECR. Then, the common layer container image Amazon ECR functions as a source along with its own CodeCommit repository which holds the code for the microservices architecture CodePipeline. Having two sources for microservices architecture codepipeline lets us build every docker image. This is due to a change made to the common layer docker image that is referred to in other docker images, and another source that holds the code for other microservices including Lambda Function.
Introducing public builds for AWS CodeBuild
=======================
Using AWS CodeBuild, you can now share both the logs and the artifacts produced by CodeBuild projects. This blog post explains how to configure an existing CodeBuild project to enable public builds.
AWS CodeBuild is a fully managed continuous integration service that compiles source code, runs tests, and produces software packages that are ready to deploy. With CodeBuild, you don’t need to provision, manage, and scale your own build servers. With this new feature, you can now make the results of a CodeBuild project build publicly viewable. Public builds simplify the collaboration workflow for open source projects by allowing contributors to see the results of Continuous Integration (CI) tasks.
How public builds work
During a project build, CodeBuild will place build logs in either Amazon Simple Storage Service (Amazon S3) or Amazon CloudWatch, depending on how the customer has configured the project’s LogsConfig property. Optionally, a project build can produce artifacts that persist after the build has completed. During a project build that has public builds enabled, CodeBuild will set an environment variable named CODEBUILD_PUBLIC_BUILD_URL that supplies the URL for that build’s publicly viewable logs and artifacts. When a user navigates to that URL, CodeBuild will use an AWS Identity and Access Management (AWS IAM) Role (defined by the project maintainer) to fetch build logs and available artifacts and displays these.
To enable public builds for a project:
Navigate to the resource page in the CodeBuild console for the project for which you want to enable public builds.
In the Edit choose Project configuration.
Select Enable public build access.
Choose New service role.
For Service role enter the role name you want this new role to have. For this post we will use the role name example-public-builds-role. This creates a new IAM role with the permissions defined in the next section of this blog post.
Choose Update configuration to save the changes and return to the project’s resource page within the CodeBuild console.
Project builds will now have the build logs and artifacts made available at the URL listed in the Public project URL section of the Configuration panel within the project’s resource page.
Now the CI build statuses within pull requests for the GitHub repository will include a public link to the build results. When a pull request is created in the repository, CodeBuild will start a project build and provide commit status updates during the build with a link to the public build information. This link is available as a hyperlink from the Details section of the commit status message.
IAM role permissions
This new feature introduces a new IAM role for CodeBuild. The new role is assumed by the CodeBuild service and needs read access to the build logs and any potential artifacts you would like to make publicly available. In the previous example, we had configured the CodeBuild project to store logs in Amazon CloudWatch and placed our build artifacts in Amazon S3 (namespaced to the build ID). The following AWS CloudFormation template will create an IAM Role with the appropriate least-privilege policies for accessing the public build results.
Role template
Parameters:
LogGroupName:
Type: String
Description: prefix for the CloudWatch log group name
ArtifactBucketArn:
Type: String
Description: Arn for the Amazon S3 bucket used to store build artifacts.
Resources:
PublicReadRole:
Type: AWS::IAM::Role
Properties:
AssumeRolePolicyDocument:
Statement:
- Action: ['sts:AssumeRole']
Effect: Allow
Principal:
Service: [codebuild.amazonaws.com]
Version: '2012-10-17'
Path: /
PublicReadPolicy:
Type: 'AWS::IAM::Policy'
Properties:
PolicyName: PublicBuildPolicy
PolicyDocument:
Version: "2012-10-17"
Statement:
- Effect: Allow
Action:
- "logs:GetLogEvents"
Resource:
- !Sub "arn:aws:logs:${AWS::Region}:${AWS::AccountId}:log-group:${LogGroupName}:*"
- Effect: Allow
Action:
- "s3:GetObject"
- "s3:GetObjectVersion"
Resource:
- !Sub "${ArtifactBucketArn}/*"
Roles:
- !Ref PublicReadRole
Creating a public build in AWS CloudFormation
Using AWS CloudFormation, you can provision CodeBuild projects using infrastructure as code (IaC). To update an existing CodeBuild project to enable public builds add the following two fields to your project definition:
  CodeBuildProject:
Type: AWS::CodeBuild::Project
Properties:
ServiceRole: !GetAtt CodeBuildRole.Arn
LogsConfig:
CloudWatchLogs:
GroupName: !Ref LogGroupName
Status: ENABLED
StreamName: ServerlessRust
Artifacts:
Type: S3
Location: !Ref ArtifactBucket
Name: ServerlessRust
NamespaceType: BUILD_ID
Packaging: ZIP
Environment:
Type: LINUX_CONTAINER
ComputeType: BUILD_GENERAL1_LARGE
Image: aws/codebuild/standard:4.0
PrivilegedMode: true
Triggers:
BuildType: BUILD
Webhook: true
FilterGroups:
- - Type: EVENT
Pattern: PULL_REQUEST_CREATED,PULL_REQUEST_UPDATED
Source:
Type: GITHUB
Location: "https://github.com/richardhboyd/ServerlessRust.git"
BuildSpec: |
version: 0.2
phases:
build:
commands:
- sam build
artifacts:
files:
- .aws-sam/build/**/*
discard-paths: no
Visibility: PUBLIC_READ
ResourceAccessRole: !Ref PublicReadRole # Note that this references the role defined in the previous section.
Disabling public builds
If a project has public builds enabled and you would like to disable it, you can clear the check-box named Enable public build access in the project configuration or set the Visibility to PRIVATE in the CloudFormation definition for the project. To prevent any project in your AWS account from using public builds, you can set an AWS Organizations service control policy (SCP) to deny the IAM Action CodeBuild:UpdateProjectVisibility
Conclusion
With CodeBuild public builds, you can now share build information for your open source projects with all contributors without having to grant them direct access to your AWS account. This post explains how to enable public builds with AWS CodeBuild using both the console and CloudFormation, create a least-privilege IAM role for sharing the public build results, and how to disable public builds for a project.
CICD on Serverless Applications using AWS CodeArtifact
=======================
Developing and deploying applications rapidly to users requires a working pipeline that accepts the user code (usually via a Git repository). AWS CodeArtifact was announced in 2020. It’s a secure and scalable artifact management product that easily integrates with other AWS products and services. CodeArtifact allows you to publish, store, and view packages, list package dependencies, and share your application’s packages.
In this post, I will show how we can build a simple DevOps pipeline for a sample JAVA application (JAR file) to be built with Maven.
Solution Overview
We utilize the following AWS services/Tools/Frameworks to set up our continuous integration, continuous deployment (CI/CD) pipeline:
The following diagram illustrates the pipeline architecture and flow:
Our pipeline is built on CodePipeline with CodeCommit as the source (CodePipeline Source Stage). This triggers the pipeline via a CloudWatch Events rule. Then the code is fetched from the CodeCommit repository branch (main) and sent to the next pipeline phase. This CodeBuild phase is specifically for compiling, packaging, and publishing the code to CodeArtifact by utilizing a package manager—in this case Maven.
After Maven publishes the code to CodeArtifact, the pipeline asks for a manual approval to be directly approved in the pipeline. It can also optionally trigger an email alert via Amazon Simple Notification Service (Amazon SNS). After approval, the pipeline moves to another CodeBuild phase. This downloads the latest packaged JAR file from a CodeArtifact repository and deploys to the AWS Lambda function.
After the Git repository is cloned, the directory structure is shown as in the following screenshot :
Let’s study the files and code to understand how the pipeline is built.
The directory java-events is a sample Java Maven project. Find numerous sample applications on GitHub. For this post, we use the sample application java-events.
To add your own application code, place the pom.xml and settings.xml files in the root directory for the AWS CDK project.
Let’s study the code in the file lib/cdk-pipeline-codeartifact-new-stack.ts of the stack CdkPipelineCodeartifactStack. This is the heart of the AWS CDK code that builds the whole pipeline. The stack does the following:
Creates a CodeCommit repository called ca-pipeline-repository.
References a CloudFormation template (lib/ca-template.yaml) in the AWS CDK code via the module @aws-cdk/cloudformation-include.
Creates a CodeArtifact domain called cdkpipelines-codeartifact.
Creates a CodeArtifact repository called cdkpipelines-codeartifact-repository.
Creates a CodeBuild project called JarBuild_CodeArtifact. This CodeBuild phase does all of the code compiling, packaging, and publishing to CodeArtifact into a repository called cdkpipelines-codeartifact-repository.
Creates a CodeBuild project called JarDeploy_Lambda_Function. This phase fetches the latest artifact from CodeArtifact created in the previous step (cdkpipelines-codeartifact-repository) and deploys to the Lambda function.
Finally, creates a pipeline with four phases:
Source as CodeCommit (ca-pipeline-repository).
CodeBuild project JarBuild_CodeArtifact.
A Manual approval Stage.
CodeBuild project JarDeploy_Lambda_Function.
CodeArtifact shows the domain-specific and repository-specific connection settings to mention/add in the application’s pom.xml and settings.xml files as below:
Deploy the Pipeline
The AWS CDK code requires the following packages in order to build the CI/CD pipeline:
After the AWS CDK code is deployed, view the final output on the stack’s detail page on the AWS CloudFormation :
How the pipeline works with artifact versions (using SNAPSHOTS)
In this demo, I publish SNAPSHOT to the repository. As per the documentation here and here, a SNAPSHOT refers to the most recent code along a branch. It’s a development version preceding the final release version. Identify a snapshot version of a Maven package by the suffix SNAPSHOT appended to the package version.
The application settings are defined in the pom.xml file. For this post, we define the following:
The version to be used, called 1.0-SNAPSHOT.
The specific packaging, called jar.
The specific project display name, called JavaEvents.
The specific group ID, called JavaEvents.
The screenshot below shows the pom.xml settings we utilised in the application:
You can’t republish a package asset that already exists with different content, as per the documentation here.
When a Maven snapshot is published, its previous version is preserved in a new version called a build. Each time a Maven snapshot is published, a new build version is created.
When a Maven snapshot is published, its status is set to Published, and the status of the build containing the previous version is set to Unlisted. If you request a snapshot, the version with status Published is returned. This is always the most recent Maven snapshot version.
For example, the image below shows the state when the pipeline is run for the FIRST RUN. The latest version has the status Published and previous builds are marked Unlisted.
For all subsequent pipeline runs, multiple Unlisted versions will occur every time the pipeline is run, as all previous versions of a snapshot are maintained in its build versions.
Fetching the Latest Code
Retrieve the snapshot from the repository in order to deploy the code to an AWS Lambda Function. I have used AWS CLI to list and fetch the latest asset of package version 1.0-SNAPSHOT.
Notice that I’m referring the last code by using variable $ListLatestArtifact. This always fetches the latest code, and demooutput is the outfile of the AWS CLI command where the content (code) is saved.
Testing the Pipeline
Now clone the CodeCommit repository that we created with the following code:
Enter the following code to push the code to the CodeCommit repository:
cp -rp cdk-pipeline-codeartifact-new /* ca-pipeline-repository
 cd ca-pipeline-repository
 git checkout -b main
 git add .
 git commit -m “testing the pipeline”
 git push origin main
Once the code is pushed to Git repository, the pipeline is automatically triggered by Amazon CloudWatch events.
The following screenshots shows the second phase (AWS CodeBuild Phase – JarBuild_CodeArtifact) of the pipeline, wherein the asset is successfully compiled and published to the CodeArtifact repository by Maven:
The following screenshots show the last phase (AWS CodeBuild Phase – Deploy-to-Lambda) of the pipeline, wherein the latest asset is successfully pulled and deployed to AWS Lambda Function.
Asset JavaEvents-1.0-20210618.131629-5.jar is the latest snapshot code for the package version 1.0-SNAPSHOT. This is the same asset version code that will be deployed to AWS Lambda Function, as seen in the screenshots below:
The following screenshot of the pipeline shows a successful run. The code was fetched and deployed to the existing Lambda function (codeartifact-test-function).
Cleanup
To clean up, You can either delete the entire stack through the AWS CloudFormation console or use AWS CDK command like below –
cdk destroy
For more information on the AWS CDK commands, please check the here or sample here.
Summary
In this post, I demonstrated how to build a CI/CD pipeline for your serverless application with AWS CodePipeline by utilizing AWS CDK with AWS CodeArtifact. Please check the documentation here for an in-depth explanation regarding other package managers and the getting started guide.