Contents of this page is copied directly from AWS blog sites to make it Kindle friendly. Some styles & sections from these pages are removed to render this properly in 'Article Mode' of Kindle e-Reader browser. All the contents of this page is property of AWS.
Page 1|Page 2|Page 3|Page 4
Migrating accounts between AWS Organizations with consolidated billing to all features
=======================
Customers start their cloud journey with one AWS account, and over time they deploy many resources within it before utilizing more accounts. Prior to the launch of AWS Organizations in 2017, customers received a consolidated bill for all of these accounts. The launch of AWS Organizations meant these customers were provided with an organization that had a limited ‘Consolidated Billing’ feature set, as well as an optional ‘All features’ feature set. When you enable “all features” in your organizations, you can benefit from the advanced account management features available in AWS Organizations, such as integration with supported AWS services and organization management policies. When you create a new organization, it is created in all features by default, as it is the preferred way to work with AWS Organizations. Learn more about the feature sets in the documentation for AWS Organizations.
Many customers who have been utilizing organizations with consolidated billing have deployed resources in order to support workloads in their management accounts. If there are any resources in the management account of your organization, then we recommend that you migrate them to a member account within the organization. If the resources cannot be migrated between the accounts without disruption, then we recommend you move the existing management account to a new organization as a member account. This requires a full migration of every AWS account from the existing organization to the new one. The main reason for isolating the management account is to improve your organization security by limiting the management account usage for administrative actions and users only.
Solution overview
If your organization is only configured with consolidated billing, and you cannot move your workloads from the management account to a member account without disruption, then this post outlines the steps for migrating accounts to a new organization that has all features. Before you implement the steps, we recommend you review the considerations and prerequisites below.
Considerations
If you have a consolidated billing organization without any resources supporting workloads in your management account, and you want to utilize the advanced account management features from AWS Organizations, then you can enable all features in your existing organization. Learn more about this process in the AWS Organizations documentation.
However, if you have a consolidated billing organization containing resources supporting workloads in the management account, then we recommend you follow the steps outlined in this post and migrate to a new organization with all features enabled.
Many of the steps from this blog also apply to a migration between two organizations that are already enabled with all features. However, it requires more assessment from the existing organization, such as applied policies or AWS services activated across accounts in order to ensure that there is no disruption during the migration process. We do not provide steps regarding those dependencies in this post.
Prerequisites
Ensure that the following steps are completed for a safe migration of accounts.
AWS accounts require a valid payment method before leaving an organization. The easiest way to manage this across multiple accounts in an organization is to ensure that the payment method of each account (including the management account) is set to Invoice.
To change the payment method to invoice for an account, create a support case with the following information from the management account:
AWS Account number, Company Name, Contact Name, Contact Phone, Contact Email, Address, City, State or Province, Zip, and Country.
AWS CLI can be utilized to list all accounts in an organization by using the ListAccounts API. This information must be provided for every account that the customer wants to change the payment method to invoice. If a support case is to be opened for multiple accounts, then list every account number and outline the information above in order to change the payment method to invoice.
If you have savings plans, reserved instances (RIs), or enterprise agreements, then we recommend working with your account manager to determine if there are any additional programs that your accounts/organization can utilize to leverage the existing pricing discounts applied to the new organization during the migration.
Architecture

Figure 1: Architecture diagram
Steps for Migration
Step 1: Assess your current environment in order to identify organization conditions in identity and resource-based policies. This will help you come up with a list of remediations for resources before migrating to the new organization.
Consider the follow in order to assess the AWS accounts to be migrated from the existing organization to the new organization:
- Analyze the AWS services that are utilized in every AWS Account in the organization.
For every AWS resource supporting resource-based policies,
Check for organization conditions in the policies that can have global condition context keys and values specific to an organization, such as aws:PrincipalOrgID and aws:PrincipalOrgPaths.
AWS resources with organization conditions in the resource-based policies would require remediation in the new organization. To better understand this, let’s take an example of an Amazon S3 bucket that has an S3 bucket policy allowing access to the resources in the existing organization with organization ID o-1234xxxxxxx.
{
"Version": "2012-10-17",
"Statement": {
"Sid": "AllowPutObject",
"Effect": "Allow",
"Principal": "*",
"Action": "s3:PutObject",
"Resource": "arn:aws:s3:::policy-dev/*",
"Condition": {
"StringEquals": {
"aws:PrincipalOrgID": [
"o-abx1341cy0"
]
}
}
}
}
When this S3 bucket moves to the new organization, this S3 bucket policy must be updated to allow access to resources in the new organization with the organization ID as o-abx1341cy0. Similarly, there can be other AWS resources, such as Amazon SNS topics or Amazon SQS queues, with resource policies that have organization conditions in the policies. These must be remediated so that the resources don’t lose the access as required.
- Check for the usage of AWS global condition context keys (aws:PrincipalOrgID and aws:PrincipalOrgPaths) in the AWS IAM roles and IAM policies of all accounts in the organization.
- Check for any AWS Lambda functions making AWS Organizations API calls. These functions would become erroneous since the AWS Lambda functions can make Organizations API calls only in the organization management account.
- Check for AWS CloudFormation Stack Policies if the global condition context keys aws:PrincipalOrgID and aws:PrincipalOrgPaths are present.
- Check for AWS Organizations API calls made in AWS CloudTrail logs. Utilize Amazon Athena to query AWS CloudTrail logs. Create or utilize an existing Athena table of organization trail with partitions like account, region, year, month. Execute queries for the last three months, and generate reports to analyze if any calls have been made to organization API calls.
Overall, the assessment will provide the following:
Resource-based policies to be remediated with the new aws:PrincipalOrgID and aws:PrincipalOrgPaths in the new organization.
Any other resources like AWS IAM policies and AWS CloudFormation Stack policies must be remediated with the new aws:PrincipalOrgID and aws:PrincipalOrgPaths in the new organization.
Any AWS Lambda functions that will need to move to the new management account in the new organization.
Any potential impact from the AWS CloudTrail log analysis report must be remediated.
Now you can identify organizational dependencies between the accounts in an organization before they are moved to the new organization.
Step 2: Review the existing organization and save the following details:
Root Id of the organization
For every Organizational Unit (OU)
OU Name
OU Parent Name
OU Parent Type
“ROOT” for the OUs immediately under the root of the organization
“ORGANIZATIONAL_UNIT” for the OUs that are part of another OU (also known as nested OUs)
For every AWS account in the existing organization
Account Id
Account Name
Account Email
Account Parent Name
Account Parent Type
“ROOT” for the management account and the accounts that are not part of any OU
“ORGANIZATIONAL_UNIT” for accounts that are part of an OU
These will be utilized after the migration to ensure that the new organization structure reflects your existing organization. Note that if you are migrating to a new organization and intend to utilize a new OU structure, then you can learn more about our recommended best practices for OUs and accounts.
Step 3: Create a new AWS account within you existing organization.
- Ensure that the payment method for the newly created AWS account is set to invoice. If not, then follow the steps in the prerequisites in order to set the payment method to invoice.
- Once the payment method is set to invoice, it can be removed from the existing organization.
Step 4: After the newly created AWS account leaves the existing organization, create an organization in that account utilizing AWS Organizations with “all features”. Now, the newly created AWS account becomes the management account of the new organization.
- Verify the email address for the management account. AWS Organizations requires email address verification in order to invite accounts to an organization.
- Create Cost and Usage Reports (CUR) to get the most comprehensive set of cost and usage data.
- Activate User-Defined and AWS-Generated cost allocation tags in order to organize your resource costs on your cost allocation report, as well as to make it easier for you to categorize and track your AWS costs.
- Retrieve existing cost allocation tag keys that are approved on the existing management account.
- Apply this list of tag keys with null value to the S3 bucket storing the CUR data within the new management account.
- It can take up to 24 hours to propagate these tags into the approval list.
- Turn on tax setting inheritance in order to add your tax registration information to other AWS Organizations accounts.
- To retain the Cost and Usage Reports (CUR) from the existing organization, copy the CUR files to the new organization by replicating from the source Amazon Simple Storage Service (Amazon S3) bucket in the management account of the existing organization to an Amazon S3 bucket in the management account of the new organization. Instructions to set up rules to replicate objects between buckets.
Note: Once you remove the organization from the existing management account, you will lose access to your billing history via Cost Explorer, and CUR files stored in the S3 bucket will be retained.
- Now your new organization is ready to invite and accept member accounts.
Step 5: Migrate accounts from the existing organization to the new organization.
- Create OU Structure: Utilize the OU names, respective parent names, and types from Step 2 in order to replicate the OU structure in the new organization.
- Send Invitations to the member accounts: Utilize the Account Id or Account Email from Step 2 in order to invite every member account from the existing organization to join the new organization. Please review the service quotas for the maximum number of invitations allowed in your organization.
- Member accounts leave the existing organization and accept invitations: Each member account must leave the existing organization before accepting the invitation to join the new organization.
- Once the invitation is accepted from each account individually, all of the activity of each member account is billed to the new management account.
- Invitations have up to 15 days to respond before they expire.
- Move Accounts: By default, when a member account accepts the invitation from the new organization, the account will be placed under the root of the organization and not automatically moved to an OU.
- Move the accounts to the appropriate OUs by using the OU structure of accounts captured in Step 2 from your existing organization.
Step 6: Move the Management Account from the existing organization to the new organization.
- Before moving the management account, ensure that
- All of the member accounts have been successfully migrated.
- The month-end billing process is completed.
- The existing organization has been deleted.
- Utilize the Account Id or Account Email of the management account from Step 2 to invite the management account to join the new organization.
- Accept the invitation to join the new organization. After this step, the management account of the existing organization becomes a member account of the new organization.
If you apply policies to the new organization, then you can avoid interruptions for the applications running in the management account of the existing organization by creating a transitional OU without any policies applied to it, then move the account into that OU.
Conclusion
We recommend that you do not run any workloads in your management account. In the event that you do have workloads running in your management account, and you require a migration to a new organization, this post has provided detailed steps to assess the state of your existing consolidated billing only organization and its dependencies, as well as how to migrate accounts to a new all features enabled organization. This solution can be utilized when you have resources running in your management account, which cannot be migrated to other member accounts of your existing organization without disruption.
Automating AWS Security Hub Alerts with AWS Control Tower lifecycle events
=======================
Important Update: As of 23 Nov 2020 the Security Hub service was updated to support direct integration with AWS Organizations. Please see the announcement here regarding a simplified Organization-wide integration for Security Hub and your Control Tower environment.
AWS Control Tower is an AWS managed service that automates the creation of a well-architected multi-account AWS environment. Control Tower simplifies new account provisioning for your AWS Organization. Control Tower also centralizes logging from AWS CloudTrail and AWS Config, and provides preventative and detective guardrails.
AWS Security Hub can be used to provide a comprehensive view of high-priority security alerts and compliance status across AWS accounts. Bringing these two solutions together allows customers to govern and launch cloud capabilities with an aggregated security view within their multi-account framework.
This post walks through the process of automating Security Hub enablement and configuration in a Control Tower multi-account managed environment using Control Tower lifecycle Events. This solution also enables and configures Security Hub on any new account provisioned or updated from the Account Factory and runs a scheduled task to ensure that all accounts stay enabled. Automating this feature helps reduce complexity and risk, enhancing your security posture while saving time and reducing operational burden.
Solution overview
Security Hub helps you monitor critical settings to ensure that your AWS accounts remain secure, allowing you to detect and react quickly to any security event in your environment.
Enabling Security Hub in an AWS account requires just a few selections in the AWS Management Console. Once enabled, Security Hub begins aggregating and prioritizing findings and conducting compliance checks. In a multi-account environment, Security Hub findings from all member accounts can be aggregated to a Security Hub management account, which allows effective monitoring of critical security events across the organization. Aggregated findings across the organization are also available in the Amazon CloudWatch Events of the Security Hub management account, enabling you to automate your AWS services and respond automatically to events.
When working in a multi-account environment, the Security Hub management account sends an invitation to member accounts. These member accounts must then accept the invitation, which grants permissions to the management account to view the findings of each of the member accounts. In this solution, we automate this process by triggering AWS Lambda functions when Control Tower provisions new accounts. This guide assumes that you have Control Tower already set up. If you have not set up Control Tower yet, follow the steps on Getting Started with AWS Control Tower guide.
The architecture for this solution is mapped in the following diagram.
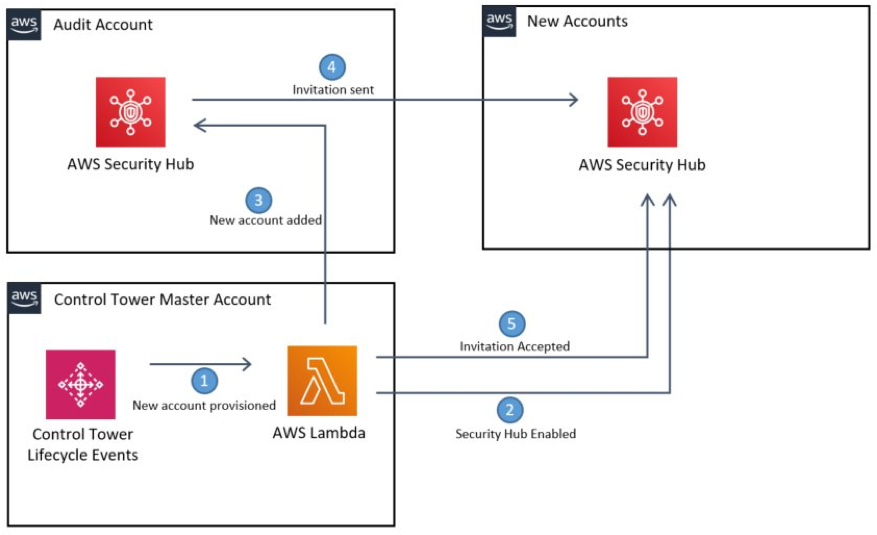
Fig 1 Solution Architecture
Here is an overview of how the solution works:
• The SecurityHubEnablerLambda enables Security Hub in the Security Hub management Account.
• The Lambda function loops through all supported Regions in the member accounts, assuming a role, and enabling Security Hub and the Center for internet Security (CIS) AWS Foundations Benchmark. There are other compliance standards that can be enabled, but the CIS Benchmark has been selected as a useful starting point for most organizations.
• Member accounts are registered in the Security Hub management account and an invitation is sent to the member accounts.
• The invitation is accepted in the member accounts.
• When new accounts are successfully vended from Account Factory, a Control Tower Lifecycle Event triggers the Lambda function to loop through the process again.
Prerequisites
This solution assumes that you have access to the Control Tower management account. We deploy to the Control Tower management account and leverage the AWSControlTowerExecution role from Control Tower.
Although you deploy this solution from your Control Tower management account, you must choose an AWS account as your Security Hub management. By default, Control Tower creates a security Audit account for cross-account auditing and centralized security operations within the Control Tower Organization. We use the Audit account for our Security Hub management account, but if you have another account you think is more appropriate, then use it instead.
Before launching this solution, you will must gather the following information:
• The ID of the Organization (in a format such as o-xxxxxxxxxx) and the email address of the owner of its management account, which can be found on the Settings tab of the Organizations console.
• The Account ID of the account you would like to be your Security Hub management account. From the AWS Organizations console, select Accounts. The Account ID is in a 12-digit numeric format.
• An Amazon S3 bucket to host the Lambda package. Identify or create a bucket, and take note of that bucket’s name. The Amazon S3 bucket must be in the same Region in which you plan launch AWS CloudFormation, and should be a Region supported by Control Tower.
• Select this AWS CloudFormation template. Save it to your computer so you can upload it later.
Packaging the Lambda code
In this solution, we provide you with sample Lambda code. You can also clone the GitHub repo to tailor the code to your needs and contribute. The Lambda function is written in Python, but is too large to be included in-line in the CloudFormation template. To deploy it, you must package it.
- Start by ensuring you have installed a supported version of Python (3.5+). If you don’t already have it, the latest version can be downloaded here
- Next, download the code here or clone the repo from GitHub. Decompress if you downloaded the ZIP version.
- Open a command prompt.
- Navigate to the folder into which you extracted the zip file or cloned the repo and run
cd src to change to the subfolder. There is a package script in the folder that reads the dependencies from requirements.txt, downloads them, and then creates a zipped package for Lambda. ./package.sh ./package.ps1
Uploading the Lambda code
Now, upload the ZIP package you built into the Amazon S3 bucket that you created earlier.
- Log in to your Control Tower management account as a user or role with administrative privileges.
- Upload the securityhub-enabler.zip you created into your Amazon S3 bucket. Make sure you upload it to the root of the bucket.
Launching the AWS CloudFormation stack
Next, launch the AWS CloudFormation stack.
- Go to AWS CloudFormation in the AWS Management Console.
- Confirm that your console session is in the same Region as the Amazon S3 bucket in which you stored the code.
- Choose Create Stack and select With new resources (standard).
- On the Create Stack page, under Specify template, select the Upload a template file template source.
- Select Choose file and find the template you downloaded in the prerequisites steps.
- Choose Next to continue.
- On the Specify Stack Details page, give your stack a name such as “MySecurityHubStack.”
- Under Parameters, review the default parameters and enter the required OrganizationID, S3SourceBucket, and SecurityAccountID gathered earlier.
There are several parameters for the AWS CloudFormation stack:
ComplianceFrequency: Frequency in days to re-run Lambda to check Security Hub compliance across all targeted accounts.
OUFilter: OU Scope for Security Hub deployment; choose either all OUs or Control Tower managed OUs.
OrganizationID: AWS Organizations ID for Control Tower. This is used to restrict permissions to least privilege.
RegionFilter: Region scope for Security Hub deployment; choose either All AWS Regions or Control Tower managed Regions.
RoleToAssume: IAM role to be assumed in child accounts to enable Security Hub; the default is AWSControlTowerExecution. If you’re deploying to a non-Control Tower managed account, make sure that this role exists in all accounts.
S3SourceBucket: Amazon S3 bucket containing the securityhub_enabler.zip file you uploaded earlier.
SecurityAccountId: The AWS account ID of your Security Hub management account.
- On the Configure stack options page you can choose to add tags, choose additional options, or just choose Next.
- On the Review page, validate your parameters and acknowledge that IAM resources will be created. Finally, select Create stack.
Once you select Create stack, you can follow the process and view the status of the deployment via the Events tab of the CloudFormation stack. When it finishes deploying, move on to the next step.
Validating in the Security Hub console
CloudFormation automatically triggers the Lambda function to invite all existing AWS Accounts in Control Tower to join the Security Hub. The OUFilter parameter in the CloudFormation stack determines the scope of deployment.
After the stack has completed deploying from the Control Tower management account, sign in to the AWS Management Console of the Security Hub management account and open the AWS Security Hub console.
- From the Security Hub Summary page, you see the consolidated insights and compliance standards within minutes, as shown in the following screenshot.

Fig 2 Security Hub Summary
- Under Settings, you can also view the member accounts now sharing their findings with you, as shown in the following screenshot.

Fig 3 Security Hub Settings
From this point forward, any newly vended accounts from Account Factory will automatically have Security Hub enabled and share their findings with this Audit account.
Cleaning up
To avoid incurring future charges, you can disable Security Hub by deleting the resources created. You can delete the provisioned CloudFormation stack via the AWS CloudFormation console or the command line. Deleting the CloudFormation stack triggers the Lambda function to disable Security Hub in all the accounts, as well as cleans up the resources deployed by the stack.
Conclusion
In this post, we demonstrated how to leverage Control Tower Life Cycle Events to enable and configure Security Hub in a Control Tower environment. Control Tower already provides customers with the ability to centrally manage compliance through guardrails. With this solution, customers can now also leverage Security Hub to get a comprehensive view of their high-priority security alerts and compliance status across all the AWS accounts in their landing zone environment. Furthermore, you can leverage Security Hub findings in additional ways to enhance your security posture, including:
Invoking a Lambda function
Invoking an Amazon EC2 run command
Relaying the event to Amazon Kinesis Data Streams
Notifying an Amazon SNS topic or an AWS SQS queue
Sending a finding to a third-party ticketing, chat, SIEM, or incident response and management tool
Further Information
Security Hub users guide
Multi-account Security Hub
Control Tower governance
Service Catalog governance
Multi-account framework
The latest from AWS Organizations (Fall 2021)
=======================
AWS Organizations provides features that customers can utilize to manage their AWS environment across accounts. When paired with other AWS services, AWS Organizations helps you manage permissions, create and share resources, govern your environment, and centrally control your security requirements. Here’s what our team has been up to since Spring 2021.
Programmatically manage alternate contacts for member accounts
Ensure that the right contacts receive important notifications for member accounts in your organization. Now you can programmatically update billing, operations, and security contacts for accounts in your organization. Managing alternate contacts is essential as your organization scales to hundreds or thousands of accounts, thereby saving you time and reducing the operational burden.
Furthermore, you can designate a member account to manage this on behalf of the organization with delegated administration. For more information, and an example of applying changes across your organization, refer to the following blog: “Programmatically update alternate contacts on member accounts using AWS Organizations“.
Generate custom IAM policies by using AWS CloudTrail data from member accounts
AWS Identity and Access (IAM) Access Analyzer helps you identify resources that may inadvertently allow access from outside the organization. You can also create custom IAM policies by utilizing Access Analyzer. It can identify access usage patterns from AWS CloudTrail in your organization, and then assist you with creating policies with only the required permissions. This helps you achieve least-privilege access in order to secure your environment. Learn more about this feature by reviewing the What’s New post.
Tag policy increases limits for policy size and applied tag policies
Tag policies let you programmatically define acceptable tags for your AWS resources, thereby letting you ensure that consistent tags are applied when resources are created across your organization. The tag policy size limit is now 10k characters (4x larger than the previous limit of 2.5k). You can also apply up to 10 tag policies at each organization level (root, each OU level, and member accounts). Learn more about this feature by reviewing the What’s New post.
If you want to enforce tags upon resource creation, apply this Service Control Policy (SCP) that limits tag-less resource creation. Utilizing an SCP to require a tag and a tag policy to define allowable tags on a resource are best practices for enforcing tags across your organization.
Share S3 on Outposts to multiple accounts
Amazon S3 on Outposts makes it easier to store, secure, tag, and control access to the data on your AWS Outposts. This allows you to extend AWS infrastructure, services, and tools to virtually any data center, co-location space, or on-premises facility. Now Amazon S3 on Outposts supports sharing S3 capacity across multiple accounts within an organization by using AWS Resource Access Manager (RAM). This provides flexibility so that multiple teams within your organization can create and manage buckets, access points, and endpoints for S3 on Outposts. To learn more, visit the S3 on Outposts page.
Aggregate and customize organization health alerts
Finally, quickly diagnose and resolve issues impacting applications and workloads by using AWS Health Aware. Utilize AWS Health Aware to get aggregated account level alerts from across your organization, and configure these alerts in order to notify teams on channels such as Slack, Microsoft Teams, or email. Learn more about this feature by reading the blog, Customize AWS Health Alerts for organization and personal AWS accounts.
If you aren’t yet familiar with AWS Organizations, please visit the AWS Organizations page. For information about future releases for AWS Organizations, see What’s New with AWS and the Management and Governance blog.
Implement AWS resource tagging strategy using AWS Tag Policies and Service Control Policies (SCPs)
=======================
AWS lets us assign metadata to the AWS resources in the form of tags. Each tag is a simple label consisting of a customer-defined key and a value that makes it easier to manage, search for, and filter AWS resources. Tagging can be an effective scaling mechanism for implementing cloud management and governance strategies. Tags can simplify attribute based access control (ABAC), as well as streamline automation/operation processes, grouping of resources for enhanced visibility, and effective cost management.
Without tags, managing your resources effectively can become difficult as you continue to utilize more AWS services. Companies of any size face the challenge of having a centralized framework or programmatic controls to enforce consistent tagging on cloud resources. This post will walk you through how to build and enrich cloud management and governance practices by utilizing AWS Organizations to create Tag Policies and Service Control Policies. We guide you in enforcing the standardization of tags, denying AWS resource creation if a specific tag is missing, and denying users from deleting existing tags on AWS resources.
Tag policies are a policy type that can help you standardize tags across resources in your AWS Organization.
When a tag policy is applied to your AWS account, users are unable to create resources using noncompliant tags.
You can enforce specific tag policies by choosing the option ‘prevent non-compliant operations for this tag’, and selecting the resource types that supports tag policy enforcement.
These AWS Services and resource types support enforcement using tag policies.
SCPs are a policy type that you can utilize to manage permissions across accounts in your AWS Organization.
Using SCPs lets you ensure that your accounts stay within your organization’s access control guidelines.
SCPs can be used along-side tag policies to ensure that the tags are applied at the resource creation time and remain attached to the resource.
Solution Overview
Policies in AWS Organizations enable you to apply additional types of management to your AWS accounts. In this solution, we enable the tag policies from the AWS Organizations, create the appropriate tag policy, and attach the policy to the target member account. Then, utilizing service control policies (SCPs), we define guardrails or set limits on the actions that an IAM user/role can conduct on the target member account. Using Tag policies and SCPs would not incur any additional charge.
This solution covers detailed steps, including reusable policy templates to:
Apply and enforce a standardized tagging policy during AWS resource creation.
Deny AWS resource creation if a specific tag is missing.
Deny users from deleting specific tags on AWS resources.
 Walkthrough
For this walkthrough, you need the following prerequisites:
AWS Account
AWS IAM admin user or role in your management account
AWS Organization
AWS Organizations – Tag policies
AWS Organizations – Service control policies
Step 1: Creating Tag Policy
First, sign in to the organization’s management account and enable Tag policies for your AWS Organization.

The following steps help you create standardized tags during Amazon EC2 resource creation. Utilize this tag policy to define the tag keys costcenter and team, as well as their allowed values (including how the tag keys and values are capitalized).


You can also create a tag policy by simply copying the following JSON template and pasting it in the Tag policy –> JSON editor.
{
"tags": {
"costcenter": {
"tag_key": {
"@@assign": "costcenter"
},
"tag_value": {
"@@assign": [
"CC102",
"CC103",
"CC104"
]
},
"enforced_for": {
"@@assign": [
"ec2:instance"
]
}
},
"team": {
"tag_key": {
"@@assign": "team"
},
"tag_value": {
"@@assign": [
"Team1",
"Team2",
"Team3",
]
},
"enforced_for": {
"@@assign": [
"ec2:instance"
]
}
}
}
}
Once the tag policy is created, make sure to attach it to the target OU/Account.

Checking Tag Policy Compliance
Once this policy is created and attached to the target account, check the policy compliance by visiting the Tag policies page in the Resource Groups console (AWS Resource Groups -> Tagging -> Tag Policies).

You have just created a tag policy, which will limit the AWS account from creating an EC2 instance without the compliant tags, ‘costcenter and team’. Now, utilizing SCPs, we will ensure that every new EC2 instance contains these tags, and that those tags remain attached to the resources.
Step 2: Creating Service Control Policy – Enforce tagging at resource creation
Tag Policy only enforces the accepted value of a tag, and not its presence. Therefore, users (with appropriate IAM permissions) would still be able to create untagged resources. To restrict the creation of an AWS resource without the appropriate tags, we will utilize SCPs to set guardrails around resource creation requests.
Sign in to the organization’s management account and enable SCPs for your organization.

Now, let’s create an SCP that denies Amazon EC2 instance creation if the tag keys costcenter and team and their allowed values in the Tag Policy (including how the values are capitalized) are missing.

Utilize Add actions to choose an AWS service, and Add resource to choose the service whose resources you want to control from the list. Then, utilize Add condition to define which condition keys you want to include in your policy.

You can also create an SCP policy using the SCP –> JSON editor. The following policy denies Amazon EC2 launch if the tag key costcenter and the tag key team are missing.
{
"Version": "2012-10-17",
"Statement": [
{
"Sid": "DenyEC2CreationSCP1",
"Effect": "Deny",
"Action": [
"ec2:RunInstances"
],
"Resource": [
"arn:aws:ec2:*:*:instance/*",
"arn:aws:ec2:*:*:volume/*"
],
"Condition": {
"Null": {
"aws:RequestTag/costcenter": "true"
}
}
},
{
"Sid": " DenyEC2CreationSCP2",
"Effect": "Deny",
"Action": [
"ec2:RunInstances"
],
"Resource": [
"arn:aws:ec2:*:*:instance/*",
"arn:aws:ec2:*:*:volume/*"
],
"Condition": {
"Null": {
"aws:RequestTag/team": "true"
}
}
}
]
}
Step 3: Creating Service Control Policy – Deny tag deletion
Now, let’s create another SCP that denies users from deleting tag key costcenter and the tag key team after it has been created. Create this SCP by simply copying the following JSON template and pasting it in the SCP –> JSON editor. Alternatively, you can build the SCP by using the ‘Create policy’ wizard.
{
"Version": "2012-10-17",
"Statement": [
{
"Sid": "DenyDeleteTag1",
"Effect": "Deny",
"Action": [
"ec2:DeleteTags"
],
"Resource": [
"arn:aws:ec2:*:*:instance/*",
"arn:aws:ec2:*:*:volume/*"
],
"Condition": {
"Null": {
"aws:RequestTag/costcenter": "false"
}
}
},
{
"Sid": "DenyDeleteTag2",
"Effect": "Deny",
"Action": [
"ec2:DeleteTags"
],
"Resource": [
"arn:aws:ec2:*:*:instance/*",
"arn:aws:ec2:*:*:volume/*"
],
"Condition": {
"Null": {
"aws:RequestTag/team": "false"
}
}
}
]
}
Once the SCPs are created, make sure that you attach it to the target OU/Account.

Step 4: Validation
Sign in to the target member account, create an EC2 instance, and follow the test below.
| Tag enforcement test |
Outcome |
Expected result |
| without tags |
launch failed |
Yes |
| with random tag key and value |
launch failed |
Yes |
| with tag key costcenter and wrong tag value |
launch failed |
Yes |
| with tag key team only and correct tag value |
launch failed |
Yes |
| with both tag keys (costcenter & team) and correct tag value |
launch success |
Yes |
The following screenshot shows a ‘failed EC2 instance launch’ error message due to tag enforcement.

Once the EC2 instance is created, try to delete the tags.
| Tag enforcement test |
Outcome |
Expected result |
| add a new random tag key / value |
success |
Yes |
| remove the random tag key / value |
success |
Yes |
| remove the tag costcenter |
error |
Yes |
| remove the tag team |
error |
Yes |
The following screenshot shows a ‘failed to delete tags’ error message due to tag enforcement.

Quotas for AWS Organizations
The number of policies that you can attach to an entity (root, OU, and account) is subject to quotas for AWS Organizations. If need be, the following policy illustrates how to combine the SCPs described above into a single SCP while still being within the quota.
{
"Version": "2012-10-17",
"Statement": [
{
"Sid": "DenyanyEC2operationSCP1",
"Effect": "Deny",
"Action": [
"ec2:RunInstances"
],
"Resource": [
"arn:aws:ec2:*:*:instance/*",
"arn:aws:ec2:*:*:volume/*"
],
"Condition": {
"Null": {
"aws:RequestTag/costcenter": "true"
}
}
},
{
"Sid": "DenyanyEC2operationSCP2",
"Effect": "Deny",
"Action": [
"ec2:RunInstances"
],
"Resource": [
"arn:aws:ec2:*:*:instance/*",
"arn:aws:ec2:*:*:volume/*"
],
"Condition": {
"Null": {
"aws:RequestTag/team": "true"
}
}
},
{
"Sid": "DenyDeleteTag1",
"Effect": "Deny",
"Action": [
"ec2:DeleteTags"
],
"Resource": [
"arn:aws:ec2:*:*:instance/*",
"arn:aws:ec2:*:*:volume/*"
],
"Condition": {
"Null": {
"aws:RequestTag/costcenter": "false"
}
}
},
{
"Sid": "DenyDeleteTag2",
"Effect": "Deny",
"Action": [
"ec2:DeleteTags"
],
"Resource": [
"arn:aws:ec2:*:*:instance/*",
"arn:aws:ec2:*:*:volume/*"
],
"Condition": {
"Null": {
"aws:RequestTag/team": "false"
}
}
}
]
}
Conclusion
By combining the AWS Tag Policies and SCPs explained in this post, customers can achieve consistency in coverage, discoverability, and enforcement of resource tags by using a centralized tagging governance framework. Companies of any size can adopt this proactive approach to resource tagging enforcement as part of the broader cloud governance framework. This framework will simplify attribute based access control (ABAC), as well as streamline the automation/operation processes, grouping of resources for enhanced visibility, and better cost management.
AWS Tag Policies and SCPs are available from the AWS Management Console, AWS Command Line Interface (CLI), and through the AWS SDKs. Utilize AWS CloudFormation to create and provision the Tag Policies and SCPs in an orderly and predictable fashion. For further reading, refer to AWS Well-Architected Framework to apply best practices in the design, delivery, and maintenance of AWS environments. We are here to help, and if you need further assistance in implementing a tagging governance framework for your AWS environment, reach out to AWS Support and your AWS account team.
Centralized software package distribution across multiple regions and accounts in an AWS Organization using AWS Systems Manager Distributor
=======================
Security remains a top priority for most organizations, and, in order to stay secure and compliant, they leverage agent-based vulnerability management tools, such as CrowdStrike, TrendMicro, and Tennable. AWS Systems Manager Distributor automates the process of packaging and publishing software to managed Windows and Linux instances across the cloud landscape, as well as to on-premises servers, via a single simplified interface. Customers can leverage Distributor to package and manage security and other monitoring agents, and then distribute them to cloud and on-premises instances as well.
Most customers have well-established landing zones built via AWS Organizations, with several AWS accounts spread across multiple regions. They want to centrally automate software package management and distribution across this large landscape. This post will demonstrate how you can build a solution that automates your software package distribution across all of your member accounts spread across regions within an AWS Organization via AWS Systems Manager. The key features leveraged are Automation, Distributor and State Manager.
Prerequisites
The following prerequisites need to be completed to deploy this solution.
- Prepare your .zip files of installable assets, with one .zip file per operating system platform. At least one .zip file is required to create a package.
- Create a JSON manifest. The manifest includes pointers to your package code files.
- When you have your required code files added to a folder or directory, and the manifest is populated with correct values, then upload your package to an Amazon Simple Storage Service (S3) bucket. These have been described in the first 3 steps of Create a package (advanced).
Note: To ensure optimal package management, we recommend only having the relevant files for a package uploaded in its own prefix within the S3 bucket that is utilized solely for this purpose. This post uses the management account within AWS Organizations, but you can also designate an account to manage this on behalf of the organization, for more details refer to Configuring a Delegated Administrator.
Solution overview
Distributor, a capability of AWS Systems Manager, helps you package your software within a region in an account. The Centralized Software Distributor (CSD) solution described in this post enhances your ability to manage and distribute software packages across member accounts that are spread across regions in an AWS Organization.
Figure 1 shows the solution architecture. In addition to Distributor, the solution utilizes the following Systems Manager capabilities.
Automation to orchestrate the workflow.
State Manager to invoke the Automation document on a user-defined frequency.

Figure 1: Solution architecture
Walkthrough
To deploy the solution, launch this CloudFormation template in your organization’s management account.

The template deploys the following resources:
- Automation documents
- CSD-AddSoftwarePackageToDistributor which contains the logic to package the installable software assets and add it to Distributor.
- CSD-DistributeSoftwarePackage which contains the logic to distribute the software package to every target instance in the member accounts.
- IAM roles
- AWS-SystemsManager-AutomationAdministrationRole
- AWS-SystemsManager-AutomationExecutionRole
- CSD-CloudFormationStackSetAdministrationRole
- CSD-CloudFormationStackSetExecutionRole
Provide the following inputs for the template:
CreateCloudFormationStackSetRoles: Specify if the CloudFormation StackSet IAM roles should be provisioned. These roles will be utilized to deploy AWS-SystemsManager-AutomationExecutionRole in each target account. Refer to Prerequisites for stack set operations for more details.
CreateSystemsManagerRoles: Specify if the AWS Systems Manager IAM roles required to run automation in multiple accounts and regions should be provisioned. Refer to Running automations in multiple AWS Regions and accounts for more details.
ManagementAccountId: (Required) AWS Organization’s Management account ID.
TargetKey: Specify which instances have to be targeted for this solution. Allowed values – ParameterValues, ResourceGroup or begin with tag:, AWS::EC2::Instance, InstanceIds (default), instanceids. Refer to Target for more details.
TargetValues: Specify the target key values specified above. Default is *, which targets every instance. Refer to Target for more details.
TargetOUs: Organization Unit (OU) IDs which are in scope for this solution in a comma-separated format (e.g., ou-abc1-abc12ab1,ou-def2-def12de1).
Visit our GitHub repository to access the individual resource templates.
Invoking the solution using a State Manager association
A State Manager association is a configuration assigned to your managed instances. The configuration defines the state you want to maintain on your instances.
Update the highlighted parameters, and then execute this command in the management account of your organization.
TARGET_ACCOUNTS: AWS account IDs and/or the organizational unit IDs within AWS Organization whose accounts have the target instances (e.g., ou-abcd-1qwert43, 123456789123) for distribution.
TARGTE_REGIONS: All AWS Regions (e.g., us-east-1) where the target instances are running.
MAX_CONCURRENCY and MAX_ERRORS: Specify these values based on the number of accounts and error thresholds described in TargetLocation in the AWS Systems Manager API Reference.
ACTION: Specify whether or not to install or uninstall the package.
INSTALLATION_TYPE: Specify the installation type. Uninstall and reinstall: The application is taken offline until the reinstallation process completes. In-place update: The application is available while new or updated files are added to the installation.
PACKAGE_NAME: The package to install/uninstall.
VERSION: The package version to install or uninstall. If you don”t specify a version, then by default the system installs the latest published version. The system will only attempt to uninstall the version currently installed. If no version of the package is installed, then the system returns an error.
ADDITIONAL_ARGUMENTS: The additional parameters to provide to your install, uninstall, or update scripts.
S3_BUCKET_NAME: Specify the S3 bucket name where the package has been deployed to. This bucket should only consist of the packages and its manifest file.
S3_BUCKET_PREFIX: Specify the S3 prefix (if used) where the package assets are stored.
AUTOMATION_ROLE_ARN: ARN of the AWS-SystemsManager-AutomationAdministrationRole.
aws ssm create-association \
--association-name "csd-association" \
--name " CSD-AddSoftwarePackageToDistributor" \
--parameters '{"targetAccounts":["TARGET_ACCOUNTS"],"targetRegions":["TARGET_REGIONS"],"maxConcurrency":["MAX_CONCURRENCY"],"maxErrors":["MAX_ERRORS"],"action":["ACTION"],"installationType":["INSTALLATION_TYPE"],"name":["PACKAGE_NAME"],"version":["VERSION"],"additionalArguments":["{ADDITIONAL_ARGUMENTS}"],"AutomationAssumeRole":["AUTOMATION_ROLE_ARN"],"bucketName":["S3_BUCKET_NAME"],"bucketPrefix":["S3_BUCKET_PREFIX"]}' \
--no-apply-only-at-cron-interval
This command will invoke the system to run it once immediately after it is created. To update it to run on a scheduled basis using --schedule-expression, see create-association in the AWS CLI Command Reference.
Validating the execution ran successfully
After the association has triggered the automation, open the Systems Manager console, and from the left navigation pane choose Automation. In Automation executions, you should see the most recent execution of both CSD-AddSoftwarePackageToDistributor and CSD-DistributeSoftwarePackage, as shown in Figure 2.

Figure 2: Automation executions (management account)
Click each execution to validate if they were completed successfully.
Depending on the number of regions, accounts, and instances that you execute this solution against, a successful run of the execution looks like the following in the CSD-DistributeSoftwarePackage execution details:

Figure 3: CSD-DistributeSoftwarePackage execution detail (management account)
To ensure that the package was deployed to the targeted member account instances, navigate to the Systems Manager dashboard and select Run Command in the left pane. Under Command history, you should be able to see every invocation and their status.

Figure 4: Run command history (member account)
Click any Command ID, and then select the instance ID for the command output. Check the Ouput section for both steps. On a successful completion, you can expect a similar output as shown in Figure 5.

Figure 5: Run Command output (member account)
Adding new accounts, OUs, and Regions
The solution will automatically deploy to any new accounts that you provision under the OUs specified when you originally deployed the CloudFormation template. The addition of new accounts or OUs will require updates to both CloudFormation and State Manager Association as described below. The addition of new regions will only require updating the Association.
CloudFormation (complete these steps only if you provisioned the AWS-SystemsManager-Automation* roles):
- In the CloudFormation console, choose the original template you deployed, and then choose Update.
- Leave the Use the current template option selected.
- Under Automation details, update the STACKSET_TARGETS
State Manager Association:
Update the association using the instructions provided in Editing and creating a new version of an association with the new accounts, OUs, and/or Regions.
Conclusion
This post demonstrated how you can leverage AWS Systems Manager Distributor, as well as some of its other capabilities, to build a centralized software package distribution solution across all of your AWS accounts and Regions within an AWS Organization. With a consistent and reliable package management and distribution framework in place, you can now maintain your security and compliance posture across not only AWS, but also your on-premises infrastructure.
Setting up an Amazon CloudWatch Billing Alarm to Proactively Monitor Estimated Charges
=======================
I’m pleased to announce the start of a multi-part series for CloudWatch Billing in which I will explore the techniques for proactively managing your AWS costs.
This series kicks off with a walkthrough of setting up CloudWatch Billing Alarms from the AWS console.
This walkthrough demonstrates how to enable Billing Alerts, create an Amazon CloudWatch Billing alarm, and connect the Amazon CloudWatch Billing alarm to an Amazon SNS topic for notifications when the alarm exceeds the specified threshold.
Amazon CloudWatch is a monitoring and observability service that provides a unified view of your application’s performance, resource utilization, and performance changes. Amazon CloudWatch is ideal for improving operational performance and resource optimization, such as creating alarms to notify you when your billing charges are exceeding a predefined threshold.
By using Amazon CloudWatch, you can better monitor your estimated AWS charges. By monitoring the estimated AWS charges for your AWS account(s), you can be alerted and proactively notified when the calculated estimated charges exceed the defined threshold, both from the AWS CloudWatch console and via SNS Notification.
Overview of Solution
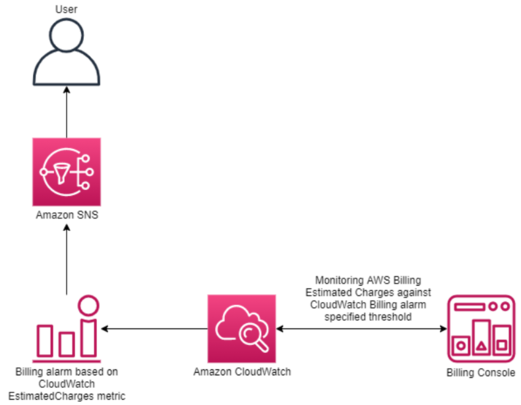
Figure 1: CloudWatch Alarm Solution Overview
Walkthrough
In this walkthrough, you will complete the following steps.
Enable Billing Alerts Monitoring from the AWS Console.
Create an Amazon CloudWatch Billing Alarm using the AWS console.
Configure conditions and thresholds for when the Amazon CloudWatch Billing alarm triggers.
Define the Amazon SNS topic for SNS notification.
You can use the AWS CloudFormation template provided in this post to:
Create an Amazon CloudWatch Billing Alarm.
Create an Amazon SNS Topic.
Prerequisites
You need an AWS account with the IAM permissions required to access Amazon CloudWatch, Billing & Cost Management Console, and Amazon SNS. You will also need IAM permissions to AWS CloudFormation if you plan to deploy the sample template.
Enable Billing Alerts Monitoring
Before creating a Billing Alarm, in Amazon CloudWatch, you must enable billing alerts from the Billing and Cost Management console to ensure that the billing metrics data is available to Amazon CloudWatch.
Note: If you are using AWS Organizations or Consolidated Billing, then the Billing Alerts must be enabled from the Management/Payer account.
From the Billing and Cost Management console, select Billing preferences.

Figure 2: Select Preferences from AWS Billing Console.
On the Preferences page, select the checkbox for Receive Billing Alerts, and then click Save preferences.

Figure 3: Enabled Receive Billing Alerts
After enabling Billing Alerts for the first time, it can take approximately 15-30 minutes before you can view the billing data and set/configure billing alarms.
Creating the CloudWatch Billing Alarm
To create the billing alarm, you must first navigate to the CloudWatch console.
From the CloudWatch console, select Alarms from the navigation on the left side, then select Create Alarm.
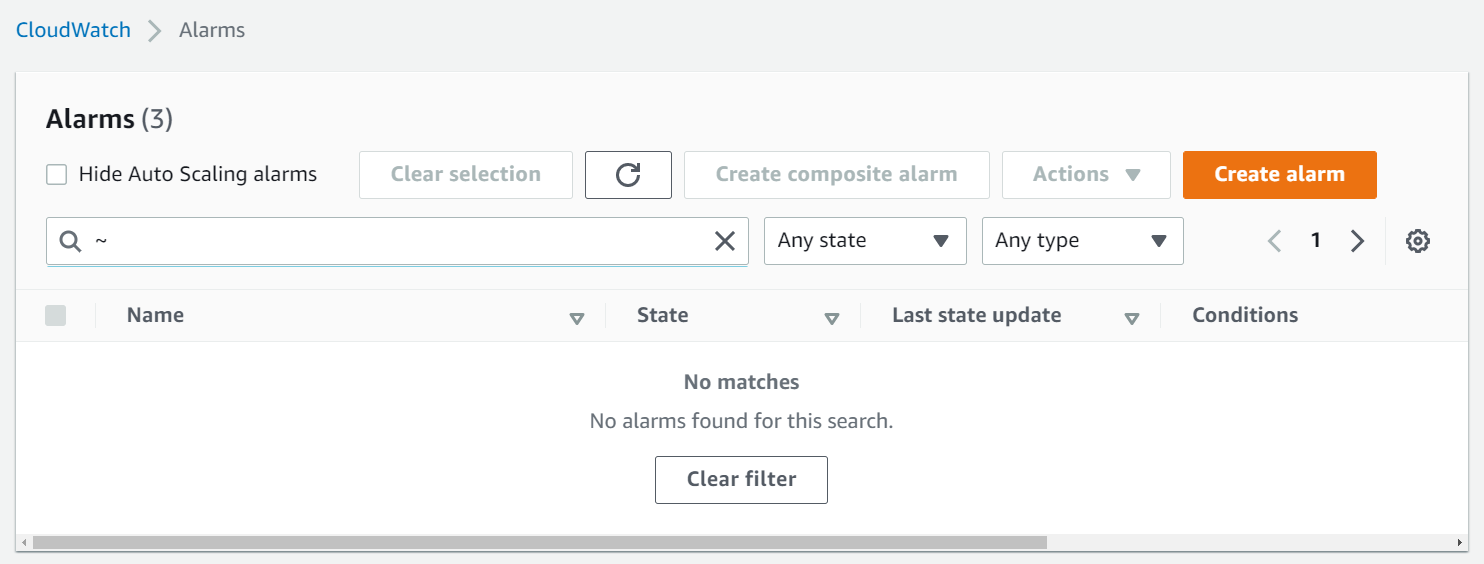
Figure 4: Create a CloudWatch Billing Alarm
From the Specify metric and conditions page, choose Select metric. Then, select the Billing metric and drill down to Total Estimated Charge.
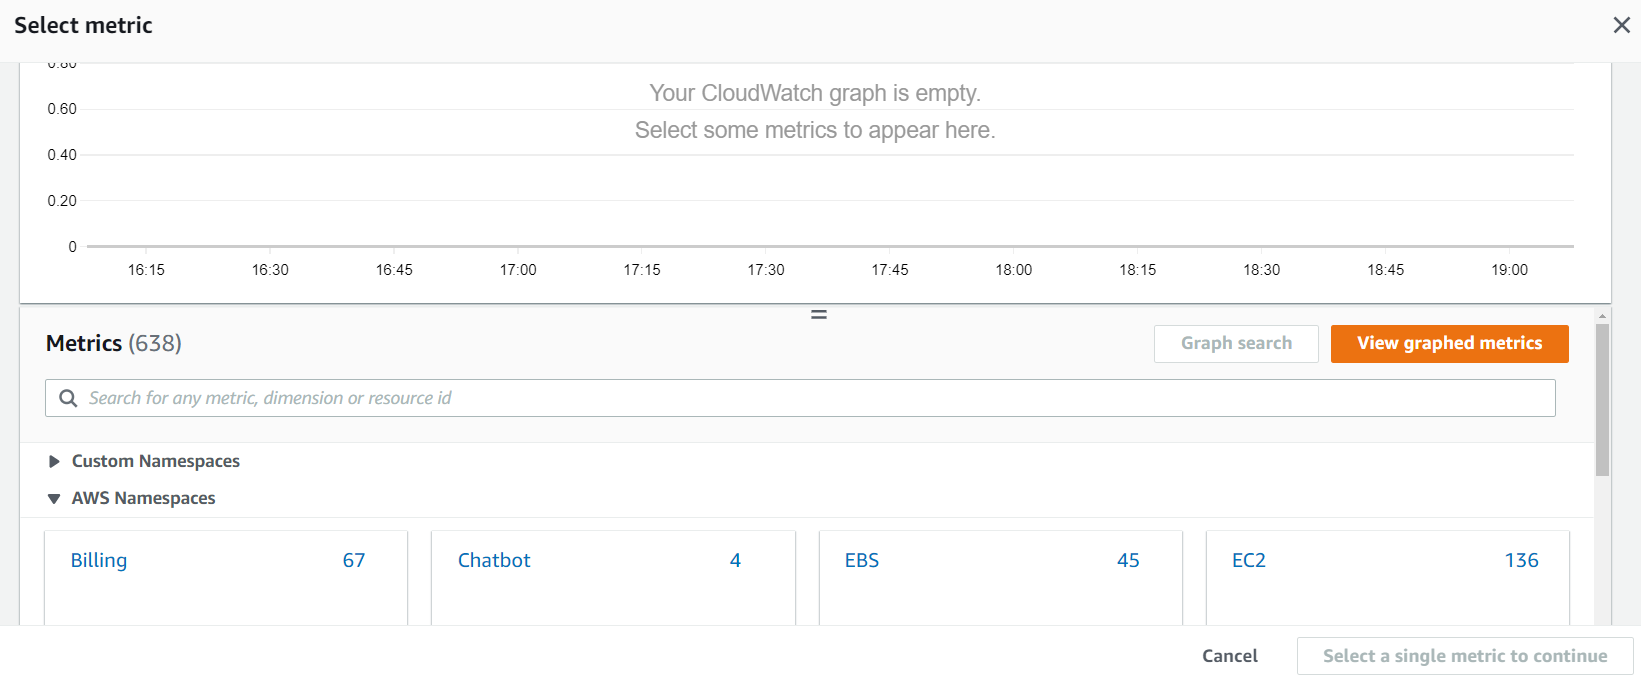
Figure 5: Select Billing under AWS Namespaces
Total Estimated Charges are monitored in USD. Select the USD option and choose Select metric.

Figure 6: Check the box for USD under Currency
On the next page, under Conditions define the threshold, in USD, you want this alarm to monitor and alert if Estimated Charges exceed the threshold, then click Next.
For this walkthrough, we want to be alerted when our estimated charges are greater than 10,000 USD, so that is what we’ll set for our threshold.

Figure 7: Add threshold value in USD
On the Configure actions page, select an SNS topic that will receive the notification when the alarm has been triggered, and then provide an email address. If you do not have an existing SNS topic, you must create an SNS Topic and return to this step.
This email address should correspond to the classification level of the environment.
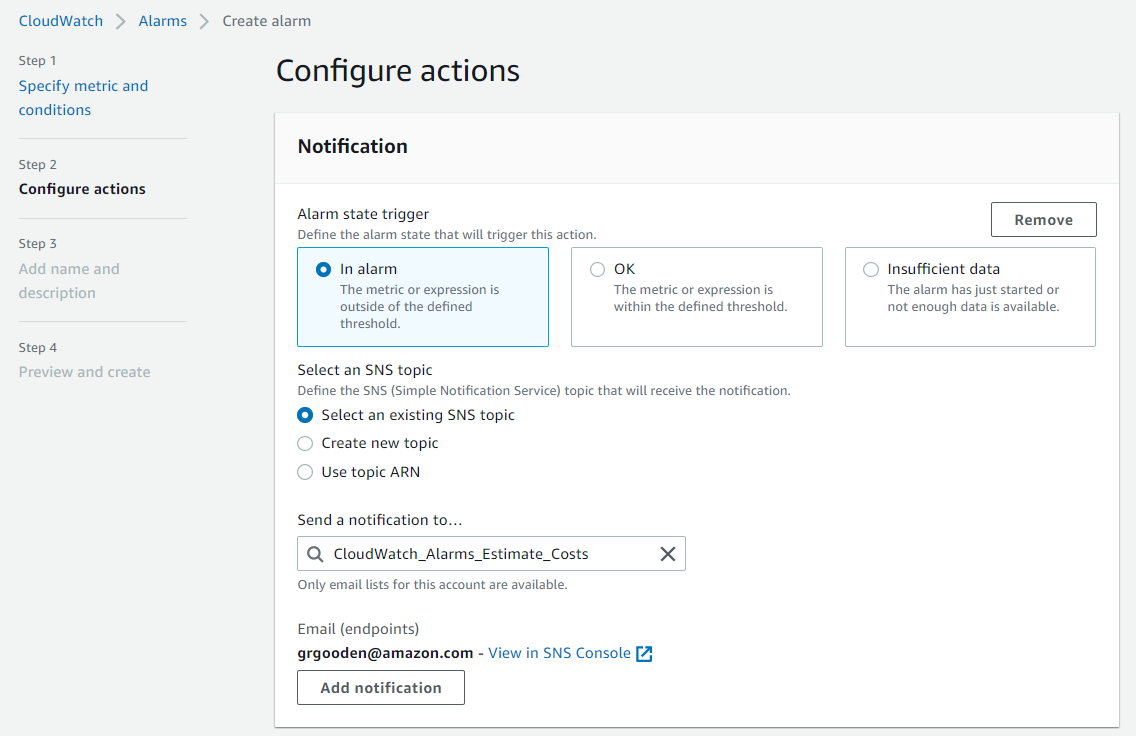
Figure 8: Choose an existing SNS topic or create a new SNS topic for notifications
Under Add name and description, provide a unique name for the alarm and a description (optional), then click Next.

Figure 9: Add CloudWatch Alarm name and description
Under Preview and create, review the configurations and selections. You can edit any of the sections by clicking the Edit button for that corresponding section. Once you have confirmed the sections, click Create alarm.
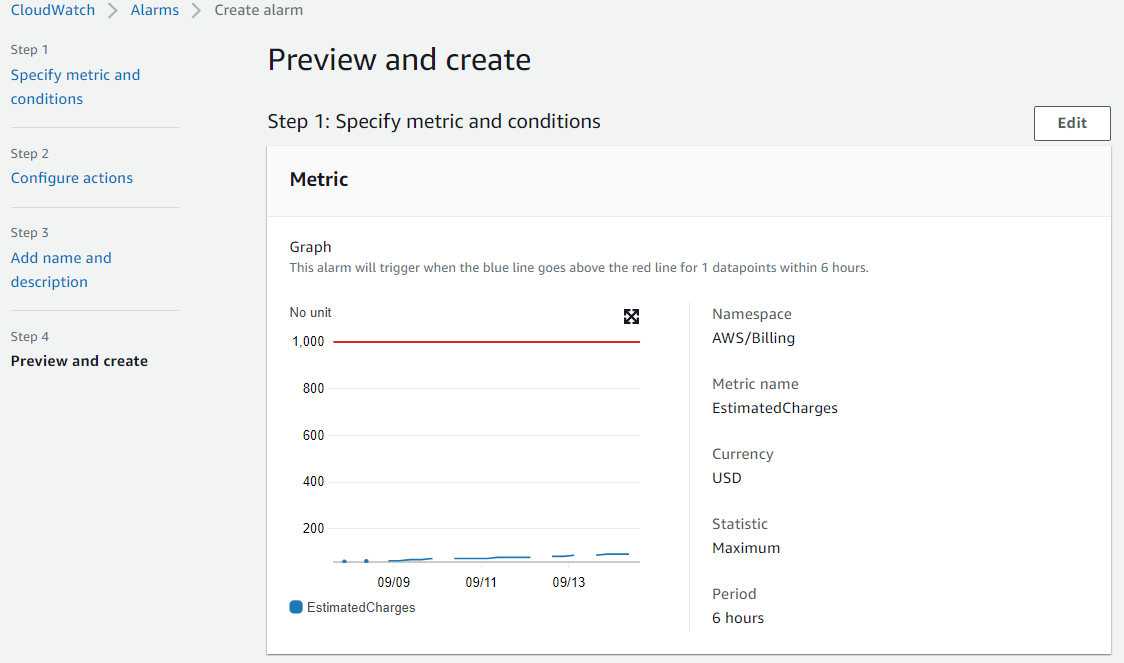
Figure 10: Preview and create CloudWatch Alarm
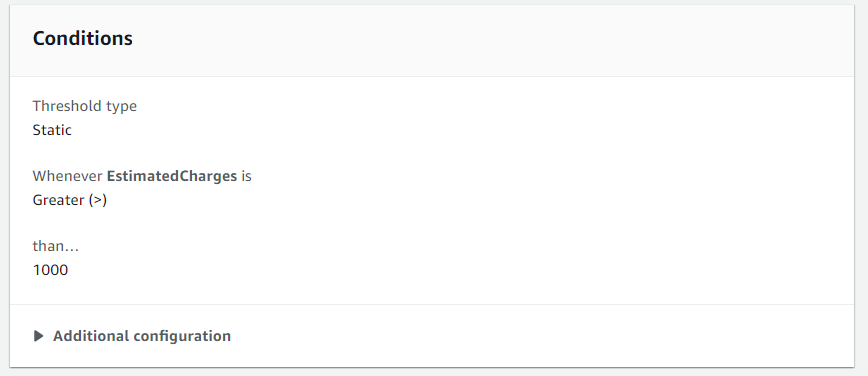
Figure 11: Preview and create CloudWatch Alarm

Figure 12: Preview and create CloudWatch Alarm
Return to the CloudWatch console and select Alarms. You may see that the Alarm is in the Insufficient state. This is because we have the CloudWatch Billing Alarm checking the account every six hours, depending on your account it may take a few hours for this Alarm to display as Ok.
And that’s it! You’ve setup a CloudWatch Billing Alarm in the AWS console, and you will be notified every time your Estimated Charges goes over your predefined threshold.
Cleaning up
To avoid incurring future charges, delete the resources you created in this walkthrough.
Delete the Amazon CloudWatch Billing Alarm
Delete the SNS topic
Delete the CloudFormation stack (if deploying the solution from the CloudFormation template)
Conclusion
This blog demonstrated how to enable Billing Alerts from the AWS Billing & Cost Management console. I also showed how to create and configure an Amazon CloudWatch Billing Alarm, and then associate that with an SNS topic for notifications. For more information, see Using Amazon CloudWatch alarms in the Amazon CloudWatch User Guide.
Now that you know how to create CloudWatch Billing Alarms from the AWS console, try taking this a step further by creating a multi-layer alarm that will notify you (or an email distro) when the Estimated Charges reach different predefined thresholds. You could also explore adding automation for creating Billing Alarms for newly created linked accounts with an AWS Organization.
Look out for subsequent posts where I will walk through how to take automate the creation of CloudWatch Billing Alarms using CloudFormation and Lambda.
Monitor for public AWS Systems Manager custom documents with AWS Config rules
=======================
A new managed AWS Config rule is now available that checks if your AWS Systems Manager (SSM) documents have been shared publicly. This makes it easy to monitor your SSM document public sharing settings by leveraging a managed Config rule. This post demonstrates how to utilize detective controls and remediation actions for publicly shared SSM documents.
AWS Config has released a new managed rule that provides the ability to add an additional guardrail monitoring for any SSM documents that may have been shared publicly. Here is how it works: The rule is executed on a frequency of 1, 3, 6, 12, or 24 hours. When executed, it checks for any SSM documents owned by the account that are shared publicly. If it finds any publicly shared custom SSM documents, then those SSM documents will trigger noncompliance of the Config rule.
Detective monitoring for public SSM documents
To get started, you must add the new managed AWS Config rule (named SSM_DOCUMENT_NOT_PUBLIC) to your set of active rules in your AWS accounts. For more information on adding the rule to your accounts, see Working with AWS Config Managed Rules for console and AWS CLI. Once you have the new rule in place, note its name, as we will use it later.
Next, we will set up automated or manual remediation options when noncompliant SSM documents are discovered.
Remediation options for public SSM documents
If your detective monitoring finds that you have SSM documents that should not be shared publicly, then you can configure an automatic remediation of these documents via AWS Config. AWS Config rules can configure an automatic or manual remediation action for noncompliant rules. The execution of the Config remediation action is achieved via an SSM Automation runbook.
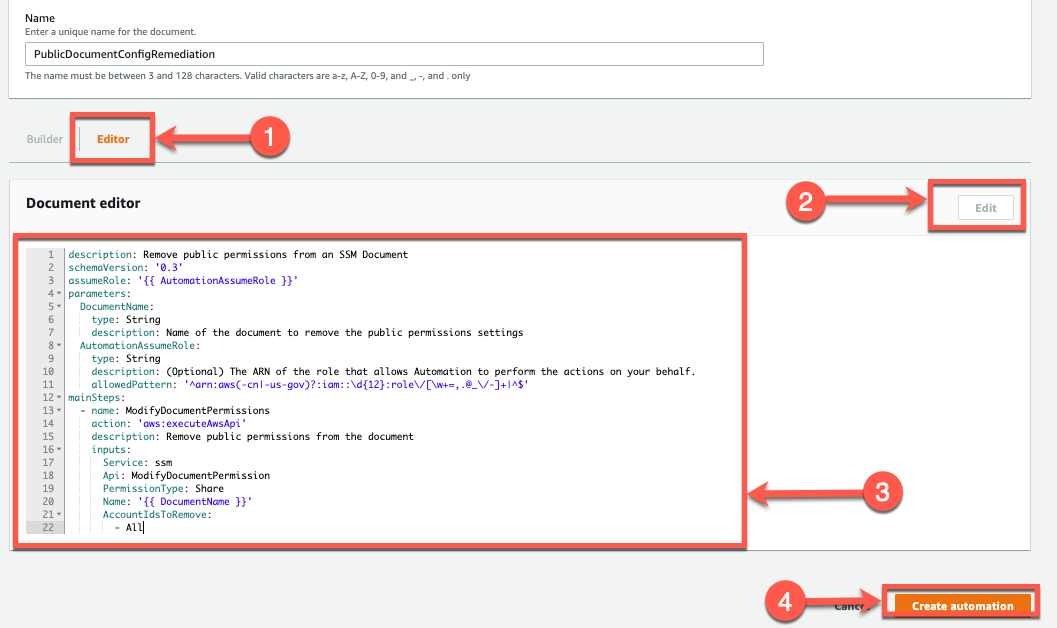
Several things can be done with these SSM Automation runbooks. You may want to create a Jira issue for further investigation, or you may choose to automatically disable the public sharing of the noncompliant SSM document. In this example, we will choose the latter and walk you through how to disable the public sharing of the noncompliant SSM document. To begin setting up the remediation, let’s create an SSM automation document. When executed, this document will disable the public sharing of the SSM document via an AWS API call to ModifyDocumentPermissions.
To create an SSM automation document (console)
- Open the Systems Manager Documents console.
- Under Create document, choose Automation.
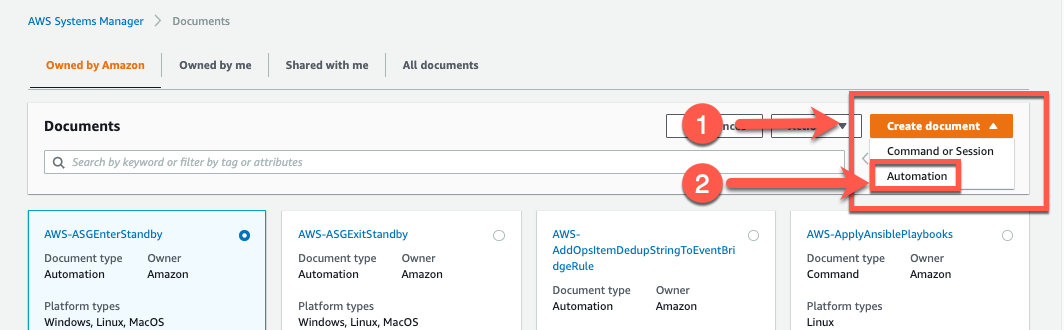
Figure 1: Documents page in Systems Manager console
- Enter a Name for the document (such as PublicDocumentConfigRemediation).

Figure 2: New automation document page
- Select the Editor, and choose Edit to create a document with the following content:
description: Remove public permissions from an SSM Document
schemaVersion: '0.3'
assumeRole: '{{ AutomationAssumeRole }}'
parameters:
DocumentName:
type: String
description: Name of the document to remove the public permissions settings
AutomationAssumeRole:
type: String
description: (Optional) The ARN of the role that allows Automation to perform the actions on your behalf.
allowedPattern: '^arn:aws(-cn|-us-gov)?:iam::\d{12}:role\/[\w+=,.@_\/-]+|^$'
mainSteps:
- name: ModifyDocumentPermissions
action: 'aws:executeAwsApi'
description: Remove public permissions from the document
inputs:
Service: ssm
Api: ModifyDocumentPermission
PermissionType: Share
Name: '{{ DocumentName }}'
AccountIdsToRemove:
- All
- Choose Create automation
With the new AWS Config rule and the new SSM automation document are created, we must set the automation document as the Config rule remediation action. In this blog post, we demonstrate how to attach the remediation document manually via the console to the Config rule.
Note: If you choose an automatic remediation option, then you’ll also need to have an IAM role with permissions for invoking the API calls within the runbooks. For the sample document above, the IAM role needs the ModifyDocumentPermissions permission.
To configure remediation for the new Config rule (console)
- Open the AWS Config Rules console, and select your new Config rule for SSM_DOCUMENT_NOT_PUBLIC.
- Under Actions, choose Manage remediation.

Figure 3: Manage Config rule remediation
- Choose either Automatic remediation or Manual remediation.
- Under Remediation action details, choose your remediation document created above (PublicDocumentConfigRemediation).
- Under Resource ID parameter, choose DocumentName.
- Under Parameters, for the AutomationAssumeRole value, enter the IAM Role ARN required to execute the document.

Figure 4: Remediation configuration settings
- Choose Save changes.
You’ve now enabled a new detective control utilizing the new AWS Config rule to monitor for any publicly shared custom SSM documents in the region. And you’ve set up a remediation action for any noncompliant SSM documents which will remove the document from being shared publicly.
Conclusion
This post introduced you to the new SSM_DOCUMENT_NOT_PUBLIC AWS managed Config rule, and described how to set up detective monitoring in your AWS accounts for publicly shared SSM documents. When the Config rule detects noncompliance, we walked through how to setup a remediation action in order to remove the document from being shared publicly.
Consider adding this new Config rule in your AWS accounts in each operating region in order to provide an additional set of controls for your SSM documents. In order to enforce Config rules at scale across accounts and regions in your Organization, see automate configuration compliance at scale in AWS. For more information regarding other public SSM document best practices, see best practice considerations with using SSM document sharing and best practices for shared SSM documents.
Control developer account costs with AWS CloudFormation and AWS Budgets
=======================
Often when working with customers, we guide them by using AWS Budgets and related tools in the AWS platform in order to create cost and utilization guardrails. These tools can be used to conduct advanced, automated, and hands-free actions within your AWS environment – even across multiple accounts. This post will walk you through a fully automated approach to create a forecast-based mechanism in order to alert your developers when their spend is approaching a warning threshold. It will then automatically shut down their EC2 instances if their forecasted spend for the month will exceed a defined value.
This solution utilizes integrations with AWS Organizations and AWS CloudFormation in order to deploy a budget to every account in a specific organizational unit in your organization. In turn, this budget will send notifications through Amazon Simple Notification Service (SNS) when forecasted thresholds are exceeded. Then, we will utilize these SNS notifications to execute an AWS Lambda function that will shut down every EC2 instance that is not tagged as critical in a single region.
Some important notes about this solution:
We use a CloudFormation stack as part of a multi-account organization. However, you can also use the stack in a single-account context.
The stack presented here is not safe for production environment deployment as-is, and it is intended only for use in a development or test environment. As such, you must be careful and certain of where you deploy it.
Utilizing a budget notification with a Lambda function creates an extensible solution that allows nearly limitless possibilities for you to create your own cost-control measures. While you can use this stack as-is, we consider it a good starting-place for far more creative solutions.
Prerequisites
There are two prerequisites for this automated solution to be deployed in accounts within an organization:
In order for AWS Budgets to be created, use the management account of your organization to enable Cost Explorer in (see this page for guidance).
Trusted access for AWS CloudFormation StackSets must be enabled for your organization (see this page for guidance).
About AWS Budgets
AWS Budgets lets you set custom budgets to track your cost and usage from the simplest to the most complex use cases. AWS Budgets also supports email or SNS notification when actual or forecasted cost and usage exceed your budget threshold, or when your actual Reserved Instance and Savings Plans’ utilization or coverage drops below your desired threshold.
AWS Budgets is also integrated with AWS Cost Explorer, so that you can easily view and analyze your cost and usage drivers, AWS Chatbot, so that you can receive Budget alerts in your designated Slack channel or Amazon Chime room, and AWS Service Catalog, so that you can track cost on your approved AWS portfolios and products.
Overview of a standard organization
Many customers’ AWS organizations will be similar to the diagram below, with development and production accounts split into discrete organizational units (OUs). Placing accounts into OUs that are mapped to their function lets customers create guardrails around the functionality of these accounts. Typically, these include security controls, such as blocking the provisioning of certain EC2 instance types, or creating resources in specific regions. In our example, we will utilize the Sandbox OU as the root for a budget and associated automation.
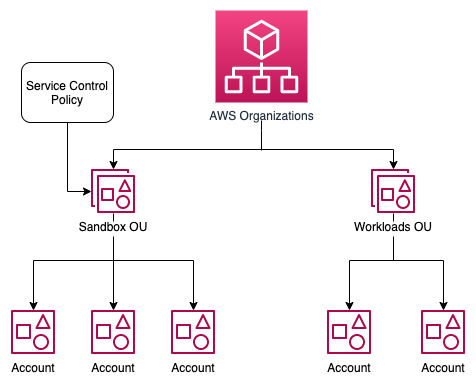
Figure 1: A typical AWS organization
Your organization will vary from this example in many ways. However, you can easily substitute a Sandbox OU for one of your own choosing.
Solution overview
AWS Budgets has two features that we will be using:
- Multiple budget alerts and thresholds can be created for each AWS account, limited at five.
- These alerts can be delivered to an SNS topic, as well as directly to an email address.
As a first step, a warning alert will be delivered to an email address when the forecast spend for an account reaches a threshold of 80%. Then, if an account is forecast to spend 100% of its budget, an email will be delivered again, as well as a Lambda function executed. In turn, this will shut down every EC2 instance in this account where the EC2 instance is not tagged as critical (in the same region where you deploy the solution).
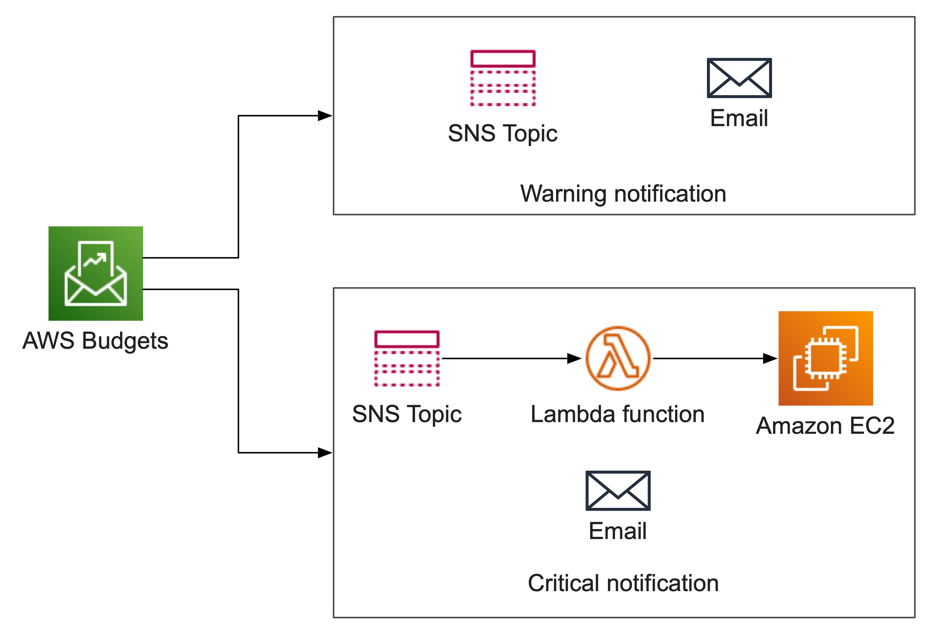
Figure 2: Architecture diagram of our solution
Step 1: Determine your budget and thresholds
Before proceeding, you will must determine the total permissible spend per month for each AWS account. As presented in this blog, the CloudFormation stack will apply the same budget to every account in the same OU. However, this is only a starting point, and you can also adapt the solution to have per-account budgets. See Extending the solution below for more details.
You must also decide what your threshold percentages will be for warnings and budgets. You can select your threshold values, though the stack below has default values of 80% for warnings and 100% for critical values. Having a critical threshold of 200% of forecast budget is a valid approach as well, and many customers will routinely allow their teams to exceed their budgets.
Step 2: Create a service control policy
Before creating our budgets and automation, we will create a Service Control Policy (SCP) that will protect them from modification. The four parts of this policy each enforce that only the account that deployed the stack set can modify it.
- Statement1 blocks all roles except for the stack set execution role from modifying a budget.
- Statement2 blocks changes to the Lambda functions that are called by the critical budget threshold.
- Statement3 blocks changes to the SNS topics for the solution.
- Statement4 prevents a user in the account from creating their own IAM role that can modify the previous three statements. This would allow someone with broad IAM privileges to spoof the stack set owner role.
Note that Statement4 is tailored to using CloudFormation stack sets with service-managed permissions. If you wish to proceed with self-managed permissions, then adjust this stanza accordingly. Details regarding using service-managed permissions for CloudFormation are available on this page.
This SCP is applied to the OUs that you wish to attach your budgets to. You must replace the following values in it before deployment:
Replace ACCOUNTNUMBER with the account number for the management account that deploys the stack set. This can be either the management account or a delegated administrator account. See Register a delegated administrator for more information regarding delegated accounts for CloudFormation.
Replace STACKNAME with the name of the stack set that you will create in CloudFormation.
{
"Version": "2012-10-17",
"Statement": [
{
"Sid": "Statement1",
"Effect": "Deny",
"Action": [
"budgets:ModifyBudget",
"budgets:UpdateBudgetAction"
],
"Resource": [
"*"
],
"Condition": {
"StringNotLike": {
"aws:PrincipalARN": [
"arn:aws:iam::*:role/stacksets-exec-*"
]
}
}
},
{
"Sid": "Statement2",
"Effect": "Deny",
"Action": [
"lambda:DeleteFunction",
"lambda:RemovePermission",
"lambda:UpdateFunctionCode",
"lambda:UpdateFunctionConfiguration",
"lambda:UpdateFunctionEventInvokeConfig"
],
"Resource": [
"arn:aws:lambda:*:*:function:StackSet-STACKNAME-*-BudgetLambdaFunction-*"
],
"Condition": {
"StringNotLike": {
"aws:PrincipalARN": [
"arn:aws:iam::*:role/stacksets-exec-*"
]
}
}
},
{
"Sid": "Statement3",
"Effect": "Deny",
"Action": [
"sns:DeleteTopic",
"sns:AddPermission",
"sns:DeleteEndpoint",
"sns:RemovePermission",
"sns:Unsubscribe"
],
"Resource": [
"arn:aws:sns:*:*:StackSet-STACKNAME-*-CriticalTopic-*",
"arn:aws:sns:*:*:StackSet-STACKNAME-*-WarningTopic-*"
],
"Condition": {
"StringNotLike": {
"aws:PrincipalARN": [
"arn:aws:iam::*:role/stacksets-exec-*"
]
}
}
},
{
"Sid": "Statement4",
"Effect": "Deny",
"Action": [
"iam:CreateRole",
"iam:DeleteRole",
"iam:UpdateRole"
],
"Resource": [
"arn:aws:iam::*:role/stacksets-exec-*"
],
"Condition": {
"StringNotLike": {
"aws:PrincipalARN": [
"arn:aws:iam::ACCOUNTNUMBER:role/aws-service-role/stacksets.cloudformation.amazonaws.com/AWSServiceRoleForCloudFormationStackSetsOrgAdmin"
]
}
}
}
]
}
To create the service control policy, navigate to AWS Organizations, and select Policies from the left-navigation menu. Under the Supported policy types, select service control policies.
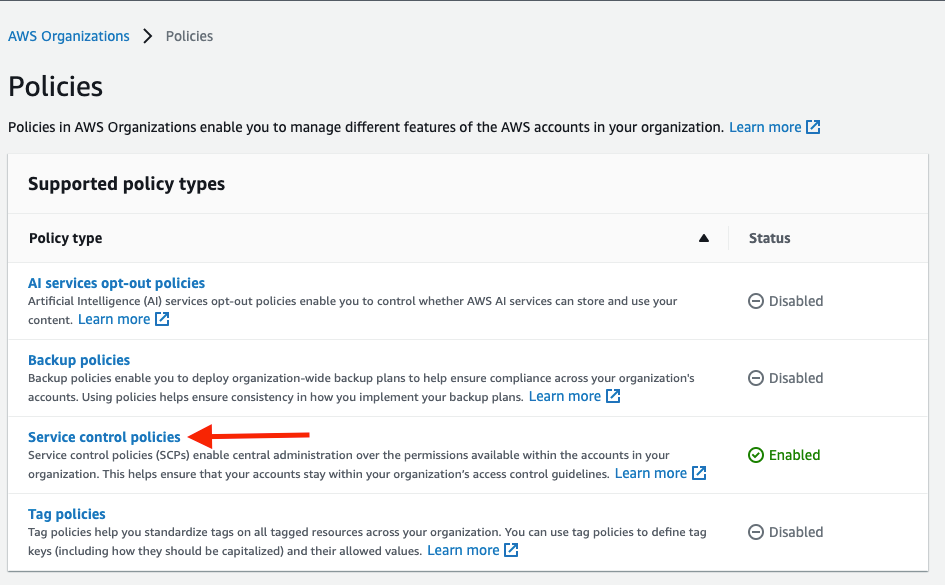
Figure 3: Selecting Service control policies
On the service control policy console, click the Create policy button to create a new service control policy.
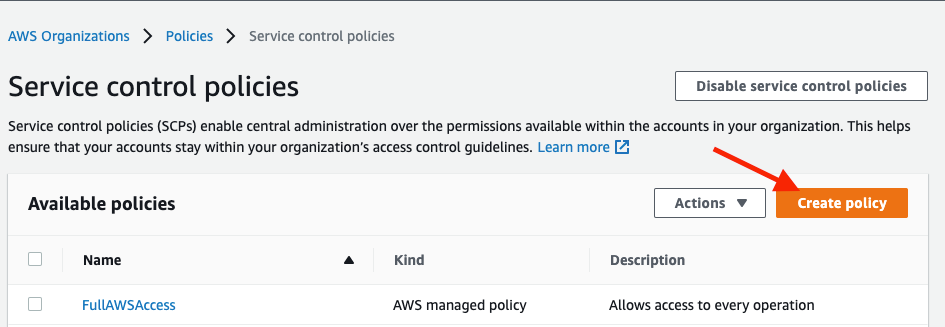
Figure 4: Creating new policy
Enter a name and description, and paste the policy statements above to the policy editor. Then, click the Create policy button. Remember to replace the ACCOUNTNUMBER and STACKNAME with the values gathered earlier.
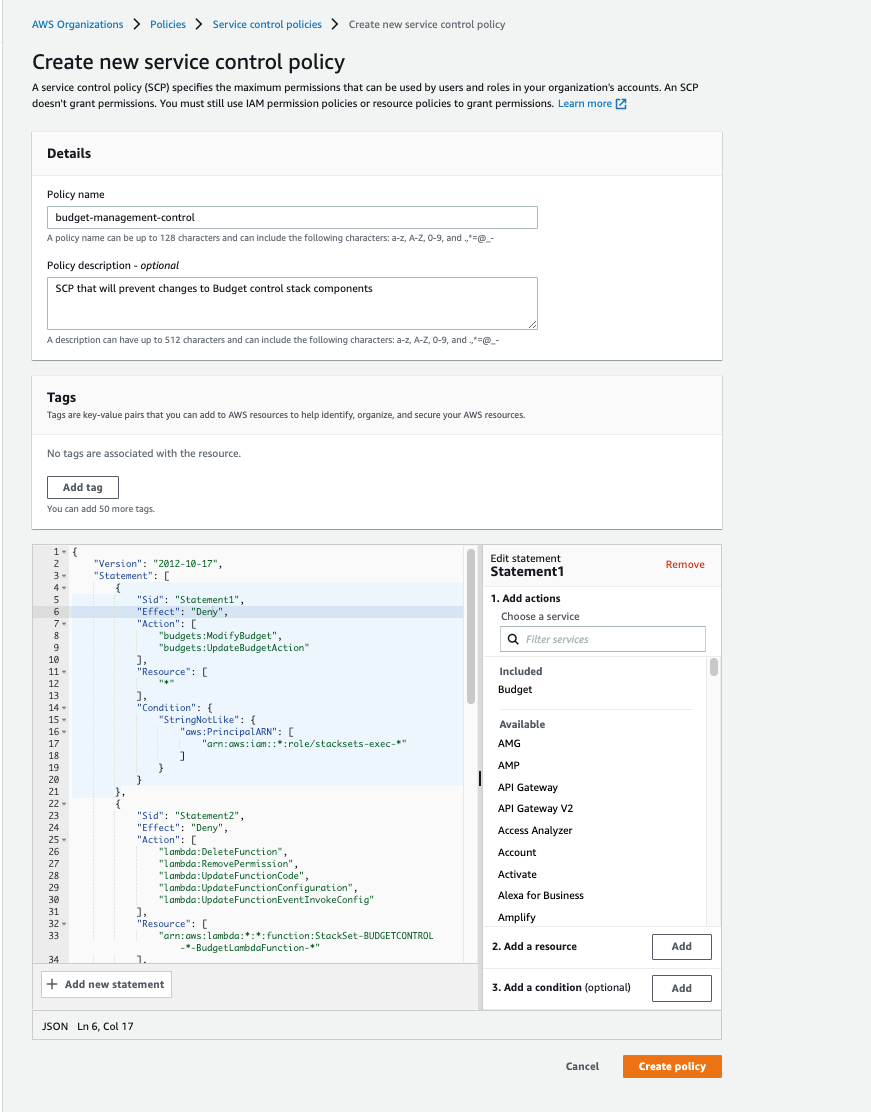
Figure 5: Entering policy details
Click the Create Policy button in order to complete the SCP creation.
Next, we will attach the newly created SCP to the target Development Organizational unit where we want the policy statements to be in effect. From the available policies screen, select the newly created policy by clicking the check-box on the left-hand side of the policy name. From the Actions list, select Attach policy.

Figure 6: Attaching the policy
In the following screen, we will select the Development Organizational Unit that would be the target for the policy by clicking the radio-button next to the OU name.

Figure 7: Specifying the OU to attach the policy
With this SCP created in advance, we have your budget, notifications, and Lambda protected from the moment that they are provisioned.
Step 3: Create your CloudFormation stack set
Now we can create our stack set. The actual CloudFormation stack is below. Review it carefully before deploying, and note these sections:
Lines 26-58 create the SNS topics for warnings and alerts.
Lines 60-87 create the actual budget and thresholds.
Lines 89-158 create the Lambda function and subscription to the critical notification topic.
---
AWSTemplateFormatVersion: '2010-09-09'
Description: Stack that creates an AWS budget, notifications, and a Lambda function that will shut down EC2 instances
Parameters:
BudgetAmount:
Type: Number
Description: Maximum permissible spend for the month
Email:
Type: String
Description: Email address to deliver notifications to
WarningThreshold:
Type: Number
Description: Percentage of forecast monthly spend for the warning notification
Default: 80
CriticalThreshold:
Type: Number
Description: Percentage of forecast monthly spend for the critical notification
Default: 100
ShutdownExemptionTagKey:
Type: String
Description: Key name to exempt from auto-shutdown
Default: "instance-class"
ShutdownExemptionTagValue:
Type: String
Description: Value of key name tag to exempt from auto-shutdown
Default: "critical"
Outputs:
BudgetId:
Value: !Ref Budget
Resources:
WarningTopic:
Type: AWS::SNS::Topic
WarningTopicPolicy:
Type: AWS::SNS::TopicPolicy
Properties:
PolicyDocument:
Version: 2012-10-17
Statement:
- Effect: Allow
Action: sns:Publish
Resource: "*"
Principal:
Service: budgets.amazonaws.com
Topics:
- !Ref WarningTopic
CriticalTopic:
Type: AWS::SNS::Topic
CriticalTopicPolicy:
Type: AWS::SNS::TopicPolicy
Properties:
PolicyDocument:
Version: 2012-10-17
Statement:
- Effect: Allow
Action: sns:Publish
Resource: "*"
Principal:
Service: budgets.amazonaws.com
Topics:
- !Ref CriticalTopic
Budget:
Type: AWS::Budgets::Budget
Properties:
Budget:
BudgetLimit:
Amount: !Ref BudgetAmount
Unit: USD
TimeUnit: MONTHLY
BudgetType: COST
NotificationsWithSubscribers:
- Notification:
NotificationType: FORECASTED
ComparisonOperator: GREATER_THAN
Threshold: !Ref WarningThreshold
Subscribers:
- SubscriptionType: EMAIL
Address: !Ref Email
- SubscriptionType: SNS
Address: !Ref WarningTopic
- Notification:
NotificationType: FORECASTED
ComparisonOperator: GREATER_THAN
Threshold: !Ref CriticalThreshold
Subscribers:
- SubscriptionType: EMAIL
Address: !Ref Email
- SubscriptionType: SNS
Address: !Ref CriticalTopic
BudgetLambdaExecutionRole:
Type: AWS::IAM::Role
Properties:
AssumeRolePolicyDocument:
Version: 2012-10-17
Statement:
- Effect: Allow
Principal:
Service:
- lambda.amazonaws.com
Action:
- sts:AssumeRole
Path: /
Policies:
- PolicyName: BudgetLambdaExecutionRolePolicy
PolicyDocument:
Version: 2012-10-17
Statement:
- Effect: Allow
Action:
- logs:CreateLogGroup
- logs:CreateLogStream
- logs:PutLogEvents
Resource: arn:aws:logs:*:*:log-group:/aws/lambda/*-BudgetLambdaFunction-*:*
- Effect: Allow
Action:
- ec2:DescribeInstances
- ec2:StopInstances
Resource: arn:aws:ec2:*:*:instance/*
BudgetLambdaFunction:
Type: AWS::Lambda::Function
Properties:
Description: Lambda function to be called after a critical budget threshold has been exceeded
Handler: index.lambda_handler
ReservedConcurrentExecutions: 1
Role: !GetAtt BudgetLambdaExecutionRole.Arn
Runtime: python3.8
Timeout: 20
Environment:
Variables:
ShutdownExemptionTagKey : !Ref ShutdownExemptionTagKey
ShutdownExemptionTagValue : !Ref ShutdownExemptionTagValue
Code:
ZipFile: |
import boto3
import os
instances = []
def lambda_handler(event, context):
ec2 = boto3.resource('ec2')
exemption_tag_key = os.environ.get("ShutdownExemptionTagKey")
exemption_tag_value = os.environ.get("ShutdownExemptionTagValue")
for instance in ec2.instances.all():
print('Found instance: {}, checking instance-class tag value...'.format(instance.id))
instance_class = 'undefined'
tags = instance.tags
for t in tags:
if t["Key"] == exemption_tag_key:
instance_class = t["Value"].lower()
print(f"Instance type is : {instance_class}")
if instance_class != exemption_tag_value:
instances.append(instance.id)
if len(instances) > 0:
print('Calling shutdown API for all discovered instance IDs')
response = ec2.instances.stop(InstanceIds=instances)
print('Raw response from shutdown API:')
print(str(response))
return True
CriticalTopicSubscription:
Type: AWS::SNS::Subscription
Properties:
Protocol: lambda
TopicArn: !Ref CriticalTopic
Endpoint: !GetAtt BudgetLambdaFunction.Arn
BudgetLambdaFunctionPermission:
Type: AWS::Lambda::Permission
Properties:
Action: lambda:InvokeFunction
FunctionName: !Ref BudgetLambdaFunction
Principal: sns.amazonaws.com
SourceArn: !Ref CriticalTopic
Deployment of this stack set is best managed using CloudFormation service-managed permissions, as this enables the automatic deployment and removal of stacks as accounts are added to OUs in AWS Organizations. Many of the options, as well as the use of features such as delegated administrator accounts, are at your discretion.
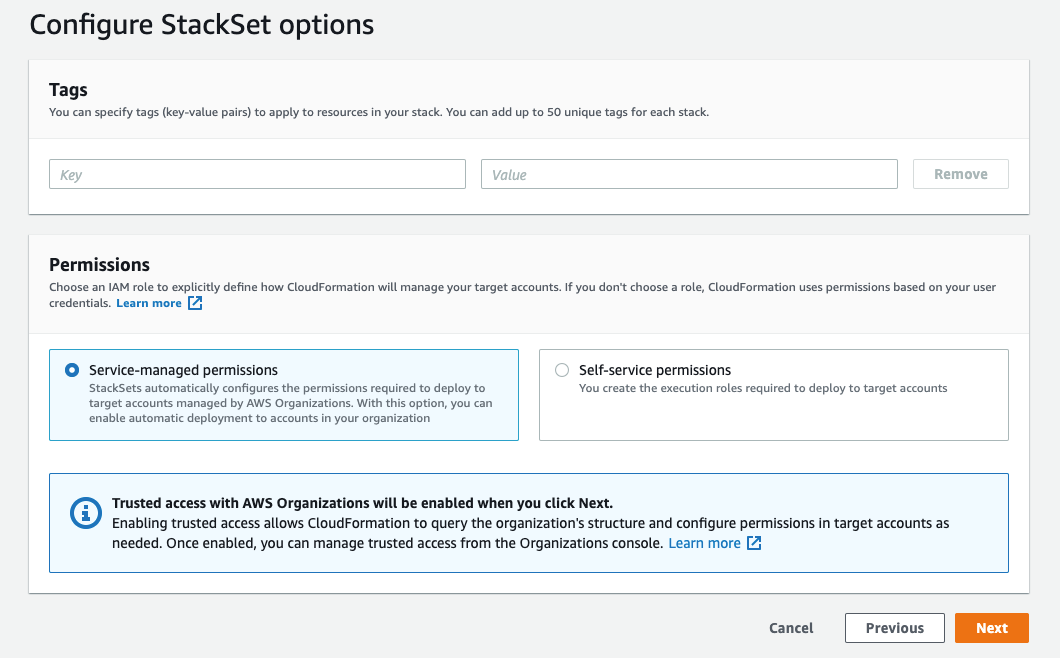
Figure 8: Selecting Service-managed permission as Stackset permission
Note that the OU ID required will be available within the Organizations console. You must copy this value into the AWS OU ID field when deploying your stack set. Up to 10 OUs can be specified per stack set, and OUs contained therein will inherit these from the parent OU.
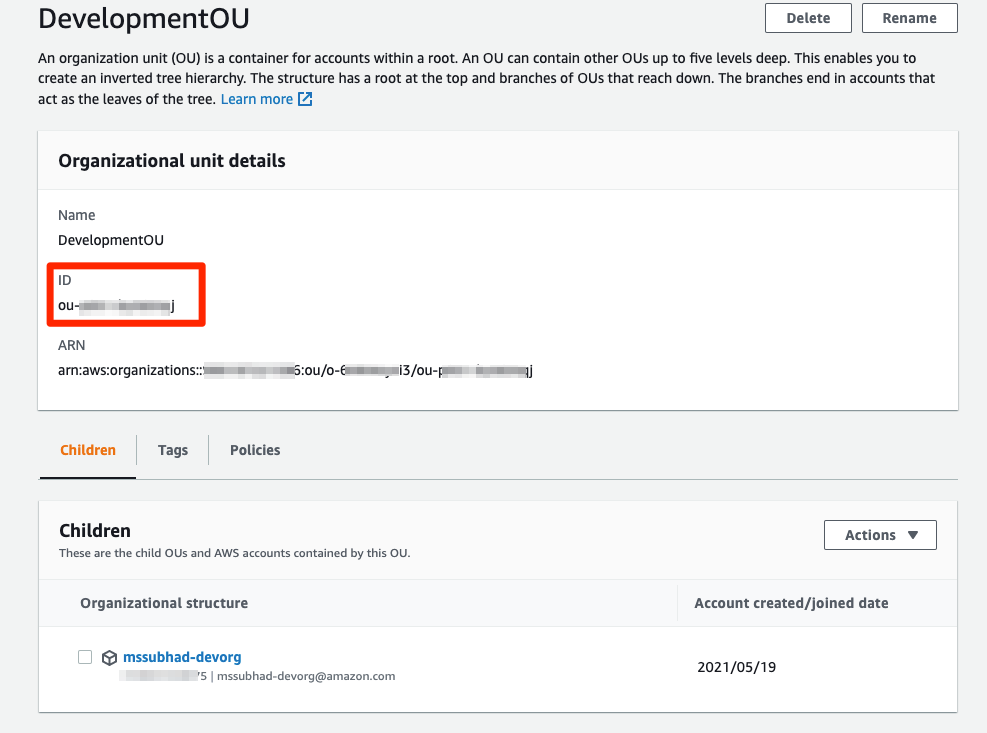
Figure 9: Finding the OU ID
Figure 10: Specifying target OU for deployment
Clicking the Next button will show the review screen. You must acknowledge that AWS Cloud Formation will create IAM resources. Clicking Submit will create the stack-set and deploy the stack components to the accounts under the target OU. While an AWS budget is global, the actual stack can only be deployed to a single region.
Operating without shutting-down EC2 instances
This solution works well as a notification and monitoring tool, and so you can easily deploy it without the automatic shutdown of EC2 instances. This can be achieved in two ways. You can comment-out every line in the CloudFormation stack after line 88, which leaves the budget capability in place as-is, but no Lambda execution will take place. Alternatively, the CloudFormation template lets you set a tag value for EC2 instances that must be exempted from shutdown. EC2 instances that carry the tag name and tag value specified as the CloudFormation template parameters will be exempted from shutdown. The default value is set in line 23 and line 27 as instance-class/critical. This can be modified to a key/value pair that your organization follows in order to tag critical instances.
Note: The provided CloudFormation stack utilizes the “Forecasted” value to trigger the notification. If the target account is new, then it generally takes some time (typically a few days to a week) for the cost management tool to generate a “forecast” value.
Extending the solution and next steps
This CloudFormation stack is a good starting place for many customers, and it can be extended to perform any number of actions in your environment based on your need. Below are some common alterations that may be useful for you as you are implementing this solution..
First, the EC2 shutdown script can be easily extended to include Amazon RDS instances, Amazon ElastiCache, Amazon Elasticsearch Service, Amazon SageMaker notebooks, or any other number of running resources. We presented EC2 here, as it is ubiquitous, and it is a good reference for your controls. Any actions you can script with Lambda are available to you.
You may wish to have different budget thresholds for each AWS account. You can accomplish this in two ways: one is to modify the SCP to permit another IAM user or role to change the thresholds in Statement1 within your SCP, and then have that person or role change the threshold after the stack has been created. Another option is to use Systems Manager Parameter Store to keep new threshold values, reference them in the stack set, and then update the stack. This page details the embedding parameters from the Systems Manager Parameter Store.
The approach utilized here is fully compatible with AWS Control Tower and the Customizations for Control Tower solution. This solution provides a convenient way to manage the deployment of the service control policy and the stack, all in one place. Likewise, updating the stack and SCP is conducted easily through the pipeline provided by this solution.
In conclusion, utilizing a programmatic approach to controlling developer account costs is straightforward and requires little effort to manage. We recommend that all customers use AWS Budgets wherever possible in order to maintain observability regarding their cloud consumption, thereby utilizing an automatic shutdown mechanism as an evolved way to enforce your own cost control measures.
Visual monitoring of applications with Amazon CloudWatch Synthetics
=======================
Monitoring application endpoints is a reliable way to measure availability. This best practice can be extended by adding synthetic monitoring to your observability strategy. Synthetic monitoring lets you continually verify your customers’ experience by following the same routes and actions as your customers. You can create scripts or canaries that monitor things such as availability, page load times, broken links, etc. in your application. However, these custom scripts increase your operational overhead in developing and maintaining them. Furthermore, these scripts might not be able to identify visual defects that could affect end-user experience.
With the launch of visual monitoring support by Amazon CloudWatch Synthetics, you can measure visual differences in your application and identify defects before they impact your users. Utilizing visual monitoring lets you detect visual defects in your application by comparing screenshots with an established baseline, adjust thresholds for variance, ignore selected page sections, and more. This post will walk through how the visual monitoring blueprint for Amazon CloudWatch Synthetics can be utilized to monitor your applications for visual defects.
Creating canaries with the visual monitoring blueprint
Based on your needs, you can create and run canaries with your own scripts via CloudWatch Synthetics. However, the blueprints available will help you get started quickly, and they are available for various use-cases. I will walk through creating a canary using the visual monitoring blueprint.
- Navigate to the CloudWatch console and click Synthetics Canaries under Application monitoring. Click Create canary.
- Select the Use a blueprint radio button and select the Visual monitoring.
Figure 1: Create canary
- In the Canary builder section, provide a Name for the canary and specify the Application or endpoint URL of your application. Also specify the threshold for visual variance between screenshots of your application. I will leave it at 0 for now.
Figure 2: Configure canary
- Based on the blueprint selected and the configuration specified, CloudWatch Synthetics automatically generates the script that will be used for canary runs.
- Configure other options such as Schedule, Data Retention and Storage, Access permissions, and more. Refer to the CloudWatch Synthetics documentation on creating a canary to learn more about these options. I have used default values for all of these fields in this example.
- Click Create canary. CloudWatch Synthetics may take up to a minute to provision the resources needed for the canary runs. Once the canary has been created, you will automatically be returned to the canaries dashboard.

Figure 3: Canary create in progress
Viewing canary runs
After the canary has been created, it makes requests to the application or endpoint URL at the frequency that was specified and then captures responses received. The screenshot captured on the first run of the canary becomes the baseline and all subsequent screenshots are compared against this in order to detect variance.
- Click the canary you created from the list of canaries to view details of canary runs.
- You can see a summary of canary runs, such as the status of the latest run, issues detected in the last 24 hours, success % in the last 7 days, and the status of the canary.
Figure 4: Canary summary
- The Availability tab provides details of issues in the last 24 hours, provides a graph of Passed and Failed canary runs, and other options such as Steps, Screenshots, Logs, and HAR files which allow you to drill down into specific canary runs.
Figure 5: Availability tab
- Clicking the Screenshots tab and clicking the image there brings up the baseline screenshot, the screenshot from the latest run, and the visual variance percentage. No differences are identified here since I have not modified my application.

Figure 6: Baseline vs canary run
The application I am using is running on Amazon Elastic Compute Cloud (EC2) and returns the instance ID, Availability Zone, and other text, along with an image. The EC2 instance is part of an Amazon EC2 Auto Scaling group behind an Application Load Balancer. It is the only instance currently in the group. I will increase the group capacity to add 2 more instances and then observe the canary.

Figure 7: Sample application
I can see that some of the canary runs are failing and issues are being detected. Selecting one issue lets me drill down into the details. Under the issue description, I can see that the visual variance was 0.37%.
Figure 8: Issues detected
Clicking the Screenshots tab and then the image brings up the comparison between the baseline and the screenshot taken on that canary run.
Figure 9: Baseline vs canary run with failure
Looking at the two images, I see differences which have been highlighted. I see that the instance_id, private_hostname, and private_ipv4 have changed. I can utilize this information to determine if this change is expected or not.
I have multiple instances in the Amazon EC2 Auto Scaling group for my application and each EC2 instance is returning information related to itself, resulting in changes to the data between runs. Requests from canary runs are being handled by a different EC2 instance each time. Therefore, the changes are expected.
Updating the canary
Now that we know the change is expected, the canary must be updated to prevent false positives. This can be achieved in multiple ways.
Update variance threshold
Based on the description for the issues detected, I see that the variance between the baseline and screenshots from the canary runs is 0.37%. Since this variance degree is expected, I can update the canary and increase the variance threshold (the default value is 0). I select my canary and, under Actions, choose to Edit the canary. On the edit page, I scroll down to the Script editor and locate the following line:
syntheticsConfiguration.withVisualVarianceThresholdPercentage(0)
This sets the canary variance threshold. Based on my data from previous canary runs, I can update the threshold to be 0.5%, and then save.
syntheticsConfiguration.withVisualVarianceThresholdPercentage(0.5)
Figure 10: Edit canary
With the variance threshold increased to 0.5%, I can see that the subsequent canary runs are not failing and no issues are detected.

Figure 11: Canary summary and canary runs
Edit baseline screenshot
Alternatively, I can edit the baseline screenshot and have selected areas ignored during visual comparison. This is especially useful for applications containing dynamic content. To do this, I once again select my canary and, under Actions, choose Edit. I scroll down to Visual Monitoring and click Edit baseline.
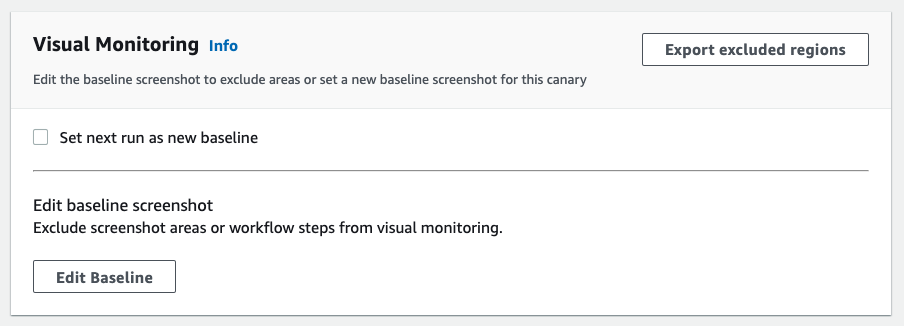
Figure 12: Edit baseline
This pulls up the current baseline screenshot. A simple click-drag lets me select an area of the screenshot to exclude from visual comparison for subsequent canary runs. In this case, I select the area where the text is located, since I know that this is the dynamic content in my application. I click Save to update the baseline, and then click Save again to update the canary. You can select more than one area to exclude from comparison if your applications have additional areas with dynamic content.
Figure 13: Update baseline
Application update
The image utilized as part of my application is stored in an Amazon Simple Storage Service (S3) bucket. Let’s assume that the image stored in the bucket was updated without me being aware of it, and my application now looks like this:

Figure 14: Sample application with new image
CloudWatch Synthetics quickly detects this change and the canary monitoring this application raises an issue. I can see from the issue description that there is a percentage of 25.53%, much higher than the threshold of 0.5% that I had set.
Figure 15: Canary run failures
Drilling down into the details of the failed canary run, the image being returned by my application is different from what is in the baseline. Using this information, I can determine if this change is desirable or not BEFORE it impacts end users.

Figure 16: Baseline vs canary run with failure
After determining that this change is intentional, I can update the canary so that subsequent canary runs do not detect this as an issue.
Set a new baseline
The baseline screenshot can be updated to reflect the application changes. To do this, click Actions and then choose to Edit the canary.
On the edit page, under Visual Monitoring, check the box next to Set next run as new baseline, and save changes. The screenshot taken during the next canary run will be used as the new baseline moving forward. Screenshots from all subsequent canary runs will be compared against this new baseline.

Figure 17: Set new baseline
As expected, subsequent canary runs are passing since the baseline has been updated.
Figure 18: Successful canary runs
Clicking Screenshots and then clicking the screenshot lets me verify that the baseline has indeed been updated.
Figure 19: Updated baseline vs canary run
Other options
CloudWatch Synthetics offers various options and integrations that can be tailored for your use-case.
Enable/disable visual monitoring
If you already have CloudWatch Synthetics canaries monitoring your applications, you can update them to include visual monitoring. Select the canary into which you want to include visual monitoring, click Actions, and then Edit. Under Script editor, include the following line in the canary script in order to enable visual monitoring on that canary. Note that this is only supported for canaries running syn-puppeteer-node-3.2 and later.
syntheticsConfiguration.withVisualCompareWithBaseRun(true);
Customize canary response
When visual defects are detected, the default behavior of canaries conducting visual monitoring is to set the canary run status as Failed. Depending on your use-case, you may want to adjust this so that a canary does not fail when a visual variance is detected. This is particularly useful when you want to take different actions based on the failure type. For example, you might want to identify if a failure is due to a visual difference on the User Interface (UI) of an application, or if there was a page load failure due to an error with the backend system. In this case, you can utilize CloudWatch alarms to notify only the UI developer team instead of a generic maintenance team for the application. In order to do this, select the canary, click on Actions, and then Edit. Under Script editor, include the line:
syntheticsConfiguration.withFailCanaryRunOnVisualVariance(false)
This is what determines the canary behavior when visual differences are detected. In order to revert this change and have the canary fail when visual differences are detected, you can change this to:
syntheticsConfiguration.withFailCanaryRunOnVisualVariance(true)
Customize highlight color
CloudWatch Synthetics uses yellow (#fafa00) to highlight differences between canary run screenshots and the baseline. This setting can be customized by including the following line in the canary script and providing a hex value for the color of your choice.
syntheticsConfiguration.withVisualVarianceHighlightHexColor("<REPLACE WITH VALUE OF YOUR CHOICE>")
Monitoring and alerting
Canaries publish a variety of metrics to CloudWatch such as VisualMonitoringSuccessPercent, VisualMonitoringTotalComparisons, HTTP response codes, and more. Refer to the CloudWatch Synthetics documentation for a full list of metrics published by canaries. These metrics can be utilized to create CloudWatch alarms and receive alerts when visual differences are detected in your applications. Create alarms from the CloudWatch Synthetics console by editing your canary, or select from one of the available metrics under the CloudWatchSynthetics namespace from the CloudWatch Metrics console. Learn more about creating alarms in CloudWatch.
Cleanup
To avoid ongoing charges to your account, delete any canaries you may have created as part of reading through this blog post. For instructions, check editing or deleting a Canary in the Amazon CloudWatch User Guide.
Conclusion
This post showed how Amazon CloudWatch Synthetics canaries can now be utilized to conduct visual monitoring of your applications. By using the visual monitoring blueprint, you can quickly create canaries, or update existing canaries to include the visual monitoring of your applications. With the wide range of customizations supported by this new feature, you can tailor canaries specifically to your use-cases. This will enable you to identify visual defects with your application in a timely manner and thus take necessary action.
For more information, see Visual monitoring with CloudWatch Synthetics and Visual monitoring blueprint for CloudWatch Synthetics canaries in the Amazon CloudWatch User Guide.
Check out this video to learn how you can detect visual differences in your application using Amazon CloudWatch synthetics.
Automating account provisioning with CloudCheckr integration for Cloud Financial Management
=======================
AWS Organizations helps you centrally manage and govern your environment as you grow and scale your AWS resources. AWS Organizations lets you programmatically create new AWS accounts to allocate resources, group accounts to organize your workflows, apply policies to accounts or groups for governance, and simplify billing by utilizing a single payment method for every account.
AWS Control Tower provides the easiest way to set up and govern a secure, multi-account AWS environment, called a landing zone. AWS Control Tower creates your landing zone using AWS Organizations, bringing ongoing account management and governance as well as implementation best practices based on AWS’s experience working with thousands of customers as they move to the cloud. With AWS Control Tower, builders can provision new AWS accounts in a few clicks, while you have peace of mind knowing that your accounts conform to company-wide policies.
AWS Service Catalog allows organizations to create and manage catalogs of IT services that are approved for use on AWS. These IT services can include everything from virtual machine images, servers, software, and databases to complete multi-tier application architectures. AWS Service Catalog allows you to centrally manage deployed IT services and your applications, resources, and metadata. This helps you achieve consistent governance and meet your compliance requirements, while enabling users to quickly deploy only the approved IT services they need. With AWS Service Catalog AppRegistry, organizations can understand the application context of their AWS resources. You can define and manage your applications and their metadata, to keep track of cost, performance, security, compliance and operational status at the application level.
CloudCheckr is a cloud management platform for cost, security, utilization, and inventory management. CloudCheckr is a comprehensive cloud management and governance platform that sits on top of AWS environments to provide customers with complete visibility and control over siloed data across AWS infrastructure. As organizations transform their business by leveraging the power of AWS they require total visibility, actionable intelligence, self-healing automation, and business accountability to make the most of their cloud investments. With CloudCheckr, enterprises, service providers, and government agencies can manage a hyper-dynamic, ephemeral, and elastic cloud environment as usage and demand grows. CloudCheckr transforms complexity into clarity, delivering actionable insights and automation in order to mitigate security risks, optimize cloud spend, and increase operational efficiencies.
As more AWS customers adopt a multi-account strategy, they’re utilizing AWS Control Tower to build their landing zones. This strategy incorporates the best practices and recommendations from AWS to secure, segregate, and manage your workloads. In order to support the account adoption and proliferation, CloudCheckr has developed an integration with AWS Control Tower to enable the onboarding of new AWS accounts into CloudCheckr. CloudCheckr utilizes automation to integrate with AWS Control Tower lifecycle events. Check this blog post for integrating CloudCheckr cloud management platform with AWS Control Tower.
In this blog, we will demonstrate how to leverage AWS Service Catalog to provision a managed account in an AWS Organization with CloudCheckr integration. This will allow you to benefit from automation to integrate with CloudCheckr in cases where your organization has not yet migrated to using an AWS Control Tower landing zone solution. Our Service Catalog integration also provides standardization for using CloudCheckr and a prescriptive approach for CloudCheckr integration.
We will provide a step-by-step walkthrough of the solution along with necessary templates and snippets to achieve a complete automation.
Architecture
The figure below illustrates the overall architecture of automating account provisioning with CloudCheckr integration

Figure 1: Architecture of automating account provisioning with CloudCheckr integration
Prerequisites
To run this solution, you must have the following prerequisites:
AWS Organizations within your AWS environment. If you have not already created AWS Organizations for your AWS account, follow this tutorial.
A CloudCheckr subscription and Admin Access API Key, which you can procure Once logged in, click on the Admin Functions (on the top right) → Admin API Keys → + New Admin Access Key. In the Create new Access Key screen, type in a description Test_Key, and click Create. Save the 64 byte API Key for further steps.
AWS CLI version 2
Solution Walkthrough
This walkthrough provides step-by-step instructions for deploying the account provisioning automation along with integration to CloudCheckr in a multi-account environment with AWS Organizations.
Step 1: Clone GitLab repo and set environment variables
First, let’s clone the Github to download code related to this automation process and set a few environment variables using the commands below. The snippets are available in this Github repo.
git clone https://github.com/aws-samples/amazon-account-automation-cloudchekr.git
cd amazon-account-automation-cloudchekr
AWS_DEFAULT_REGION=us-east-1
AAP_AWS_REGION=us-east-1 <-- Change this to match your region
AAP_ACCOUNT_ID=$(aws sts get-caller-identity --query 'Account' --output text)
AAP_USER_ARN=$(aws sts get-caller-identity --query 'Arn' --output text)
AAP_CLOUDCHECKR_API_KEY=<<64 byte CloudCheckr Admin Access API Key saved above>>
AAP_SUPPORT_EMAIL=<<Your Email to Contact for Support>>
Step 2: Create Amazon S3 Buckets and load artifacts from Github
Next, lets create the S3 buckets required to run this solution on your AWS Account.
## Artifact S3 Bucket
aws s3api create-bucket \
--bucket "config-${AAP_ACCOUNT_ID}"
## Cloud Checker Cloud Trail S3 Bucket
aws s3api create-bucket \
--bucket "cloudtrailbucket-${AAP_ACCOUNT_ID}"
## Cloud Checker Current Billing S3 Bucket
aws s3api create-bucket \
--bucket "curbucket-${AAP_ACCOUNT_ID}"
## Cloud Checker Dbr Billing S3 Bucket
aws s3api create-bucket \
--bucket "dbrbucket-${AAP_ACCOUNT_ID}"
## Config and Logs S3 Bucket
aws s3api create-bucket \
--bucket "configbucket-${AAP_ACCOUNT_ID}"
Use the command below to upload each file downloaded from the github repo to the newly created S3 bucket config-${AAP_ACCOUNT_ID}.
aws s3 sync . s3://config-${AAP_ACCOUNT_ID}
Step 3: Account provisioning baseline setup
In this step, you will utilize the AccountCreationLambdaSetup-cfn.yaml CloudFormation template to deploy a base infrastructure for this solution. This includes a self-service AWS Service Catalog model for deploying member accounts. Here’s the AWS CLI command to deploy this base infrastructure using AWS CloudFormation:
    aws cloudformation create-stack \
--stack-name account-builder-stack \
--template-body file://AccountCreationLambdaSetup-cfn.yaml \
--parameters ParameterKey=UserRoleARN,ParameterValue=$AAP_USER_ARN \
ParameterKey=ArtifactBucketName,ParameterValue="config-${AAP_ACCOUNT_ID}" \
ParameterKey=CloudCheckrApiKey,ParameterValue=$AAP_CLOUDCHECKR_API_KEY \
ParameterKey=AccountVendingMachineSupportEmail,ParameterValue=$AAP_SUPPORT_EMAIL \
--capabilities CAPABILITY_IAM
The following resources are provisioned by this AWS CloudFormation template:
An AWS Lambda function on the management AWS account, which performs the member AWS account creation and CloudCheckr integration.
An AWS Service Catalog Portfolio to which the account vending AWS Service Catalog Product will be tagged. Check this documentation for getting started with the AWS Service Catalog.
An AWS Service Catalog Product. The AWS Service Catalog launch constraint will be utilized for account vending by triggering the account creation Lambda function deployed as part of this step
Finally, the template outputs the ARN of the Lambda function, which will be used by Service Catalog Product.
Solution Components
Deeper look into the provisioned Service Catalog Product
Let’s look into the AWS Service Catalog product step created in the previous step. The AWS Service Catalog product invokes the accountbuilder.yml in the config-${AAP_ACCOUNT_ID} S3 bucket. This Cloud Formation script will be running in the background when Service Catalog Product is invoked. It does the following:
Takes the following parameters as input:
MasterLambdaArn: ARN of the Lambda created by AccountCreationLambdaSetup-cfn.yaml
AccountEmail:The root email for the member AWS Account.
OrganizationUnitName:The name of the Organizational Unit to hold the account. This can be None by default. Please check this documentation to learn about AWS Organizational Unit.
AccountName: Name for new member AWS account.
StackRegion: us-east-1
SourceBucket: Config-<AccountID>. Replace the AccountID with management AWS Account.
BaselineTemplate: AccountBaseline.yml
AccountBilling : Invoicing (Value Invoicing or Direct Pay and will be used for Tags in the AWS account).
SkipCloudCheckr: false (This should be set to “false” for enabling CloudCheckr integration).
CloudCheckrApiSecret: ARN of the Secret containing the API key for accessing CloudCheckr (can be retrieved from the Outputs section of CloudFormation stack deployment).
CloudTrailBucket: CloudTrailBucket-<AccountID>
CurBucket: CurBucket-<AccountID>
DbrBucket: DbrBucket-<AccountID>
ConfigBucket: ConfigBucket-<AccountID>
Note: <AccountID> in the above parameters should be replaced with the AWS account id of the management account.
Triggers the Lambda function created in step 3 which conducts the member AWS account creation and CloudCheckr integration.
Deeper look into Account Creation and CloudCheckr Integration Lambda
Let’s look into the lambda function created from AccountCreationLambda.py and AccountCreationLambda.zip in the config-${AAP_ACCOUNT_ID} S3 bucket created as part of step 3. This lambda function is the heart of the automation and does the following:
Received the inputs from Cloud formation script accountbuilder.yml.
Calls the create_account function with input parameters in order to create the member AWS account under the AWS Organization.
Creates an OrgAccessRole in the member AWS account that can be assumed by the management AWS account for subsequent processes.
Deploys a stack based on Cloud formation script AccountBaseline.yml in the newly created member account. This will run a CloudFormation script on the member account for creating an Amazon S3 bucket. This baseline script can be modified for any initial/optional resource provisioning in the member AWS account.
From a CloudCheckr Integration standpoint, it first calls the add_account_v3 CloudCheckr public API to create an account in CloudCheckr as an empty slate and return and external_id.
Next, the cc_aws_cfn_iam_stack.template.json CloudFormation stack is run on the created member AWS account which will create the required roles in the member account for CloudCheckr to assume for Cloud Financial Management.
Finally, it calls the CloudCheckr edit_credential public API which uses the cross-account role created by the cloud formation stack in the previous step and adds it to CloudCheckr.
Note: We will retain creation behaviors on the CloudFormation stack for delete and update operations for account creation and CloudCheckr Integration Lambda.
Test and Run
Testing the Account Provisioning with CloudCheckr Integration
Since the setup is complete, let’s test this member AWS account provisioning with CloudCheck Integration via the AWS Service Catalog console.
To provision a new member AWS account, navigate to the AWS Service Catalog Products section to pick the “Account Vending Machine” Product and click Launch Product.

Figure 2: Products page of AWS Service Catalog console
In the next screen, select the latest version of the service catalog product and specify the product name. Refer to the Deeper look on to the created Service Catalog Product section above in order to fill the relevant values, click the next button, and then the launch button in the final screen to initiate the service catalog product.
Once the AWS Service Catalog product launch completes, you will see a new account provisioned under the AWS Organization. You can also navigate to the AWS CloudFormation for CloudFormation outputs and AWS Lambda console to check on logs generated from the lambda trigger for AWS account creation and CloudChekr integration.
Verifying account provisioning
Next, verify that the account was provisioned in CloudCheckr by logging in to the CloudCheckr console. You will see the below screen showing the list of AWS accounts integrated with CloudCheckr. Click on to the recently provisioned AWS account for a detailed view of the cloud management platform for Cost, Security, Utilization, and Inventory.

Figure 3: CloudCheckr Home Page
Clean-up
- Under the Actions drop down in AWS Service Catalog Provisioned products, choose “Terminate”. Provide confirmation in the following screen.
- Once your provisioned products are successfully terminated, run
aws cloudformation delete-stack --stack-name account-builder-stack
- Clean up S3 buckets
aws s3 rm s3://"config-${AAP_ACCOUNT_ID}" --recursive
aws s3api delete-bucket \
--bucket "config-${AAP_ACCOUNT_ID}"
aws s3 rm s3://"cloudtrailbucket-${AAP_ACCOUNT_ID}" --recursive
aws s3api delete-bucket \
--bucket "cloudtrailbucket-${AAP_ACCOUNT_ID}"
aws s3 rm s3://"curbucket-${AAP_ACCOUNT_ID}" --recursive
aws s3api delete-bucket \
--bucket "curbucket-${AAP_ACCOUNT_ID}"
aws s3 rm s3://"dbrbucket-${AAP_ACCOUNT_ID}" --recursive
aws s3api delete-bucket \
--bucket "dbrbucket-${AAP_ACCOUNT_ID}"
aws s3 rm s3://"configbucket-${AAP_ACCOUNT_ID}" --recursive
aws s3api delete-bucket \
--bucket "configbucket-${AAP_ACCOUNT_ID}"
- Ensure that the member account(s) created has every resource terminated prior to closing the account.
Note: Every user/group or launch constraint added to the AVM product in the AWS Service Catalog product must be removed before the account-builder-stack can be deleted, otherwise it will fail due to an error removing the AVM product.
Conclusion
This post demonstrated how to automate member account provisioning along with integration to a third-party software such as CloudCheckr for Cloud Financial Manager in a multi-account AWS environment with AWS Organizations and AWS Service Catalog.
The code and contents of this post were validated to work on the publishing date.
Page 1|Page 2|Page 3|Page 4